Scene Optimization for Efficient Octane Rendering
When thinking about optimizing a render, most 3D artists commonly consider changing kernel settings. This is a significantly important part. However, optimizing a render is a two-part process where scene optimization is worth doing before the render settings. Let’s see how the polygons, lighting, and materials are set up properly in a scene to optimize a render for efficient rendering in Octane Render.
Scene Optimization for Octane
Introduction
Octane Render processes scenes by taking geometry, applying materials, lights and other elements such as volumes and instances, and sending all this data to the GPU. The GPU then loads the scene data into VRAM, performs the necessary calculations, and renders a completed frame.
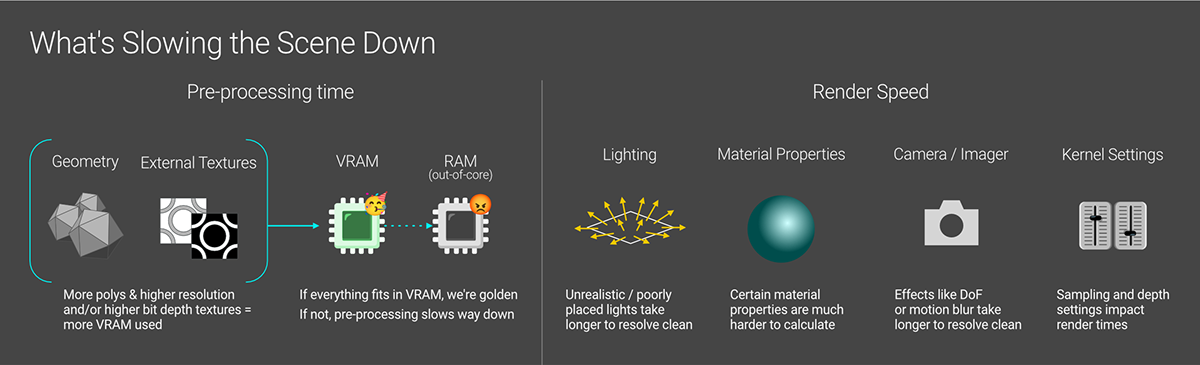
Memory management is crucial as Octane’s performance relies heavily on scene data fitting into VRAM: If everything fits in VRAM, Octane runs at its full speed.
If data exceeds VRAM, Octane must use slower RAM (out-of-core-memory), which significantly slows the rendering process. Even if all the data fit within VRAM, more textures and geometry mean longer pre-processing is required before a render can even start.
Optimizing memory usage provides additional benefits, like freeing up VRAM that can then be allocated to parallel samples to accelerate the render itself.
Once memory is under control, we should turn to optimizing materials, lighting, and other objects which will speed up render times regardless of specific settings.
Geometry
Always remember to use real-world scale.
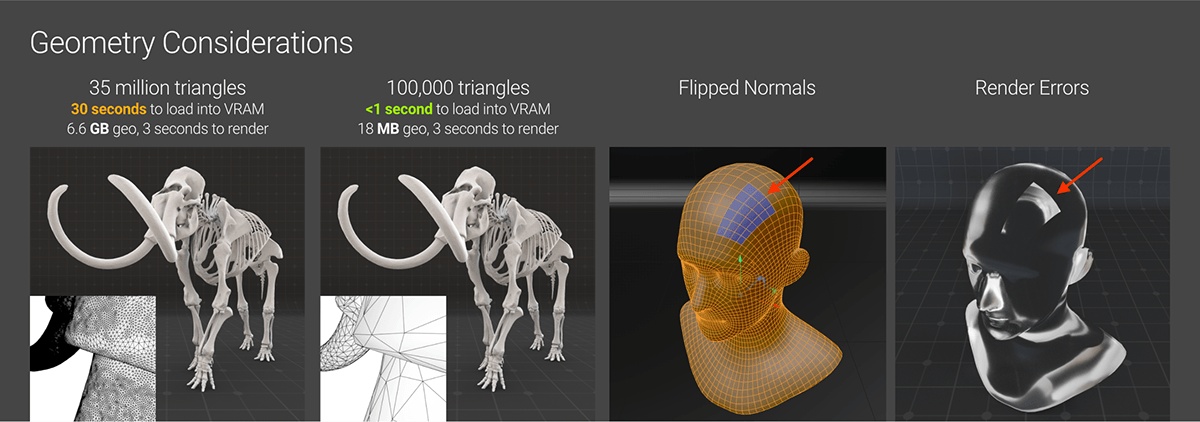
The geometry itself also impacts rendering performance. Both the polygon count and mesh quality are important factors. Higher polygon numbers equate to increased load, processing time before rendering begins, and VRAM usage – especially in the case of 3D scans or tons of instances. Issues such as flipped normals, and overlapping/deformed/non-planar polygons can cause render errors and noise that cannot be fixed simply by increasing samples.
Lighting
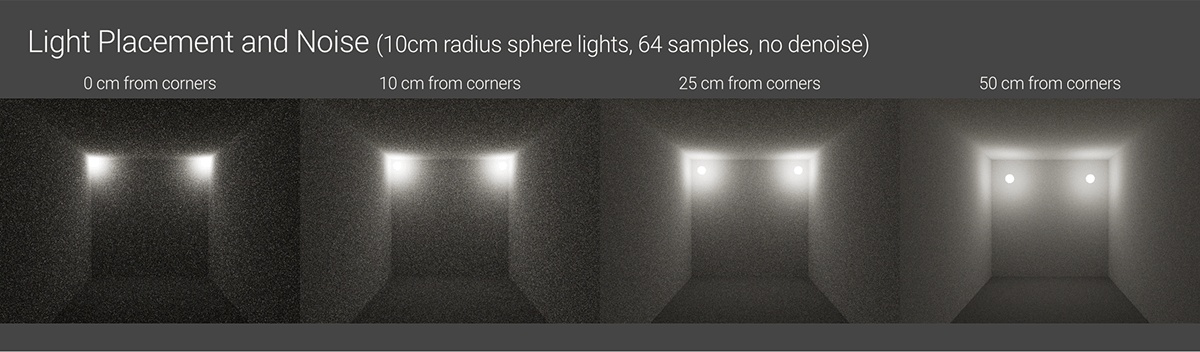
The not set up properly, lighting setup can significantly contribute to noise and artifacts. In general, the two primary issues to address are unrealistic light (size/intensity) and geometry getting too close to an emissive surface and blocking the rays. Both of these raise extra noise into the scene and produce artifacts such as hot pixels. While some adjustments in render settings may mask these to an extent, it reduces realism. A better approach is to directly fix the problems by using IES textures, spotlight distributions, or repositioning lights before they negatively impact the render quality.
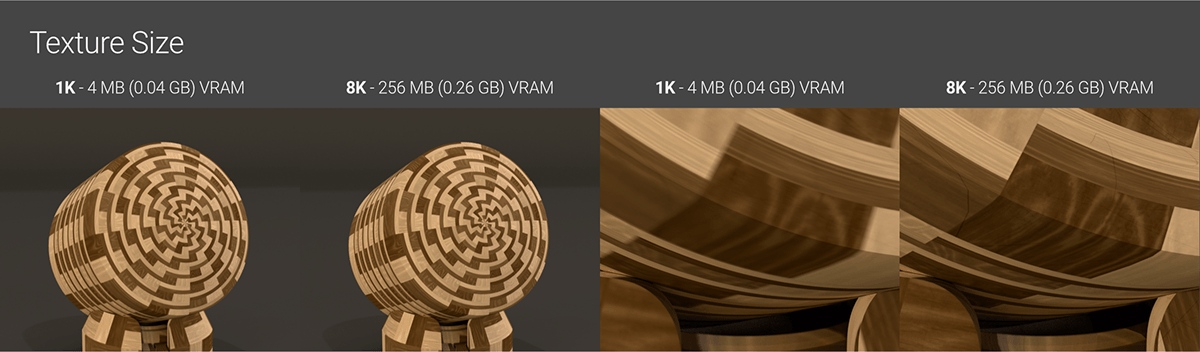
For scenes using HDRI lights, it is best to use the smallest resolution texture as possible, such as 4K or 2K, unless unless we need sharp reflections of the texture itself or we are using it as a backplate. HDRI textures of 8K resolution or higher (16K+) consume significant VRAM and take longer to load, which slow down the rendering process.
Textures
Textures heavily impact VRAM usage, sometimes drastically. Loading many textures and/or completely utilizing available VRAM will reduce performance. It’s best to use the smallest and lowest bit depth image textures acceptable for each use case. We should also limit the number of textures used and leverage procedural textures whenever possible.
Materials
Material properties that are easy on the GPU
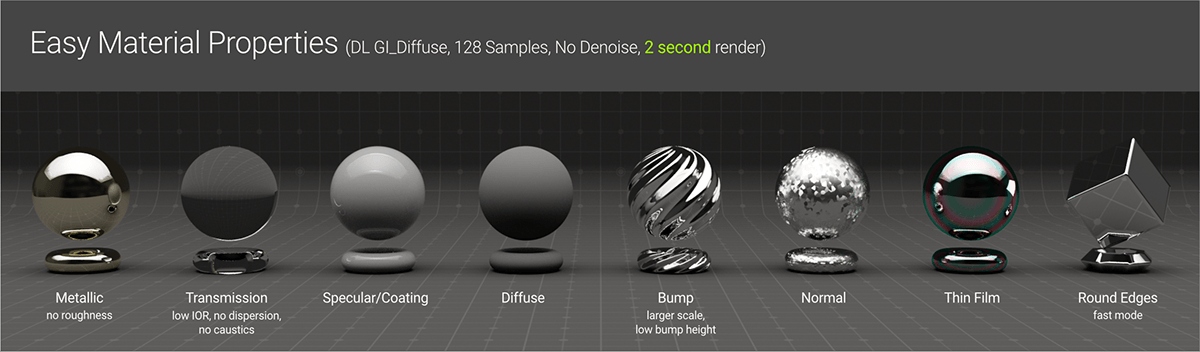
Rendering Reflections on glossy surfaces with no roughness or diffuse is extremely fast for an engine, as these calculations are highly optimized.
Fairly low IOR Transmission calculations (for example, realistic glass or water without roughness or dispersion) also are not that bad if it is just in one single object. If the IOR gets unrealistically high, or there is lots of overlapping refraction, it can start affecting the render times and noise. This also applies to Specular and Coating as well.
Rendering materials with Diffuse (Albedo, Diffuse, Basecolor) requires more computational effort than reflections or refractions. Diffuse and Sheen (low roughness) surfaces typically need a minimum of 32 samples to resolve cleanly without denoising. However, the performance impact of diffuse materials remains low overall.
Bump and normal maps contribute minimal overhead to rendering on their own. However, bump maps with tight patterns and large bump scales can add noise and hot pixels. In contrast, bump maps with subdued details and lower bump values resolve much faster than displacement techniques.
Thin film effects and Round edges in fast mode incur negligible performance penalties during rendering. Accurate round edge calculations may increase rendering times to a small degree depending on scene complexity and settings.
Material properties with moderate impact on the GPU
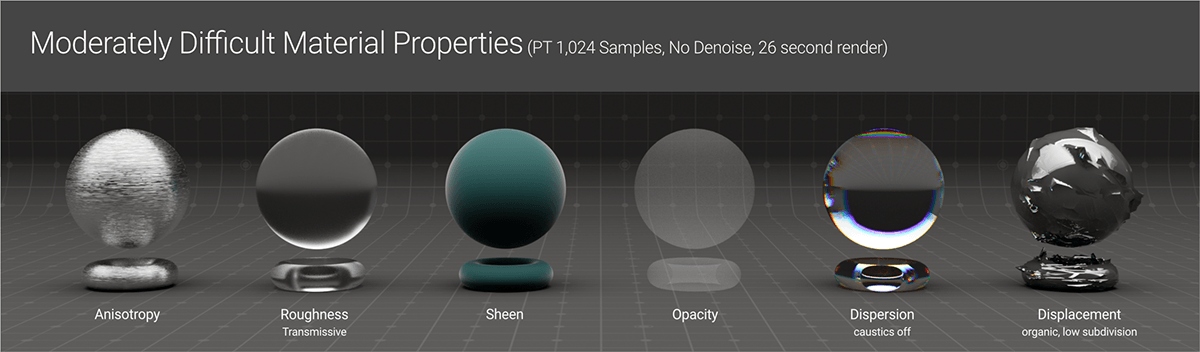
Rendering Anisotropic materials, especially those with tight patterns such as brushed steel, may take longer to calculate accurately compared to other materials.
Rendering Roughness takes additional time, as it breaks up light and scatters it out. It is especially hard with refraction, but there is a noticeable impact when high amounts are applied to reflection. This also applies to Sheen.
Opacity materials can take a little bit longer to resolve cleanly, depending on the rest of the material.
Rendering Dispersion is computationally demanding, as it requires simulating how light is split into its component wavelengths as it passes through an object, creating a rainbow-like effect. Modelling the separation of light into different spectral components can introduce noise and increase the render time considerably, particularly when using lower Abbe values that produce a stronger dispersion effect.
Low Detail Displacement with low-resolution textures and/or low subdivision levels takes a little time to calculate. The higher the settings, the more pre-processing and render time it will take.
Material properties that are brutal on the GPU
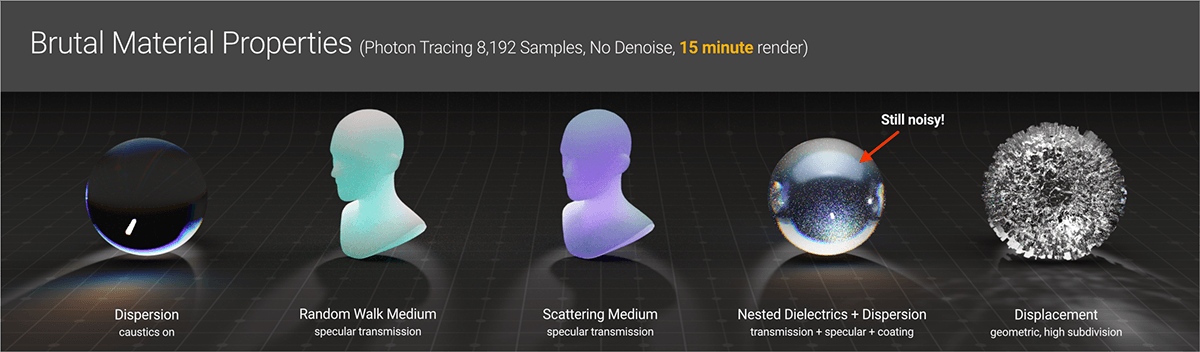
Caustics is the result of light bouncing off or through a reflective or refractive surface onto a diffuse surface. This significantly increases render time to produce noise-free results. Accounting for dispersion further adds more calculations to caustics.
Rendering Scattering, such as using Random Walk or Scattering medium (especially with Specular Transmission) can be notably time-consuming.
Applying multiple Nested Specular Properties places a significant burden on the GPU. Stacking multiple reflective/refractive material properties together within a single material, or nesting objects with such properties in a scene, greatly increases render times. Adding effects like dispersion or scattering worsens this cost further and leads to long processing.
Using High Detail Displacement with tight patterns with high subdivision values can drastically prolong rendering because of the massively increased polygon load on the scene.
Camera and Scene Considerations
Effects such as Depth of Field and Motion Blur place significant demands on the GPU during rendering. Accurately simulating these effects requires a very large number of samples to sufficiently resolve without noise or artifacts.
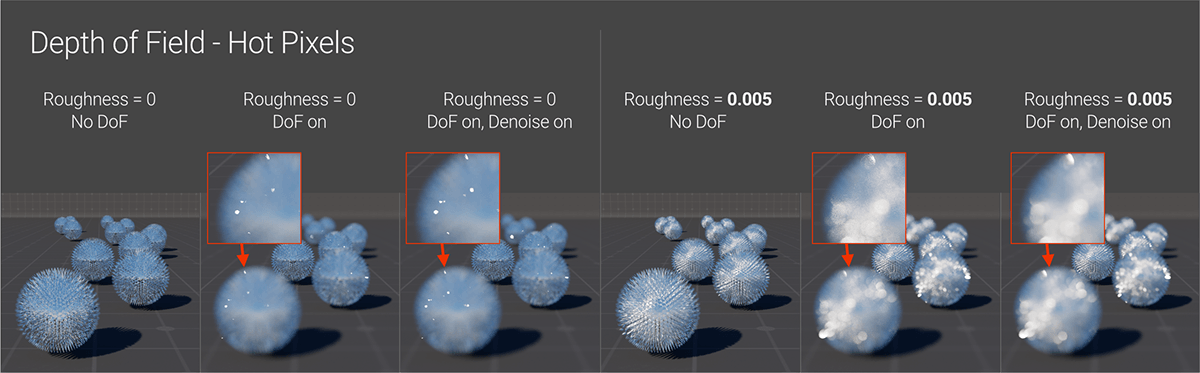
Small, intense reflections can pose major challenges for rendering and potentially create noisy “hotspots” when combined with depth of field effects, as seen in the example above. This may occur due to sharply spiked geometry or tight bump map patterns with high bump depth. In these situations, Denoiser can worsen the problem. Applying an extremely minor amount of roughness, such as 0.005, is enough to alleviate the issue and produce nice bokeh circles.
The overall scene size impacts both render times and VRAM usage. Rendering at a lower resolution can significantly accelerate the process, though reducing the size too much may miss important details. Using the resolution multiplier drop-down in the Live Viewer (the left option when the lock icon is enabled, not the right zoom one) allows easy previewing at lower resolution without changing the actual render size in the render settings.
Volumetric Considerations
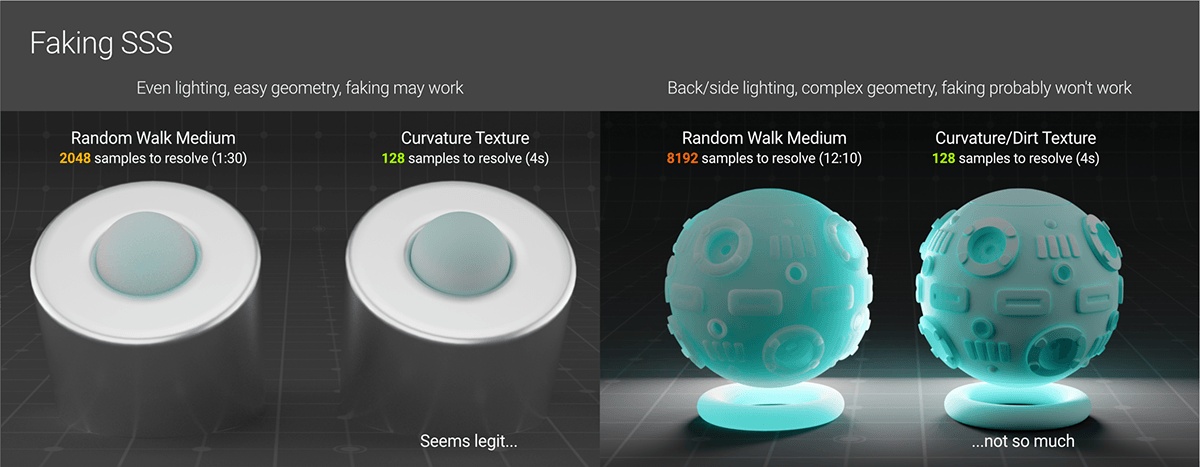
Volumes are difficult to optimize since even small modifications to medium or lighting can impact the look considerably. However, there are some techniques to reduce their rendering cost. General fog effects can be done more efficiently and quickly in post-production. VDB objects not central to the scene could use fewer voxels. Scattering materials may in some cases be cheated and replaced by a colored gradient output from curvature or dirt shader nodes if there is minimal back/side lighting, complex geometry, or animation involved. Volumes and scattering effects are often good for denoising to reduce noise.
Conclusion
Scene optimization includes:
-
- Use real scales for geometry and realistic values for lights.
- Minimize VRAM usage as much as possible. This can be done primarily by reducing polygon counts through retopology/simplification and by using the fewest and smallest necessary image textures.
- Ensure geometry has correct normals (no reversed normals or messed up/overlapping polys).
- Learn which material effects are computationally cheap vs costly, and use the cheap ones as much as possible if the costly ones are not significantly better.
- Simplify lighting complexity as much as possible and prevent emissive surfaces from being blocked too closely by other geometry.
- Consider faking volumetrics if possible and consider whether they’re worth it for the scene.
- Establish tone mappings like ACES or AgX early on to avoid potential issues and optimize the render appearance.
The tips outlined in this article have provided valuable practices for scene optimization process that minimizes computational demands. However, even with a well-optimized project, rendering complex 3D content can still require extensive processing time. This is where a service like iRender proves extremely useful for you.
Speed up Octane rendering with iRender
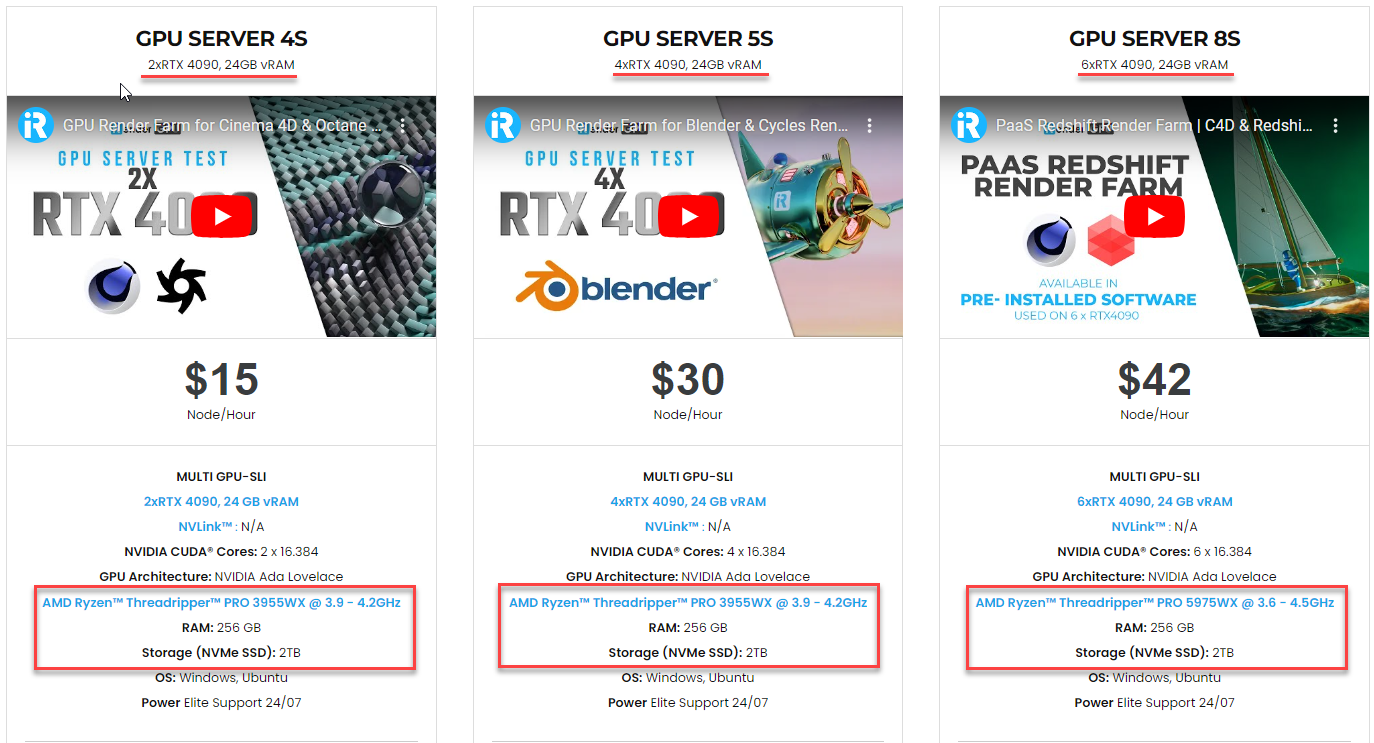
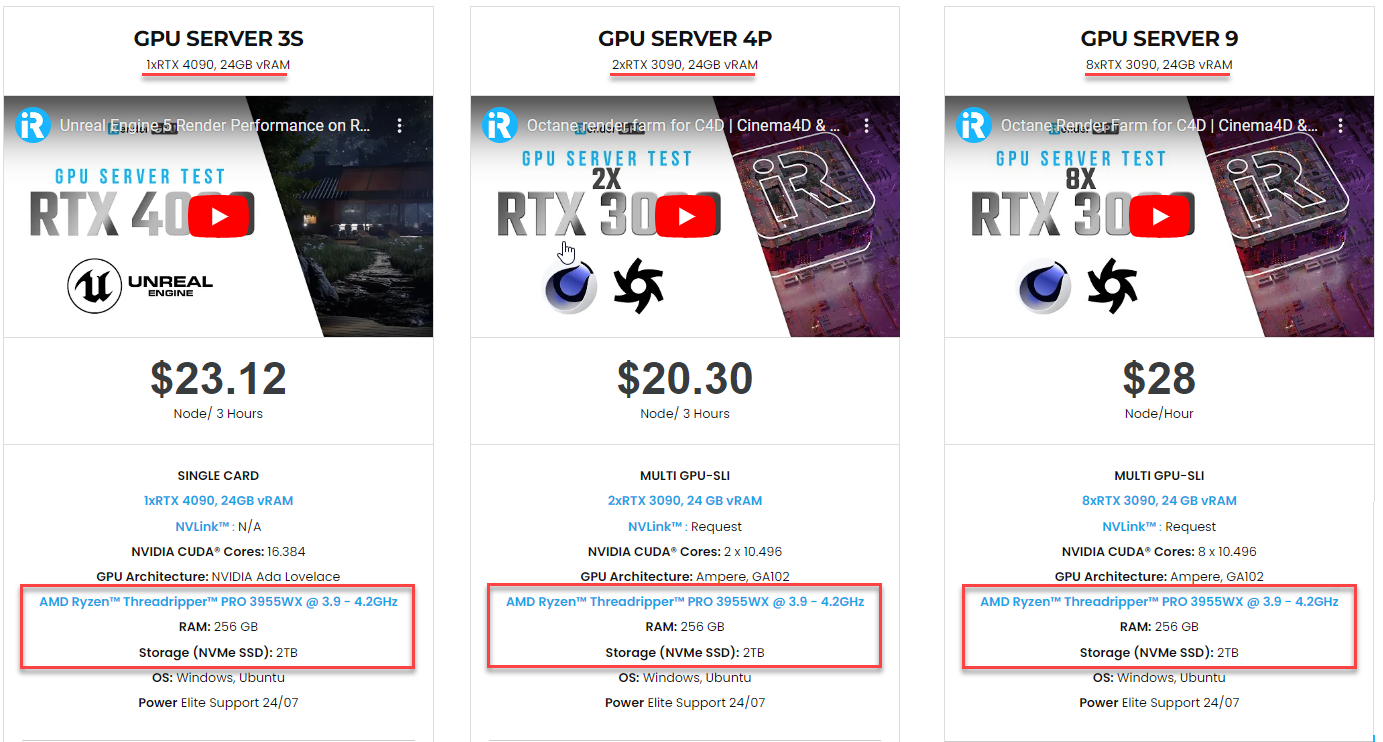
iRender powers up your creativity with unlimited GPU rendering resources. Our GPU render farm houses the most powerful 3D rendering machines. Configure from 1 to 8 GPU with top-tier RTX 4090/RTX 3090, Threadripper Pro CPUs, 256GB RAM and 2TB SSD storage – iRender’s machines are capable of speeding up any 3D projects.
Once renting our machines, you will use them as your personal workstations. Thus, you can use any software, plugins or versions you want.
As an official partner of Maxon, we provide pre-installed C4D machines to streamline your pipeline further! Currently, we provide one free C4D license for all our users.
Let’s see how to render using C4D and Octane via our desktop app.

We are offering an attractive 100% Bonus Program for our new users making the first deposit within 24 hours of registration. As a result, you can effectively double your recharged credits.

For further information, please do not hesitate to reach us at [email protected] or mobile: +84915875500.
iRender – Happy Rendering!
Reference source: Scott Benson on otoy.com
Related Posts
The latest creative news from Octane Cloud Rendering.