Set up Octane for Blender Network Rendering on iRender
For today’s article, let’s go with iRender to find out how to set up Network Rendering on Octane for Blender as well as Octane’s Network Rendering feature. Network rendering allows additional GPUs in other computers to be utilized in rendering images. OctaneRender distributes compiled render data and not scene data, so no file management is required by the user. Conceptually it is similar to working with additional GPUs by allowing the distributed rendering of single images over multiple computers connected through a fast local area network. Network rendering requires a Primary Render Node and one or more Render Nodes on different computers. The OctaneRender instance that drives the rendering is referred as the “Primary Render Node” and the OctaneRender instances that are helping are referred as the rendering “Render Nodes”.
Since an OctaneRender slave currently requires an activated Standalone license, it is advisable to run the Standalone first to activate a Standalone license on that computer, if necessary. It is best to copy the whole folder of the released archive onto the slave computer. Also ensure that the Primary Render Node and the slave are not blocked by the Operating System firewall or any firewalls in the network. This can be done, for example, by turning off the firewall for home/work networks on the Primary Render Node. If that does not help, also try switching off the firewall on the slave computer for home/work networks.
Primary Render Node, Render Nodes and Daemons
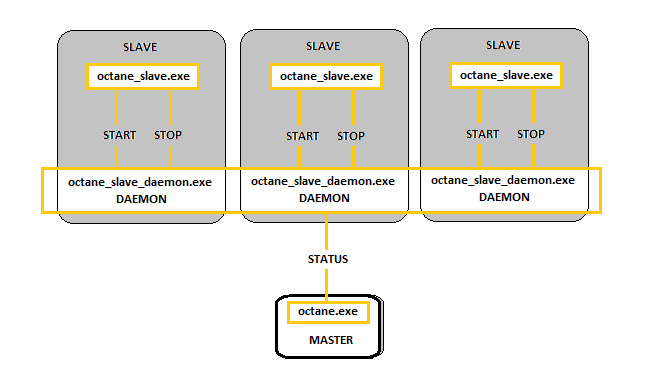
The Standalone version or the octane.exe act as Primary Render Node and a special console version of Octane for Blender, octane_slave.exe, can run on other computers as Render Nodes. Of course, they should be all on different computers or they would have to share the same GPUs. Running the slave on the same computer as the Primary Render Node is pointless.
The OctaneRender network render slave is fairly dumb and all the render data processing is actually done on the Primary Render Node side. The slave does not need to have a powerful CPU at all, but the slave is of course required to have enough memory (RAM) to store the render data plus some render results. The operating systems of the Render Nodes can also be different since the communication between the machines is cross platform. No data is stored on the Render Nodes’ discs, it all happens 100% in memory.
Each time network rendering is required, the slave process has to be launched on the slave machines. The slave daemon makes the control of the Render Nodes more practical, as slave daemon can be set up to be launched at every start up of the operating system of each machine in the network. The daemon is the little program that starts a slave process on the machine (on request by a Primary Render Node), monitors it and stops it (on request by a Primary Render Node). Monitoring means making sure that a running slave sends a regular “heartbeat” to the daemon and if that doesn’t happen it will try to stop the slave gracefully and if that does not work, it kills the process. The daemon runs all the time and starts/stops a slave process if a Primary Render Node requests it. The daemon also listens for the “heartbeat” of the slave to check if the slave process is still running at all. This slave daemon eliminates the need to launch the slave process manually on each computer each time rendering is required on the slave.
IMPORTANT: The Octane version for the Slave must be the same version as the plugin you are using (ie. if you are using version OctaneSever 3.06.x – xx.xx of the plugin, you must run the slave for OctaneSE 3.06.x).
The Slave Daemon
The Slave Daemon is initiated using the batch script _install_daemon.bat on the slave computer. During the setup, it will ask if the user wants to use all GPUs or only a sub-set and on which port the daemon should listen to for Primary Render Node requests. After that, the daemon will be resident on that machine and it will be active at all times.
When a daemon is invoked by a Primary Render Node, the slave is quickly launched to get some information about the number of GPUs, version, bitness, etc. and then closed again. After that there is no slave process running. So the daemon just sits there and waits for Primary Render Nodes (there could be multiple Primary Render Nodes in the local network) to detect it, by scanning the complete local network in regular intervals. The daemon should appear in the daemon list of the network preferences of the Primary Render Nodes. If it does not, it can have the following reasons:
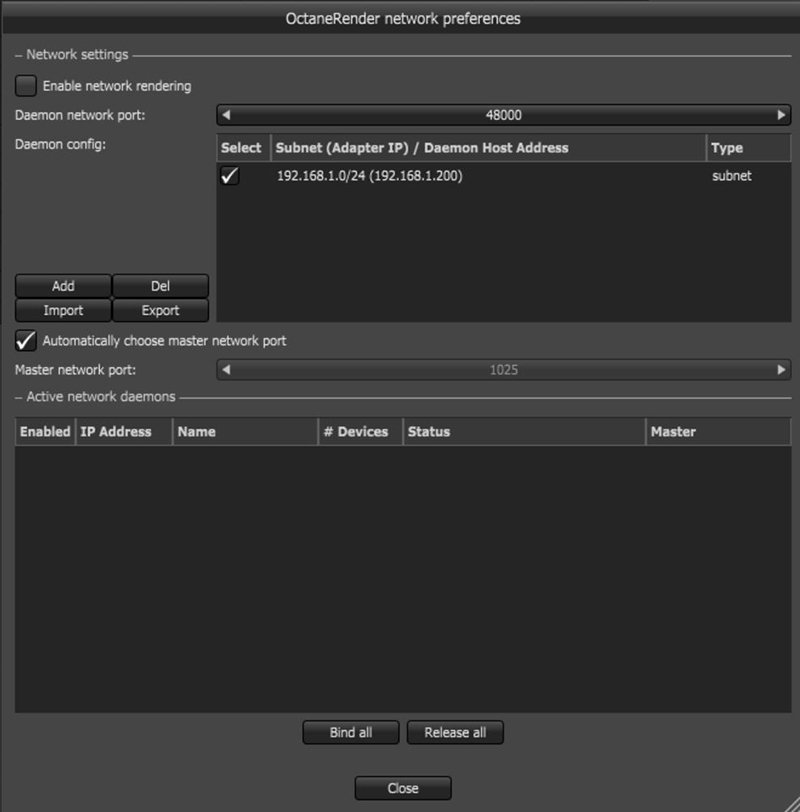
- The network rendering in the Primary Render Node is not enabled.
- The daemon is listening on a different port than the Primary Render Node is scanning. In your case both are 48000, so that’s fine.
The Windows firewall keeps the Primary Render Node from connecting to the daemon or the daemon from responding to the Primary Render Node. That’s the most likely reason. To verify it, disable the firewall for private or home/work networks on both PCs. You have to close the Windows dialog containing the firewall options. Only then the change is actually applied. If the daemon is now detected (should take only up to 10-20 seconds), you can try enabling one firewall after the other to see which one is causing trouble. If you want to have the firewall running, you may have to poke a hole into it, to allow the communication between daemon and Primary Render Node.
Only when you enable a daemon in the Primary Render Node settings, the slave gets actually launched and will eventually appear in the status bar of the Primary Render Node. One daemon can be activated only by one Primary Render Node at a time. If daemon is currently “occupied” by another Primary Render Node the user will see the daemon state change accordingly.
Steps to Deploy Octane Network Rendering
1.Set up the Render Nodes. Install Standalone Editions on the Render Nodes, make sure that these are of the same version as the OctaneServer installed in Primary Render Node.
2. On each of the Render Node machines, navigate to the installation folder of the Standalone Edition and locate the following files:
-
- _install_daemon.bat
-
- _run_installed_daemon.bat
3. On the Render Node machine, install the slave daemon by running the file called _install_daemon.bat. Follow the prompts until the installation is confirmed.
4. On the Render Node machine, run the slave daemon by initiating the file called _run_installed_daemon.bat
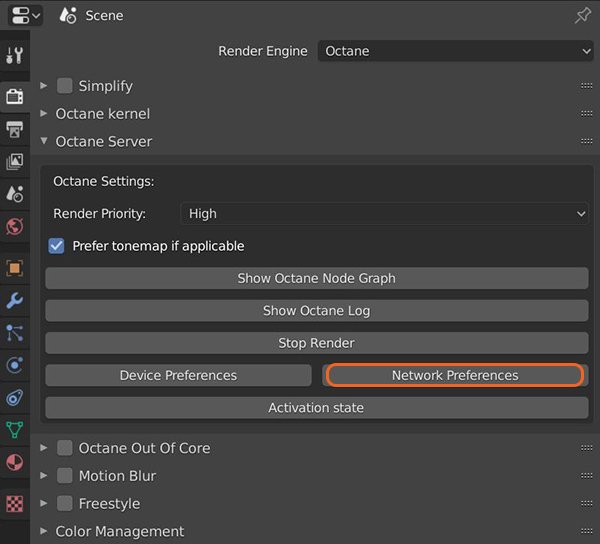
5. Back on the Primary Render Node, run the Blender Plugin’s Octane Server if it is not already running. Then Navigate to the Octane’s Network Preferences window through Blender’s interface to enable the Network Rendering feature. The Primary Render Node’s OctaneServer should be able to pick up the heartbeat of the Octane slave application sent through the network and tap into the gpus of the Render Node.
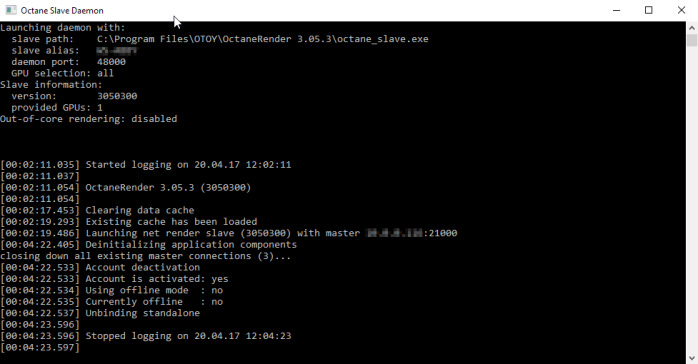
While on the Render Node, you will notice on the Octane_Slave window at the Render Node will contain some new lines indicating when the Primary Render Node (Blender Plugin’s OctaneSever component) has picked up this connection.
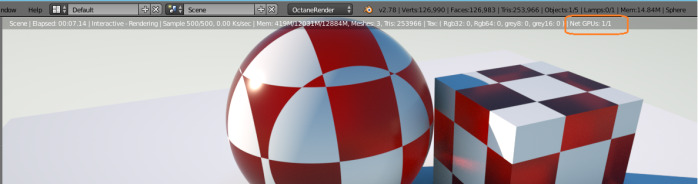
Finally, close Network Preferences window and render with Octane Blender Edition. When generating a final render (F12) or using the live render view (Blender 3d View window -> Rendered Viewport Shading method), you should see the net GPUs accounted for:
Turning off the Network Rendering Feature
The Blender plugin’s OctaneServer component is always listening for the presence of any active Render Node. The only way to turn off the Network Rendering Feature therefore is to stop the octane slave process at the Slave machine. You can do this by doing <CTRL-C> on the Octane Slave Daemon Window at the Render Node machine.
Uninstalling the Octane Slave Daemon is not necessary if you are planning to use the Network Render Feature again. But should you need to uninstall it, just navigate to the installation folder of the Standalone Edition on the Render Node machine to locate and run the file called _uninstall_daemon.bat.
Leveraging powerful servers of iRender for Network Rendering
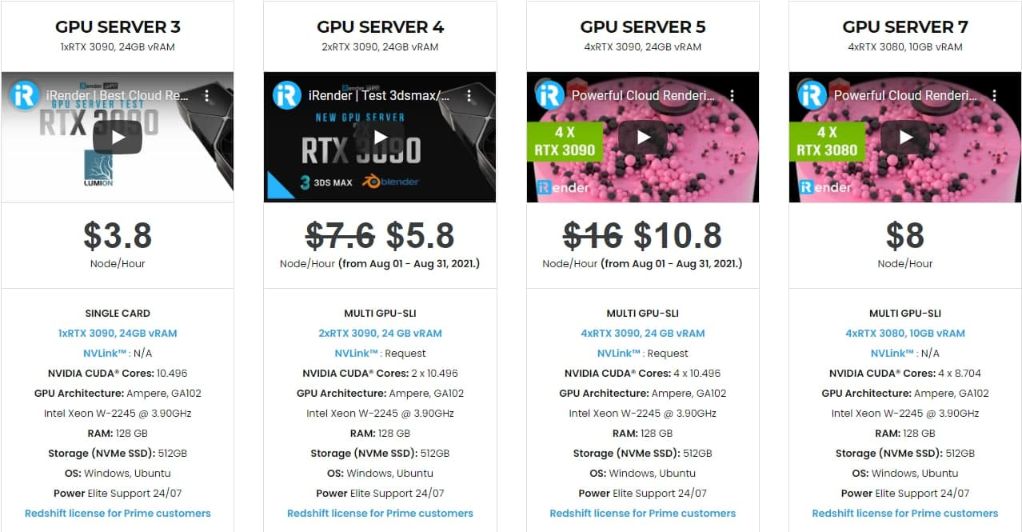
Using multiple video cards gives fantastic rendering performance. Using many computers having multi GPUs in them and enabling network rendering gives far more better performance. At iRender, we provide hundreds of powerful GPU servers with various configurations that are suitable for all types of Octane license from Octane Free Tier, Octane Studio or Octane Enterprise. Let’s have a look at the servers that we are offering here:

So, do not hesitate anymore to waste your time. If you have any questions, please do not hesitate to become a member of the iRender community today to get FREE COUPON to stop wasting pointless hours of rendering. Always at the forefront of cutting-edge graphics technology, we do the rendering, the creativity is yours!
iRender – Happy Rendering!
Reference source: Octane documentation
Related Posts
The latest creative news from Blender Cloud Rendering, Redshift Cloud Rendering, Houdini Cloud Rendering , Octane Cloud Rendering, 3D VFX Plugins & Cloud Rendering.