
Troubleshooting common displacement issues in Octane for Cinema 4D part 2
In the previous article, we have discovered some common displacement issues such as not working, crashing, Missing polygons/clipping and water stains. In part 2, we will continue to check and troubleshoot Pixelated long X&Z axes, Stepped along the Y (height) Axis, Variable Resolution, Intersecting/Misaligned Edges and Distortion issues.
Pixelated long X&Z axes issue
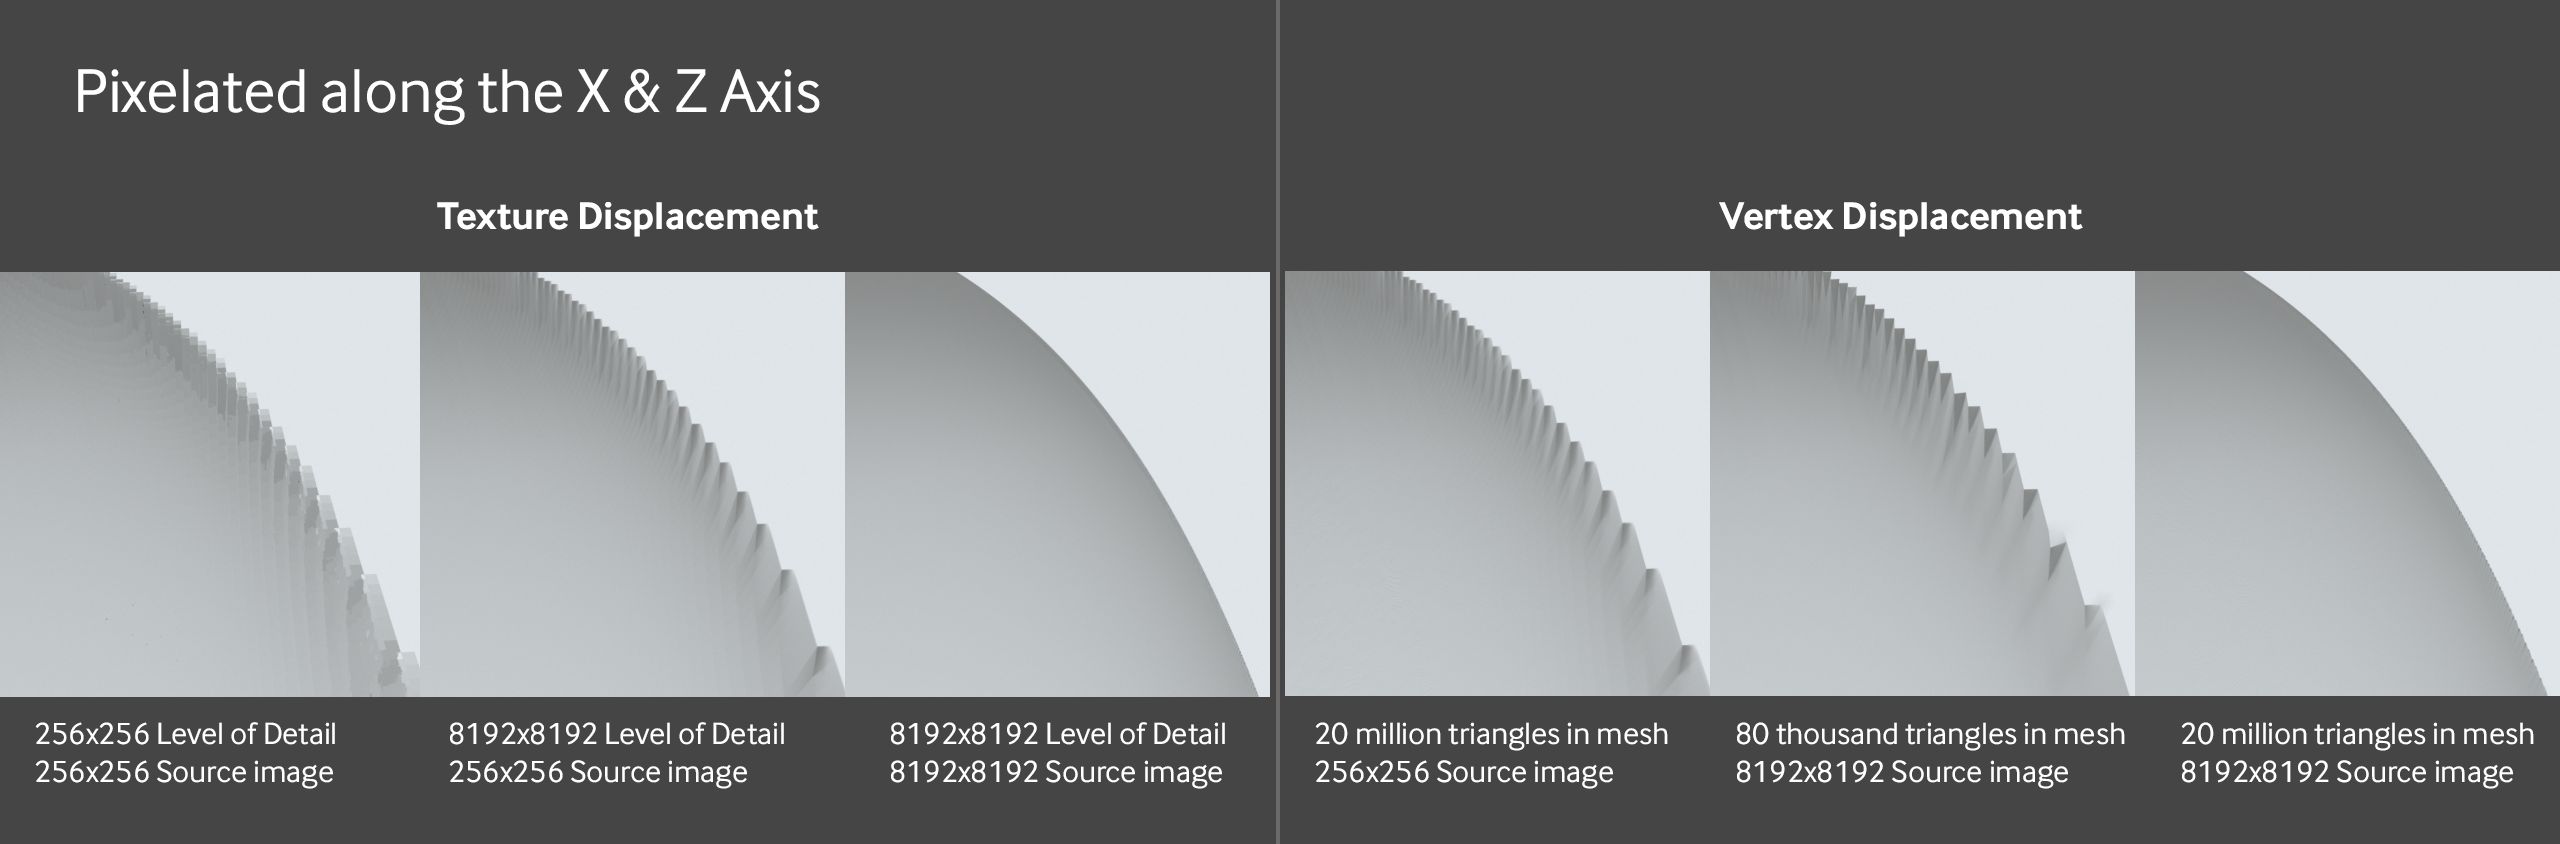
When you check and see that there’s steppy and pixelated edges of curves or diagonals (but not necessarily pixelated along the displaced height axis), it’s probably a resolution issue.
If you’re using texture displacement, try changing both the source texture itself AND the level of detail set in the displacement node to a higher res to look smooth.
If you’re using vertex displacement, you have to increase the resolution of the source texture and increase the amount of polygons on the surface. Check the image above, even when using an 8k texture (image 2 of Vertex Displacement), it won’t look good until there are a lot more polygons in the displaced area (image 3 of Vertex Displacement).
This could also be an issue with the UV island where you have displacement being too small. The smaller the island, the fewer pixels it will have to work with and the lower resolution that area will be, even with a very high-resolution texture. This is a balancing act with the rest of the model, but you can source a higher resolution texture just for the area you want displacement on and break out the geometry so it has its own UV map and everything can be larger.
Stepped along the Y (height) Axis issue
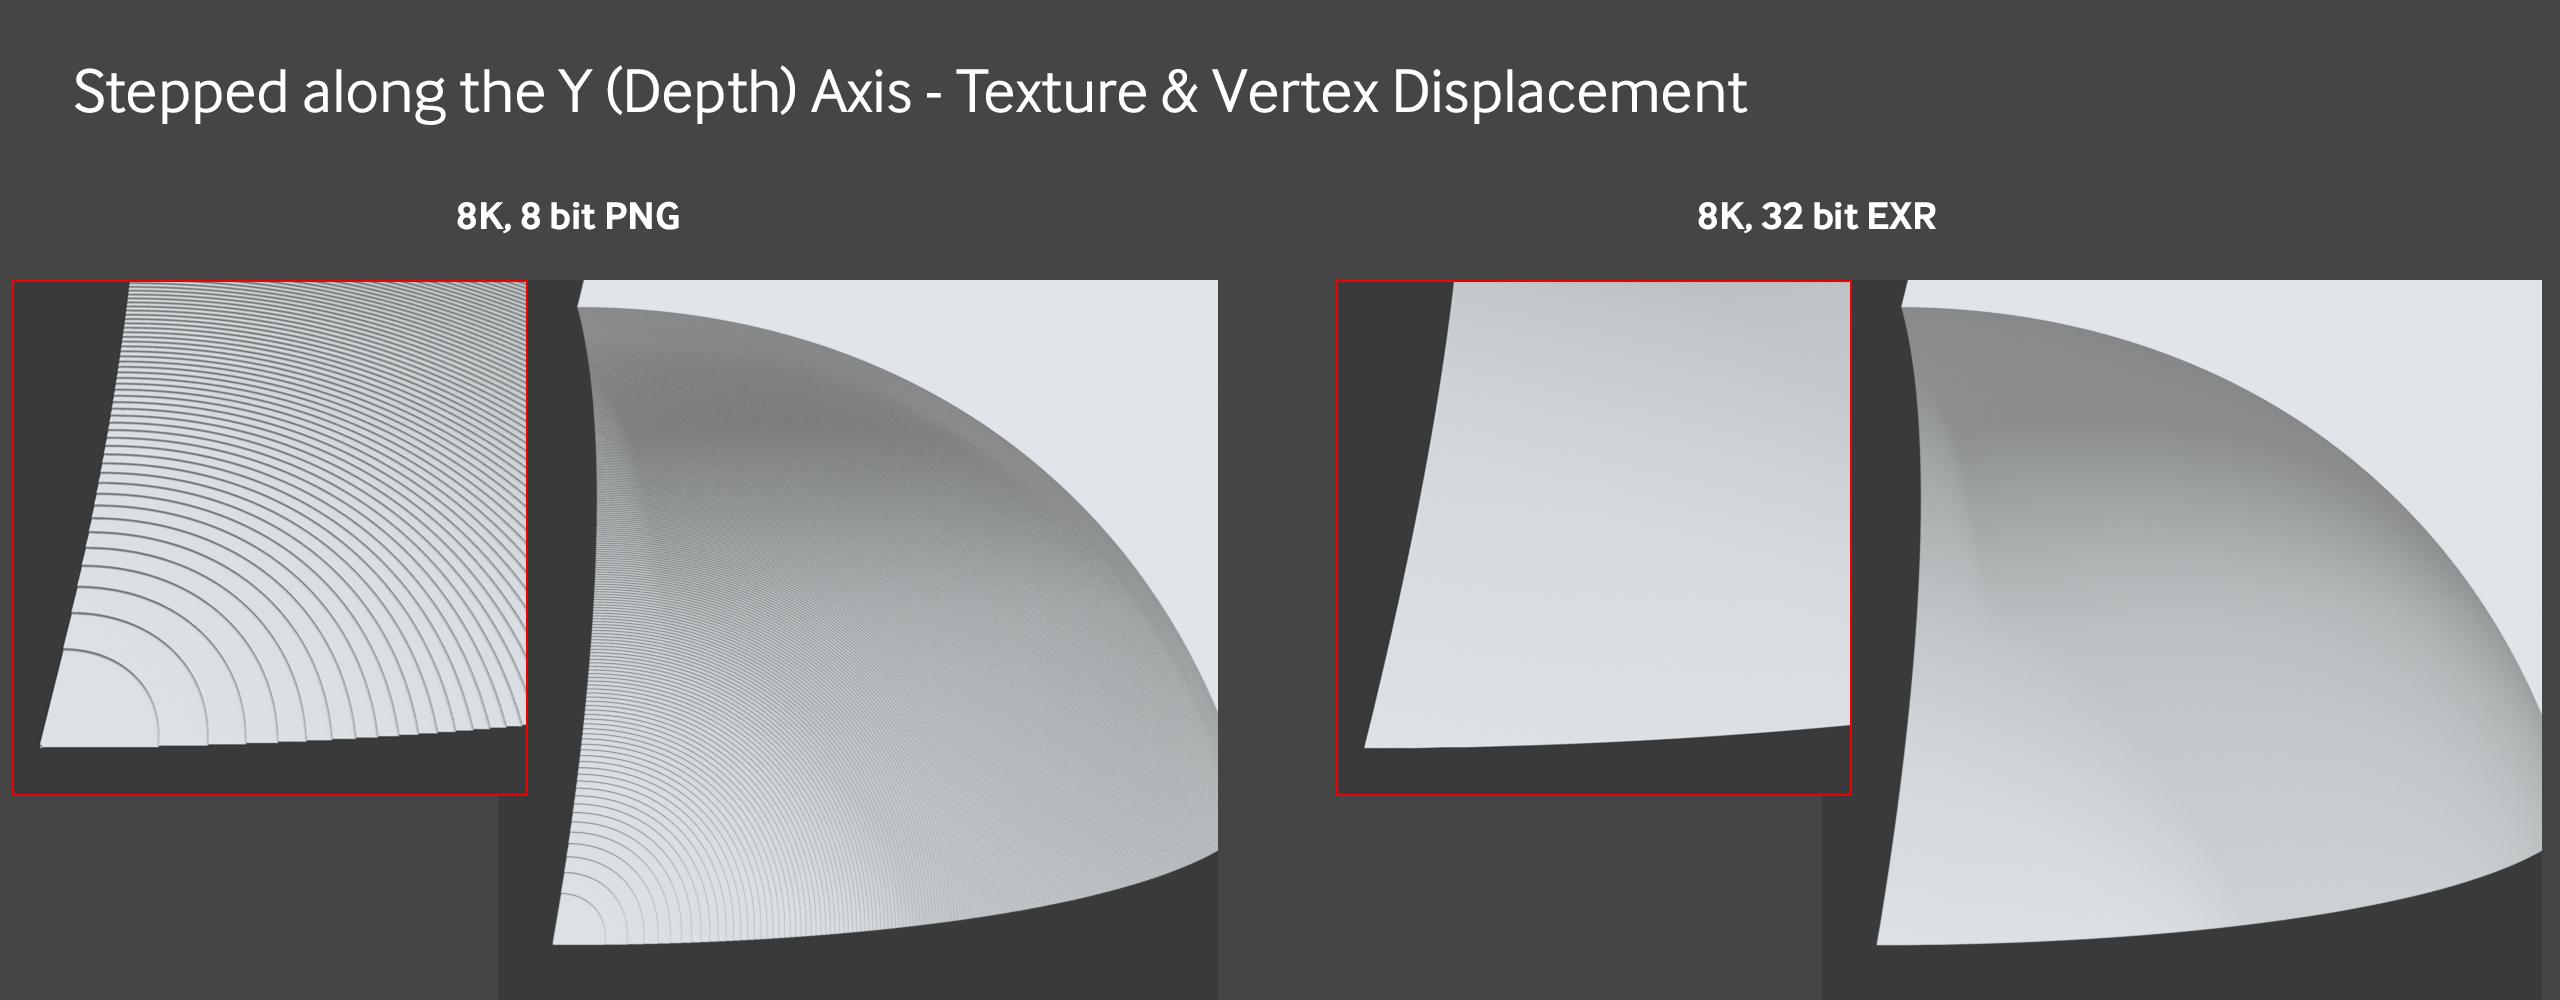
This issue could be caused by low bit depth of the source image and/or too high of a height value, like 8-bit PNG or JPGs, or even 16-bit height map.
You can try blurring or dithering in a 2D application, but maybe you will need to either find/make a higher bit depth version, lower the height value, try to cover it up with bump/normal map, or obscure it with other objects in the scene.
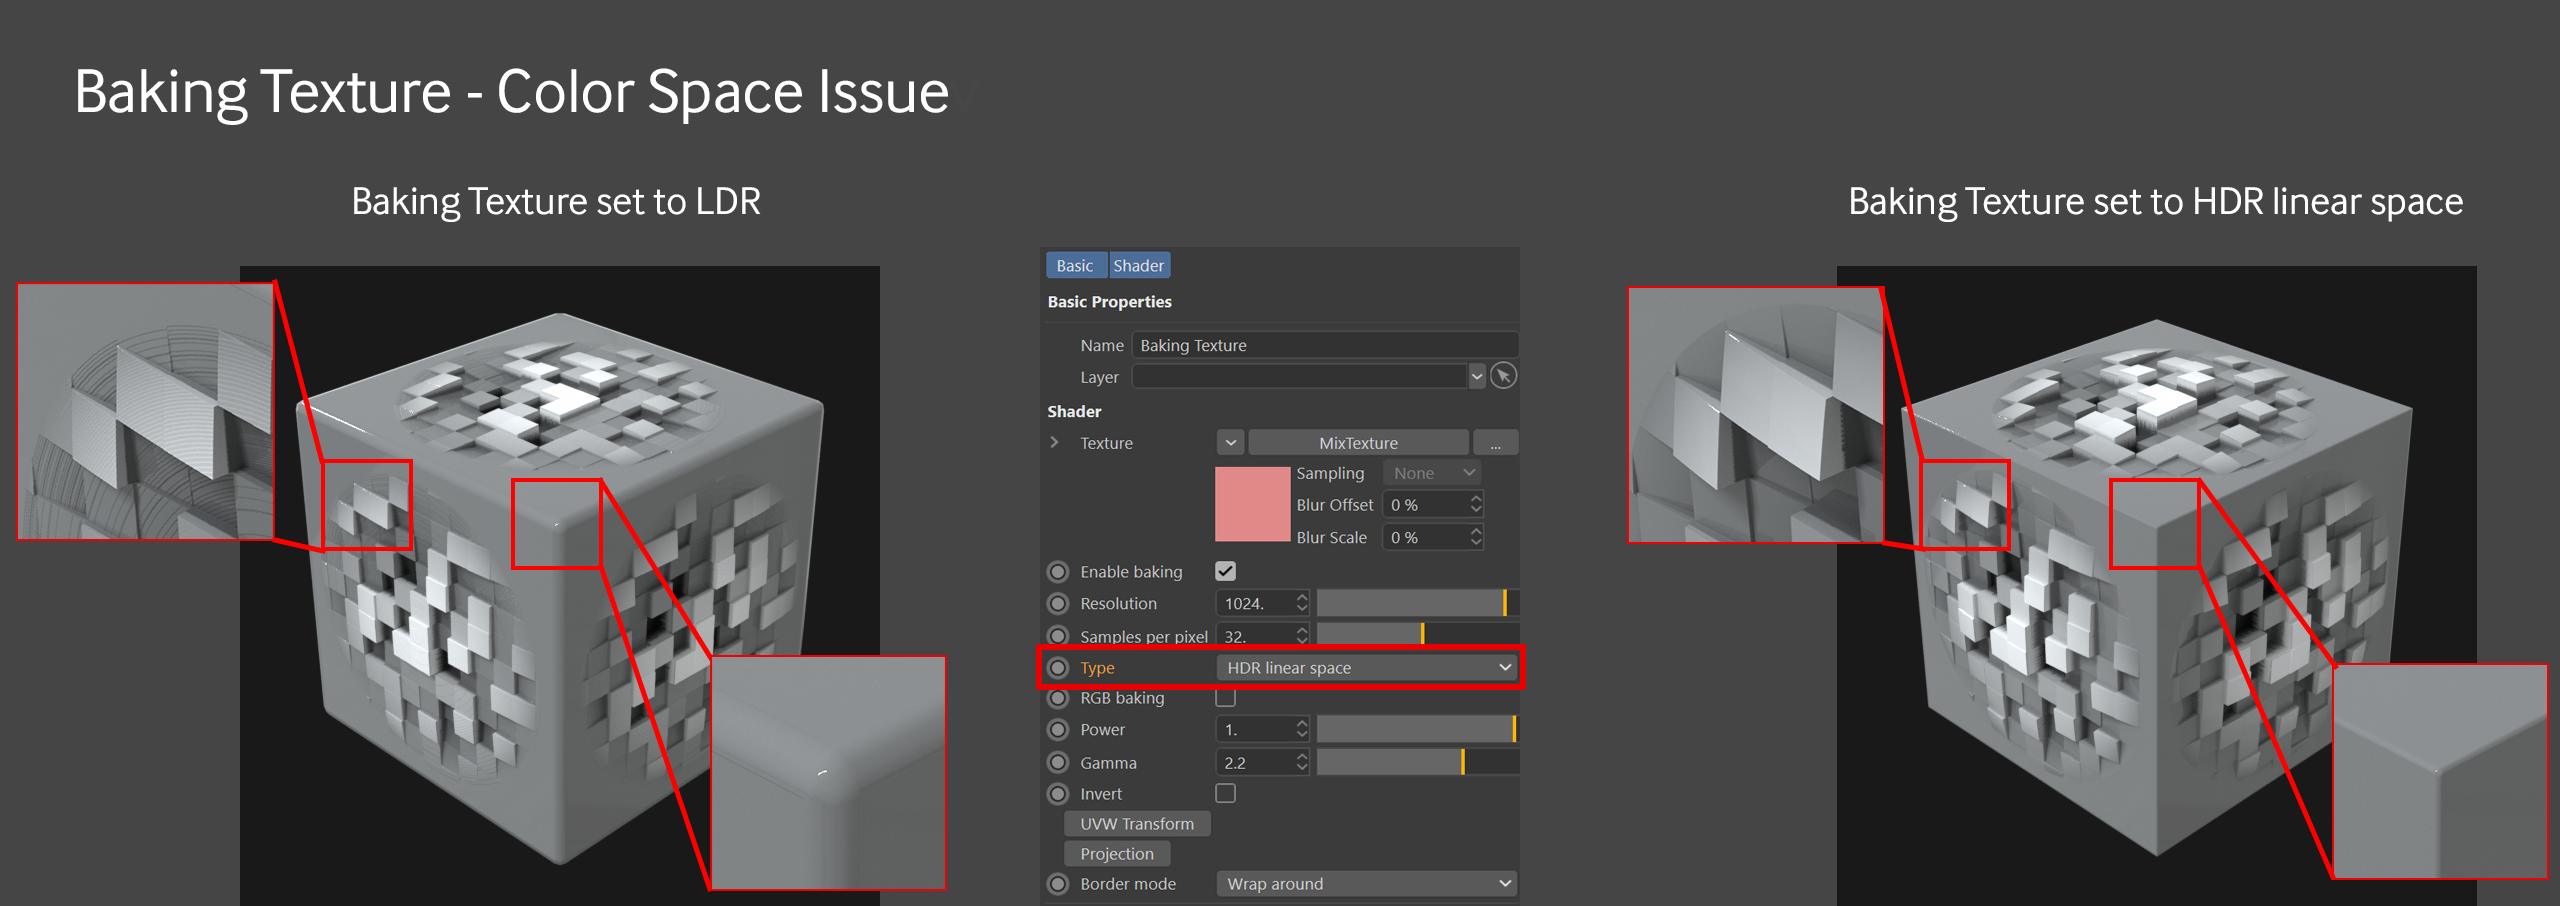
If you are using Texture Displacement with a Baking Texture, make sure the Type field in the Baking texture is set to HDR linear space. This will convert procedurally generated textures into a flattened 32-bit image which will avoid stepping.
Variable Resolution Issue
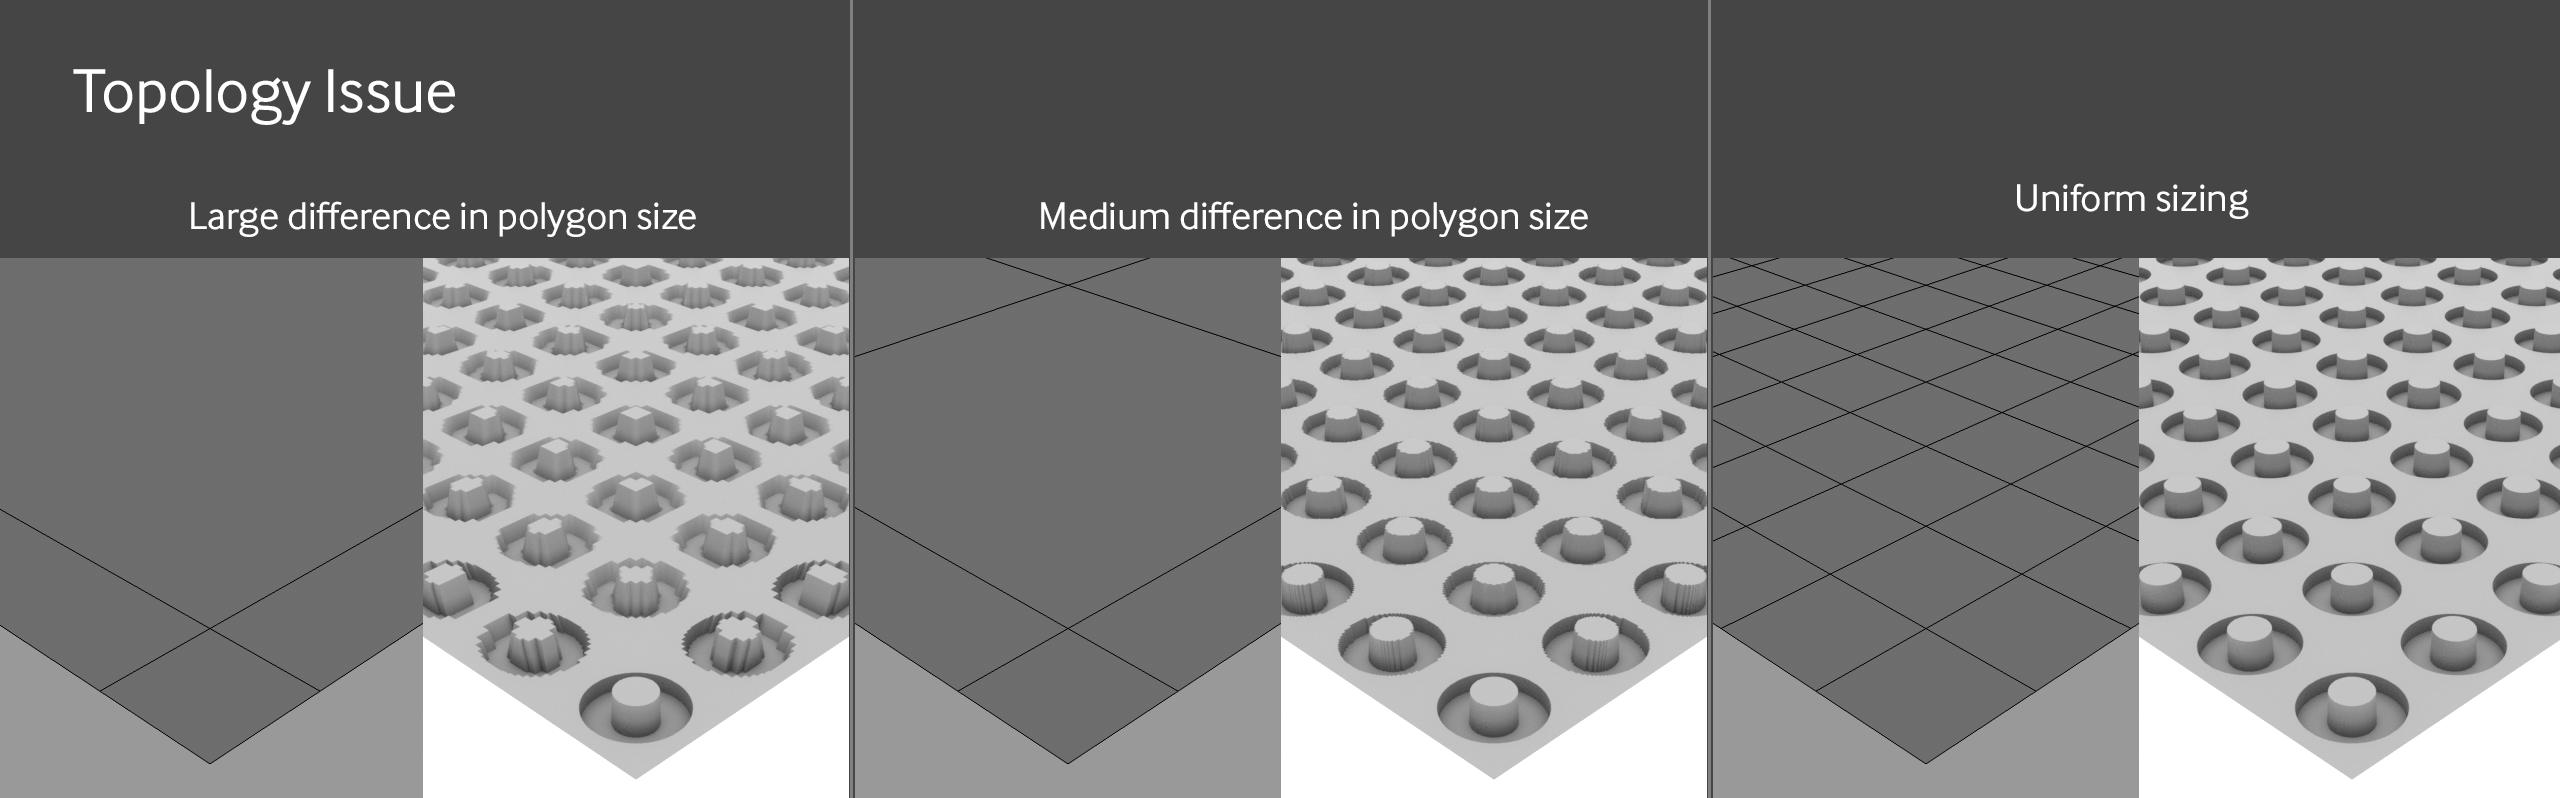
If part of the model looks great, but another part right next to it looks pixelated, maybe there’s an issue with the topology of the model, the UV map, or both. And it’s mostly an issue with vertex displacement.
You can troubleshoot it by evening out the transitions between large and small polygons on your mesh, and/or redo the UVs.
Intersecting/Misaligned Edges issue
Mid Level Issue
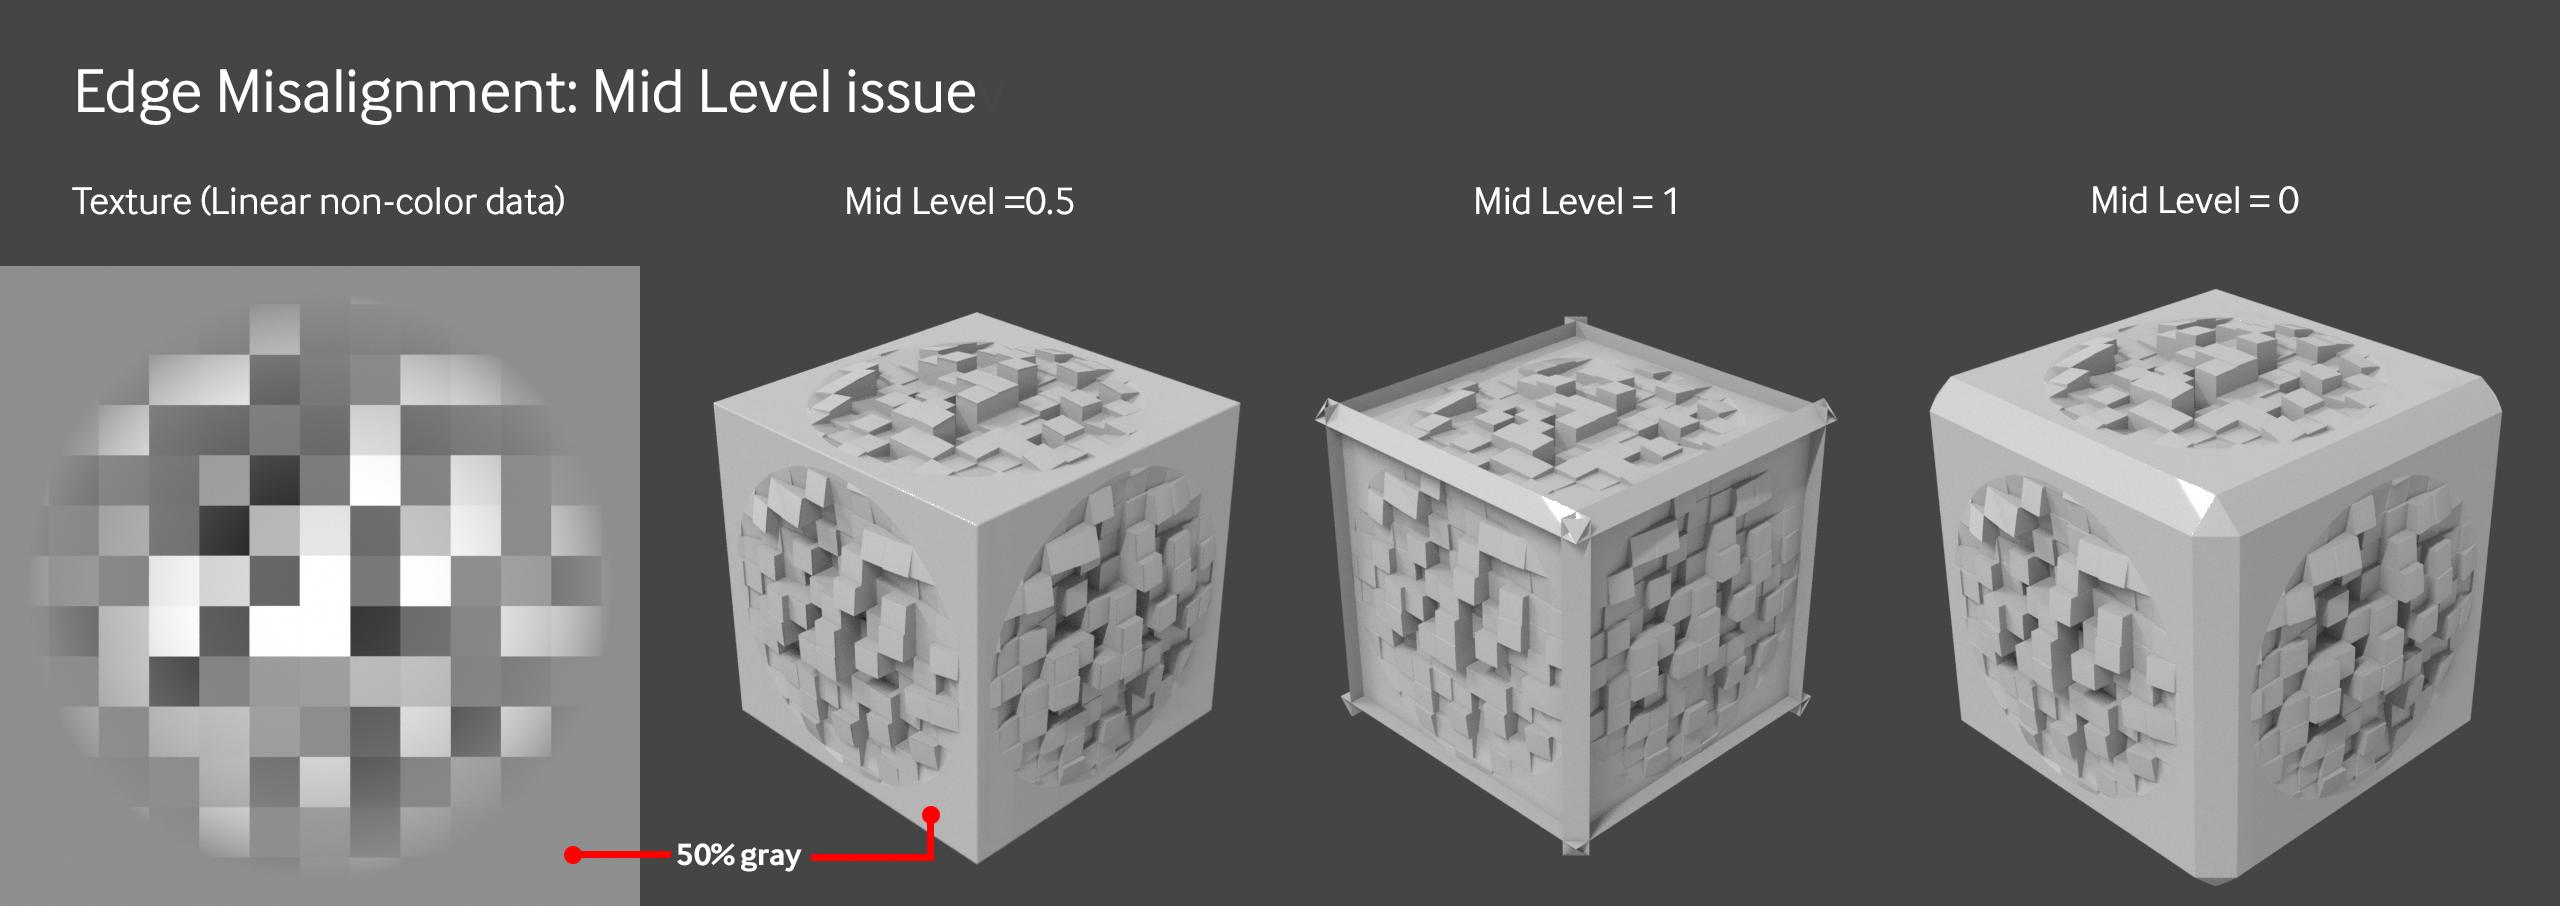
If you are using a Linear color space for the source texture, set the mid level to 0.5. At that point, anything that’s 50% gray will not be displaced, and edges should align properly (assuming the texture tiles properly).
If you set up black to be the midpoint where different UV islands are supposed to connect seamlessly, set the mid level to 0. If white is meant to be the midpoint, set the mid level to 1. If it’s any other value, you’ll have to manually adjust the value so it aligns properly.
Color Space Issue
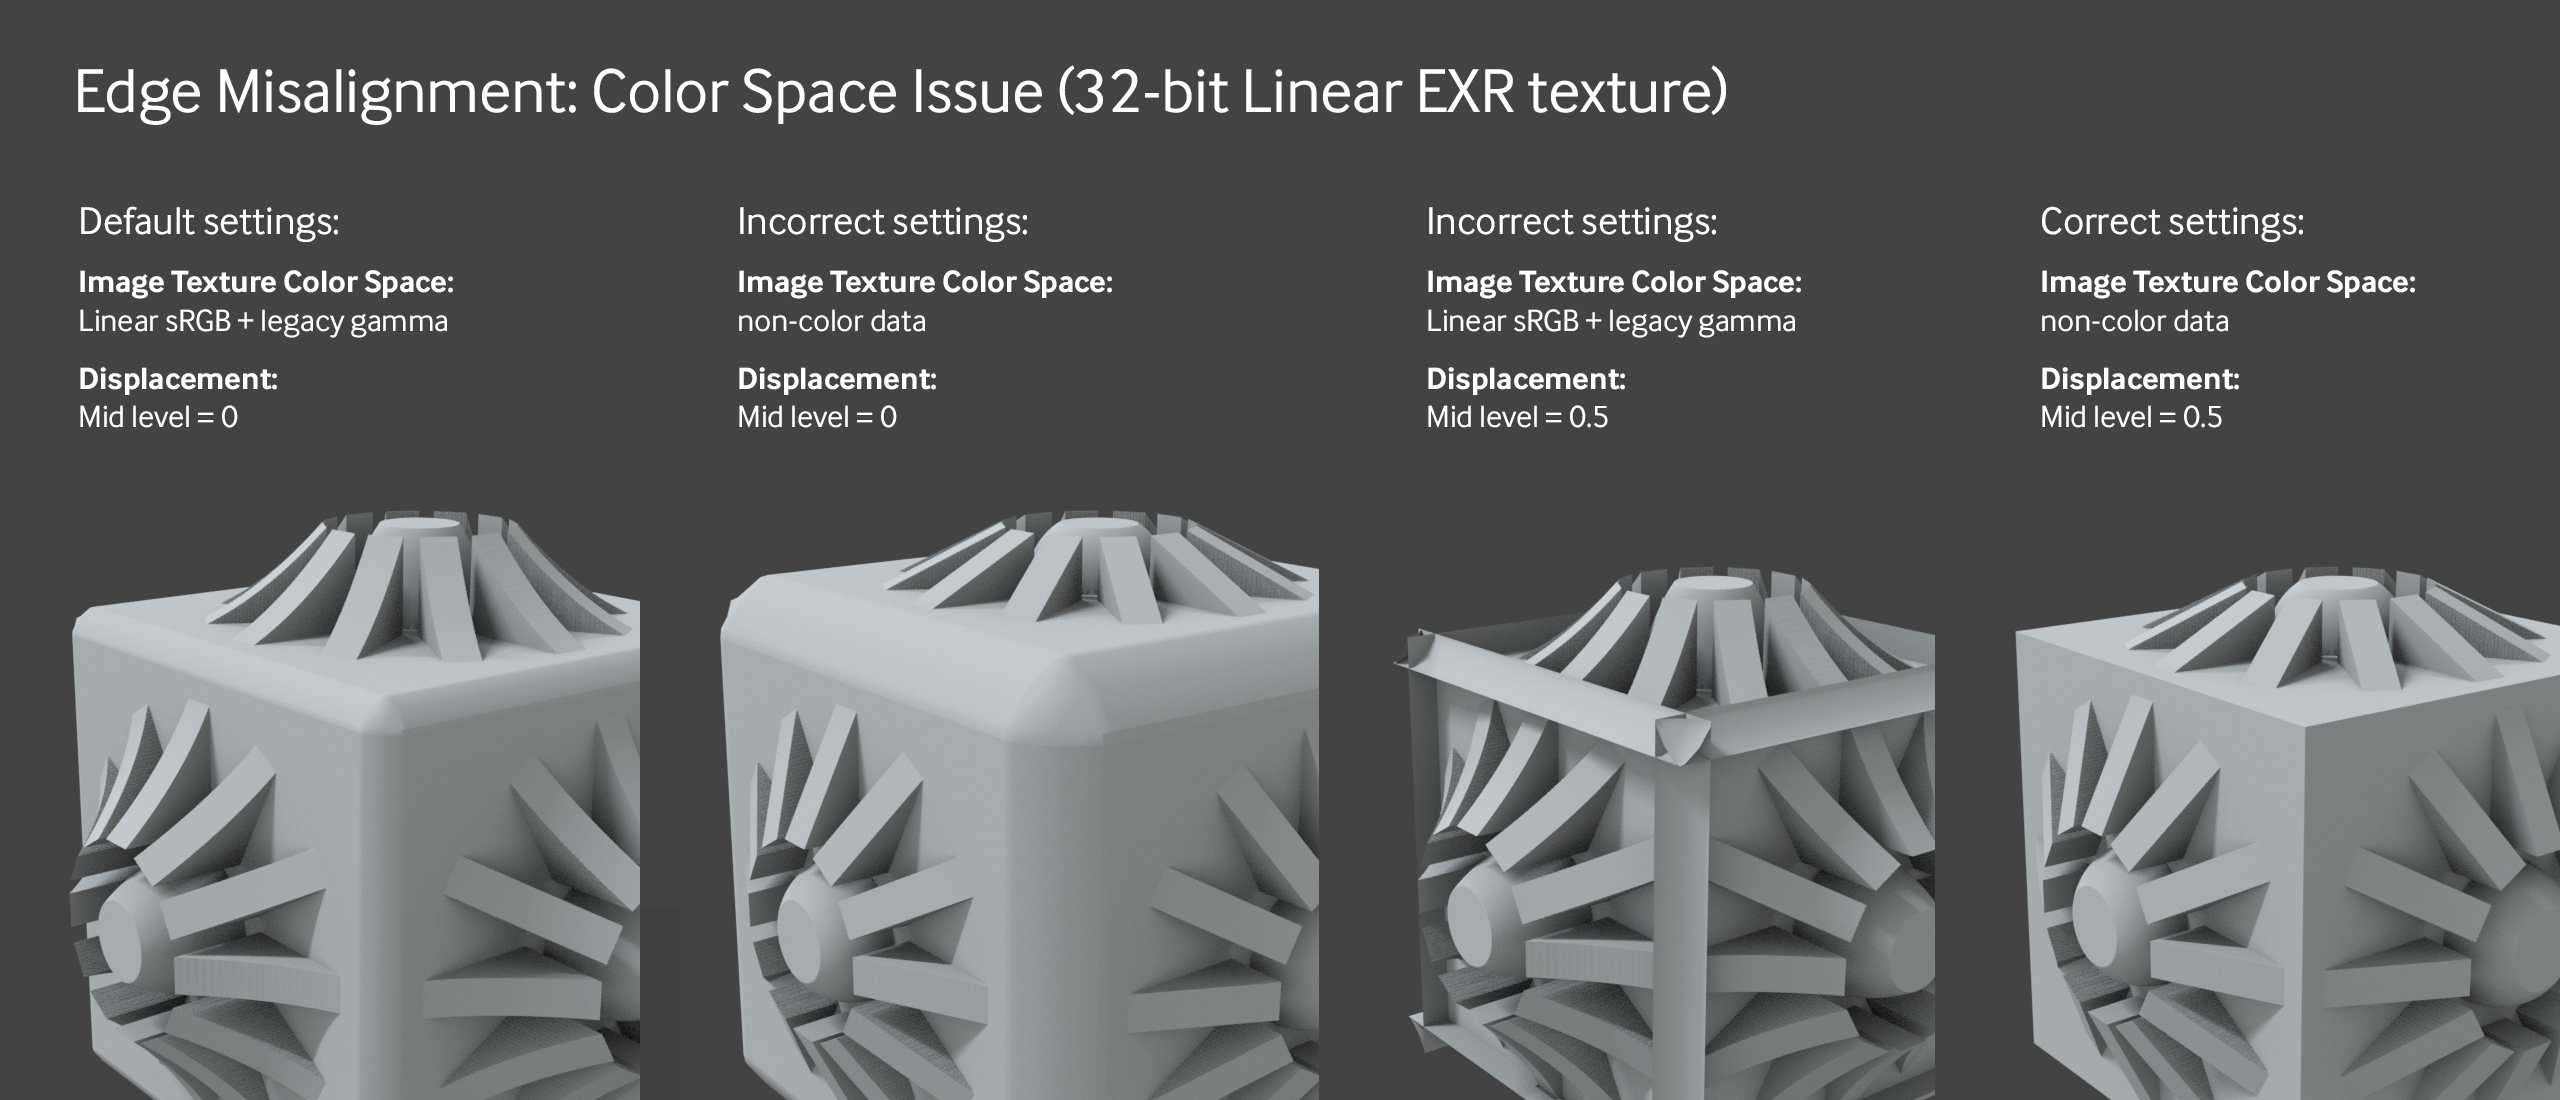
If you’re using Vertex displacement and are using a texture with a Linear color space (16 or 32 bit), try changing the Color Space in the ImageTexture node to be non-color data and set the midpoint to 0.5.
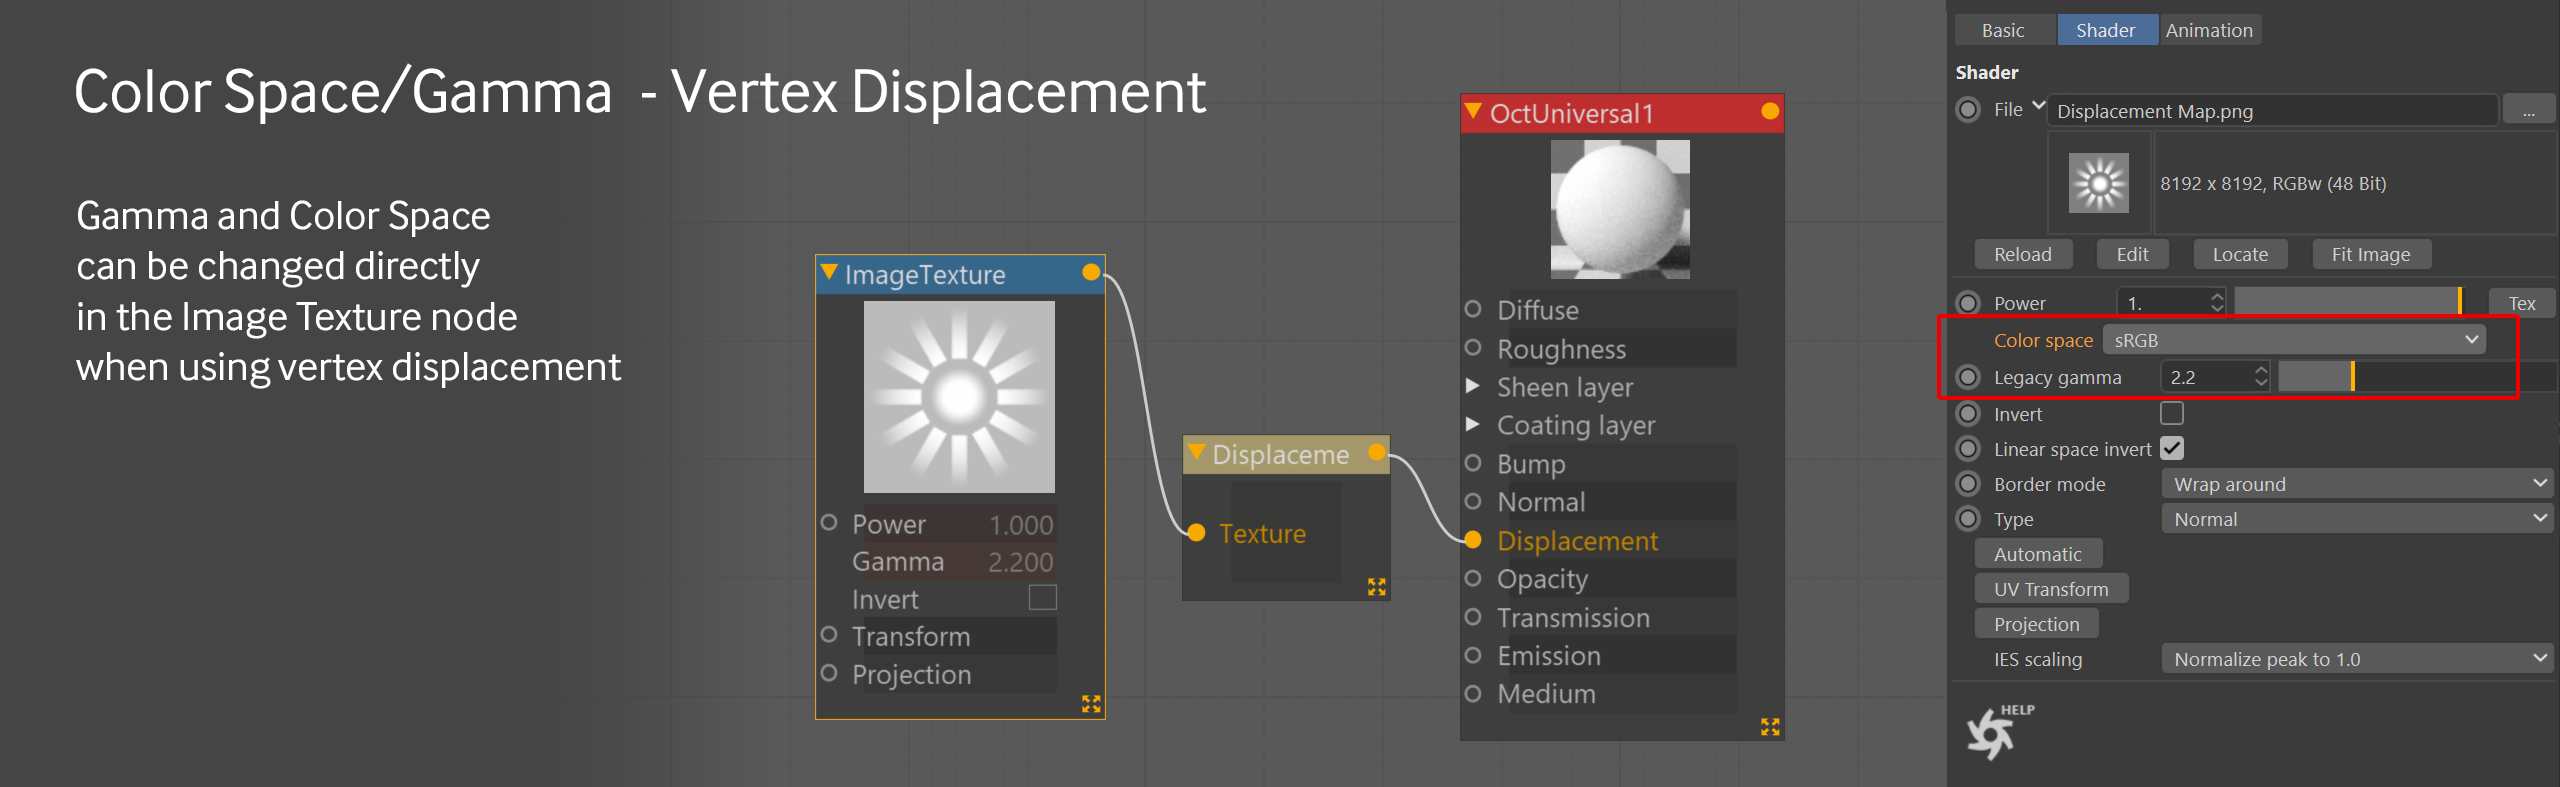
When using vertex displacement, If you need to adjust the image to compensate for an sRGB or other gamma curve, do that in the Image Texture node by using the Color Space and Legacy Gamma controls.
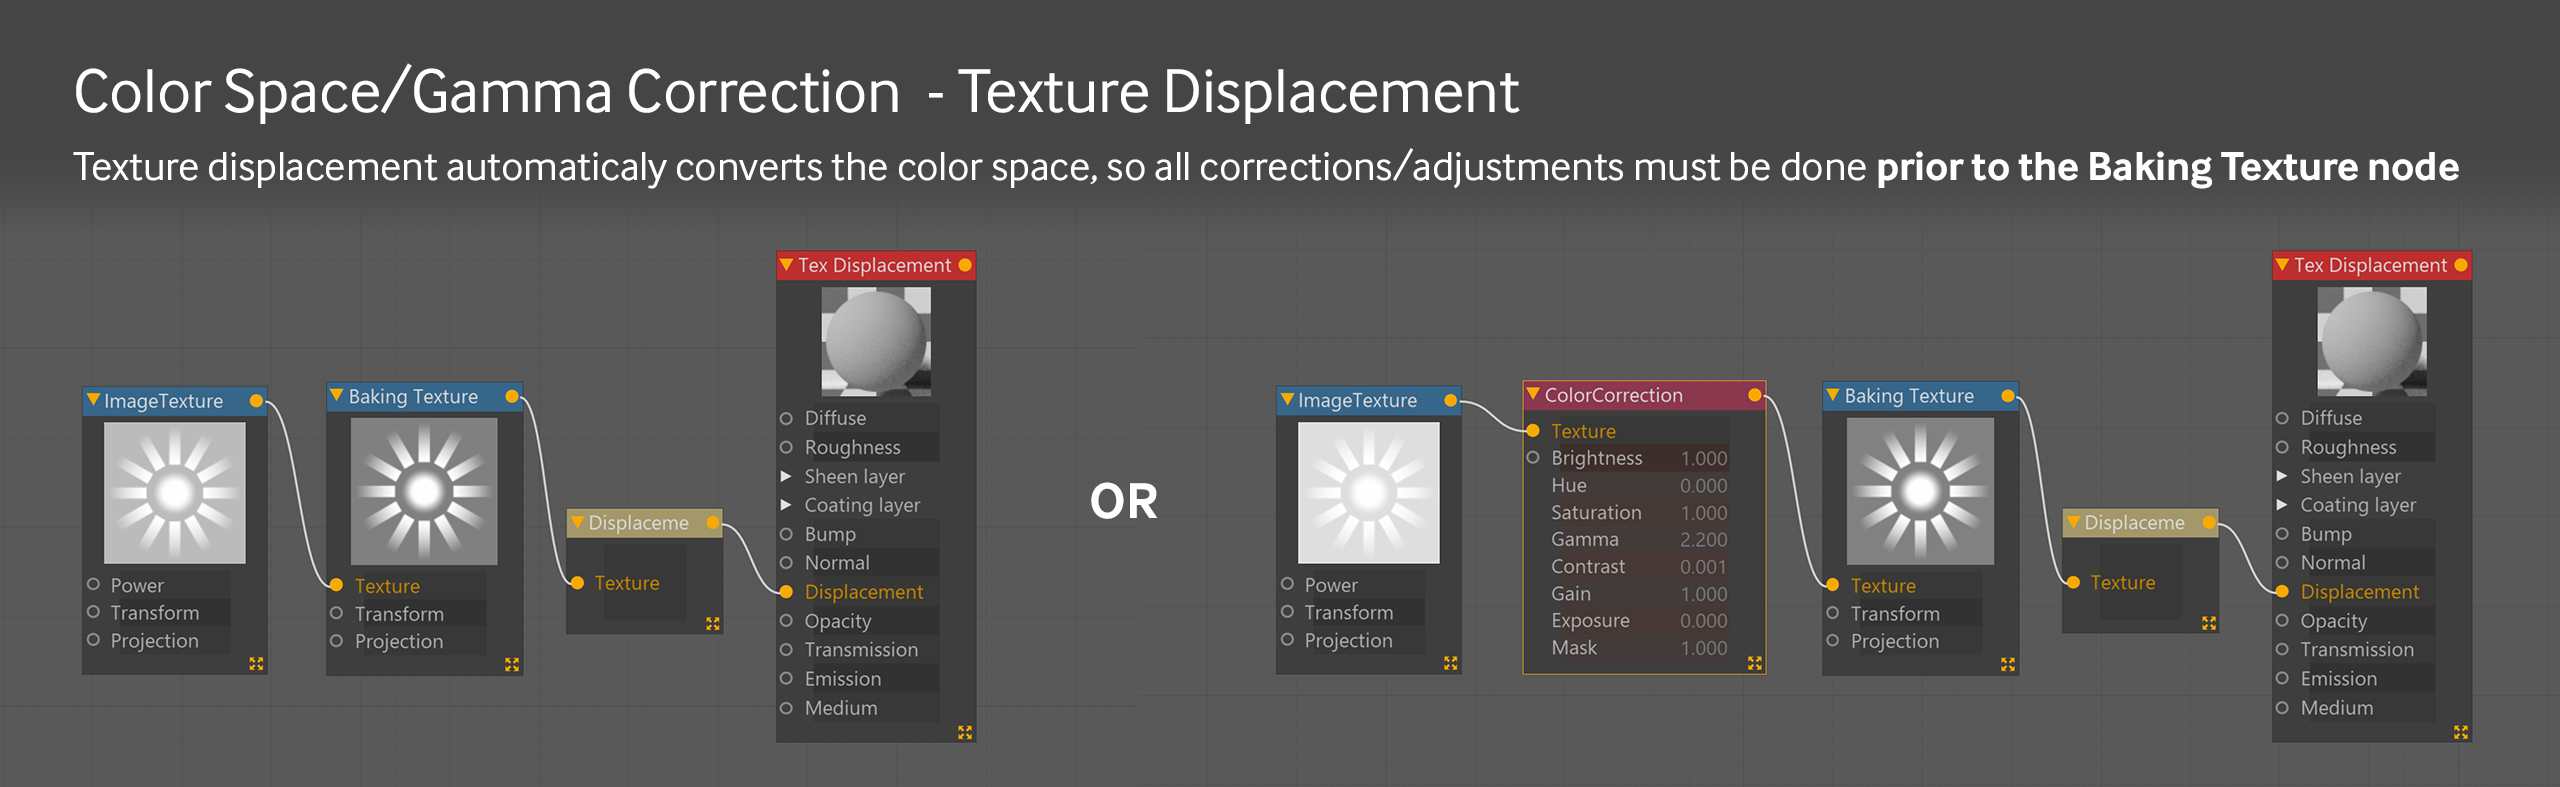
Texture displacement consider incoming data like non-color data, so it will not affect anything if you change the color space in the image texture node or adjust the gamma in the baking texture node.
If there are color space issues, you can try correcting them either by running your original source texture into a Baking Texture node and then adjusting the gamma/color space in the original texture node (not the baking texture node), or by placing a Color Correction node between your original texture and a new baking texture node, and then changing the gamma in the Color Correction node.
In both cases, make sure to set the Baking Texture Node to HDR Linear Space.
If the source image is in any other color space (like sRGB), It’s going to be a balancing act of adjusting the legacy gamma/color space, and the mid level values. Maps can be created in a number of ways, it’s anyone’s guess as to how it was done. Gamma curves not only affect the mid gray, but all of the grays along the gradient, so the wrong one will create curves in straight lines. Sometimes you may just not be able to correct a weird map, and you’ll either just keep tweaking the midpoint to avoid intersections and not worry about the distortion, or find a new map.
UV Issue
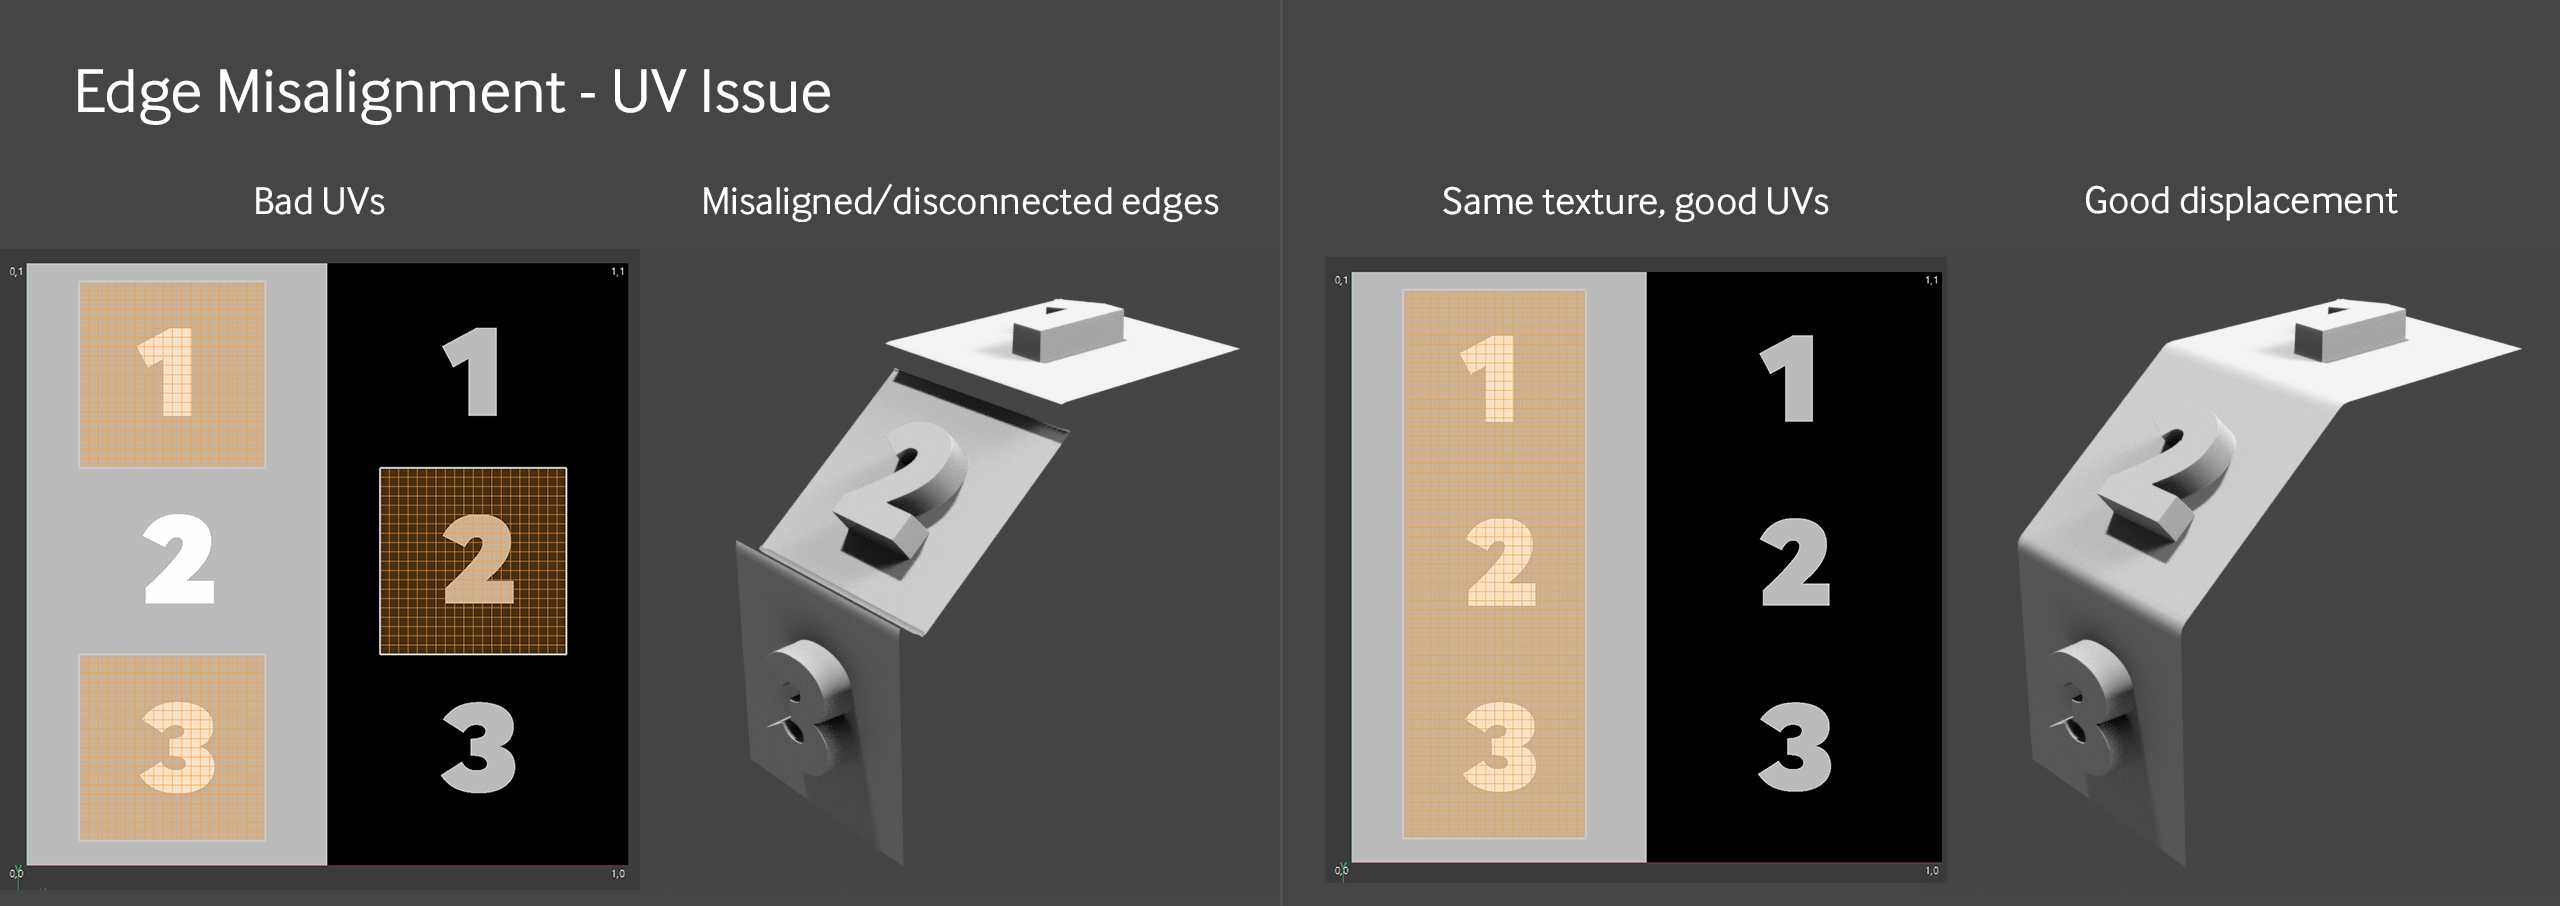
You can also check the UV islands that make up the two edges which are adjacent to each other are overlapping parts of the source image with different tones. This will cause one to be “lower” than the other and cause misalignment (or disconnected panels). Make sure the edges around the UVs are correct. If you fix this, maybe you will need to redo the UVs and/or editing the image.
Procedural Setups: Color Space Issue
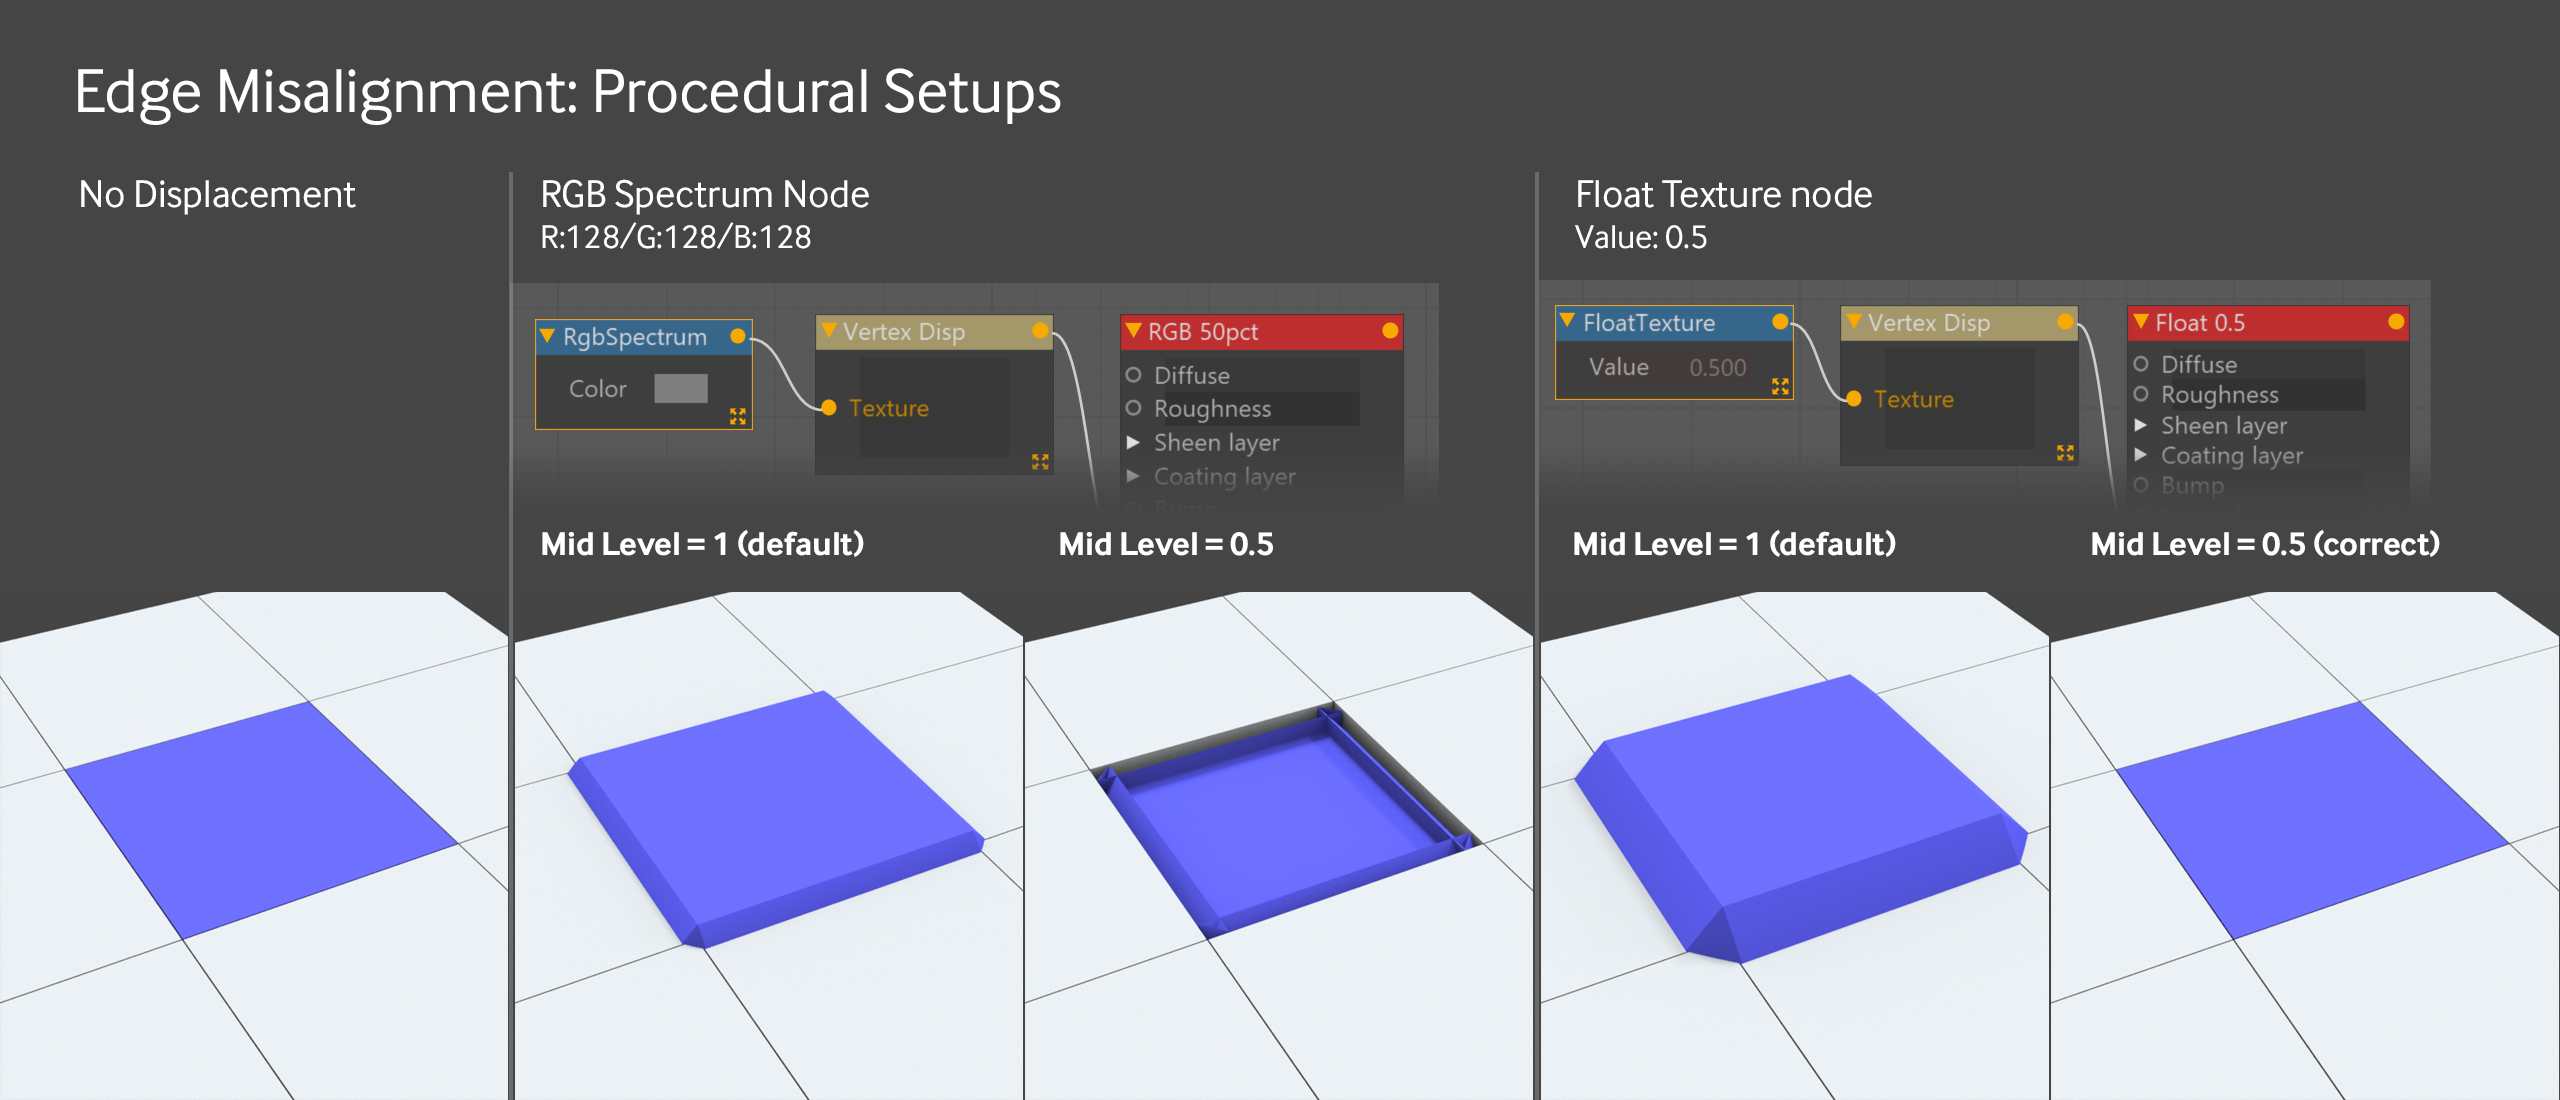
If you are generating procedural displacement data (using color and pattern nodes to make your maps) in Octane itself, and want a 50% gray field to act as a “baseline” (no displacement), don’t grab an RGB Spectrum node and make that 50% gray. This won’t work when you go to set the mid level at 0.5 because the RGB Spectrum node spits out values in the sRGB color space. Octane’s non-color channels like bump/displacement/roughness/etc are all expecting non-color data in a Linear space. If you want to correct this, the mid level value would have to be somewhere around .22 or so, and that might throw off the other black and white values you combine with this node.
Instead of an RGB Spectrum node, try using a Float Texture node. This will generate a linear non-color data value between 0 and 1. 0.5 will correspond to “middle gray”, and no displacement will occur in that portion of the final texture when the mid level is set to 0.5 also.
Distortion issue
Curve, Squash & Stretch
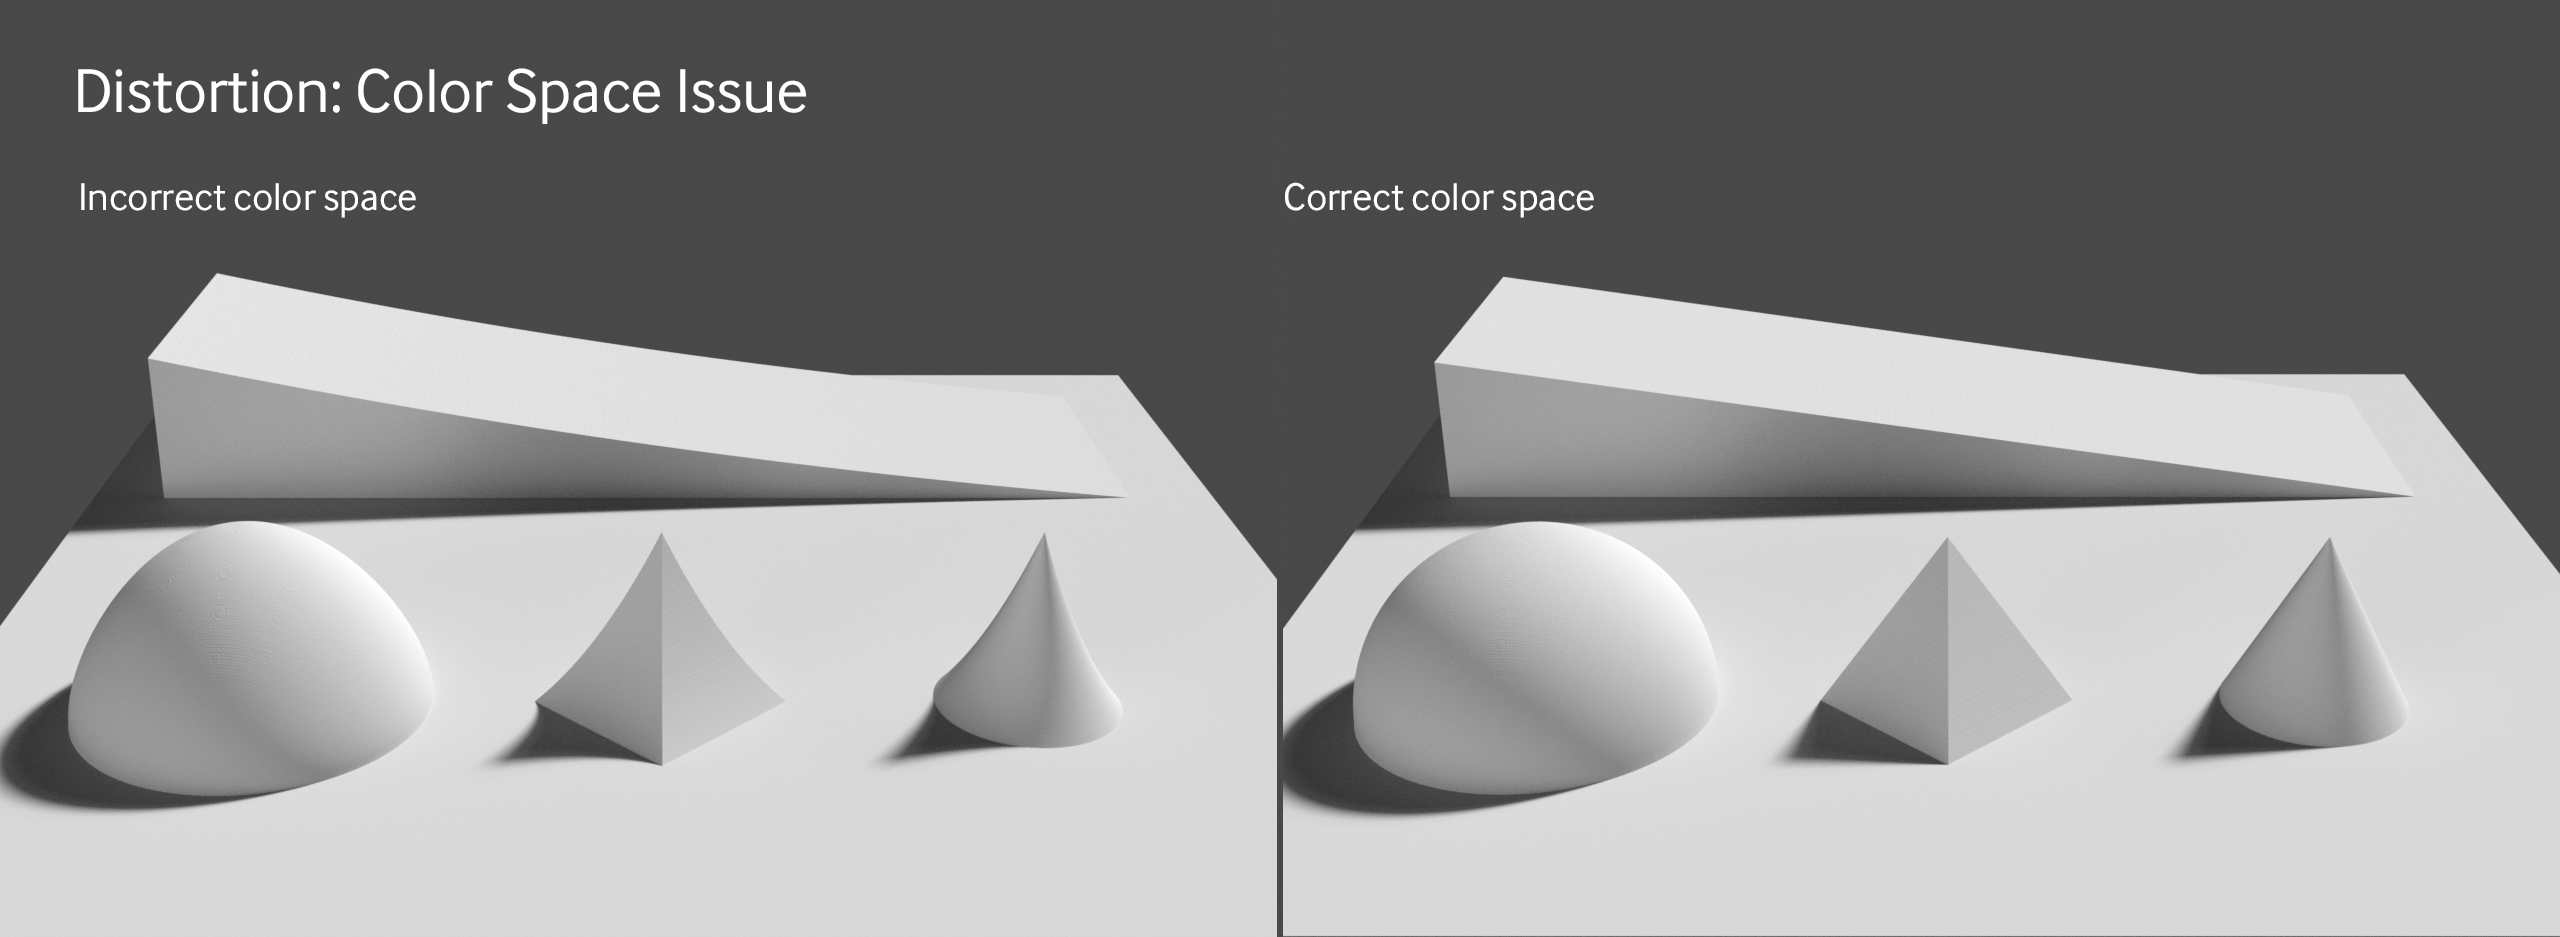
If you are expecting a straight linear ramp, or round hemisphere, but end up with a curved linear ramp or the top of an egg, maybe the problem is color space. This usually is an issue with vertex displacement. You have to make sure the color space in the ImageTexture node matches that of the image file.
Depending on the map itself (the ones that don’t use the entire black to white spectrum), having the wrong color space may also make the overall height seem “stretched”. This is due to where the middle gray falls on the gamma curve.
If your source texture is in a Linear color space, try changing the color space in the ImageTexture node to non-color data. If not, you may have to check the legacy gamma number to correct for whatever color space it’s in.
Remember to use an Image Texture node – not a bitmap one (usually a problem when the node editor isn’t used). You have no control over the gamma curve with a bitmap node.
If you’re using vertex displacement, you can alter the values in the Image Texture node directly. If you’re using texture displacement and need to correct the image, you’ll have to run the Image Texture node through a Baking Texture node (set to HDR linear space) in order to see the results of the changes you make in the Image Texture node.
Crunchy Surfaces and Spiky Edges
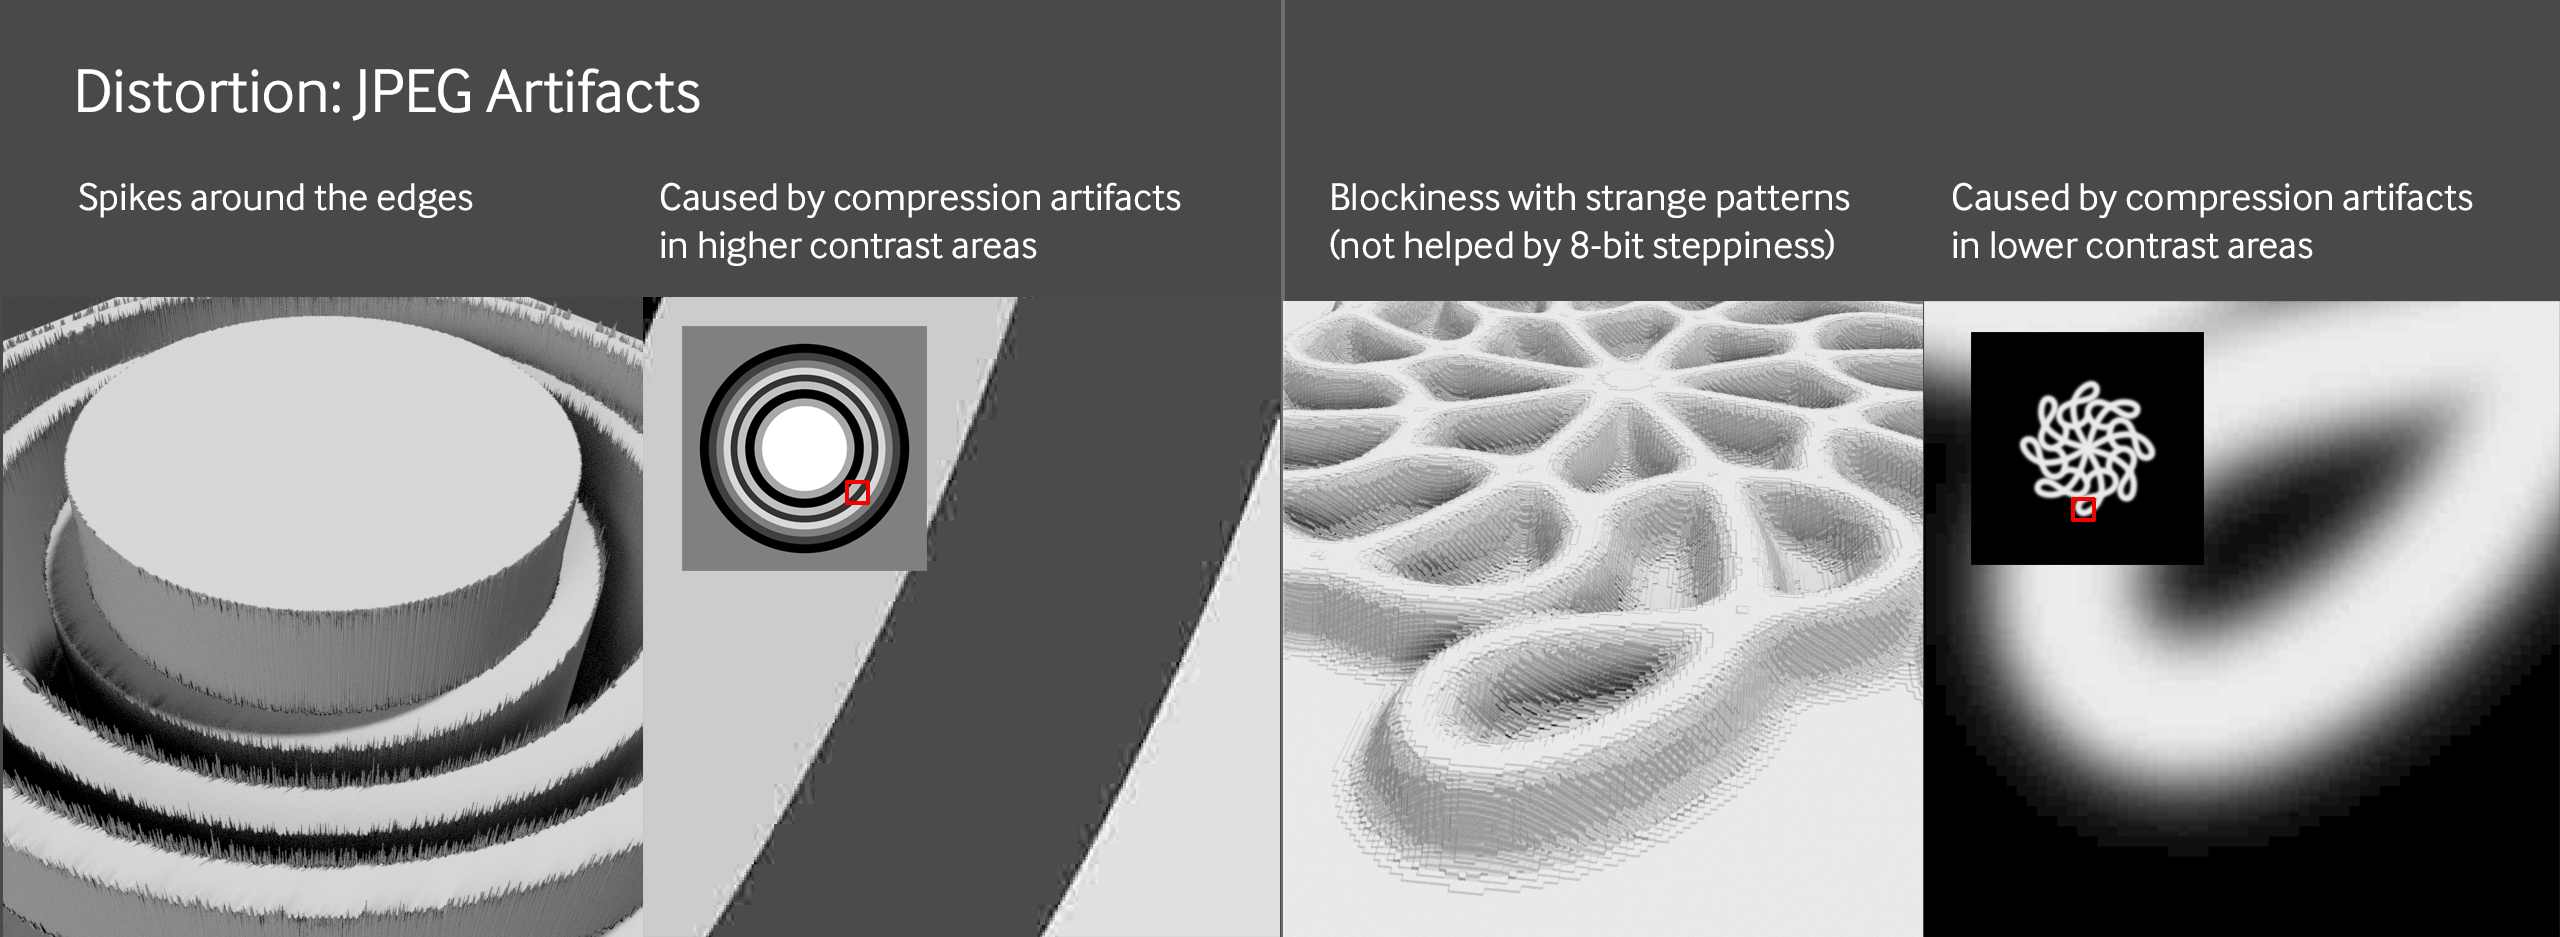
This is probably due to JPEG lossy compression artifacts.
To fix it, you can try the filter with texture displacement, try applying a light blur to the image in your 2D image editor, or try finding the source in another format like PNG, TIFF, EXR, etc.
iRender - The best cloud rendering service for Cinema 4D and Octane
iRender provides you a high-performance and configurable server system for 3D rendering, AI Training, VR & AR, simulation, etc. We believe that design and creative activities are private and personal that only you artists will know what you want with your animation.
As Octane can scale up linearly when you use a multiple GPUs system, we offer you from single RTX 4090 to multiple RTX 4090s/3090s. Check out these articles to know why RTX 4090 is still the best for Octane rendering: Top GPU for Redshift, Octane and V-Ray in 2023 and Compare RTX 4090 vs RTX 6000 Ada vs RTX A6000 for content creation.
We are not only providing you the most powerful graphics card, but also the same level of hardware, such as AMD Ryzen Threadripper processor, 256 GB RAM, 2 TB of storage (NVMe SSD).
For Octane, we suggest our multi RTX4090s or RTX3090s. Below is our test with Octane and Cinema 4D:


Not only those powerful configuration, iRender also provides you more services. Free transferring tool named iRender drive for macOS or Linux users. For Windows users, we recommend using our all-in-one application iRender GPU to work, and you don’t need to come to our website. Our price is flexible with hourly rental which has pay-as-you-go basis, daily/ weekly/ monthly subscription with discount from 10-20%. Plus, you have 24/7 support service with real human who will support you whenever you encounter an issue.
If you use Cinema 4D, kindly create a remote machine with Cinema 4D pre-installed and you are provided one license free. Regarding Octane, you can transfer your own license, or contact us if you want to use our license. Our 24/7 staff will advise you on how to use it.
Register an account today to experience our service and enjoy a very big promotion 100% bonus for new user. Or contact us via WhatsApp: (+84) 916806116 for advice and support.
Thank you & Happy Rendering!
Source and images: Scott Benson and otoy.com
Related Posts
The latest creative news from Octane Cloud Rendering, Cinema 4D Cloud Rendering


