Volumetric Lighting: Create Light Rays in KeyShot
KeyShot has an array of lighting capabilities from simple drag-and-drop HDRI lighting to physical lights, along with lighting presets to get you started and a Light Manager to make controlling your scene lighting easy. KeyShot also has rich volumetric lighting capabilities that allow you to create light rays (god rays) or lights shining through a hazy scene. Today, we’ll show how it’s done using KeyShot’s Scattering Medium and Spotlights.

Whether it’s rays of light passing through an exposed window, a stray beam illuminating a neglected furniture piece, or fast-moving vehicles headlights piercing the darkness of night, volumetric lighting can produce incredibly dramatic effects that help better tell the story of your scene. To get started creating volumetric lighting in KeyShot, you’ll first want to consider the composition of your scene – the subject to highlight, where the rays are coming from, how noticeable you want the rays to be. To demonstrate this, let’s use a Spotlight to give a basic understanding of the process, then two ways to use this same concept to create more complex scenes will be shown.
1. Isolate the Model
In the example scene, the house plant is isolated and prominent with no other details in the background. This is a great method for creating hero shots that illuminate your subject and call attention to details such as surface texture or material properties.

To create this type of composition, you’ll first want to place your subject in the center of your scene and add a Ground Plane (Edit, Add Geometry, Add Ground Plane or Ctrl+G) to give your subject a surface to sit on.
2. Add Spotlight
Next, add a Spotlight (Edit, Add Light, Spotlight or Shift+4) and move it above your object. Adjust the Spotlight parameters to your needs. (Note: If using KeyShot 9 or prior, you will need to first add a piece of geometry to your scene and then apply a Spotlight material from the Materials tab to create a physical spotlight.)
3. Add the Volume

With the light set, go to the Library window, Models tab and add a piece of geometry (like a Sphere or Cube) by double clicking on it. Then, scale the geometry up or down to encompass the entirety of the camera’s view as necessary.
4. Apply the Scattering Medium
Now, switch to the Materials tab and drag and drop a Scattering Medium Fog material. Another quick way to apply the Scattering Medium is to double-click the geometry, which puts you into the Project window, Material tab, and change the material Type to Scattering Medium. The difference is that the Library material is a preset with Transmission Color set to a neutral grey, while changing the material Type to Scattering Medium will set the Transmission Color to the geometry color.
5. Make It Your Own
With your Scattering Medium now applied and your physical light in place, you’re now ready to finalize your composition. At this point, it’s all about adjusting both your Scattering Medium and Spotlight to create the look you’ve envisioned.
You can create stylized effects by adjusting the Spotlight or Scattering Medium’s Color and you can adjust the intensity of your fog-like effect by adjusting both the Scattering Medium Transparency Distance and Density. This stage of your scene building comes down to creative expression and preference, so play with these settings until you’ve dialed in the appearance that best fits your needs.
Some other Pro Tips:

Enable Multiple Scattering: In the Material Properties for the Scattering Medium, you can also enable Multiple Scattering for a more realistic light scattering effect within the medium, while the Advanced options provide more advanced colorization and lighting control, including how the light particles reflect or absorb your medium’s light using Albedo and Scattering Directionality.
Dim the Lights: And lastly, to accentuate the light rays and better isolate objects in your scene, ensure your environment is set to pure black, so that the only illuminated element within the scene is the subject under the spotlight. Do this by going to the Project window, Environment tab and setting Brightness to 0.
Advanced Application for Volumetric Lighting

In this scene, the same concept of spotlighting through scattering medium has been used to call attention to the motorcycle’s headlights and taillights, while at the same time giving the scene context in terms of the environment it might currently be in. Not only does it create a dramatic composition, but it evokes a feeling that we are currently viewing the bike in a dark, hazy environment, perhaps a city street, or parked in some dark back alley, illuminated by a nearby light.

This interior scene demonstrates a more subtle effect. It uses a physical light to cast light through an open window creating a sunlit effect, while the Scattering Medium helps add a moodier undertone to the composition. In both, the volumetric lighting helps to elevate the story and mood of what would otherwise be a relatively plain scene, while allowing the viewer’s imagination to engage more deeply with the visual they’re looking at.
Conclusion
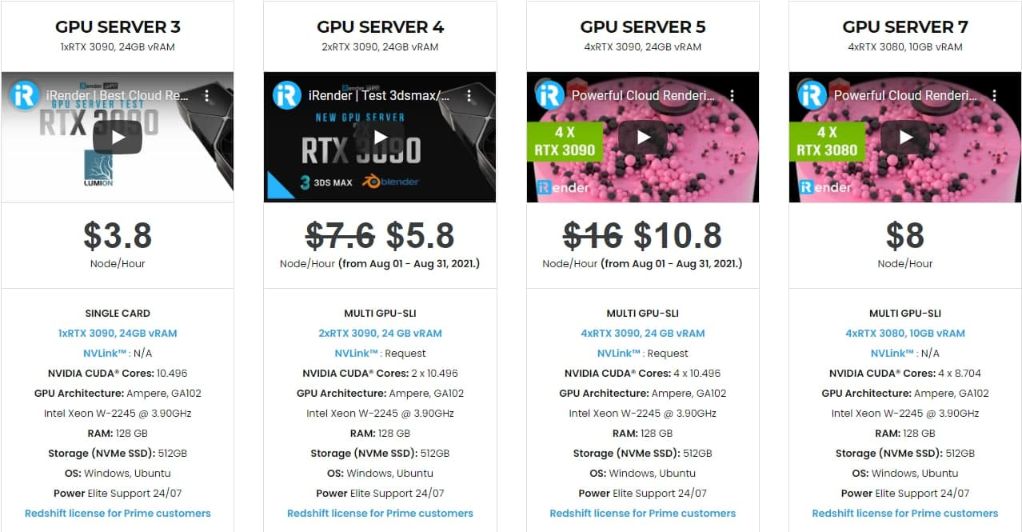
Hope that with these above instructions, designers could have more understanding about Volumetric Lighting in Keyshot and could give more realism into your scene to feast customers’ eyes. And if you are having troubles in selecting a render farm for Keyshot? And you don’t know what the best cloud render farm for your needs, don’t worry. iRender provide various multi-GPU-servers ( 1/2/4RTX 3090 and 4 RTX 3080) which are the most effective for Keyshot rendering in GPU, coming with the following specifications:
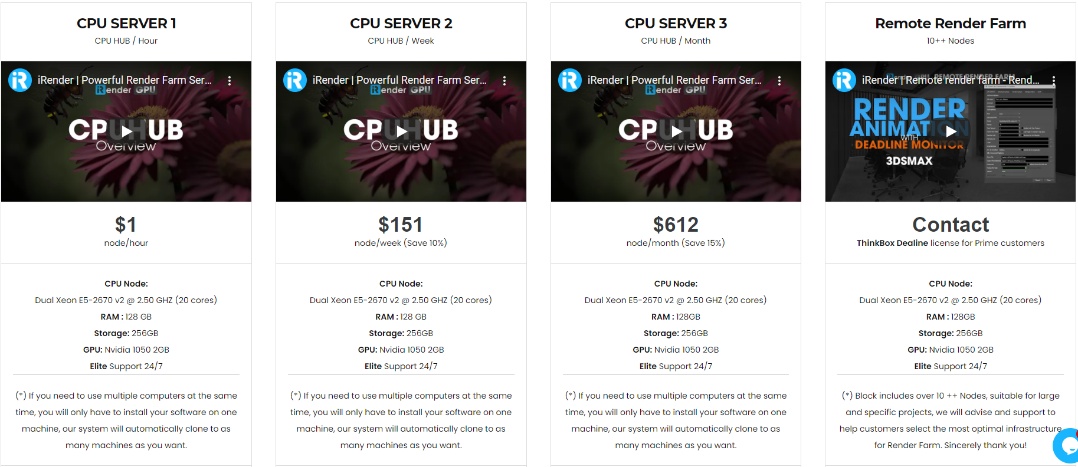
For CPU rendering, iRender also provides CPU servers with unmatched speed for rendering Keyshot with Dual Xeon E5-2670 v2 @ 2.50 GHZ, 20 cores, 40 threads, RAM 128 GB, Storage 256 GB and a Geforce GPU Nvidia 1050 2GB, which is totally higher than recommended system requirements. As a result, Keyshot users will be satisfied with CPU server performance at iRender.
At iRender, we try our best every day to offer our beloved customers the power and expedience they need to put the project, concept, or presentation together quickly and beautifully. Keeping that in mind, iRender aims to facilitate such people by providing our own cloud render services for everyone. Even a low-performance computer can turn into a supercomputer using the cloud services by iRender. You don’t need to buy expensive computers and then install heavy software, just make use of the services by iRender and start creating.

If you are a new iRender user, just register HERE to get FREE COUPON to test our servers with your Keyshot scenes and stay tuned for more interesting and useful articles related to rendering everyday.
iRender – Happy Rendering!
Reference: Keyshot.com
Related Posts
The latest creative news from KeyShot Cloud Rendering , Cinema 4D Cloud Rendering , 3D VFX Plugins & Cloud Rendering.