Why Your GPU Not Showing Up in Task Manager and How to Solve?
You open the Task Manager expecting to check your GPU usage but the graphics card simply isn’t there. No GPU tab, no performance metrics, no activity. If you’re facing the issue of GPU not showing up in Task Manager, you’re definitely not alone. This problem frustrates many users after updating Windows, installing new GPU drivers, or switching hardware.
Since Task Manager is one of the easiest ways to monitor GPU performance, not seeing your graphics card can make it difficult to diagnose system bottlenecks, troubleshoot rendering issues, or verify whether your dedicated GPU is even being used. This issue almost comes from a handful of identifiable causes, and there are many solutions for them.
Let’s break down what’s actually happening and how to get your GPU to appear correctly.
What is the GPU Not Showing Up in Task Manager?
When you experience GPU not showing up in Task Manager, the issue can appear in several different forms and each form makes the problem harder to diagnose. In most cases, Task Manager either fails to detect the GPU entirely or displays incomplete information about its performance.
Common symptoms include:
- The GPU section is missing from the Performance tab
- Only the integrated GPU (Intel UHD/Iris) appears, while the dedicated NVIDIA or AMD GPU is not listed
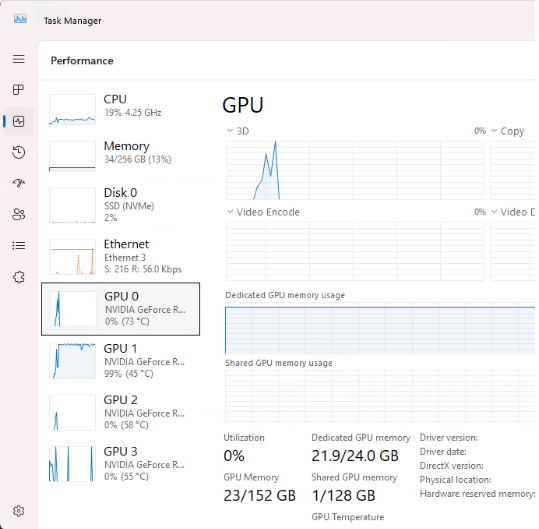
- The GPU appears, but usage, temperature, and memory metrics stay at 0% even when running graphics-heavy applications
- The GPU shows up in Device Manager but still does not appear in Task Manager
- Task Manager displays only “Basic Display Adapter”, meaning Windows cannot load the correct GPU driver
These symptoms all point to the same underlying issue: Windows is unable to detect, activate, or read performance data from your GPU, which is why Task Manager fails to display it.
Why GPU Not Showing Up in Task Manager Occurs?
Understanding why GPU not showing up in Task Manager happens is the key to finding the right fix. This issue can originate from Windows settings, hardware setup, or driver conflicts that prevent the operating system from correctly detecting the GPU.
Here are the most common reasons:
- Outdated, missing, or corrupted GPU drivers: When drivers fail to load properly, Windows cannot recognize the GPU or display its performance data in Task Manager.
- GPU disabled or hidden in Device Manager: If the GPU is accidentally disabled, flagged with an error, or not initialized, Task Manager won’t show it at all.
- GPU disabled in BIOS: Some motherboards allow toggling between integrated and dedicated GPU. If the dedicated GPU is off, Windows can’t detect it.
- Incorrect display connection: If your monitor is plugged into the motherboard port, the system prioritizes the integrated GPU instead of your NVIDIA/AMD GPU.
- Windows Performance Counters are corrupted: These background services feed data to Task Manager. If they break, the GPU won’t appear or will show 0% usage.
- Power supply or PCIe slot problems: If the GPU lacks power or isn’t fully seated in the PCIe slot, it may appear in Device Manager but not in Task Manager.
- Laptop using integrated graphics by default: On hybrid GPU laptops, the system might force Intel iGPU for power saving, hiding the dedicated GPU from Task Manager.
- Windows update conflicts or system file corruption: A bad update, missing system files, or incomplete driver installation can disrupt GPU detection.
How to Fix GPU Not Showing Up in Task Manager
1. Update Your Graphics Drivers
One of the most common reasons for GPU not showing up in Task Manager is outdated or corrupted GPU drivers.
Steps:
- Visit the official NVIDIA, AMD, or Intel driver page
- Download the latest driver for your GPU model
- Choose Clean Install (NVIDIA) to remove old files and conflicts
- Restart your PC and check Task Manager again.
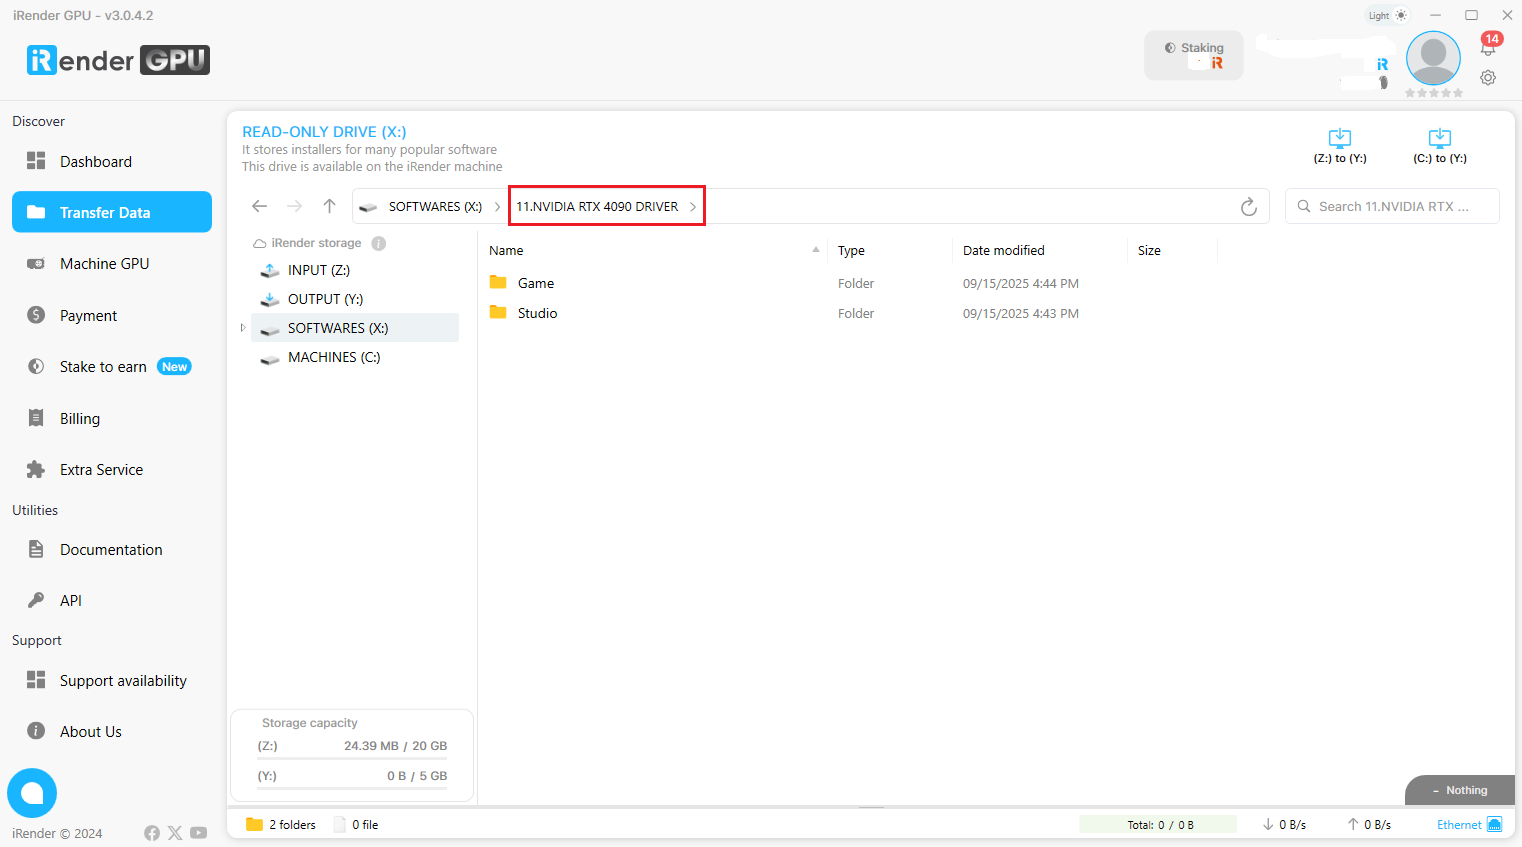
If you are using iRender servers, you just need to follow these simple steps to update your Graphics Drive:
- Go to the X: Drive on the remote machine and open the folder: 11. NVIDIA RTX 4090 DRIVER
- Find the latest Studio Driver installer
- Copy it to the Desktop/C Drive to install
- Restart the machine
2. Check Device Manager
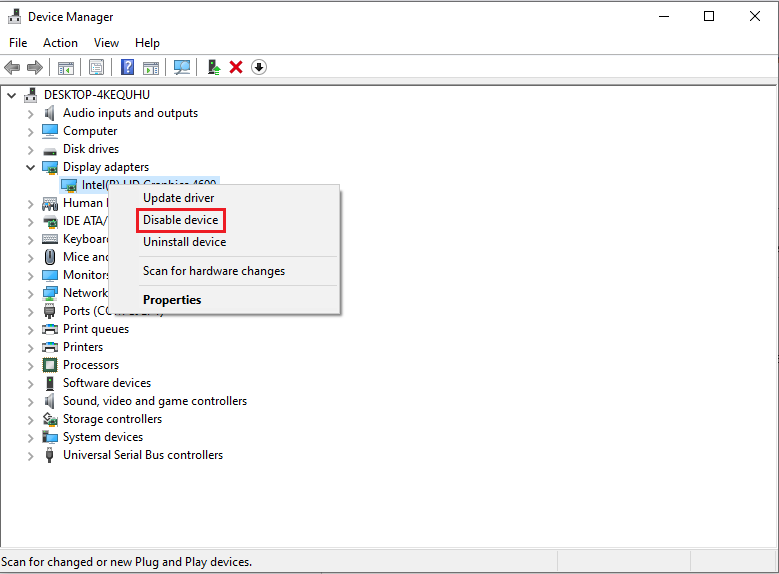
If your GPU does not appear in Task Manager, the next place to check is Device Manager, where Windows initializes all hardware components.
Steps:
- Press Win + X → Device Manager
- Expand Display adapters
- Look for your NVIDIA/AMD GPU
- If you see any of these:
- Disabled device
- Error Code 43
- Microsoft Basic Display Adapter
→ Right-click the GPU → Enable device or Update driver
3. Enable GPU in BIOS
A disabled or misconfigured GPU in BIOS can also cause GPU not showing up in Task Manager, especially on systems with integrated graphics.
Steps:
- Restart your PC and enter BIOS (Del, F2, F10, Esc depending on motherboardLook for settings like:
- Primary Display
- Initial Display Output
- PCIe/PEG (PCI Express Graphics)
- Integrated Graphics Configuration
- Set the configuration to:
- PCIe or PEG to prioritize the dedicated GPU
- Or Auto, which lets the system detect the dedicated GPU first
- Save the changes and exit the BIOS
- After rebooting, check if your GPU is now visible on Task Manager
4. Rebuild Windows Performance Counters
Sometimes the GPU is detected, but Task Manager can’t show metrics because Windows Performance Counters are corrupted.
Steps:
1. Press the Windows + X, then select Terminal (Admin)
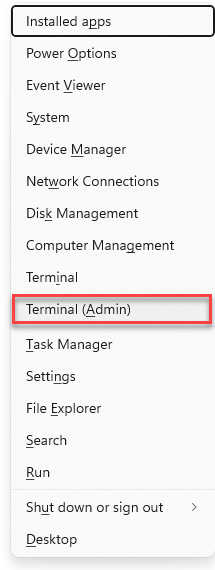
2. Enter lodctr / R and press Enter
3. If you see “Unable to rebuild performance counter”, run each of the following commands individually: type a command, press Enter, then proceed to the next.
cd C:\Windows\SysWOW64
lodctr /R
cd C:\Windows\System32
lodctr /R
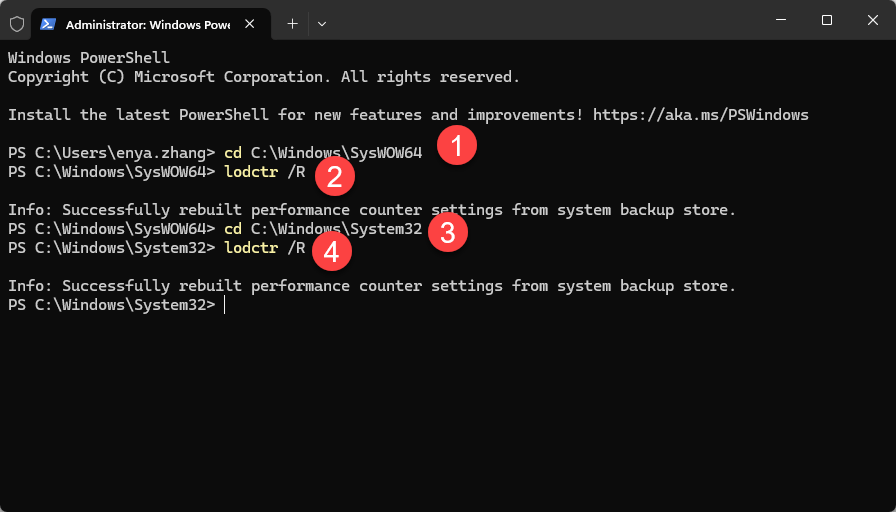
4. Once successful, Restart your computer. Check if you can now see the GPU in Task Manager.
5. Check Power Settings
Improper power configuration may prevent Windows from initializing the GPU correctly, leading to GPU not showing up in Task Manager.
Steps:
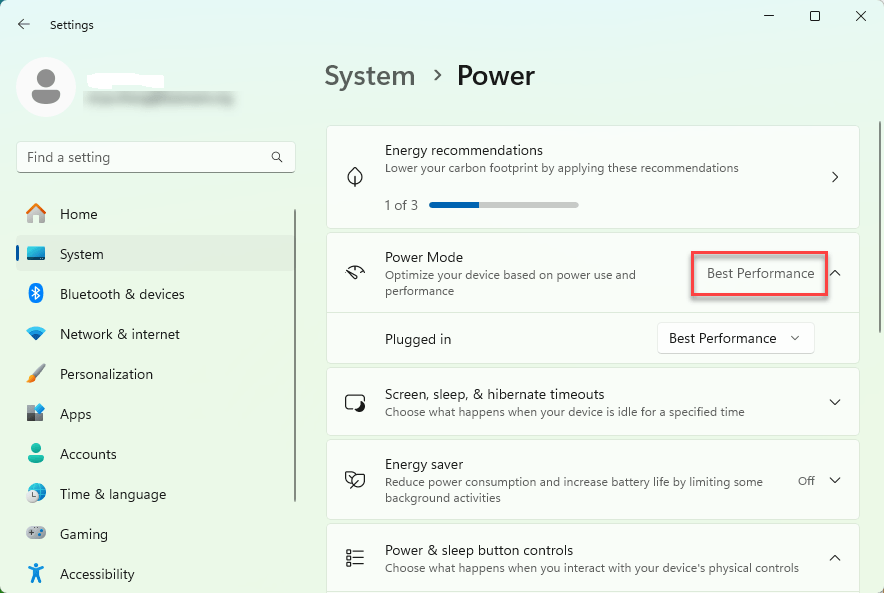
1. Press Windows + X → Power Options
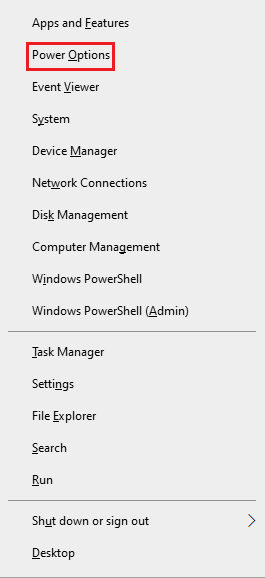
2. Select High Performance or Balanced Performance or Best performance (depend on your computer)
For NVIDIA laptops:
- Open NVIDIA Control Panel
- Go to Manage 3D Settings
- Set Preferred Graphics Processor → High-performance NVIDIA GPU
2. Restart your computer
3. Check whether you can see the dedicated GPU in Task Manager or not. If yes, you’ve solved the issue.
6. Switch Display Output Ports
This is a very common mistake:
If your monitor is plugged into the motherboard HDMI/DP port, Windows will prioritize the integrated GPU (Top ports, near the motherboard), causing the dedicated GPU to disappear from Task Manager.
Steps:
- Move your display cable to the dedicated GPU’s HDMI/DisplaysPort/DVI port – Lower ports, on expansion slots (NOT the motherboard)
- Restart your PC
Once the cable is switched, Task Manager usually detects the GPU immediately.
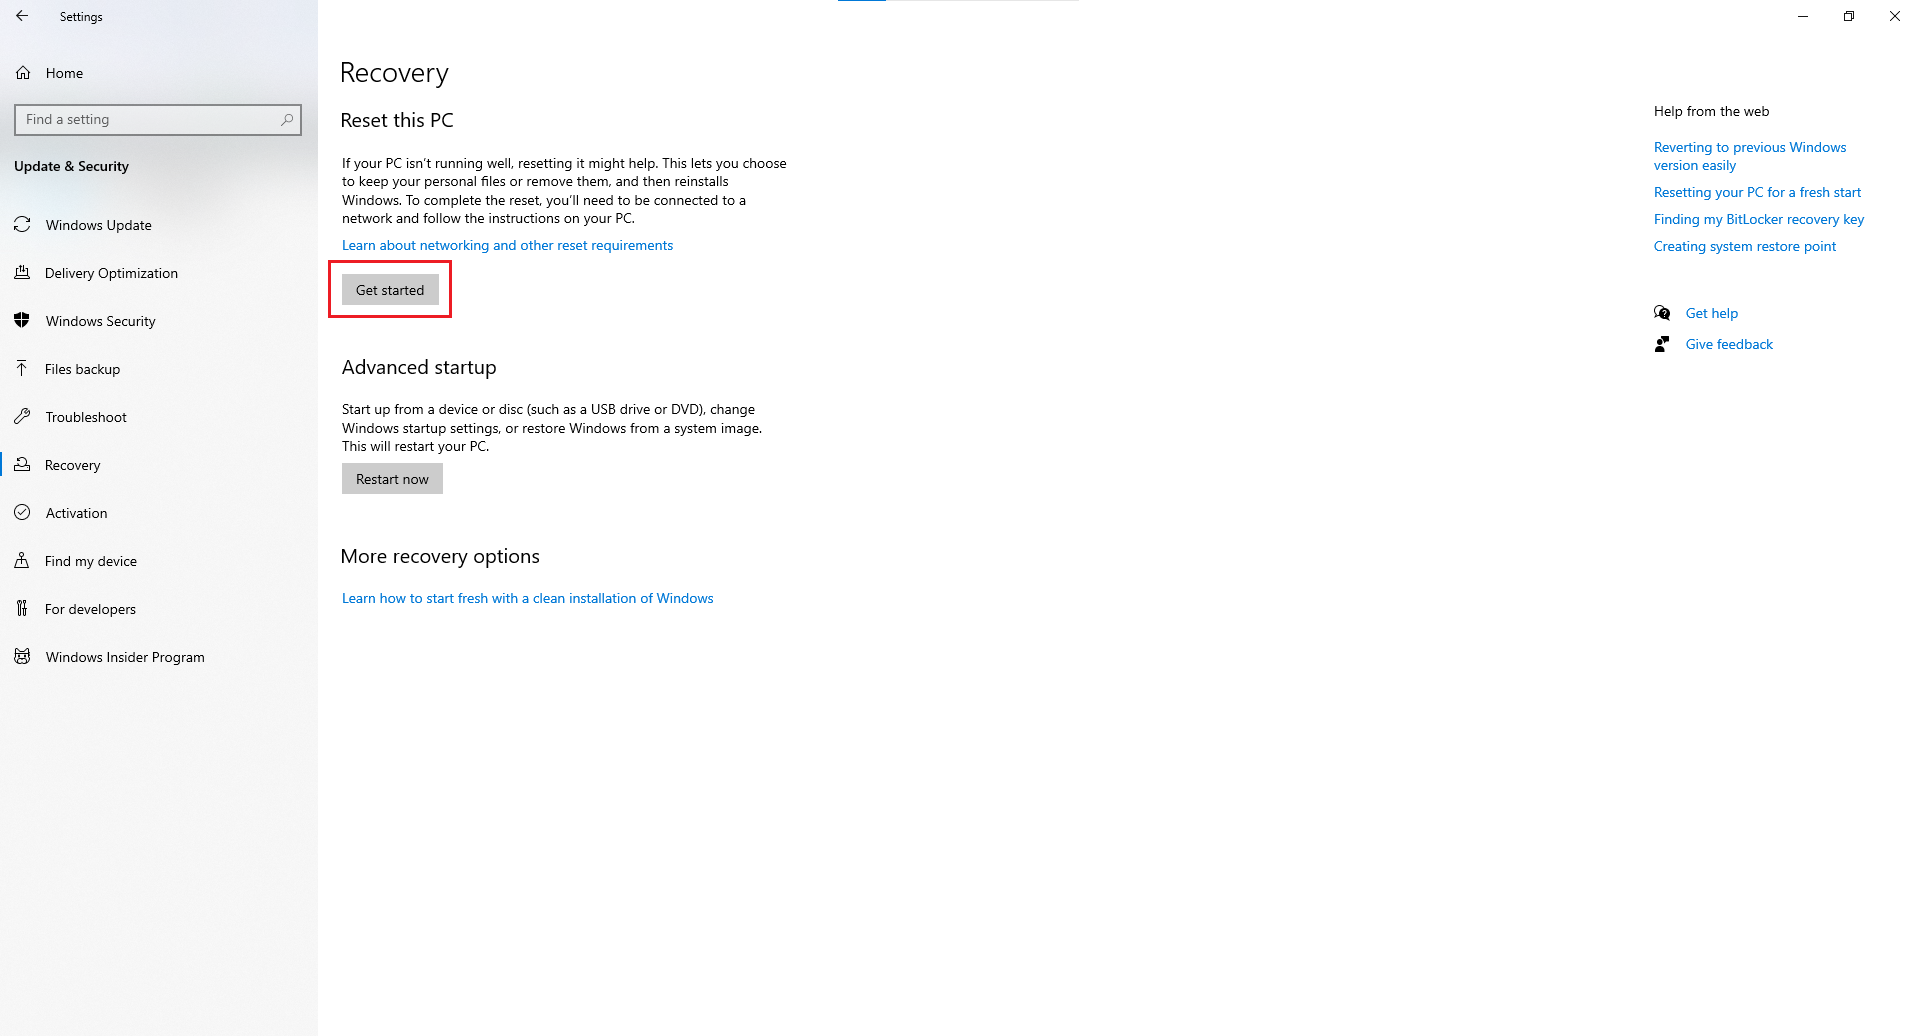
7. Reset Your Windows PC
If system files are corrupted, GPU detection may fail entirely. Resetting Windows can resolve lingering issues that cause GPU not showing up in Task Manager.
Steps:
- Go to Settings → Update & Security → Recovery
- Choose Reset this PC
- Select Keep my files (recommended)
- Reinstall drivers afterward
Do this only after other solutions fail.
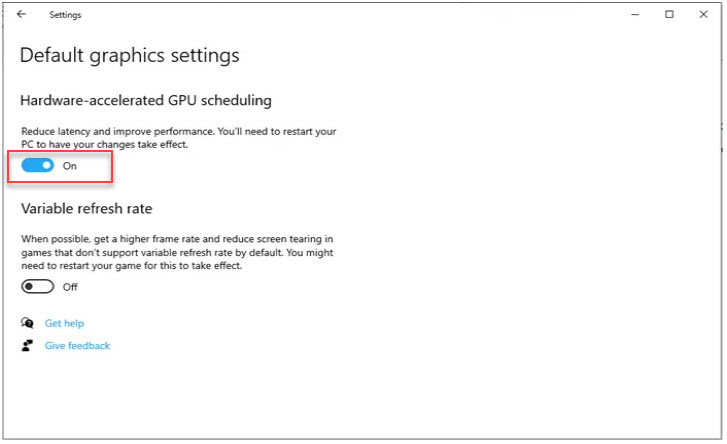
8. Enable Hardware-Accelerated GPU Scheduling (HAGS)
In some cases, HAGS can help Windows detect and communicate with your GPU more reliably.
Steps:
- Go to Settings → System → Display
- Scroll to Graphics Settings
- Turn on Hardware-Accelerated GPU Scheduling
- Restart your PC
9. Use Dedicated Monitoring Tools
Sometimes the GPU is functioning normally but the Task Manager just fails to report it. You can confirm this with third-party monitoring tools:
- MSI Afterburner
- GPU-Z
- HWInfo
- NVIDIA-SMI (for RTX cards),…
If these tools detect your GPU, but Task Manager doesn’t, the issue is definitely with Windows performance counters, not your hardware.
Conclusion
When you encounter GPU not showing up in Task Manager, it’s easy to assume that your graphics card is faulty. However, in most cases, the issue comes from software configuration, driver conflicts, or simple system settings. By updating your drivers, checking Device Manager, enabling the GPU in BIOS, rebuilding performance counters, verifying your power and display connections, and adjusting Windows GPU features, you can quickly restore proper GPU detection.
If none of these fixes work, the issue may be related to corrupted system files or deeper hardware-level problems. Using dedicated monitoring tools can help you confirm whether the GPU itself is still functioning normally.
iRender - Powerful Render Farm for All 3D Software
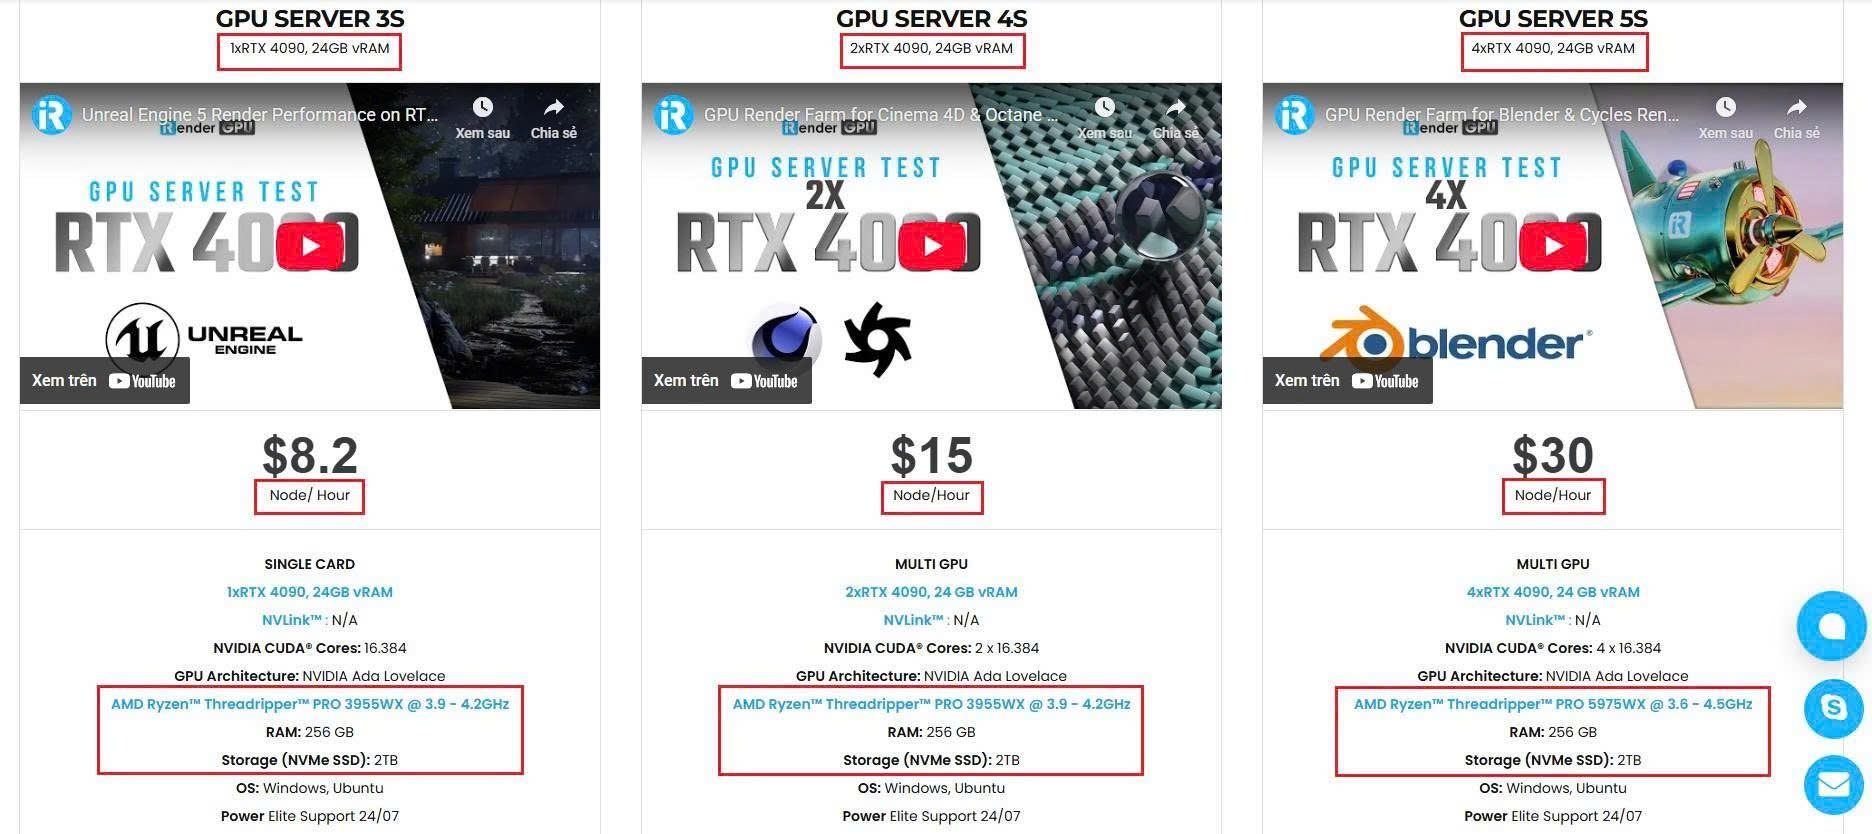
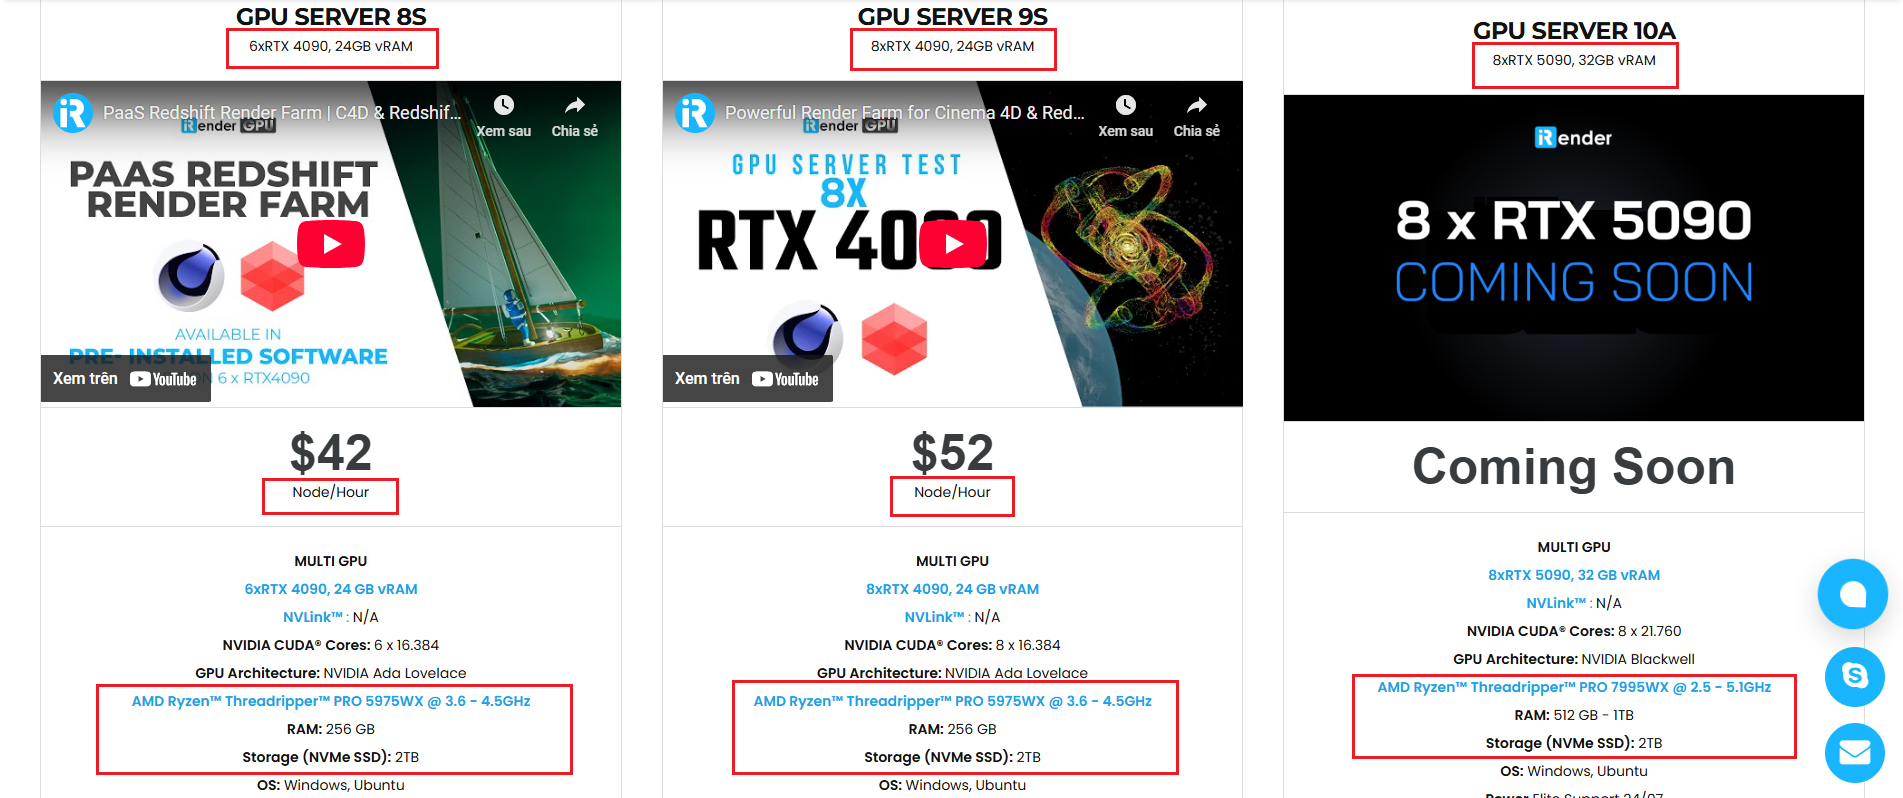
At iRender, you can install and run any 3D software or render engine you need, including Blender, Cinema 4D, 3ds Max, Enscape, V-Ray, D5 Render, Lumion, Twinmotion, etc. on our high-performance remote servers. Whether your workflow relies on CPU or GPU power (single or multi-card), iRender gives you the flexibility to choose the right configuration for your projects.
With access to powerful hardware such as the RTX 4090 GPUs and high-core CPUs (CPU AMD Ryzen Threadripper Pro 3955WX @ 3.90GHz – 4.2GHz and AMD Ryzen™ Threadripper™ PRO 5975WX @ 3.6 – 4.5GHz), you can:
- Render faster without being limited by your local workstation
- Scale your projects seamlessly, whether you’re working on small interiors or large architectural scenes
- Enjoy the freedom to set up your preferred tools, add your licenses and work as if it were your own computer only faster and more reliable
Watch Quick start for Desktop/macOS on our remote servers:


Here is all our servers with detailed information:
Why choose iRender?
When projects become bigger and deadlines become tighter, finding a suitable and optimized renderer is no longer optional, it’s crucial. iRender’s mission is to help you make all your ideas become final products in a faster, stronger and more efficient way.
- Powerful performance: GPU RTX 4090 workstations, compatible with almost 3D/AI software. Moreover, iRender’s remote servers also provide CPU AMD Ryzen Threadripper Pro 3955WX @ 3.90GHz – 4.2GHz and AMD Ryzen™ Threadripper™ PRO 5975WX @ 3.6 – 4.5GHz, RAM 256GB and 2TB SSD NVMe Storage
- Flexible usage: Use the remote server anytime you want
- Secure & Privacy: Guarantee for your data safety and privacy
- Fast support: A customer support team ready to assist 24/7
- Cost-effective: Pay-as-you-go, pay for the time used
If you are still wondering, register now to get a free trial and receive a 100% bonus points (double your credits) for your first transaction within 24 hours of registration.

REGISTER now to experience and for more detailed information, please contact us via Live chat 24/7 or WhatsApp: +(84) 962 868 890 or Email: [email protected].
iRender – Happy Rendering!
Source: drivereasy