A deep dive into Altus and OptiX denoiser in Redshift
Rendering effects such as depth of field, motion blur, area lighting, global illumination, and others require the render engine to shoot multiple rays into the scene. A low number of rays or sample count might cause the final image to look noisy or “grainy. The usual solution to this is to increase the number of samples. However, that causes longer render times. Instead, using denoising is an alternative and faster solution. In today’s article, iRender will give you a comprehensive understanding of denoising and among Altus and OptiX denoiser in Redshift, which one is better. Let’s explore!
Notes:
-
-
- Denoising feature is only available in Redshift 2.6+ versions!
- Altus denoising is available for free with Redshift versions 2.6.53+ and 3.0.15+
-
1. What’s denoising and denoising in Redshift?
Denoising is a rendering method for removing noise from an image.
Redshift supports two different denoisers. They are Innobright’s Altus and NVidia’s OptiX AI denoiser.
-
-
- Innobright’s Altus uses traditional and production-proven techniques to achieve its denoising effect.
- NVidia’s OptiX AI denoiser uses a deep learning algorithm trained with tens of thousands of images.
-
Each of these two denoisers has its pros and cons:
| Altus | OptiX | |
| Pros |
Use production-proven algorithms => Results can be more predictable |
Very fast It’s possible to use in interactive rendering while editing the scene |
| Cons |
Denoising takes several seconds to compute. It’s impossible to use in an interactive fashion. |
Sometimes, can’t detect noise as noise since it hasn’t been trained with that particular case. Thus, it has trouble cleaning noise. |
Denoising is a useful tool, but it’s not perfect.
If the rendered image is excessively noisy, denoising may not work properly. It may fail in a number of different ways as below:
-
-
- It’s possible that the denoise does not sufficiently remove all noise from the image (i.e. Noise will still be there after denoising)
- It may “over smooth” some certain parts of the image, thus significantly reduce detail, especially in textures and small geometry details
- It might result in weird visual artifacts. In OptiX, these artifacts may look like brush paint strokes
- In animations, noise may appear as unattractive (ugly) ‘flickering splotches”, causing more visually distracting than the initial noise!
-
For the reasons listed above, we suggest that you should only employ denoising to remove “the remaining few percent” of noise. To put it another way, you should continue to adjust their settings for an “acceptable” level of noise before using denoising to create the ideal frame. It’s crucial to follow this process while rendering animations.

Source: help.maxon.net
2. A deep dive into Altus and OptiX denoiser in Redshift
2.1 Altus denoiser
You can find the Altus denoiser in Redshift in the renderer’s Output tab.

Simply choose “Altus Single Pass” or “Altus Dual Pass” for the denoise engine to enable denoising with Altus. Then, use the Render View to render in buckets rather than progressive rendering mode (Altus does not support progressive!).
“Altus Single Pass” renders the frame once before Altus executes denoising. On the other hand, “Altus Dual Pass” render the frame twice before denoising. (Note: If you are a new Altus user, we recommend you use the “Altus Single Pass” denoise engine.)
Altus denoising settings
Altus can produce more accurate results when using additional Redshift AOVs. When you enable “Automatically Create AOVs“, Redshift will automatically add any AOVs that Altus requires to achieve its denoising results. If you disable that option, you will need to add the necessary AOVs manually. There are three AOVs used by Altus. They are Diffuse Albedo, World Position, and Bumped Normal
While it is rendering, Redshift generates some additional images (“buffers”) which are necessary for the denoising process. These buffers are typically hidden from Redshift’s Render View. However, when you check “Show additional buffers in RenderView”, you will see them in the Render View’s AOV list. This can be helpful in the diagnosis of denoising.
Altus denoiser in Redshift settings: kc1, kc2, kc4 and kf
The kc1, kc2, kc4, and kf are settings allowing us to control the “denoising strength” and quality of Altus.
|
Controls how much |
|
| kc1 | High-frequency detail will be retained (For example, sharp image features) |
| kc2 | Medium-frequency detail will be retained |
| kc4 | low-frequency detail will be retained (For example, chunky image features) |
kc and kf difference:
Higher kc values will strengthen the denoising while keeping more detail. Consequently, results will be smoother, but details may be lost.
The kf parameter controls the influence of AOV. It determines the amount to which AOVs affect the denoising outcomes. Smaller values in kf make the AOVs affect the denoising outcome more. If you have a bump map and Altus oversmooths the lighting on it, lowering the kf value will be helpful. Nevertheless, this will also restrain the denoiser. That means, if the image is extremely noisy, it will be unable to denoise it too much around the “bumpy areas”.
After rendering the frame and Altus has denoised it, you can toggle it on or off (to better catch its effect) in the Render View.
2.2 OptiX denoiser
You can also find the OptiX denoiser in Redshift in the renderer’s Output tab.
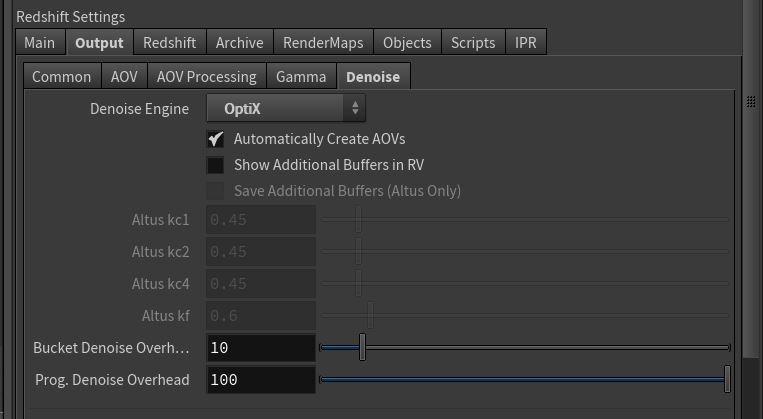
Simply choose “Optix” for the denoise engine to enable denoising with Optix. With Optix denoiser, you can render in either progressive rendering or bucket rendering with the Render View. OptiX can also achieve more accurate outcomes when using additional AOVs. The same as Altus denoiser, when you enable “Automatically Create AOVs“, Redshift will automatically add any AOVs that Altus requires to achieve its denoising results. If you disable that option, you will need to add the necessary AOVs manually.
When you enable “Automatically Create AOVs”, Redshift will automatically add any AOVs that OptiX requires to achieve its denoising outcomes. If you disable the option, you will have to manually add the necessary AOVs. The AOVs used by OptiX is Diffuse Albedo.
OptiX is fast but…
OptiX denoiser in Redshift is very fast. Nevertheless, it can “take away” a portion of the render time for the frame despite its speed. This is especially true when you render large-res images in bucket rendering mode since Redshift render denoises the entire frame after each bucket. As a result, Redshift has a “denoise overhead” setting for progressive and bucket rendering. These options determine how frequently OptiX is executed. A setting of 10 means that “execute OptiX as often as needed, but ensure that it doesn’t take more than 10% of the entire frame time”. When set to 100, it will be executed after every single pass or bucket. When the setting is zero, it tells Redshift to do OptiX-denoise only once at the end of the render.
Important notes
-
-
- The “denoise overhead” functionality only provides an estimate; as a result, it cannot guarantee that OptiX will take precisely the specified percentage of the frame time.
- Lower “overhead” settings will speed up OptiX processing, which is an advantage. The disadvantage is that since OptiX is only done once every few passes (in progressive mode) or once every few buckets (in bucket rendering), there may be some “visual latency” that is apparent. Because of this, the default denoise overhead for bucket rendering (where lag is less important and rendering efficiency is more important) is 10%, and for progressive rendering ((where the opposite is true), it is 100%.
-
2.3 Animation Considerations
When rendering an animation, it’s highly recommended to disable Redshift’s “Randomize Pattern on Each Frame“!
By doing this, you may prevent the noise effect from “dancing around like TV static” and have it “stuck on the camera.” The “stuck on camera” noise effect is not desirable in normal rendering. However, it is extremely helpful in denoising since it increases the likelihood that the noise shape will remain constant around a pixel between subsequent animation frames. This, consequently, lowers the possibility of flickering “splotchiness” on the final denoised results (which might be really distracting).
3. iRender - The Best Render Farm for Redshift
iRender is proud to be a professional GPU Accelerated Cloud Rendering Service provider for 3D Render, CGI, and VFX tasks with more than 30,000 clients. We are appreciated in many global rankings (e.g. CGDirector, Lumion Official, Radarrender, InspirationTuts CAD, All3DP, BlenderBaseCamp, VFX Rendering.)
Our service
We provide high-configuration servers (machines) that are specifically configured and optimized for GPU rendering. Using our service, you have complete control and flexibility over the server(s) you operate. Therefore, you can customize your creative working environment as you wish. With a range of multiple GPU servers (2/4/6/8x RTX 3090), you can choose the one that meets your need to start the rendering. Furthermore, we provide useful features to help you switch among the server packages without having to reinstall anything. You can even run multiple machines simultaneously to speed up the renders, not having to re-install anything, either.
Why choose us for your Redshift projects?
Redshift is a fully GPU-based renderer. This means that the graphic cards (or GPUs) in your system impact how long the renders take to complete. Also, Redshift scales very well with multiple GPUs and can significantly improve your render times. Therefore, the more powerful the GPU, the better, the more GPUs the faster the render will be.
At iRender, we have both powerful GPU and multiple GPU servers that absolutely speed up Redshift rendering. Our multiple GPU machines are designed with 2/4/6/8x RTX 3090. Also, they all have a strong AMD Ryzen Threadripper Pro 3955WX processor, allowing you to extract mesh data, load textures, and prepare scene data more quickly. Moreover, the workstations are ideal with 256GB RAM capacity and 2T NVMe SSD storage. We highly recommend you try the highest configuration server, the 8x RTX 3090. This server will be a super-configured one that brings crazy speed to Redshift. It is rated as one of the most worth-trying workstations so far for Redshift.

All of our servers’ configurations are publicly posted on our website. Visit HERE for more details about the configuration and the cost.
Redshift speed test videos
Let’s check out the rendering performance in Redshift for Cinema 4D, Houdini, and Maya on our RTX 3090 servers in the 03 following videos.


This month, we are running a SPECIAL PROGRAM: 20% Additional Bonus for new clients who register an account and make a top-up within 24 hours of registration.
Let’s get started!
Get the FREE COUPON to try our high-end computers for your Redshift projects now! For further information, please do not hesitate to reach us at [email protected] or Whatsapp: +84915875500.
iRender – Happy Rendering!
Reference source: help.maxon.net
Related Posts
The latest creative news from Redshift Cloud Rendering.