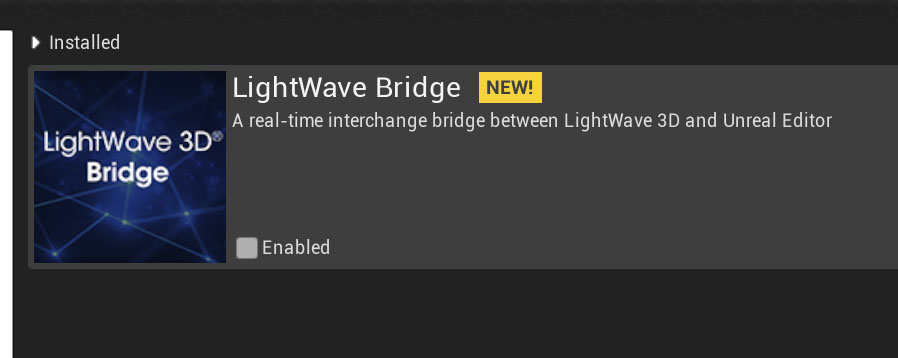
Best Lightwave with Unreal Engine Cloud Rendering at iRender
From LightWave 3D® 2019.1.4, Newtek introduces support for Unreal Engine 4.23. They will connect with each other via Unreal Bridge. It can be limited to single project use in Unreal, or installed as a general plugin for use in all Unreal projects. The Unreal Bridge will transfer objects, materials and animation from LightWave to Unreal to create a powerful realtime system that can leverage Unreal’s powerful capabilities for presentations, games and more.
How to install the bridge?
In LightWave, Unreal Bridge is a Master Plugin that can be opened from the I/O tab in Layout. To install for the Unreal Engine, you should go to your LightWave install and select the lightwavebridge folder in support/3rdparty_support/UnrealEngine/[version] and:
-
-
-
- Copy the contents to your Unreal Engine install folder under YOUR_INSTALL_LOCATION\Engine\Plugins\Editor for system-wide access (Users/Shared/Epic Games/UE_4.xx/Engine/Plugins/Editor on the Mac),
- Or you create a folder called Plugins in your Unreal project and copy the Lightwavebridge folder there for single project use
-
-
Next, you launch the Unreal editor. If you have installed lightwavebridge for single project use, the plugin will be automatically activated. If you have installed system-wide, you will first need to activate the Unreal-side lightwavebridge plugin:

When you restart Unreal after installing the LightWave Bridge plugin system-wide, you will get a message telling you “New plugins are available.” Clicking “Manage Plugins…” you can activate the LightWave Bridge. You can also visit Edit > Plugins to activate. You will need to restart the Unreal engine once LightWave Bridge is activated.
How to use?
1. Unreal
Once installed and activated, you can visit the Unreal Engine preferences and in the Performance tab uncheck Use Less CPU When in Background (this is only necessary to allow the real-time updating between UE and LightWave). If real-time updates are not crucial for your project, you can leave this setting checked and simply Send from LightWave when necessary.
2. LightWave 3D
In LightWave, you can change the color space to sRGB to match with Unreal and go to the I/O tab to launch Unreal Bridge. Start by clicking the Connect button to link LightWave to the Unreal Editor.
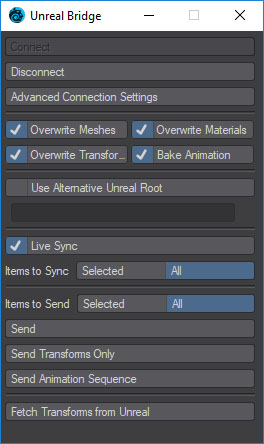
Check the options required:
-
-
-
- Overwrite options:
-
-
-
-
-
-
-
-
- Overwrite Meshes – will update meshes on the Unreal side
- Overwrite Materials – will update materials on the Unreal side
- Overwrite Transforms – will overwrite any transformations made on the Unreal side
- Bake Animation – will create baked keyframes for all scene animation
-
-
- Live Sync – Will send updates to Unreal in real-time while you interactively edit in LightWave
-
-
- Items to Sync – Use “Selected” to limit interactive synchronization to the currently selected scene items
-
-
- Items to Send – Use “Selected to limit the following “Send” actions to the currently selected scene items
-
-
-
-
-
-
-
-
-
- Send – Send scene items limited by the “Items to Send” selection
- Send Transforms Only – Sends only transforms of items limited by the “Items to Send” selection
- Send Animation Sequence – Sends animation envelopes of items limited by the “Items to Send” selection
- Fetch Transforms from Unreal – this performs a single grab of the current state of Transforms from Unreal to bring them back to Layout
-
-
-
-
-
You can start Unreal by creating a new project with no Starter content. Once the editor window is open, you remove everything from it apart from the PlayerStart item to start with a blank slate. Then you change back to LightWave.
You add a polygonal object to your scene in Lightwave and convert its surface(s) to the Unreal material. Now you can send it to Unreal. You can also create keyframe animation for your object and send that through as well, as a separate operation.
There are some notes for you: Changes to animation or transforms will not carry back through to LightWave. Make those changes in Layout to avoid any confusion. In Unreal, make changes that will affect your game or presentation’s code.
You can refer to this video for instruction:

Best Lightwave and Unreal Engine cloud rendering service with single 3090
As you may know, iRender provide to you high performance and configurable server system for 3D rendering, AI Training, VR & AR, simulation, etc. With our server, you can install any software you need, add your license, and do whatever you like with your project. Lightwave3d and Unreal Engine are no exception.
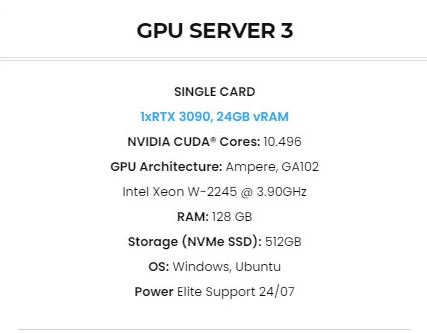
At iRender, we offer you server 3A with single 3090 and powerful hardware like Processor Intel Xeon W-2235 3.8GHz (4.6GHz Turbo) 6 Core, RAM 128GB and Storage NVMe SSD with 512GB. With those configs, the server can serve any project of yours in Lightwave and Unreal, ensure it to render and load faster and more stable.
Plus, at iRender, we provide you more support than just those config.
Free and convenient transferring tool
iRender offers a powerful and free file transfer tool: Gpuhub Sync. With fast file transfer speed, large data capacity, and completely free. You can transfer all the necessary data into our Gpuhub Sync tool at any time without connecting to the server. The data will be automatically synchronized in the Z drive inside the server, ready for you to use.
Flexible price
Besides hourly rental 3.8usd/ hour/ machine, you can always save from 10% to 20% with our Fixed Rental feature. For those who’s in need of server more than a day, or have extremely large project, we advise to choose daily/ weekly/monthly rental package. The discount is attractive (up to 10% for daily packages, 20% on weekly and monthly packages), and you don’t have to worry about over-charging if you forget to shutdown the server.
Real human 24/7 support service
Helping you to handle the problem quickly, effectively, saving you both time and money.
Render farm supports powerful single 3090
When you use iRender, you can free your computer during the hardest and most arduous part – rendering. That is also the reason that Render Farm service is becoming more and more popular and essential. However, as far as we know, iRender is proud to be one of the very few rendering service that support single GPU, and with a powerful card like RTX3090
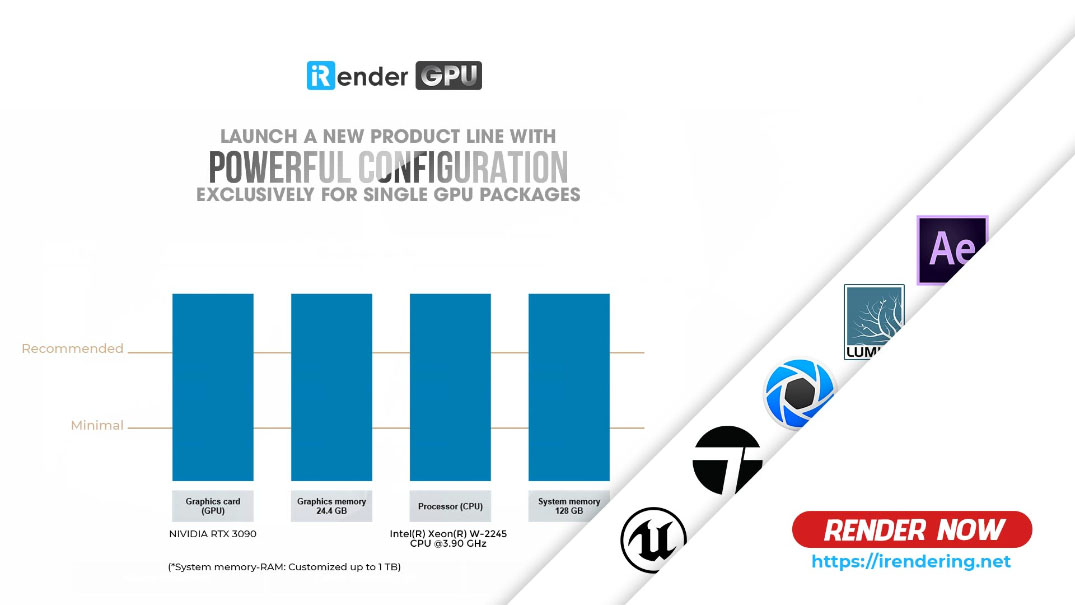
You can see that all of our server 3A configs pass the recommended hardware from Unreal Engine.
Conclusion
With the above advantages and the machine configuration packages that iRender has just offered, we believe that Lightwave and Unreal Engine users will have the most comfortable, quickest, and most effective rendering time.
Register an account today to experience our service. Or contact us via WhatsApp: (+84) 916806116 for advice and support.
Thank you & Happy Rendering!
Source: lightwave3d.com.
Related Posts
The latest creative news from Enscape Cloud rendering, Lumion Cloud rendering, V-Ray Cloud Rendering , Twinmotion Cloud Rendering , 3D VFX Plugins & Cloud Rendering.