
Creating Procedural Snow Materials in Blender
Procedural materials in Blender allow for dynamic, resolution-independent textures that are highly customizable. Snow, a versatile and visually appealing material, is an excellent candidate for procedural creation.
In this article, iRender will explore the steps and principles for designing realistic procedural snow materials in Blender, catering to beginners and advanced users alike.
Understanding Procedural Materials
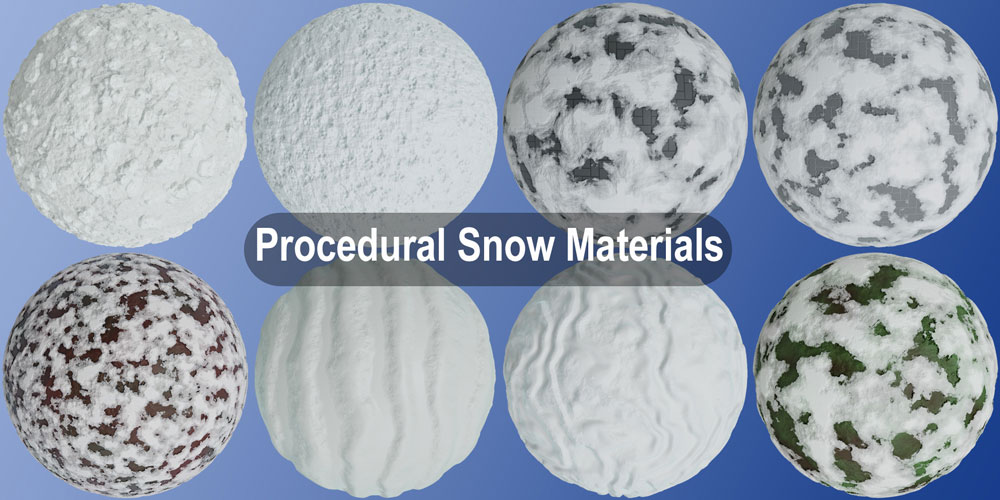
Image Source: Blender Market
Procedural materials refer to textures and materials that are generated algorithmically rather than being created from photographic or hand-painted sources. This approach is commonly used in computer graphics, game design, and visual effects to create realistic and complex surfaces efficiently.
One of the primary advantages of procedural materials is their scalability and flexibility. Because they are generated mathematically, they can be easily adjusted or modified to create variations without starting from scratch. For instance, an artist can fine-tune parameters such as color, roughness, or displacement to achieve a desired look. This capability not only saves time but also allows for the rapid iteration of designs, which is critical in the fast-paced environments of game development or digital art.
Additionally, procedural materials can often lead to more efficient use of resources. Since they do not rely on large texture files, they can significantly reduce memory usage, making them particularly suited for real-time applications, such as video games.
Procedural materials also encourage artistic creativity and experimentation. By combining different algorithms and layering effects, they can create intricate patterns, organic textures, and more, pushing the boundaries of material design.
When creating snow, procedural techniques can simulate characteristics like softness, irregularity, and subtle reflective properties inherent to real snow.
The Basics of Creating Snow Materials

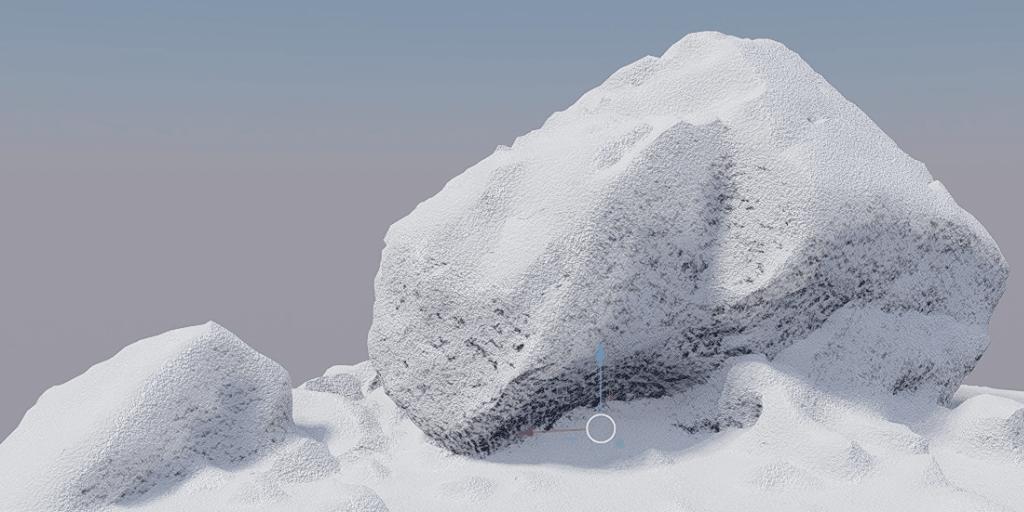
Image Source: Blender Market
To begin creating a procedural snow material in Blender, one must first set up a basic mesh object, like a plane or a terrain model. Open the Shader Editor and create a new material. The foundation of a snow material often involves a mix of a diffuse shader for the base color and a glossy shader to simulate the light reflection characteristic of snow surfaces. By utilizing the Principled BSDF shader, which combines multiple functionalities, artists can achieve realistic snow effects with minimal setup.
Next, artists must incorporate noise textures to give complexity to the surface. The “Noise Texture” node can be used to create variations in height and density, reflecting how snow accumulates unevenly. Modulating this noise with a “ColorRamp” node allows for fine-tuning where the snow is thicker or thinner, thus portraying more realistic conditions. Additionally, layering different noise patterns can mimic features like settling or drifting snow, enhancing the final appearance.
Setting Up the Shader
To begin, open Blender and switch to the Shader Editor. Start with a new material by selecting your object and clicking New in the Material Properties panel. This creates a basic Principled BSDF shader, which serves as the foundation for the procedural snow material.
To use that you must Append the “SnowGen.blend” file to your scene selecting the “SnowGen” inside the “NodeTree” folder. Select an object, add a Geometry Nodes modifier to it, and load the “SnowGen” node here. Play with the settings on the Modifiers tab.
Shaders
It also comes with 2 shaders, one for the snow and another node group that can mix with any material to simulate a frozen surface.
The snow shader it’s fully procedural, highly customizable, and gives you a very natural result. You can control the bump intensity, roughness variation, color, and translucency.
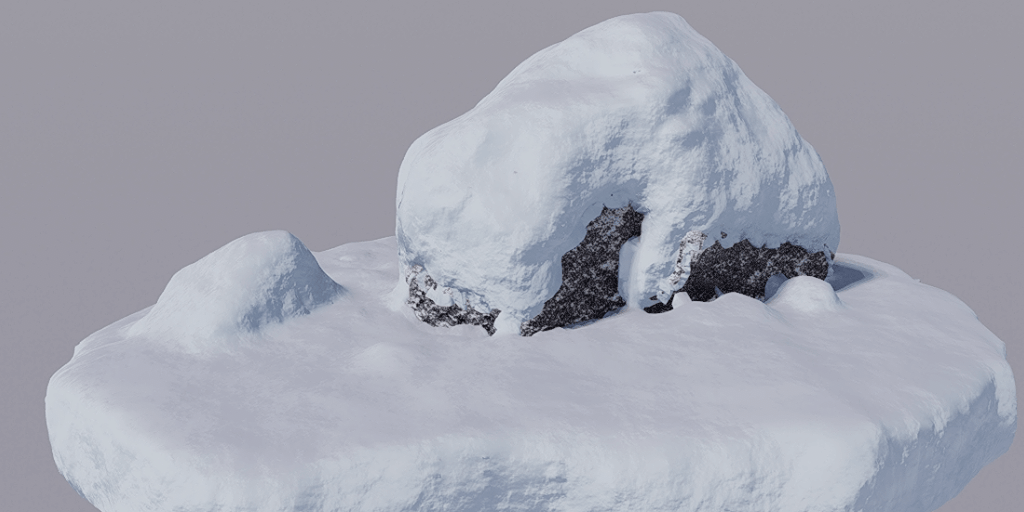
Masking
The snow will be generated naturally on the surface of the mesh, taking into account all occluded areas. However, you have the option to create a vertex group on the objects where you are applying the effect. This group can serve not just as a mask but also to influence the shape and depth of the snow. You can utilize this to add footsteps, trails, and all the visual development you need.
Enhancing Realism
To make the snow material more dynamic:
- Microdisplacement: Enable displacement in the Material Settings and use a Displacement node connected to a Noise Texture. This adds realistic surface height variation.
- Sparkling Effect: Use a Voronoi Texture node with a small scale and connect it to the Emission input for a sparkling effect that mimics sunlit snow.
- Edge Accumulation: Use an Ambient Occlusion node to create a mask for areas where snow might naturally accumulate, such as crevices or edges.
Applying the Material
Apply the procedural snow material to objects like ground planes, rooftops, or trees. Experiment with UV scaling and node parameters to adapt the material to different scales and contexts. For larger scenes, consider blending the snow material with other materials, like dirt or ice, to enhance realism.
Conclusion
Creating procedural snow materials in Blender offers a powerful and flexible way to achieve realistic winter landscapes without relying on pre-made textures. By using Blender’s node-based material editor, you can manipulate various parameters to simulate the unique characteristics of snow, such as its uneven surface, varying thickness, and interaction with light. The ability to create vertex groups enhances this process, allowing for precise control over where snow accumulates, and providing opportunities for detailing like footprints or sliding paths.
By mastering procedural snow materials in Blender, you not only enhance your artistic toolkit but also elevate the overall quality and realism of your 3D scenes. This technique fosters creativity and innovation, allowing for stunning visual presentations that can adapt seamlessly to various project requirements.
Creating Procedural Snow Materials at iRender Farm
iRender provides high-configuration servers that increase CPU and GPU rendering speeds. Right now, we offer from 1/2/4/6/8 RTX 4090s and 8 RTX 3090 servers. All servers at iRender are also equipped with AMD Ryzen™ Threadripper™ PRO 3955WX @ 3.9 – 4.2GHz or AMD Ryzen™ Threadripper™ PRO 5975WX @ 3.6 – 4.5GHz, 256GB RAM, 2TB Storage NVMe SSD.
You can check all our servers with its configuration here:
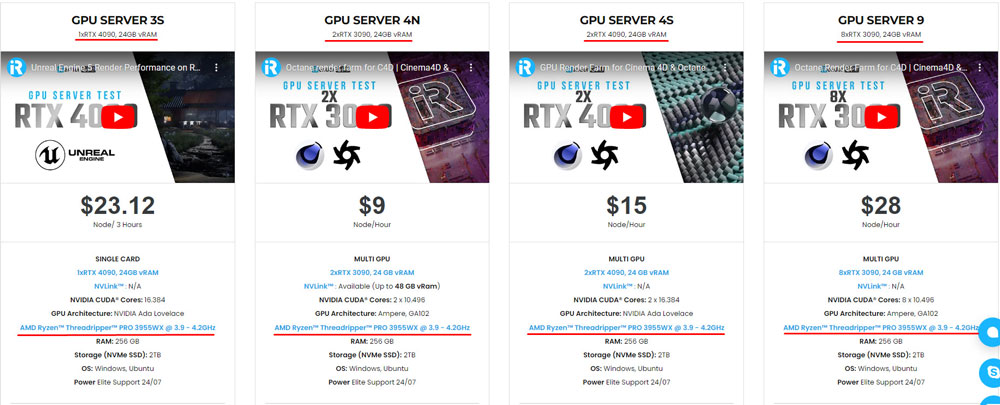

Besides, you also can watch some of our test videos on RTX 4090 card:


Besides, we also have flexible prices for all small to big projects. You can check out this video to estimate the cost with us:

Enjoy our high-end GPU now and boost your multiple GPUs rendering now! If you have any comments about our article, please do not hesitate to reach us at [email protected] or Whatsapp: +(84) 916017116.
iRender – Happy Rendering!
Related Posts
The latest creative news from Redshift Cloud Rendering, Blender Cloud Rendering, 3D VFX Plugins & Cloud Rendering.


