Introduction to nCloth in Maya with iRender
In the 3D world, nCloth simulations have always been difficult to create. You can quickly and easily construct a realistic cloth simulation with any polygon mesh by using Maya’s nCloth feature. To help you use this powerful feature more easily in your next CG project, this post will go over the basics of nCloth, what you need know, and how to build up some basic nCloth simulations.
Let’s get started with iRender!
General information of nCloth in Maya
nCloth is a fast and stable dynamic cloth solution that uses a system of linked particles to simulate various dynamic polygon surfaces.
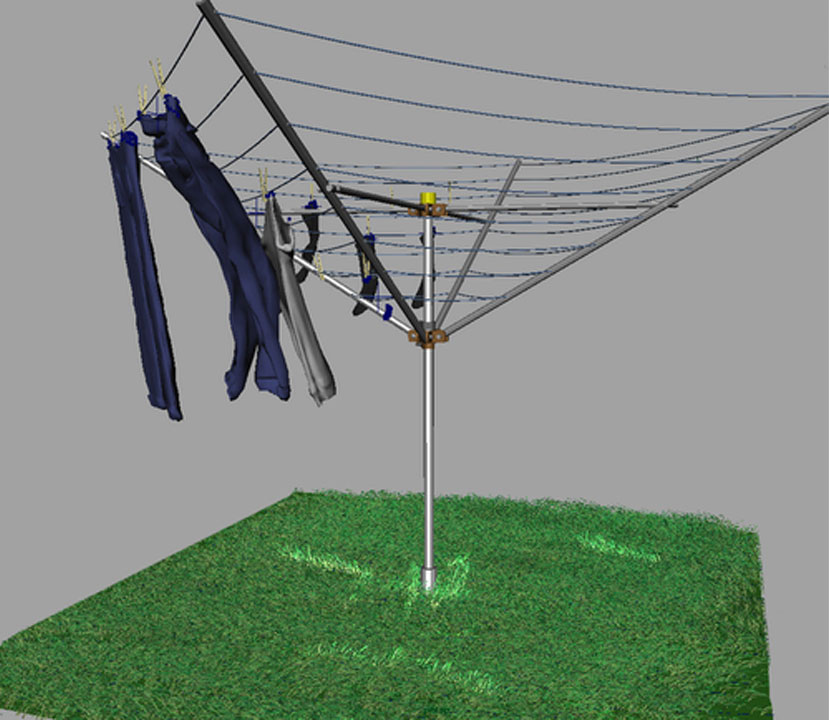
By using nCloth, you can simulate liquids, fabrics, ropes, and various flexible materials. This helps create realistic and natural motion effects in animations and games. You can adjust the natural behavior of soft materials within your scene by configuring parameters such as material stiffness, elasticity, friction, and bounciness. If you want to create soft, realistic effects in Maya, nCloth is a valuable tool to explore. For example, nCloth is flexible enough to simulate all the following surfaces: fabric clothing, inflating balloons, shattering surfaces, and deformable objects.
nCloth is generated from modeled polygon meshes. You can model any type of polygon mesh and make it a nCloth object, which is ideal for achieving specific poses and maintaining directorial control.
nCloth dynamics
nCloth is composed of a network of many particles connected by many links, that together create a dynamic mesh. Within this network, some cross-links further connect the particles. Links maintain the distance between particles and cross links maintain the angles between links, stabilizing the nCloth and preventing cloth behavior like shearing.

How to create and edit nCloth
Create and Edit nCloth Constraints
When creating constraints for nCloth and passive collision object, be aware of the following components-specific behaviors:
- You can use Component to Component constraints to make object to component or object to object connections.
- For constraints between faces, when one face is rotated the other will move as if it is rigidly attached.
- Constraints between edges are free to hinge unless Bend is turned on.
- Tangent Strength on the nComponent node affects constraints differently depending on the constrained component.
Create nCloth Component to Component constraint
You can create a Component to Component constraint to attach nCloth components (vertices, edges, or faces) to other nCloth or passive object components. For example, you can constrain the vertices from the top of an nCloth cape to the shoulders of a passive object character, so that the cape hangs from the characters shoulders and moves with the character.
- In the scene view, select the nCloth components (vertices, edges, or faces) you want to constrain.
- Select the target components (vertices, edges, or faces) on the same nCloth object, a different nCloth object, a passive object, or a non-nCloth object to which you want to constrain the nCloth vertices.
- In the FX menu set, select nConstraint > Component to Componen.
The Create Component to Component Constraint Options Box window appears. - Turn on Use Sets to add the nCloth components and the target components you selected to a dynamic constraint selection set.
- Click Create Constraint or Apply.
nCloth tips and troubleshooting
Tips for working with nCloth
It is best to deal with a low resolution mesh when altering the nCloth simulation. You undoubtedly already know that a high resolution mesh will strain your computer more than a lower resolution mesh, and that running a simulation on a high resolution mesh requires much more computing power.
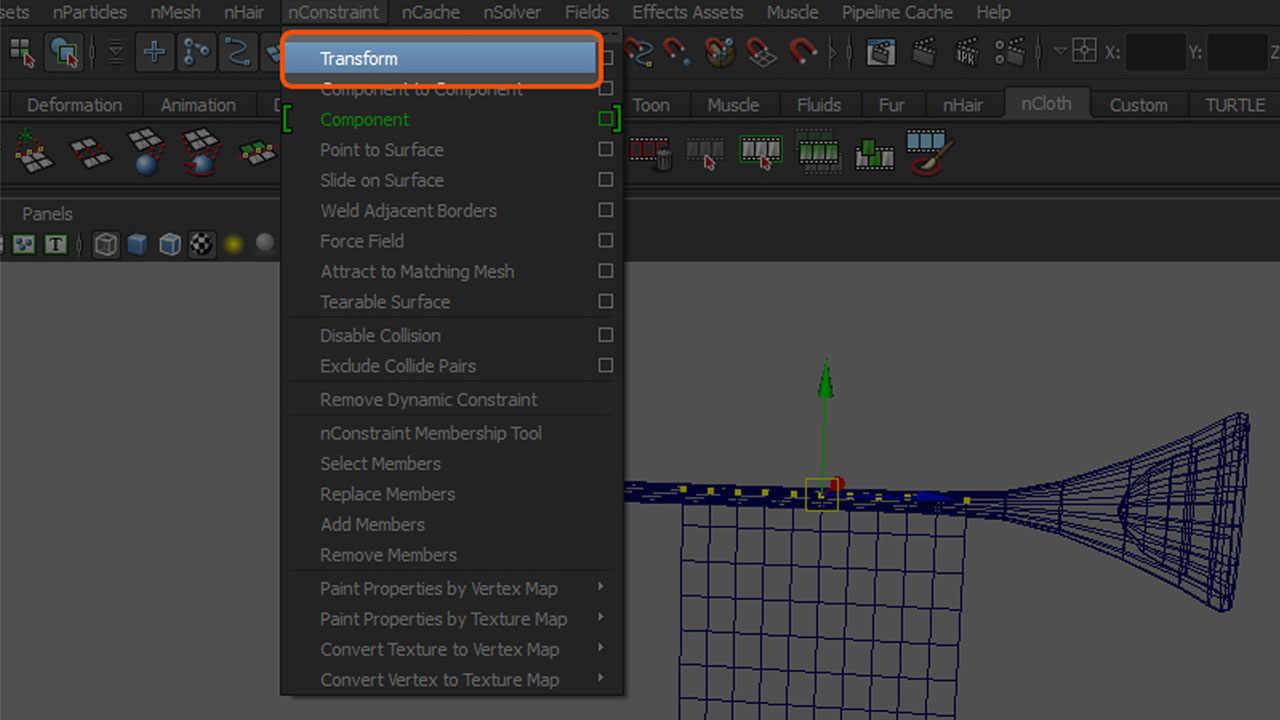
You can do this very easily by selecting the vertices you want to stay pinned to the object and go to nConstraint>Transform. This creates a locator between the middle of the vertices. Now your flag will stay in place as you play out the simulation.
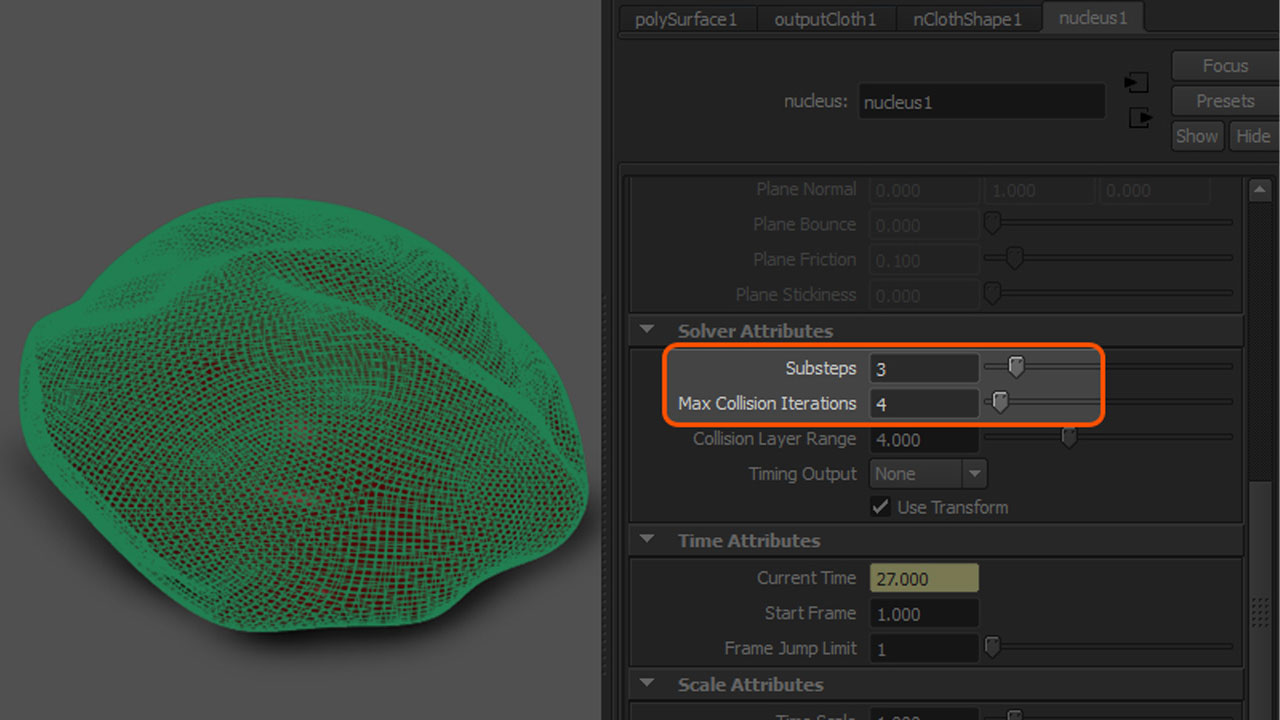
As mentioned earlier working with simulations can be taxing on your system, a good way to improve the playback speed is to lower the Substeps and Max Collide Iterations of the nucleus node. This will mean a lower quality when played back, but once you have your simulation looking how you want you can increase these values again.
nCloth Troubleshooting
This section outlines issues you may encounter with nCloth and provides solutions.
Converting to nCloth with shading
When converting a polygon object that has a shader assignment into nCloth, you may find that the shader assignment is lost.
Solution: Assign the shader after the polygon object has been converted to nCloth.
Cannot move nCloth
You cannot move a local space nCloth object after the start frame, during playback, during rendering, or while caching of the simulation.
Solution: Rewind before the start frame, or rewind to the start frame and move your nCloth.
Ridges on nCloth
You may see ridges appearing on nCloth objects where perfectly aligned edges meet.
Solution: Add Bend Resistance (nClothShape node) to your nCloth object.
In addition, after simulation, you can use Mesh > Smooth (in the Modeling menu set (F2)) on the output mesh to remove ridges.
Wrap Up
In conclusion, nCloth in Maya is an essential tool for animators and 3D artists seeking to create realistic simulations of soft materials. Its ability to accurately model fabrics, ropes, and other flexible substances allows for the production of dynamic and lifelike animations.
Whether for character clothing, environmental elements, or intricate motion effects, nCloth provides the flexibility and realism needed in modern 3D graphics. As a versatile feature within Maya, understanding and mastering nCloth can greatly elevate the quality of your projects and bring your creative visions to life.
iRender - Maya’s best cloud rendering service
iRender is the greatest choice for your Maya pipeline whether you’re searching for a render farm or cloud rendering solution. You can use the remote workstation(s) that we offer at iRender just like a regular computer.
iRender provides high-configuration dedicated servers (physical computers/machines) specifically optimized for GPU rendering. Using our service, you will completely control the server(s) you rent through the Remote Desktop application. Therefore, you can customize your creative working environment as you wish. In short, iRender’s server is like your computer in the cloud accessible on any device instantly. You will use its full power for everything. iRender provides useful features to help you switch among the server’s configurations without having to reinstall anything. You can even run multiple servers simultaneously to speed up the renders, not having to re-install anything, either.
Maya often comes with third render engines like Redshift, Octane, V-Ray, Arnold, etc.. Whether or not you use any of those render engine, you still can find a suitable package at iRender. Especially, if you use Maya with Redshift, you can access our remote servers and use our Redshift license for free. For Maya, please install and use your license to render yourself.
Recently, we have released our server 9S (8 cards 4090). You can refer its configuration here. It is the iRender’s latest powerhouse server:

Let’s check out the rendering performance of Maya on our RTX 3090 servers.

In case you have any problems or questions, don’t hesitate to contact the 24/7 support team. We will be happy to help you with your questions and problems at all times.
This month, we are running a SPECIAL OFFER: 100% Additional Bonus for new clients who register an account and make a top-up within 24 hours after their registration.
Register an account today to experience our service or contact us via the email [email protected] or WhatsApp: (+84) 912075500 for advice and support.
Happy Rendering!
Reference source: autodesk
Related Posts
The latest creative news from Maya Cloud Rendering, Redshift Cloud Rendering, Cinema 4D Cloud Rendering , 3D VFX Plugins & Cloud Rendering.