iRender Drive - A beast tool for transferring data
The graphics industry is growing rapidly at breakneck speed. Along with that comes the birth of countless design software, software updates, plugins and content libraries, etc. That leads to one result, which can also be a consequence. As a result, it enables graphic artists, designers, and creators to create works rich in content, visual quality, and aesthetics. However, this creative process is also considered a consequence when there is too much data to be stored and processed. This data storage and processing is not a free service at all. Especially for those who are looking for a cloud rendering solution. You are tired of having to reasonably calculate the budget for each service segment to get the final rendered artwork. Also, you are so upset because the cost of uploading/storage/downloading data takes up a significant portion of your total budget? Let iRender help you solve this problem completely. How do we solve it for you? Well, the iRender Technical Team has developed a free data transfer tool for all iRender customers. It is the iRender Drive tool. If your files are too large, and your content library is too heavy, iRender Drive will be the savior of this data problem. Let’s explore this awesome tool in the article below.
1. What is iRender Drive?
iRender Drive is a data transfer tool that links your computer and our servers and helps data to be two-way synced. It was upgraded based on the previous tool, GPUhub Sync. iRender Drive is easier, faster, and more effective than GPUhub Sync. Thus, it will definitely bring you a more satisfying and wonderful experience.

-
-
- The first way of synchronization: Once the data is uploaded successfully to iRender Drive, which is installed on your computer, it will be synced to the Z drive of our remote server(s).
- The second way of synchronization: After finishing the render, you move your results to the Z drive of our remote server(s). They will be synced back to the iRender Drive from which you download them to your computer.
-
2. How useful is iRender Drive?
2.1 Free for all iRender users
This data transfer tool is completely free for all iRender customers. Once you create an account, you can download and use this tool without spending a dime. We assure not to charge any additional fees/charges for data upload, storage, and download. You can even use iRender Drive when the server is off, which saves your render points.
2.2 Up to Terabytes of storage capacity
iRender Drive has Z drive capacity to transfer and store data up to TBs. No matter how large your project is, iRender Drive solves the problem of capacity very easily. So, iRender customers, instead of spending money on buying/renting cloud space to store data, why not consider using iRender Drive? Not only it is completely free, but iRender Drive also has a super huge storage capacity.
Based on the total amount you have deposited into your account, you will have the corresponding iRender Drive capacity. The image below will show you how much space you have based on the total amount deposited.
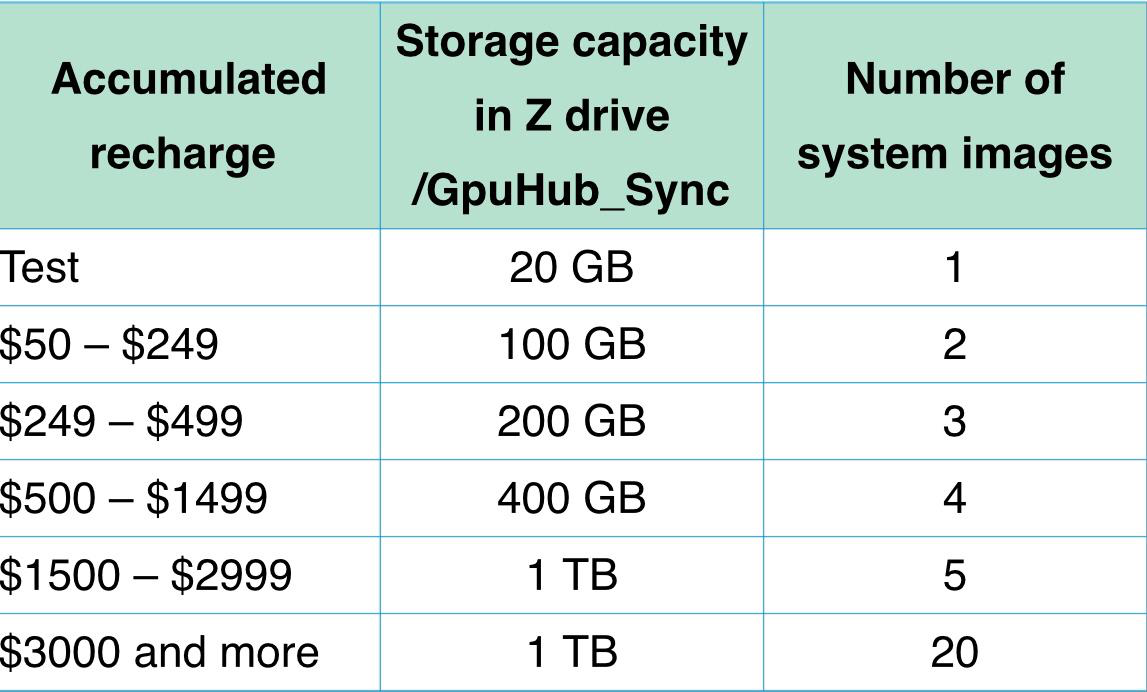
After reading this, many people will misunderstand that iRender Drive is not free at all because they have to pay to get the space. However, we need to make this clear for you to understand. The amount you deposit into your account is for running the servers and rendering your project, not to buy this data storage. This storage capacity is automatically increased based on the amount you have deposited. It is the benefit you get for having recharged up to a certain amount. And our system will automatically increase it for you. If you need more than the given capacity, you can also send us an Extra Service request > Increase size of network drive (Z). At that time, we will help you manually increase this capacity to a reasonable level.
2.3 Shorten uploading/downloading time
Using iRender Drive will help you cut down on uploading and downloading data multiple times. Once you have successfully uploaded data to the Z drive of the tool, all the data will be synced to the Z drive of our server. At this point, the data is already available on the server and ready to be used anytime. You will always be working with data on it.
This tool will be much more convenient than using other online cloud services. If you use a third-party cloud storage service, for example, Google Drive, you will need to upload and download the files at least twice to get the last render results back to your computer.
-
-
- The first process of upload/download: You upload your files to Google Drive on your computer. Then, you download them from Google Drive to our server to render them there.
- The second process of upload/download: After rendering is complete, you upload the results to your Google Drive. Then you download them again from Google Drive to your computer.
-
It will not be a problem at all if the files are small. However, they are too heavy, it will take a long time to upload and download. It is time-consuming. You can completely install third-party data storage software on our servers such as Google Drive, Dropbox, etc. However, instead of spending more time and money to install and use that offline software, using iRender Drive will be much simpler and more convenient. Because of:
-
-
- Don’t waste time installing this tool on the server. It connects to the Z drive already on the server
- No need to pay any fees
- Using this tool frees up your other data storage tools for more important files
-
2.4 Unlimited file content and formats to be uploaded
iRender Drive does not limit the data content, or data format you want to upload. You can upload photos, videos, music, software installation files, render files of various types of software and plugin, and so on. Just click upload, and the tool will do the rest for you.
3. How to use iRender Drive
3.1 Download iRender Drive
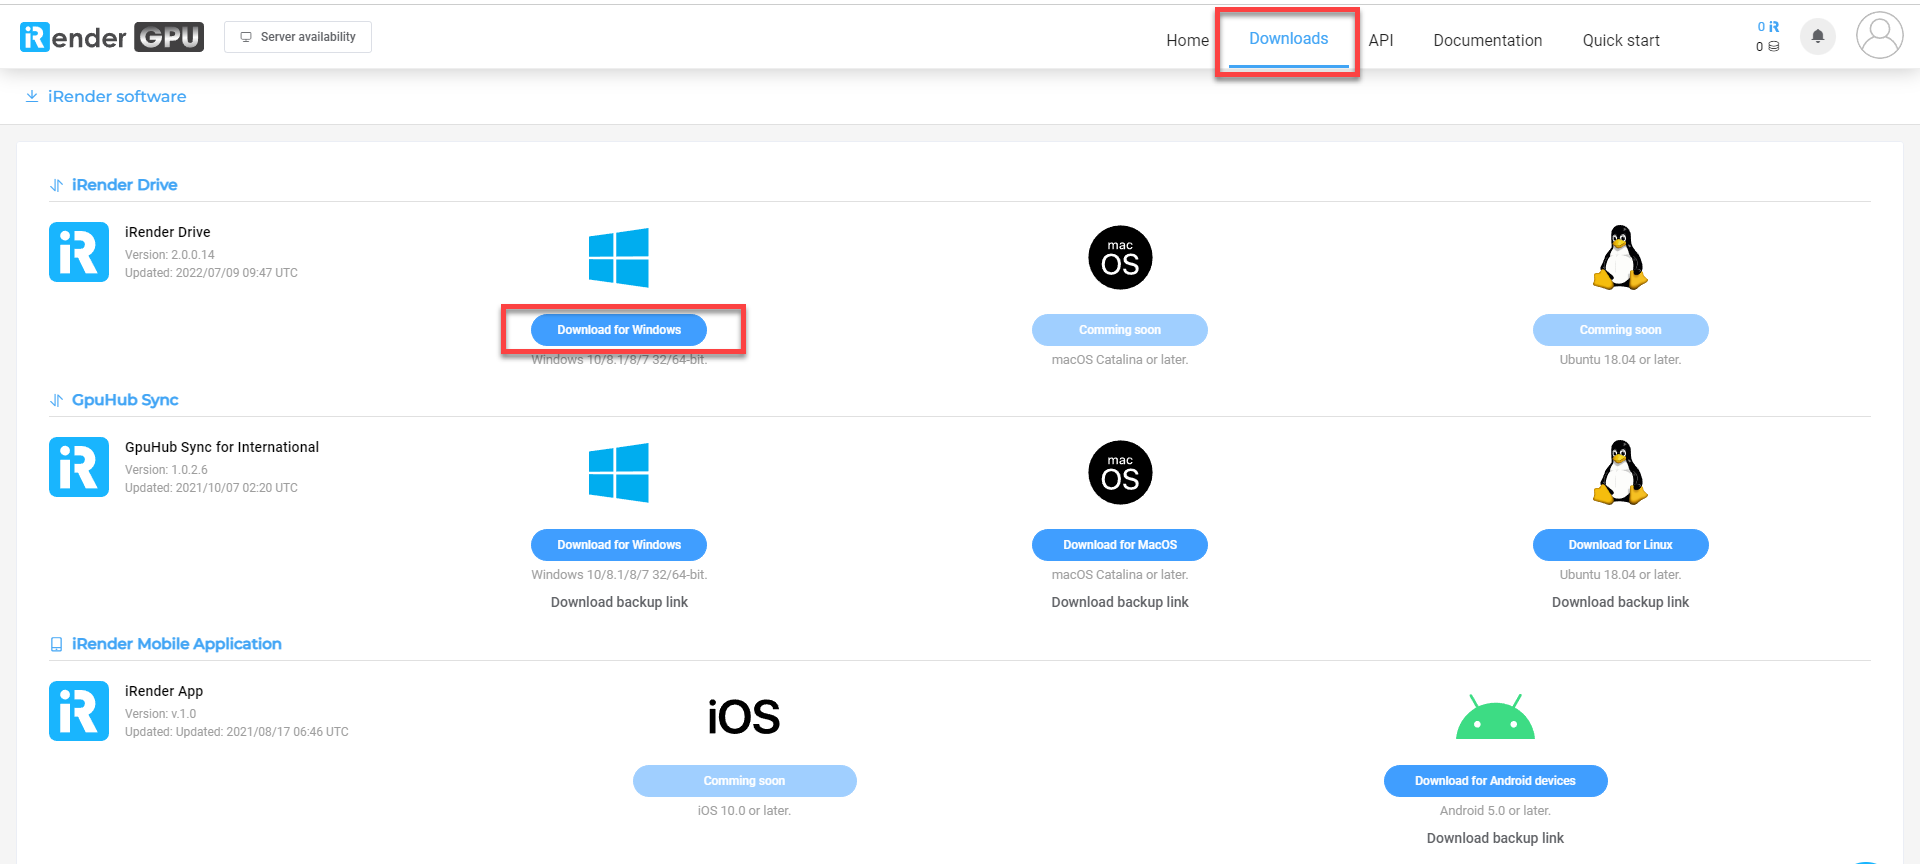
After creating an account here, log into your iRender account and go to Downloads > iRender Drive. Or you can download it directly from this link: Windows 10/8.1/8/7 32/64-bit
3.2 Install iRender Drive
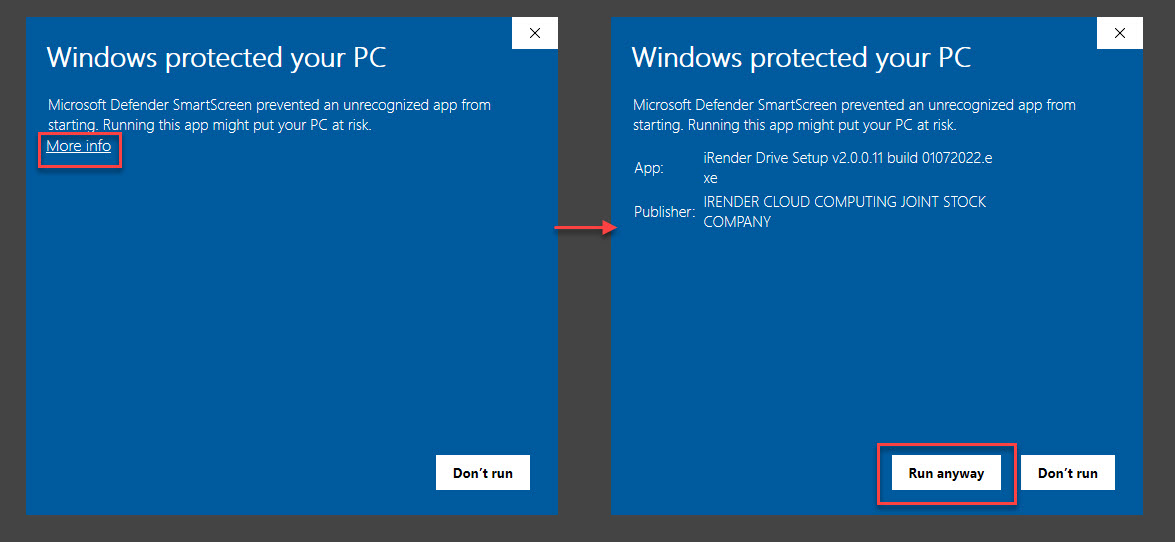
While installing iRender Drive, Windows protected your PC tab may appear. Click More info, then choose Run anyway.
Note: You need to install the .NET Desktop Runtime if you don’t already have it installed on your computer. Download it here.
3.3 How to use iRender Drive
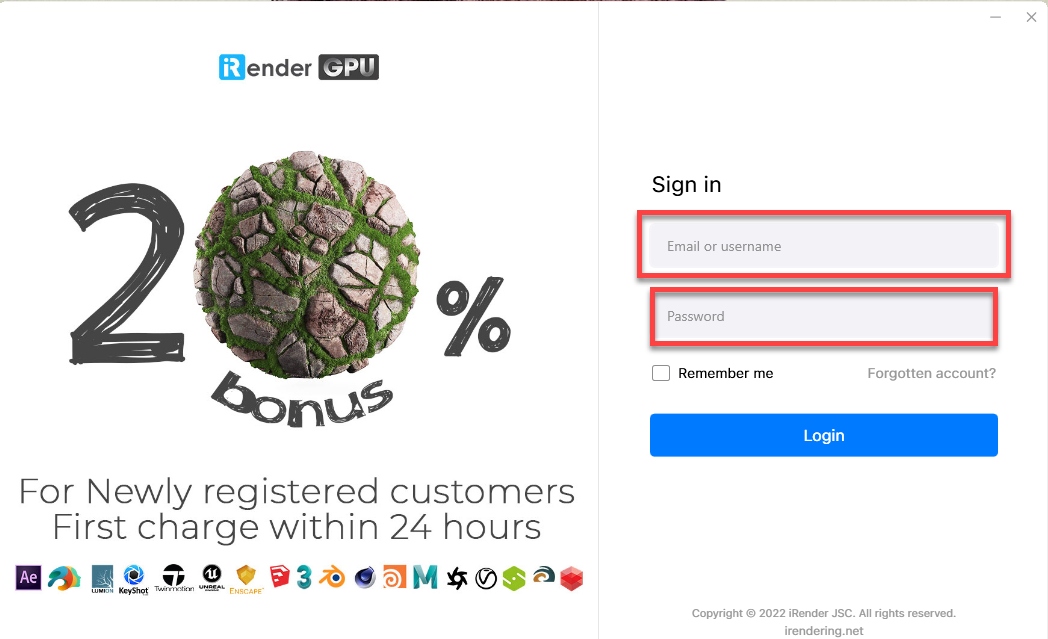
Step 1: Log into iRender Drive using your account’s username and password
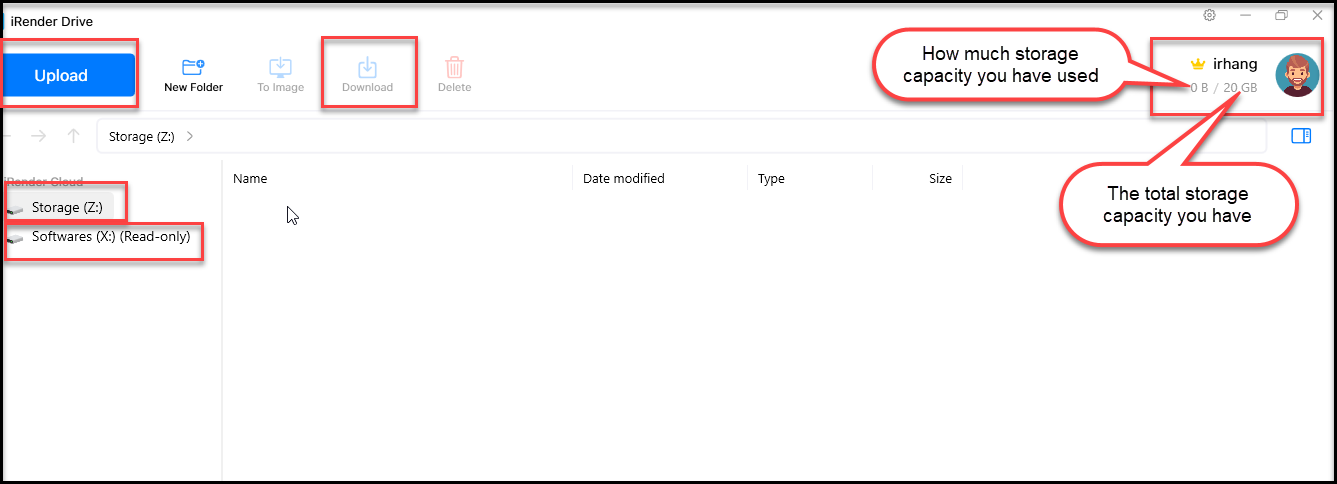
After logging in, you will see the iRender Drive interface as shown below. You need to pay close attention to the following options: Upload, Download, Z, and X drive.
-
-
- Upload: Use this option to upload your files from your computer to iRender servers.
- Download: Use this option to download the rendered results from iRender Drive (the Z drive of our remote servers) to your computer.
- Z drive is where you store data. You upload your project files here and download the rendered results from here to your computer.
- X drive is a read-only drive. This drive is where we have stored the installation files of some popular software. If the version of the software you use is already available here, you will use it to install the software when you get on the remote servers. If the version of the software you are using is not here, you will need to upload it to the Z drive.
-
Step 2: Upload files by choosing Upload or just Drag & Drop them
Select Upload: You can choose Manual or Keep Local Path:
-
-
- The Manual function is to upload files that will be under the current directory on iRender Drive. The tool will not create any directory for the file and instead will just simply upload the file to Z drive. Use this setting if you only have to work with a few jobs at a time to get the render file with ease.
- The Keep Local Path function allows our system to automatically create a directory on iRender Drive and Z drive of remote servers that is the same as the root directory on your PC. With this option, users that work on multiple projects at the same time won’t have to worry about sorting different files for different projects. This will also help users to manage the files and the progress of each project better.
-
Let’s take an example of the Keep local path function. When you upload a file from C:/Documents/Render/, our system then creates a directory on iRender Drive and Z drive of the remote server like this Z:/C/Documents/Render/.
Step 3: Download files after the render is done
After finishing the render on our remote servers, copy/move the rendered results to the Z drive. They will be automatically synced to the Z drive of iRender Drive tool.
Right-click on the result folder and choose Download or click Download on Topbar.
Task View: Show job status
-
-
- Uploading: The file/folder is being uploaded to the app
- Downloading: The file/folder is being downloaded from iRender Drive to your computer.
- Completed: The file/folder has been successfully uploaded/downloaded.
-
In the Uploading/Downloading stage, you can Stop/Cancel and Resume/Retry the job by Right-clicking on the uploading/ downloading job.
With all the benefits mentioned above, iRender Drive deserves to be called the beast tool for data transfer. iRender is constantly developing services to help customers work as quickly and efficiently as possible. Let us develop the infrastructure and services, and you unleash your creativity!
ENJOY our iRender Drive and multiple RTX 3090 servers today! For more information, please do not hesitate to reach us at [email protected] or Whatsapp: +84915875500.
iRender – Happy Rendering!
iRender Drive’s developer: The iRender Technical Team
Related Posts
The latest creative news from Cinema 4D Cloud Rendering , Blender Cloud Rendering, Redshift Cloud Rendering, Houdini Cloud Rendering , Octane Cloud Rendering, 3D VFX Plugins & Cloud Rendering.