Master Redshift Real Time Basic Rendering
Redshift is famous for its GPU-accelerated rendering capabilities. However, its feature is versatility – it includes GPU, CPU, and Redshift Real Time render engines. The Redshift Real Time renderer, called Real RT, enables near real-time feedback in the viewport using the GPU while maintaining the same materials, shaders, lights and options as the core renderer. Let’s explore Redshift Real Time and master its basic rendering with iRender!
Redshift Real Time Overview
The Redshift Real Time (Redshift RT) is the fastest rendering engine in Redshift that provides near real time updates. This fast speed and interactivity make Redshift Real Time an excellent option for scene layout, look dev, and light placement. Additionally, Redshift RT closely mimics Redshift’s Production renderer, matching shaders, lights and settings. This allows artists to quickly toggle between the fast interactive viewport and full production renderer, leveraging the strengths of both engines.

Redshift Real Time allows for Render View undersampling to further enhance interactivity. It also has an experimental per-pixel displacement version. Displacement can be configured similarly to the Redshift Production renderer. However, unlike Redshift Production, Redshift RT does not require a highly dense underlying mesh to achieve detailed displacement results. In the example below, the sphere contains only 72 faces and the ground plane only has 100 faces, yet the level of displacement detail is extremely high.

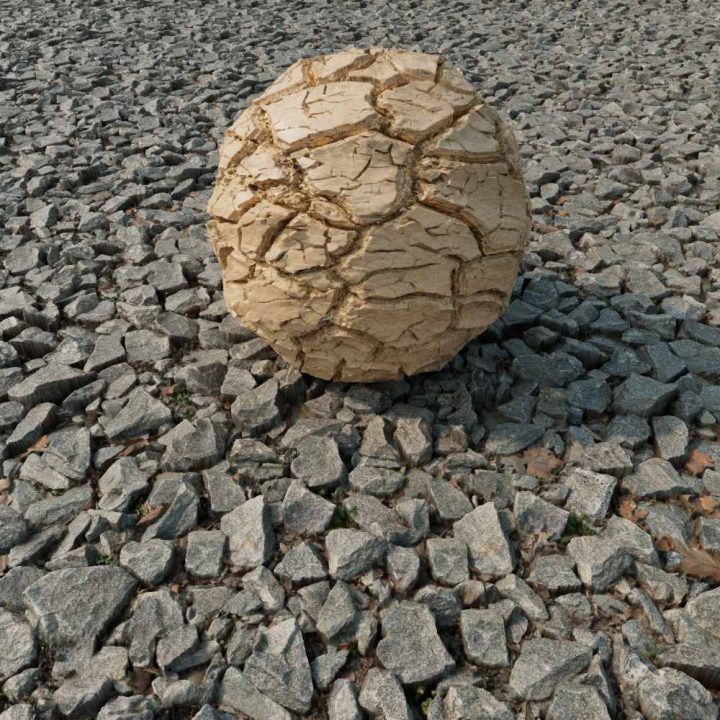
Textures from Polyhaven.com
This example showcases Redshift Real Time’s ability to produce complex displacement effects with relatively low-polygon meshes.
Using Redshift Real Time
You can enable Redshift Real Time directly from the Redshift Render View or from the render settings menu as in the images below:
From the Redshift Render View, click on the “RT” icon:

From the Render Settings menu:
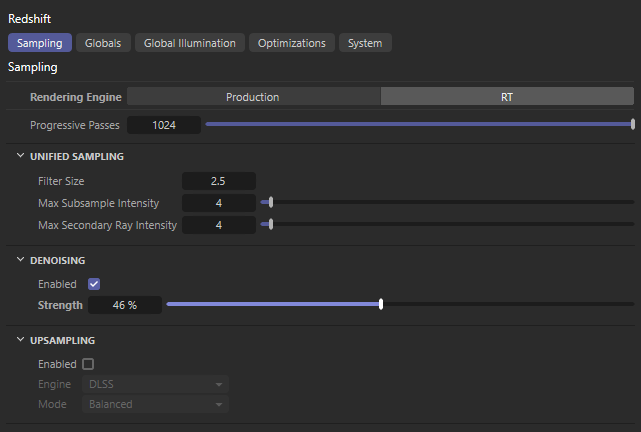
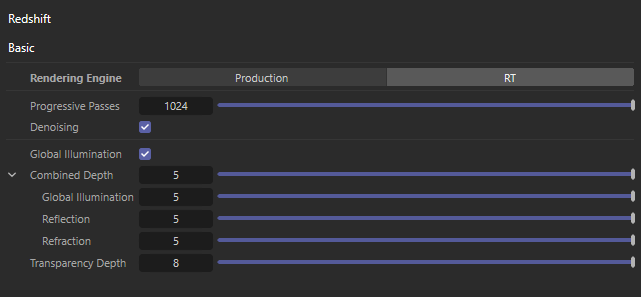
The option to switch the rendering engine from Production to Real Time is located at the top of the Basic Settings section in the render settings dialogue. Or, it can be found in the Sampling tab under the Advanced Settings tab.
From a Viewport’s “Redshift” menu:

Redshift Real Time Basic Render Settings
Redshift Real Time has its own render settings. In Redshift RT, the key setting affecting render quality is the number of Progressive Passes and the global Trace Depth limits. Redshift RT has a maximum trace depth limit of 4 to maintain interactive performance.
The specific render settings available are dependent on both the selected render settings mode (Basic or Advanced) and the selected rendering engine (Production or RT). Basic mode provides a small set of commonly used settings, while Advanced mode has all available options for the selected renderer.
If you’re new to Redshift or prefer simplifying the process, the Basic mode is a good way to adjust your render quality.
Let’s explore the Basic Settings of Redshift Real Time:
The Redshift Real Time Rendering Engine setting
Controls which engine (from these two available options) for rendering:
-
- Production: Redshift Production is Redshift’s main engine for final frame rendering.
- RT: Redshift Real Time is the fastest interactive engine providing nearly real-time updates.
The Progressive Passes setting
Controls the maximum of passes that the Progressive rendering mode can reach. Thus, it controls the maximum visual quality of Progressive mode. A higher Progressive Passes results in higher quality and less noise in the rendered output. More passes allow for greater refinement of visuals but at the cost of performance. The default pass number is set to 1024.
Because we can use Progressive mode in either Interactive Rendering or Final Rendering, the function of the Progressive Passes setting varies depending on the rendering mode and situation.
-
- Progressive Passes in Interactive Rendering mode with Production and RT engines: In Interactive Rendering mode with Production or RT, the maximum Progressive Passes will only be reached if enough time elapses without scene changes. For example, if you edit a scene before the maximum Progressive Passes is reached, a new updated Progressive render will be started and it again begins to build back up to the maximum Progressive Passes number.
- Progressive Passes in Final Rendering mode with Production engine: When using Final Rendering mode, the Progressive render will always reach the maximum Progressive Passes number before moving on to the next frame. For example, if you set the Progressive Passes to 64, Redshift will render each frame to reach the 64th pass regardless of the time taken. Redshift will shift focus to the next frame in the queue and repeat the process of accumulating 64 progressive passes until the entire batch is complete.
The Denoising checkbox
Provides a straightforward way of enabling and disabling denoising. Turning on denoising helps faster rendering by using lower-quality baseline settings, though with some loss of accuracy. Denoising can mitigate noise to a degree but cannot perfectly eliminate it. Therefore, you must find a balance between Bucket Quality and the selected denoiser engine for your project.
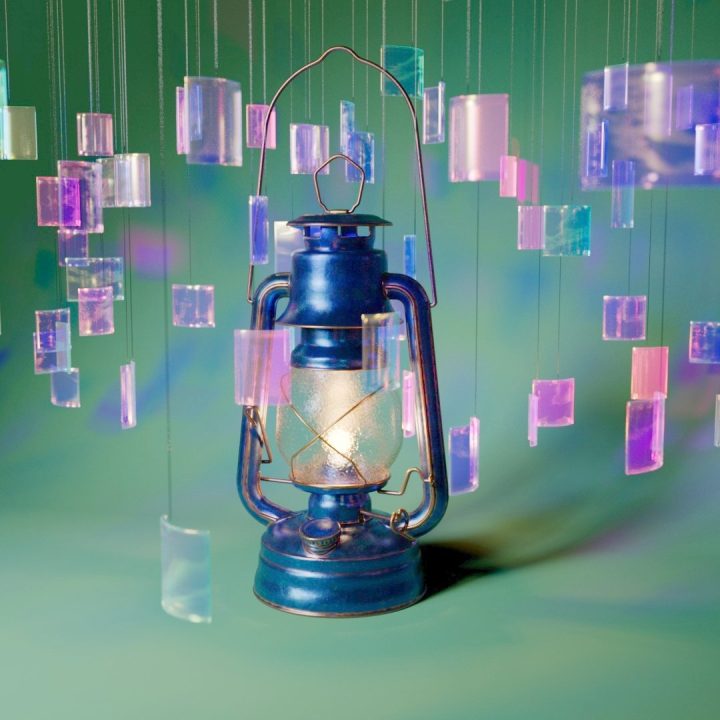
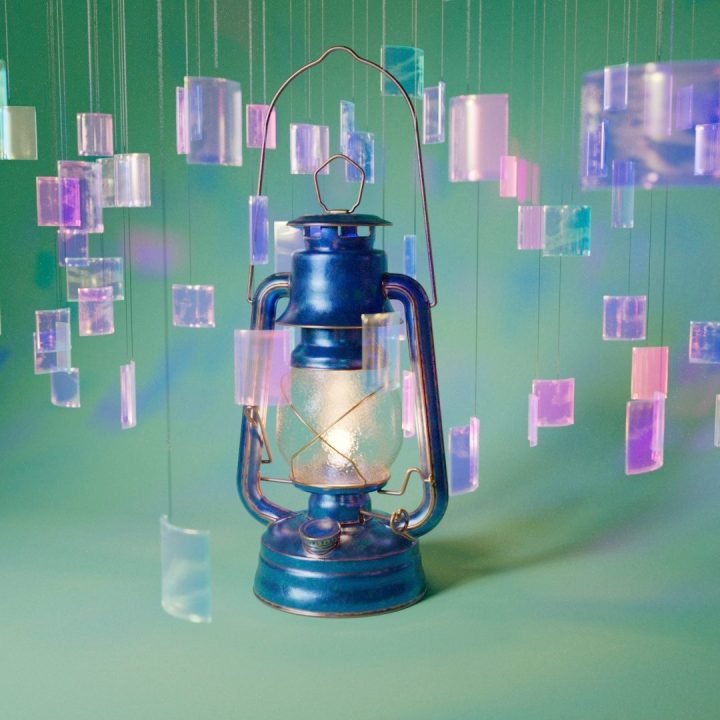
The Global Illumination checkbox
Provides a simple way to enable or disable indirect bounced lighting. For the most photorealistic results, global illumination is best left on, but it will increase render times.
In the example images below, observe how the bounced lighting from the floor and wall near the lantern is realistically filled in when Global Illumination is turned on.
Trace Depths settings
Depth parameters determine the number of interactions a ray can have with objects in a scene before termination.
Combined Depth specifies the maximum number of ray interactions across global illumination, reflection, refraction/transmission, and volume scattering. Even when the depth values for an individual ray type are higher than the Combined Depth, the resulting render will still be capped at the Combined Depth value.
This separation of controls provides flexibility. Higher depths can be used for specific effects as needed, while also placing an overall limit to avoid excessively long render times. For example, if reflection and refraction are set to 4 bounces each, but the combined depth is 6, a ray that has reflected 4 times could only refract 2 more times before stopping. This balances accurate simulation with efficiency.
Note: Increasing Depth values can rapidly and significantly extend render times for scenes with many bounces. As a best practice, it is recommended to use the minimum depth values necessary to achieve the desired render quality, as higher settings provide more realism, but also require much longer renders.
-
- The Global Illumination Depth sets a specific limit on bounce count for indirect lighting rays. For realistic lighting in interior scenes, you should increase this parameter where many indirect bounces are needed.
- The Reflection Depth separately controls the maximum bounces for reflective rays.
- The Refraction Depth sets an individual cap on how many times a refraction ray can bounce or pass through objects.
Transparency Depth sets an individual bound for transparency rays passing straight through objects. Transparency, used for Opacity in Redshift Materials, can go much deeper than complicated refractions and render much faster than refractions. This parameter is not limited by the Combined Depth setting.
The below scene was modified specifically to illustrate the impact of depth settings by placing 8 panes of glass in a row in front of the camera. Since each glass pane has a real thickness, it takes a minimum trace depth of 2 for a ray to pass through one fully. With 8 panes, a trace depth of at least 16 is needed to see through all 8.

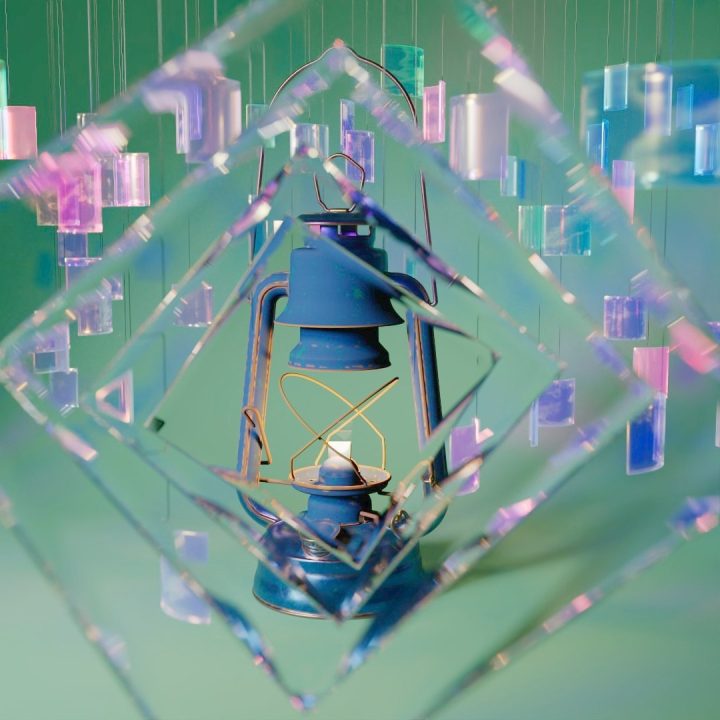
As shown in this image, the glass on the lantern remains invisible until the refraction trace depth is high enough to get through all 8 panes and the lantern glass itself. These same limitations are imposed on each ray type by their individual caps, as shown in the last example where reducing the Global Illumination and Reflection Depths well below the Combined Depth results in losing most reflections and indirect light bounces.
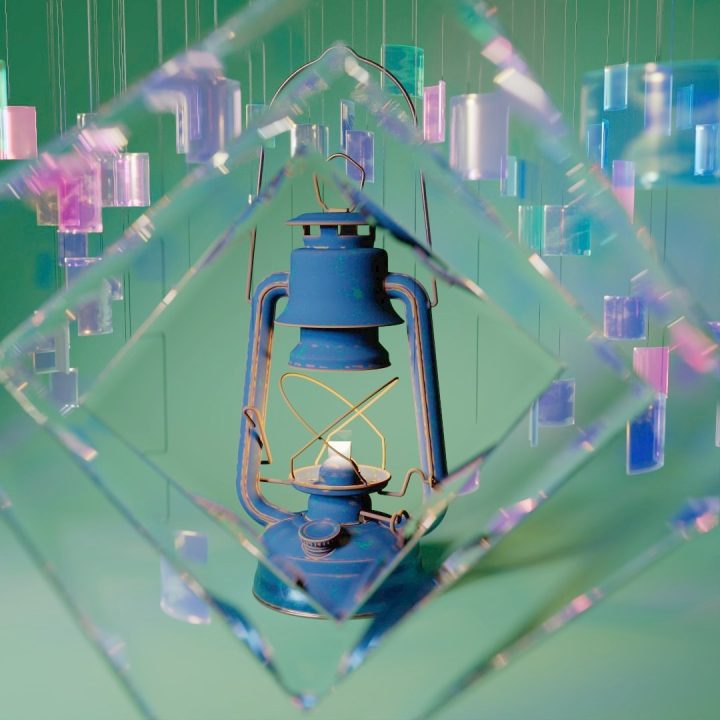
Combined Depth: 6 Global Illumination Depth: 4 Reflection Depth: 4 Refraction Depth: 6 Transparency Depth: 16 |
Combined Depth: 8 Global Illumination Depth: 6 Reflection Depth: 6 Refraction Depth: 8 Transparency Depth: 20 |
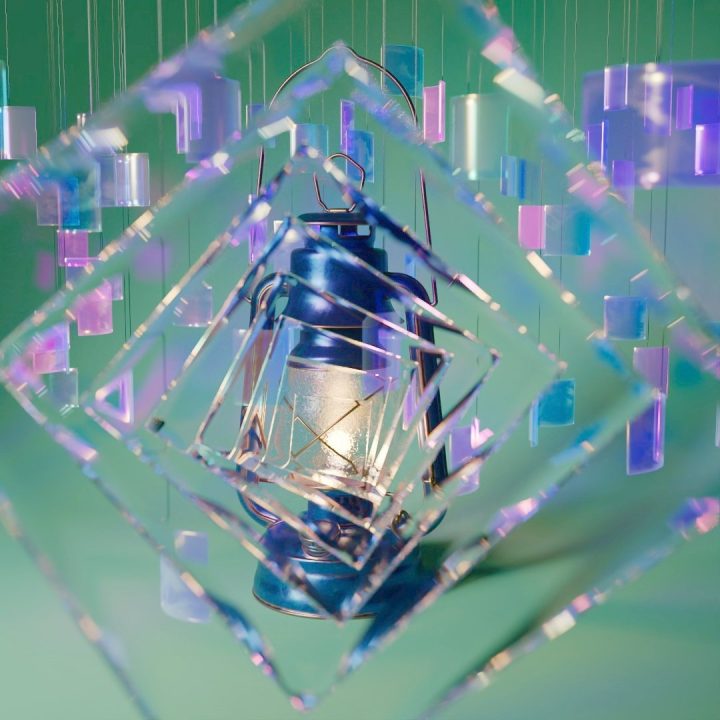

Combined Depth: 24 Global Illumination Depth: 20 Reflection Depth: 20 Refraction Depth: 24 Transparency Depth: 48 |
Combined Depth: 24 Global Illumination Depth: 1 Reflection Depth: 1 Refraction Depth: 24 Transparency Depth: 48 |
Limitations and Unsupported Features
There are currently several limitations and unsupported features in Redshift Real Time.
One known bug is that normal maps are flipped.
Some unsupported features are as follows:
-
- In terms of shading features:
-
- Back-Lighting/Translucency is unsupported when using a Standard material.
- Subsurface scattering techniques such as raytraced SSS, single scattering, and point cache based SSS are also unavailable. Subsurface GI is not supported.
- Volumes such as VDB Volumes and Global Volume Fog cannot be used.
- Matte Features, Sprite Shader, Displacement (experimental per-pixel displacement), Nested Dielectrics, Per-Shader Trace Depth Limits, and User Data (Vertex Level) are also not supported.
-
- In terms of Geometry Features: Proxies
- Lighting Features: Light Linking / Trace Sets
- General Features: AOVs, Motion Blur, Point-Based GI, Caustics, Multi-GPU Support, Non-Standard Camera types (Fisheye etc), Maximum Trace Depth: 4, Redshift Material Override.
- In terms of shading features:
Whether Redshift Real Time is suitable depends on your needs and workflow. For those who require frequent interactive editing of scenes, it has clear benefits. Being able to preview changes in real time without rendering dramatically improves creative efficiency. However, the beta status means certain limitations exist and scenes need optimizing for real-time performance. Complex elements may not be supported or work well. Moreover, hardware requirements must be met and the technology is still evolving. For final frame rendering, the full renderer is preferable. But when iterative work in the viewport is primary, Redshift Real Time can significantly boost productivity if used judiciously while mindful of current constraints. Overall, for compatible interactive workflows, its promise of real-time feedback makes it worthwhile to consider.
iRender - The best render farm for Redshift rendering
![]() iRender provides powerful render machines supporting all Redshift (with any DCC software and plugins) versions. Our GPU render farm houses the most robust machines from 1 to 8 RTX 4090/RTX 3090, AMD Threadripper Pro CPUs, 256GB RAM and 2TB SSD storage to boost rendering Redshift projects of any scale. Check out our Redshift GPU Cloud Rendering service to have more references and find the best plan for your Redshift projects.
iRender provides powerful render machines supporting all Redshift (with any DCC software and plugins) versions. Our GPU render farm houses the most robust machines from 1 to 8 RTX 4090/RTX 3090, AMD Threadripper Pro CPUs, 256GB RAM and 2TB SSD storage to boost rendering Redshift projects of any scale. Check out our Redshift GPU Cloud Rendering service to have more references and find the best plan for your Redshift projects.
Reference sources: help.maxon.net
Related Posts
The latest creative news from Redshift Cloud Rendering.