Deep dive into different GI Engines in Redshift
In the previous article, we learned about Global Illumination (GI) in Redshift. Today, we will deeply dive into different GI Engines and explore the pros and cons of those Redshift GI engines.
The Brute-Force engine
Brute-Force is the most basic GI Engine in Redshift. It does not attempt to interpolate any results. Therefore, it is very accurate but also the slowest of all GI Engines.
How it works
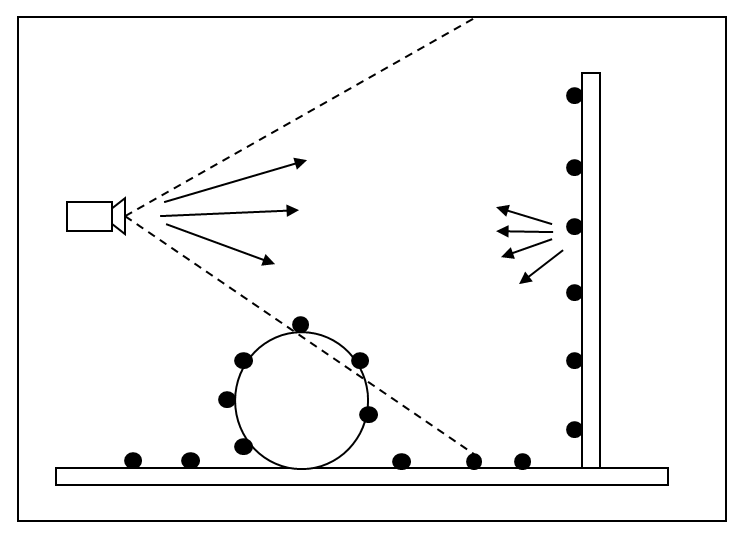
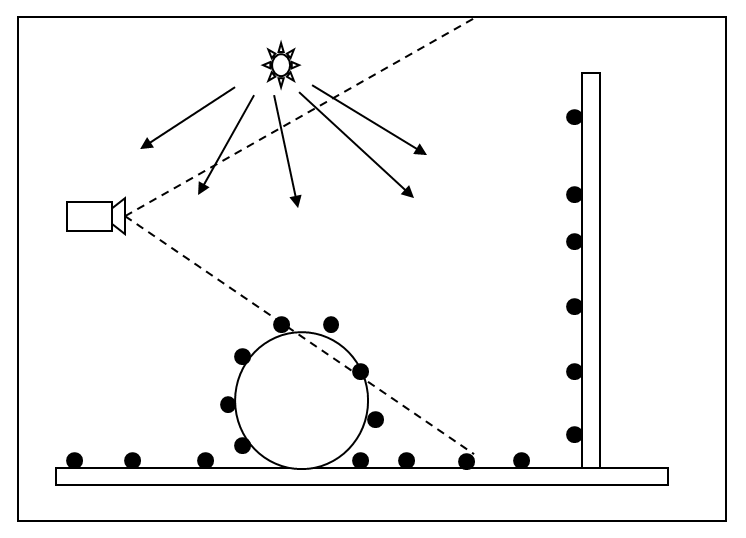
Brute-Force can be used as either a primary or a secondary GI engine. It works by simply shooting rays as demonstrated below:
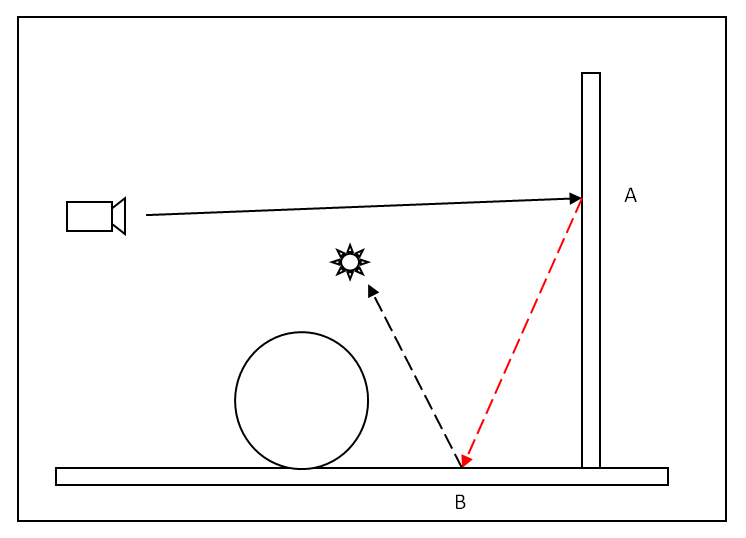
Zero GI Bounces
The Camera shoots a ray and it hits the wall (point “A”). The primary GI engine shoots another ray (red). And direct lighting (black dashed line) on point “B” affects point “A”.
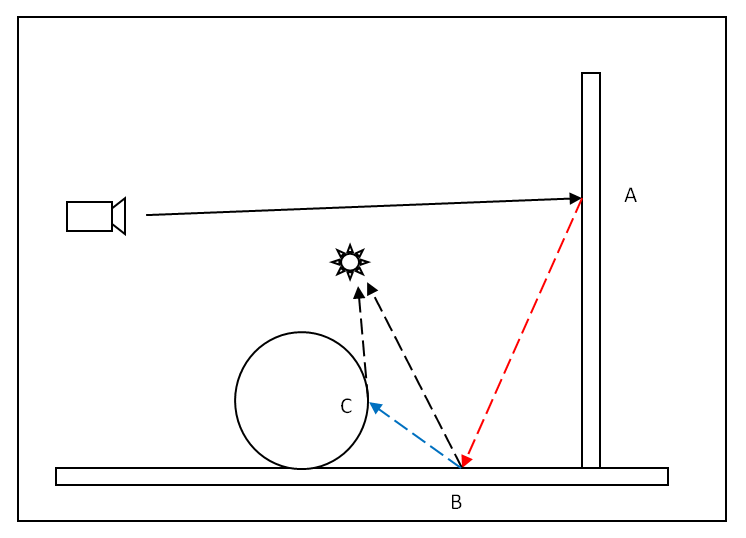
One GI Bounce
Now, the processing goes a further step. Point “B” uses the secondary GI engine to gather illumination info from the sphere by firing a single ray (blue). Ans the direct lighting (black dashed line) of points “B” and “C” both affects point “A”.
Pros and Cons
Pros:
-
- Accurate
- Easy since it only has one setting (the Num Rays)
- No flickering in animations
- Doesn’t need any storage; therefore, the final image resolution and scene detail don’t matter.
Cons:
-
- The slowest technique. (But it’s more practical compared to other render engines due to Redshift’s speed).
- If many rays are not shot per pixel, it can produce grainy images – especially in difficult lighting scenes.
The Irradiance Point Cloud engine
When multiple GI bounces are required, each ray must bounce around numerous times until it reaches a light. Because of the random nature of ray deflections, illumination calculation is left to chance in some ways. Using more rays improves the chance of finding lighting. This explains why using higher ray counts always produces cleaner results.
The Irradiance Point Cloud engine attempts to enhance the process by computing a coarse GI approximation on random points around the scene. In some ways, it resembles the Irradiance Caching except:
-
- It produces points in locations that may fall outside the camera’s view frustum. This proves necessary since multiple GI ray bounces will often terminate at positions invisible to the camera.
- The points do not care too much about surface creases and details. This sacrifices memory and improves computation time.
How it works
Let’s see the below figures of how the Irradiance Point Cloud works:
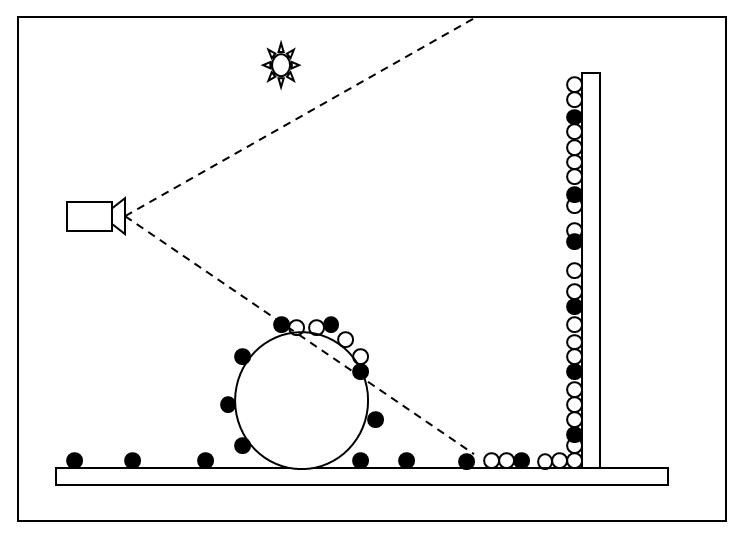
While generating the irradiance point cloud, rays are shot from the camera. Points are created where the rays intersect surfaces and are then bounced around the scene. This forms a “blanket” of points distributed throughout the scene. A coarse GI solution is progressively calculated for each of these points.
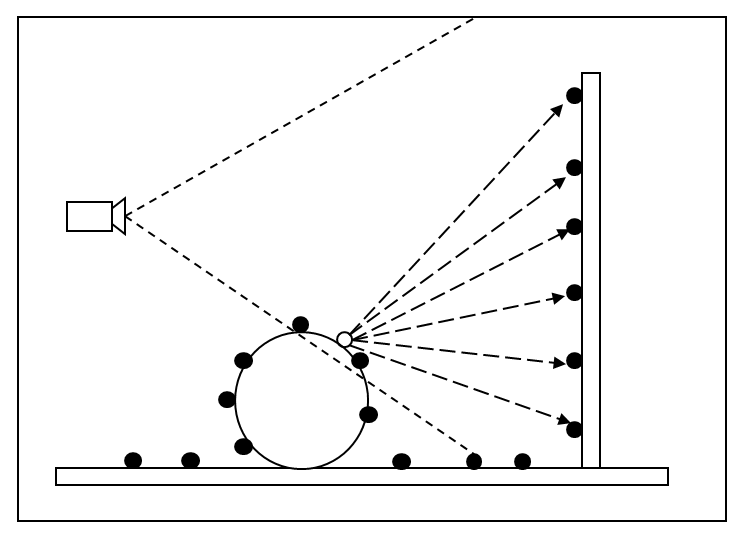
When using Irradiance Caching or Brute-Force as the primary GI engines, the irradiance points are used to compute a smoother GI result. In this case, the lighting of an irradiance cache point (displayed in white) is computed using the irradiance point cloud.
In the second figure, without the point cloud enabled, the irradiance cache point (white point) would need to shoot the dashed arrows and bounce those rays off the wall. It’s difficult to find lighting this way. By using the irradiance point cloud instead, each dashed array acquires higher-quality lighting.
Though the individual points contain a coarse lighting solution (which means it can be fairly noisy), this is often less of an issue for secondary GI lighting. Similarly with the Photon Map as a secondary GI engine: the lighting may appear somewhat splotchy at times but the final render can still look clean.
Pros and Cons
Pros:
-
- It makes Brute-Force and Irradiance Caching faster and cleaner.
- Certain extremely difficult lighting scenarios can only be rendered with this technique! (i.e. they will take a very long time with purely brute-force GI engines).
Cons:
-
- It needs some storage (but, not much).
- There are a few settings to tweak, so needs some settings experimentation.
- It only provides a benefit when multiple bounces are required, if the scene has lots of lights or when the lighting conditions are difficult.
The Irradiance Cache engine
Global illumination often changes slowly over surfaces. Consequently, several neighbouring pixels can share similar GI lighting without visible artifacts. This means we do not necessarily need to individually compute GI lighting for each pixel on the screen. Irradiance caching takes advantage of this observation and computes GI at sparse points around the image. As a result, rendering completes significantly faster.
How it works
These individual GI points are referred to as “Irradiance Cache Points”. During rendering, these points (through interpolation and filtering techniques) are used to create a smooth final result. The images below show how the Irradiance Caching GI Engine works.
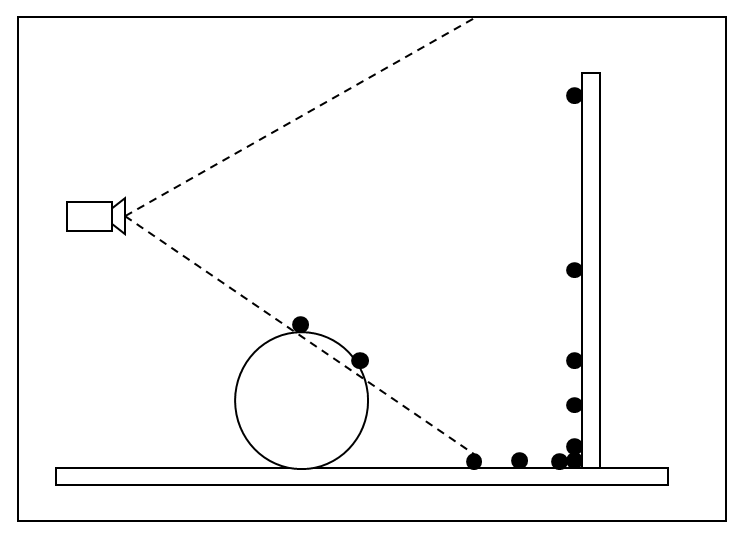
During the irradiance cache computation pass, points are recorded on surfaces within the camera’s view frustum. On flat areas, since lighting changes slowly, a few points are needed. Typically, corners need more points.
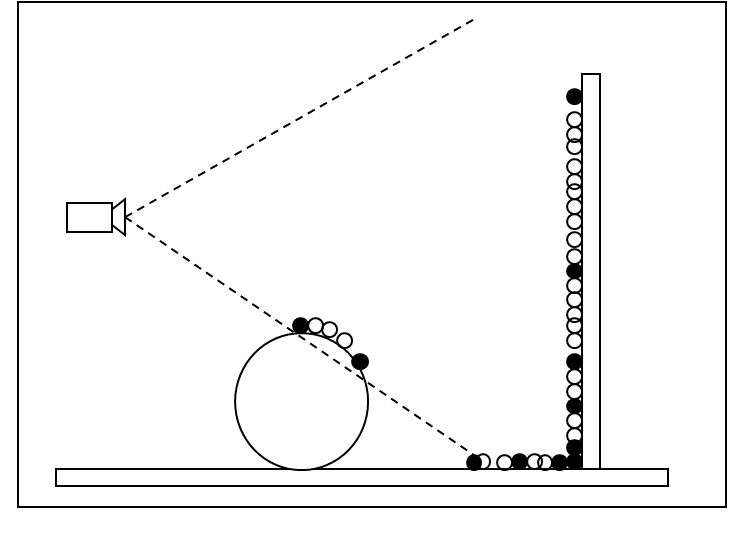
During rendering, final shaded pixels (white) are GI-lit by using the previously constructed irradiance cache points. That is faster than computing GI for each pixel.
The Irradiance Cache Gi engine can only be used as a primary GI engine. When multiple GI bounces are needed, you can combine Irradiance Cache with The Brute-Force, Photon Mapping, or Irradiance Point Cloud as secondary GI engines.
Pros and Cons
Pros:
-
- It can create smooth images several times faster than the Brute-Force.
- The results can be stored on disk for each animation frame. If we tweak things such as antialiasing, glossy “num rays”, area lighting “num samples” and other quality parameters (non-related to GI), we can simply load the GI results and perform quick iterations.
- Certain scenes (like archviz scenes) use relatively flat geometry such as the floor or the walls of an interior. The irradiance cache engine can produce a significant performance benefit for these scenes.
- Increasing the resolution of the final image often does not increase the irradiance cache time linearly. For example, going from 1280×720 to 2560×1400 (4 times more pixels), we might see the irradiance cache processing time taking less than 4 times longer. This depends on the scene complexity and the irradiance cache settings.
Cons:
-
- The Irradiance Cache Points are computed during a separate rendering pass. Therefore, interactive feedback is impossible.
- Shooting too few rays with the irradiance cache shows up as “splotches” and flickering in animations.
- If the scene contains a lot of detail (for example: foliage covering a big part of the screen), too many points might have to be produced, which invalidates the benefits of the irradiance cache. It would also strain memory resources significantly because all points need storage. For these scenes, brute-force GI engine might be a better choice.
The Photon Mapping engine for Caustics
How it works
Photon mapping works by shooting photons from light sources, whereas other engines shoot rays from the camera. For rendering effects such as caustics, the photon mapping technique provides important quality benefits.
Let’s see how it works in the below figure.
Photons that come from the light source bounce around the scene and are finally stored on the surface.
During rendering, final shaded pixels (white) are GI-lit by extrapolating the previously computed photons on the surfaces.
The above figures also reveal one weakness of Photon Mapping: it can store photons on parts of the scene that may not be visible to the camera and thus irrelevant for determining the final shaded pixels. While there are certain graphics algorithms to improve this issue, Redshift uses a traditional photon mapping technique that unfortunately suffers from storing unnecessary photons. For studio-like scenes with minimal geometry outside the camera frustum, this may not pose a major problem since most geometry is visible. However, for more complex scenes like navigating through a multi-room house with various lights, many photons could overburden memory.
Photon mapping can reproduce both Diffuse GI and Caustics. “Diffuse GI” refers to global illumination from rough surfaces, while “caustics” are created from highly reflective or refractive surfaces like mirrors and glass. While all other GI engines can only capture diffuse GI – only the Photon Mapping engine can recreate caustics effects.
To achieve diffuse GI, GI engines other than photon mapping are recommended as they tend to produce higher-quality results in most cases. Photon mapping, whether selected as a primary or secondary GI engine, can still be used for caustics effects.
Pros and Cons
Pros:
-
- Provides a very good degree of control.
- It renders fast for reasonable numbers of photons.
Cons:
-
- This is an outdated technique.
- Because photons have to be stored in GPU memory, using too many photons can be prohibitive in terms of memory usage.
- There are a few settings to tweak, so need to do some experimentation to get a clean result.
- Processing time and storage may be wasted for photons that will not be visible to the camera.
Each GI engine has its own settings. For more information on those settings, please see here.
Boost Redshift rendering to the fastest with iRender
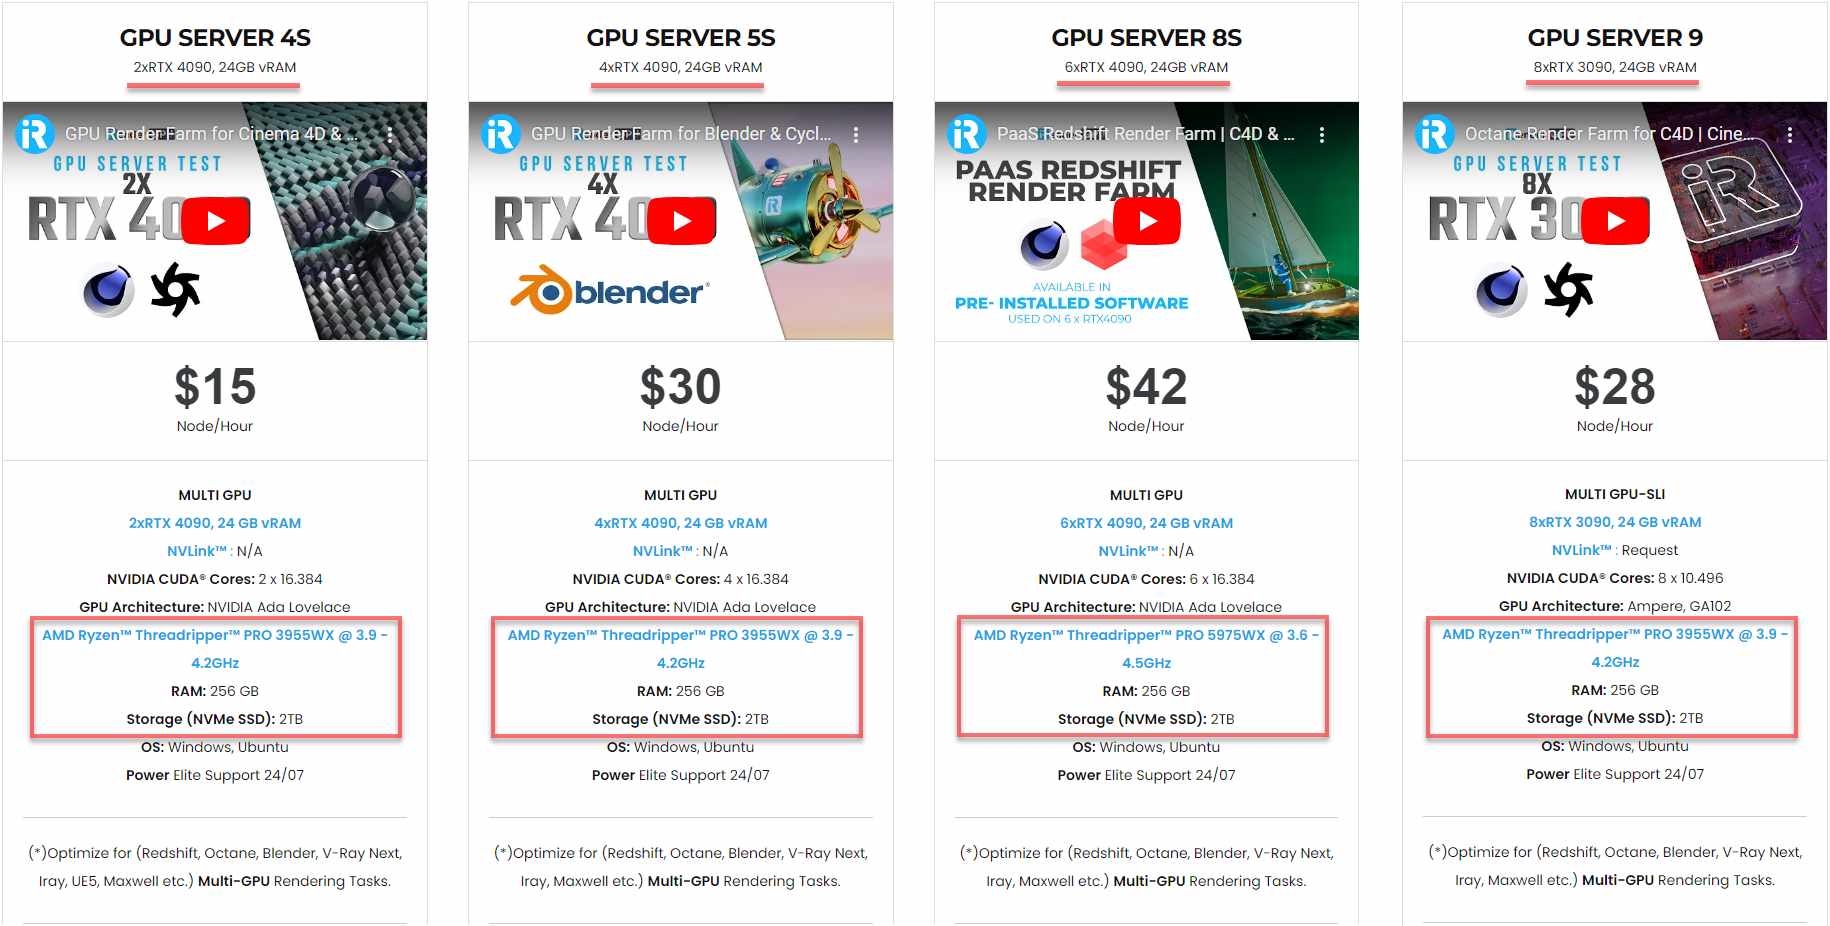
iRender powers up your creativity with unlimited GPU rendering resources. Our GPU render farm houses the most powerful 3D rendering machines. Configure from 1 to 8 GPU with top-tier RTX 4090/RTX 3090, Threadripper Pro CPUs, 256GB RAM, and 2TB SSD storage – iRender’s machines can handle any 3D project demands.
Once renting our machines, you will own them as your personal workstations. Therefore, you can install and use C4D, Redshift, plugins, and/or any other 3D software of any version (even the newly released ones).
As an official partner of Maxon, we currently provide pre-installed C4D and Redshift machines to streamline your pipeline further! Let’s explore how to use our C4D and Redshift machines through our Desktop app.

New user incentives
This April, we are offering an attractive 100% Bonus Program for our new users making the first deposit within 24 hours of registration.

Enjoy our FREE TRIAL to try our RTX 4090 machines and boost your Redshift rendering now!
For additional information, please do not hesitate to contact us at [email protected] or mobile: +84915875500.
iRender – Thank you & Happy Rendering!
Reference source: help.maxon.net
Related Posts
The latest creative news from Redshift Cloud Rendering.