Path Tracing Optimization for Faster Rendering on Octane (part 1)
Octane is an unbiased render engine with real-time capability developed by Otoy. This renderer has been a big player in the motion design industry for quite some time. It is a GPU-based renderer that handles processor-heavy algorithms with ease and is considered one of the fastest real-time render software plugins on the market to date. Making use of its interactive real-time viewport system, it smoothly speeds up your workflow by essentially displaying your final render as you work, edit and place materials, and frame compositions.

Today, the purpose of this writeup is to look at mostly the Path Tracing Kernel settings and see how to fiddle with them to speed up render and iteration times. This guide was written using the Cinema 4D version of Octane, but the settings should be the same no matter what DCC you’re using (or standalone, for that matter).
Overall Path Tracing Workflow
Step 1. Setup: Switch to Path tracing. Start with a good custom preset. Low samples (128 or 256), high depth bounces (16/16/8), low GI clamp (16), no fancy post-production stuff like denoiser yet, everything else at default.
Step 2. Build: Put your scene together – keep the Live Viewer off for the most part, unpausing it every now and again to see what you’re doing.
Step 3. Rough Pass: Once the scene is pretty much in place and you know what kind of lighting and materials you have going, adjust the kernel settings. Raise the samples a little to get a better idea of what the scene looks like, lower the depth bounces until it starts to affect the reflections/refractions/sss, adjust the GI clamp (see if you can get away with 1 or 2). Use the render region in specific areas if your scene is complex and you want to investigate the effects of the settings on just one area. At this point your image should look like what you want while still rendering in a reasonable amount of time, but it may still be noisy.
Step 4. Tweak: If there are weird artifact issues that aren’t being resolved, check the Other Tweaky Settings section of this doc to see if there are specific settings to adjust.
Step 5. Cheat with AI: Try the Denoiser and/or upsampler – make sure you have enough samples to create enough data for them to work properly. It may or may not help depending on your scene. Also start to put in Post effects if needed like Bloom/Glare.
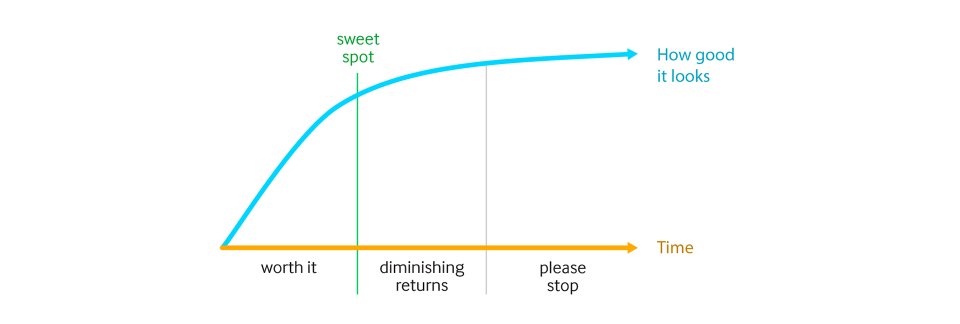
Step 6. Refine and Finish: Slowly bring the samples up (or down if the denoiser and/or upsampler is doing a bang-up job) until you find a balance of image quality and speed you’re happy with. Spend more time refining if you have an animation – every second you knock off is multiplied by the number of frames you have to render. Don’t worry about it as much if you’re doing a still – just get in the ballpark and probably overshoot on the samples, because it would have taken another minute of tweaking to save 10 seconds of render time, and that’s just not worth it.
The Nitty Gritty
Now that you have an overview of the process, let’s dive in and explore the settings more.
Kernels
Kernels are methods Octane uses to render scenes. As of this writing, there are three main ones – Direct Lighting, Path Tracing, and PMC. There are also Info Channels (Color, Alpha, etc) which are mainly for compositing which probably needs its own writeup. We’re going to focus on Pathtracing in this guide. What’s cool is that many of the Path Tracing settings are also in Direct Lighting and PMC and work in similar ways, so this will make it easier to pick those up later as you see a need for them.
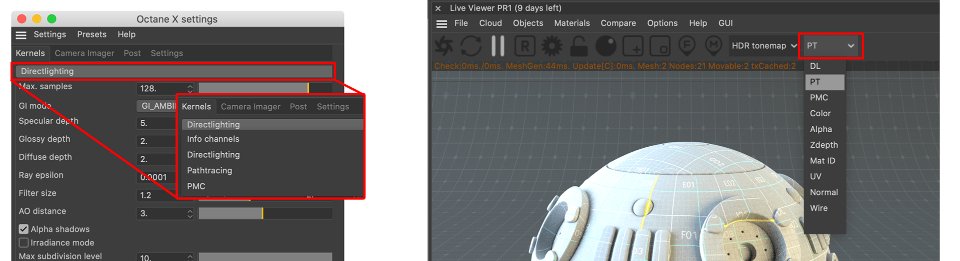
You can switch kernels in either the settings (the light gray bar at the top of the Kernel section is actually a dropdown), or in the Live Viewer (the dropdown on the right that usually says either DL or PT).
Kernel Settings
Let’s split these up into three groups. First are the really important ones in any scene (Max samples, Depth, GI Clamp). These have the most detailed explanation. Next are secondary settings in the Other Tweaky Settings section that only apply to certain scenes (Ray epsilon, Coherent ratio, etc). Lastly there’s a group of settings we are not going to cover that don’t directly apply to render speed/quality (AO distance, Light IDs, etc).
Max Samples
Max samples are probably the most important setting when it comes to quality vs. speed. A sample is a drawing pass that creates image information. If you think of it like a traditional pencil drawing, the very first pass would be a super quick, rough bunch of sketchy lines that pretty much just defines the shape and location of the objects in the composition. You might be able to tell what the drawing will be, but it’s not going to look great. The more passes the artist does, the more defined the image gets, but the longer it takes. After a few hundred passes, the drawing will start to look photoreal. Same idea with samples.
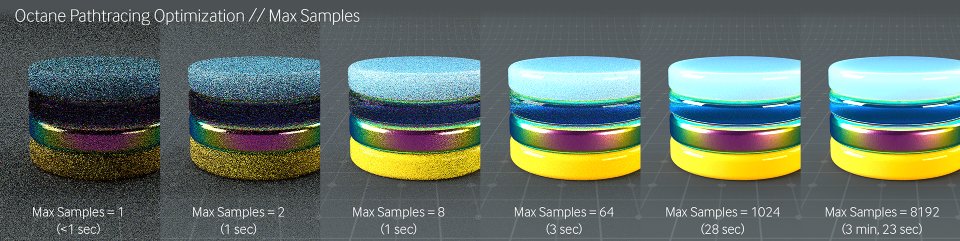
The number of samples needed is entirely based on how many and what kinds of calculations you are asking your GPU to do, and your personal tolerance for noise. Going back to our pencil drawing, if the artist is drawing a simple box in an evenly-lit room, she probably won’t need to spend too much time on each pass, or go over it too many times before it looks great. If she’s looking down on Shibuya crossing at night in the rain, it’s going to take a minute to get it looking realistic.
Similarly, if you have a few objects with simple materials being lit just by an HDRI, you may be able to get away with even 4 or 16 samples and it’ll look good, and it might only take a few seconds. If you have a large scene with a lot of glass with scattering or dispersion, and complex lighting, you’re probably looking at several thousand samples, each one taking several seconds by itself to calculate. 256 samples in this complex scene would take longer overall to render than 8192 samples in the simple one. Point is, don’t get hung up on the number – it’s only relative to the specific scene you’re working on.
The default number of maximum samples is 16,000. For general purpose use, you’re rarely going to need that many, and it makes things super slow. The idea here is that you can watch the number of samples rack up in the Live Viewer, and decide where to stop it when it looks good enough. The problem is, if you don’t change it before you go to render to the Picture Viewer, it’s going to render all 16,000 of those samples when a couple hundred would have sufficed. It’ll just keep refining and refining the image, long after the point where it won’t make a difference to your eye. An hour and a half later you’ll start to wonder why people were raving about GPU rendering.
A better strategy is to set the samples low in the beginning of your process just so you get a good enough idea of how the scene is progressing. Then change all the other settings which have a large impact on how many samples you’ll need, then come back to the samples and raise them until the scene looks good enough.
Diffuse Depth
Diffuse, Specular and Scatter Depth have to do with how many times a light ray will bounce off, or inside an object. These can dramatically impact the look and speed of the render. It’s actually a good strategy to keep these numbers too high in the beginning, and then lower them as your scene becomes more complete, because they can completely change the look of your scene if they’re too low, and that might lead to hours of trying to adjust materials or lighting to improve your render when all you really needed to do was increase one of these sliders.
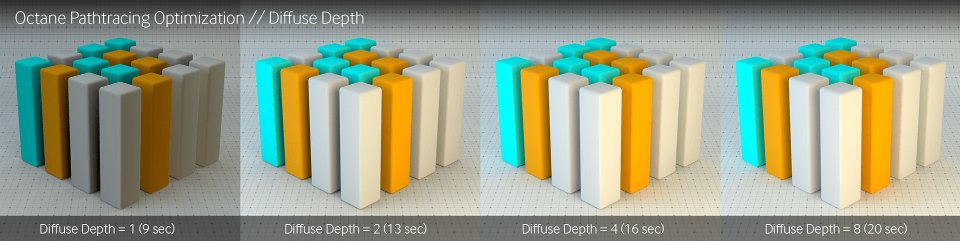
Diffuse Depth, most of the time, doesn’t make a whole lot of difference to the quality once you get over 4. The changes are subtle, and the render time can add up. Octane defaults this to 16, which is usually too high for most cases. Once your scene is fairly well complete, you can usually lower this to around 4 to shave off some time off a render.

A notable exception is if you have a Scattering type Medium (regular ol’ scattering or random walk) in a Diffuse Transmission material. Suddenly Diffuse Depth makes a substantial difference in both the render time and the look of the image. This is still the Diffuse Depth we’re talking about here – there’s also Scattering Depth that we’ll get to in a sec. For now, just try to get all these numbers as low as you can without affecting the look you’re after.
Specular Depth
This one controls the amount of light bounces off of, or through specular type materials. This can really impact the look of your image, particularly if you have a lot of things reflecting each other or a lot of overlapping glass. If this number isn’t high enough, 4th, 5th, 6th… etc level reflections will just end up being blacked out.
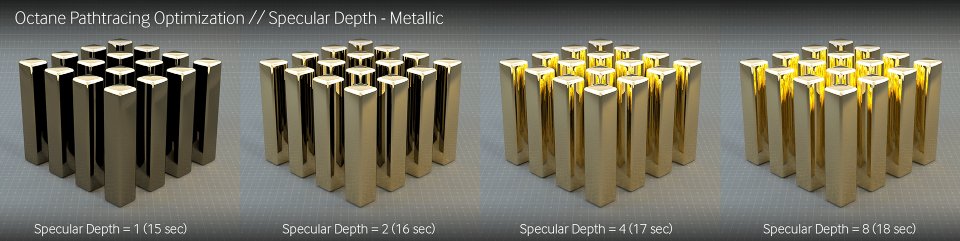
As you can see above, with one bounce, nearly all the reflections are blacked out. With two, most of them are. By 4, it’s probably looking acceptable, and at 8 and above it looks great. Start at 8 – if the blacked out reflections are noticeable, start cranking it up. If it looks fine, start lowering it until it doesn’t, and there’s your threshold (until you add more things in to reflect).
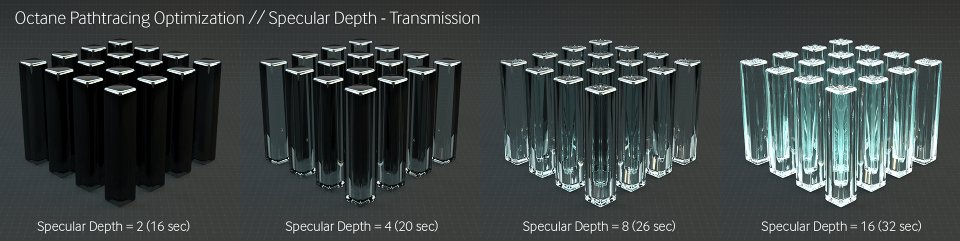
With refractions in a Transmissive material (like glass), there’s a pretty massive difference in the look between even 8 and 16 bounces. 8 is barely usable in this case. You can go even higher than 16 (and you may need to) if you have a whole lot of glass shards in your scene.
Scattering Depth
As the name implies, you mess with this when you are using a Scattering Medium in a material, or a fog volume. It doesn’t affect the scene if you have no scattering or fog, so you can leave it at the default in this case and it won’t add any extra time.
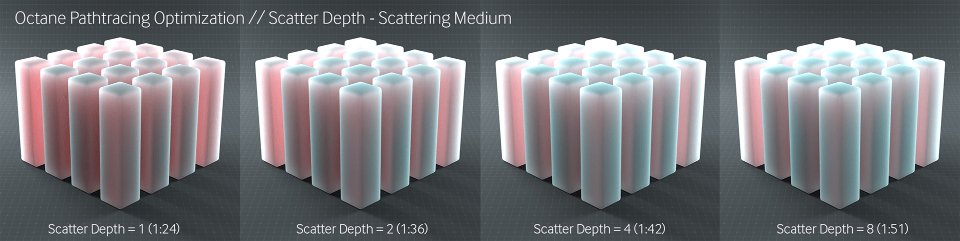
The difference between 1 and 2 here is pretty noticeable – not much of the blue is coming through. It’s only when you get up to 4 that it starts looking really good. 8 is marginally better – probably worth the render hit for a still, probably not for an animation.
GI Clamp
GI stands for Global Illumination, and that once again refers to how much light bounces around a scene. This one is pretty technical, but the default setting of 1,000,000 is usually way too high, and it can have a pretty substantial impact on render speed. Typically you can get away with a value of 1 (yes, one), but sometimes you have to go up a bit higher, but often not higher than maybe 32.
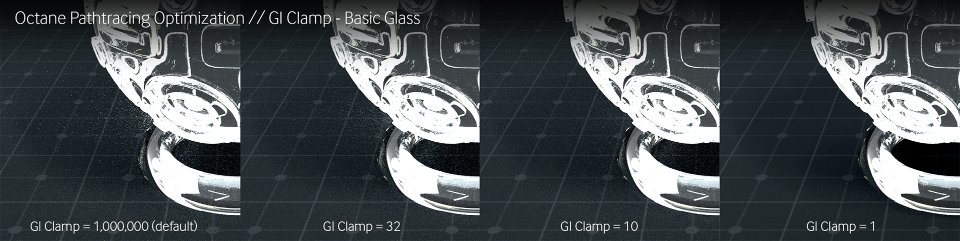
As you can see, it’s really noisy in this scene when the GI Clamp is at the default of one million, but as you reduce it into the realm of reasonable numbers, it gets better and better, until it’s pretty clean at 1 (with the same number of samples!). Values from 100-1,000,000 looked about the same for this particular scene.
So why isn’t it always set to 1? Well, because certain effects – especially the ones with lots of secondary light bounces – suffer pretty badly when this is set too low.
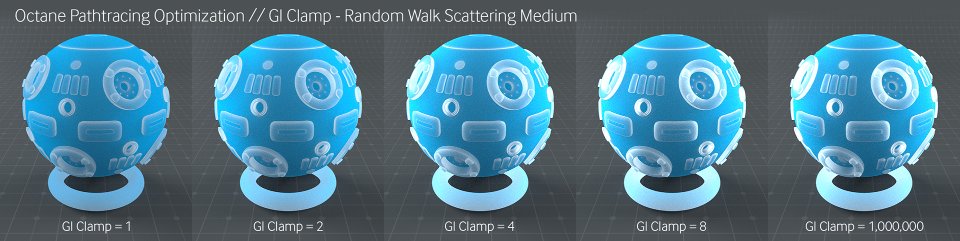
Here’s the effect that just the GI Clamp has on a Scattering Medium material where light bounces around inside the object. It loses a lot as it drops below 8, but then the difference between 8 and a million is pretty much nothing in this scene. As a general rule, Start the GI Clamp at 16, and then almost always adjust it down, especially if you see lots of speckle noise. If you’re doing a lot of scattering or refraction, it’d be worth seeing if bringing it up to 32 or so helps the look, and then just use a different method (hot pixel removal or denoiser) to address the noise this introduces.
Hot Pixel removal
(Camera Imager settings>Imager tab): Fireflies, or hot pixels, are pretty common in render engines. Luckily there are several ways to fix them in Octane. GI Clamp is usually the biggest offender, so that’s always the first thing to try. Sometimes the denoiser will take care of the ones GI clamp doesn’t catch. If you have tons of tiny lights or lights close to the ceiling in an interior, then AI light would be a good thing to try.
Then there’s a Hot Pixel Removal. This is a post-production effect, which is why it’s in the Camera Imager settings instead of the Kernel settings. It’s fast to process and you don’t have to re-render to see the results, both of which are always welcome. This slider starts at 1 for some reason, and you slide it down to remove hot pixels. This also kills detail if you go too low, so be careful. You’ll usually end up around .7 or .5 as a happy medium.
Conclusion
So that’s the end of part 1 on the Path Tracing Optimization topic today. Hope that with those basic information, you could have a general overview and a better understanding of Path Tracing Optimization Guide on Octane for Cinema 4D. And don’t forget to stay tuned for our part two, which will cover stuff related to Artificial Intelligence – Camera Imager Settings. In addition, iRender also provides high-configuration machine rental service to help you save time and costs in the rendering process.
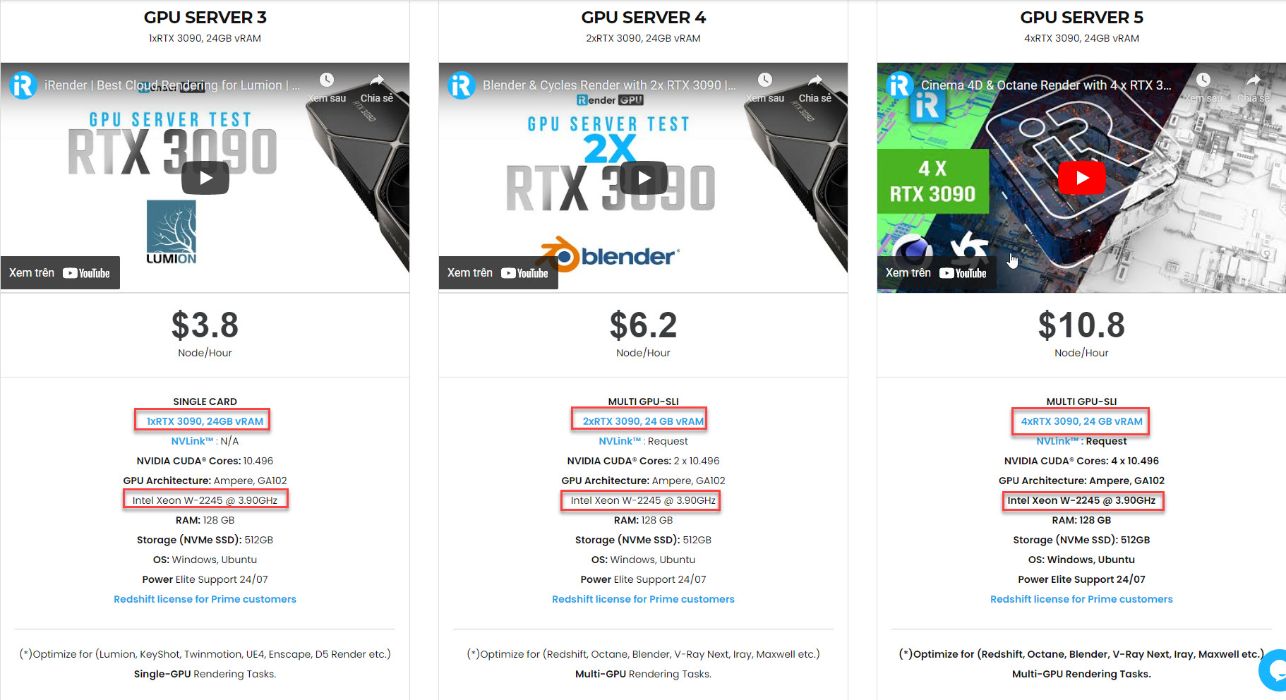
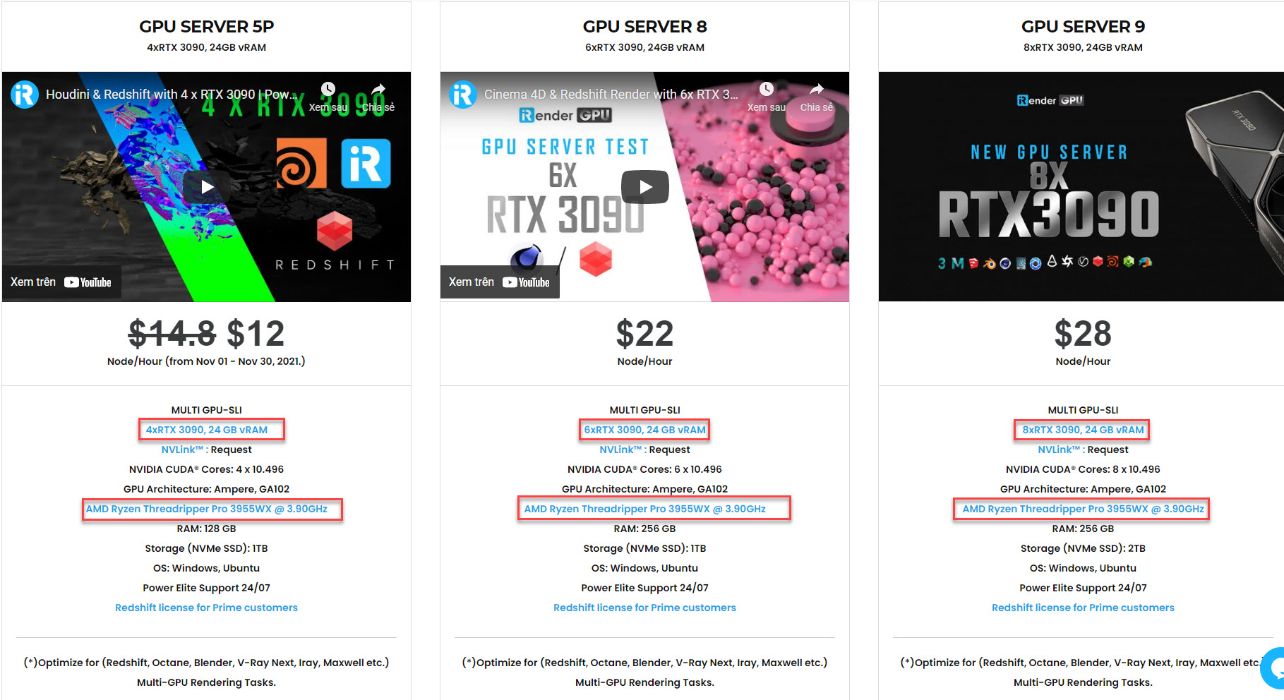
iRender is always up to date with the latest card models from NVIDIA such as RTX 3090 with large VRAM 24GB totally satisfying for software that utilizes the power from multi-cards. Besides, we offer clients the powerful processor Intel Xeon W-2245 @ 3.90GHz/AMD Ryzen Threadripper Pro 3955WX @ 3.90GHz and 512 GB – 1 TB SSD – a great option if your project requires a strong super powerful CPU. With these above powerful servers (1/2/4/6 x RTX 3090) and NVLink combined, iRender brings Octane users unprecedented rendering power, performance, and capability wherever you are. We are proud to shout out that we are one of the most suitable render farms for Cinema 4D Octane. Let’s see a rendering test with Octane project at iRender:


So, do not hesitate anymore. Let’s become a member of the iRender community today to get FREE COUPON to stop wasting pointless hours of rendering. Always at the forefront of cutting-edge graphics technology, we do the rendering, the creativity is yours!
iRender – Happy Rendering!
Reference source: Scott Benson on otoy.com
Related Posts
The latest creative news from Octane Cloud Rendering.