Volume Effect: Make Clouds on Octane render with iRender
In the last blog, we’ve learned how to make fire with Turbulence FD and also how to Create Fog on Octane and C4d. Now let’s come to the last volume effect in this series and also the most difficult one, this section discusses how to create clouds on Octane render with VDB files on iRender Cloud Rendering service.
Regarding iRender Cloud Rendering service, it is one of the most recommended Cloud Rendering services for Octane render and many other plugins. We provide service in the form of IaaS with cutting-edge technology (thousands of RTX 3090, powerful Intel Xeon W-2245 @ 3.90GHz/AMD Ryzen Threadripper Pro 3955WX CPU, Nvlink technique, API integrated, etc) on the market. Here users will remotely connect to those powerful servers, install Octane, or any other software/ plugins on the server and easily start their work same as using their local computers. Now let’s figure out how can we integrate the workflow on Cinema 4D and Octane render into this cloud rendering service to boost the speed.
Install Octane and C4d on iRender Server
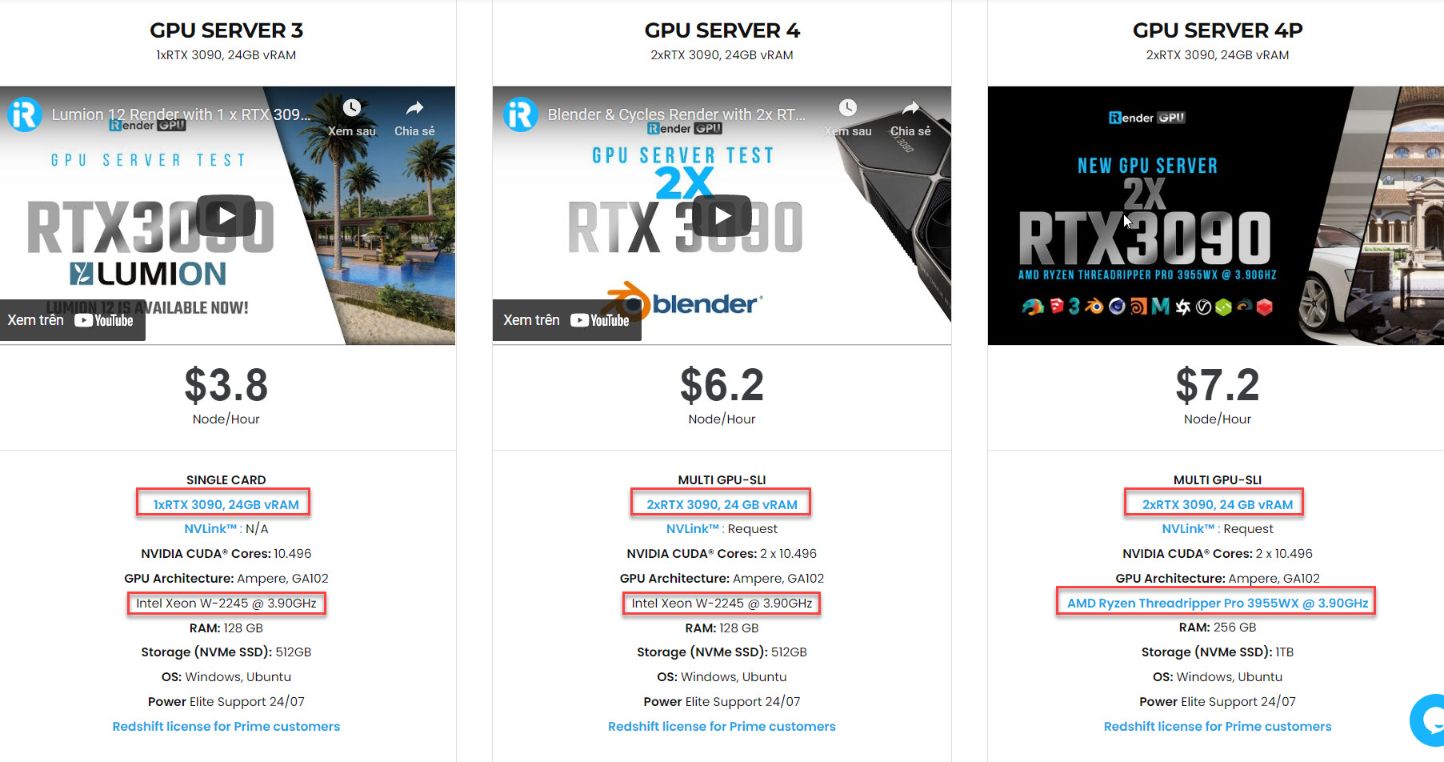
Step 1: Choosing the suitable server on iRender Service
To start with iRender Cloud Rendering, you will need to create an iRender account first. The next step is to choose the most suitable server for your project. All of our servers have 1/2/4/6//8 GeForce RTX 3090 24GB – which is highly recommended for most GPU-intensive tasks, the RTX 3090 provides the best performance in Octane while also having a tremendous 24GB of memory. Besides, we offer clients the powerful processor Intel Xeon W-2245 @ 3.90GHz/AMD Ryzen Threadripper Pro 3955WX @ 3.90GHz and 512 GB – 2 TB SSD – a great option if your project requires a strong super powerful CPU.

Step 2: Connect and set up software on iRender servers
After choosing yourself the most suitable server for your needs, you start this iRender server and connect with the server. Then you can see that a new computer screen will appear, which means you can now take full control of the iRender server.
You can use the server as if it were your own computer. You can download and install any software on this server and all will be saved for your next session. You then start to install Cinema 4D and Octane render or any other plugins that are needed for your work.
Making Volumetric Clouds from VDB File
After finishing installing all of your software and transfer your license to our server to work. We now can start Make Clouds on Octane render.
You can download the “Cloud_01” scene from here. Then open the “Cloud_01” scene. This scene will contain only the Octane Camera upon loading. Leave the camera settings as they are for now. Create an “Octane VDB Volume” from the Live Viewer Object menu. Load the “cloud_bed_003.vdb” file into the File slot. This VDB file should be in the same directory as the scene you downloaded.
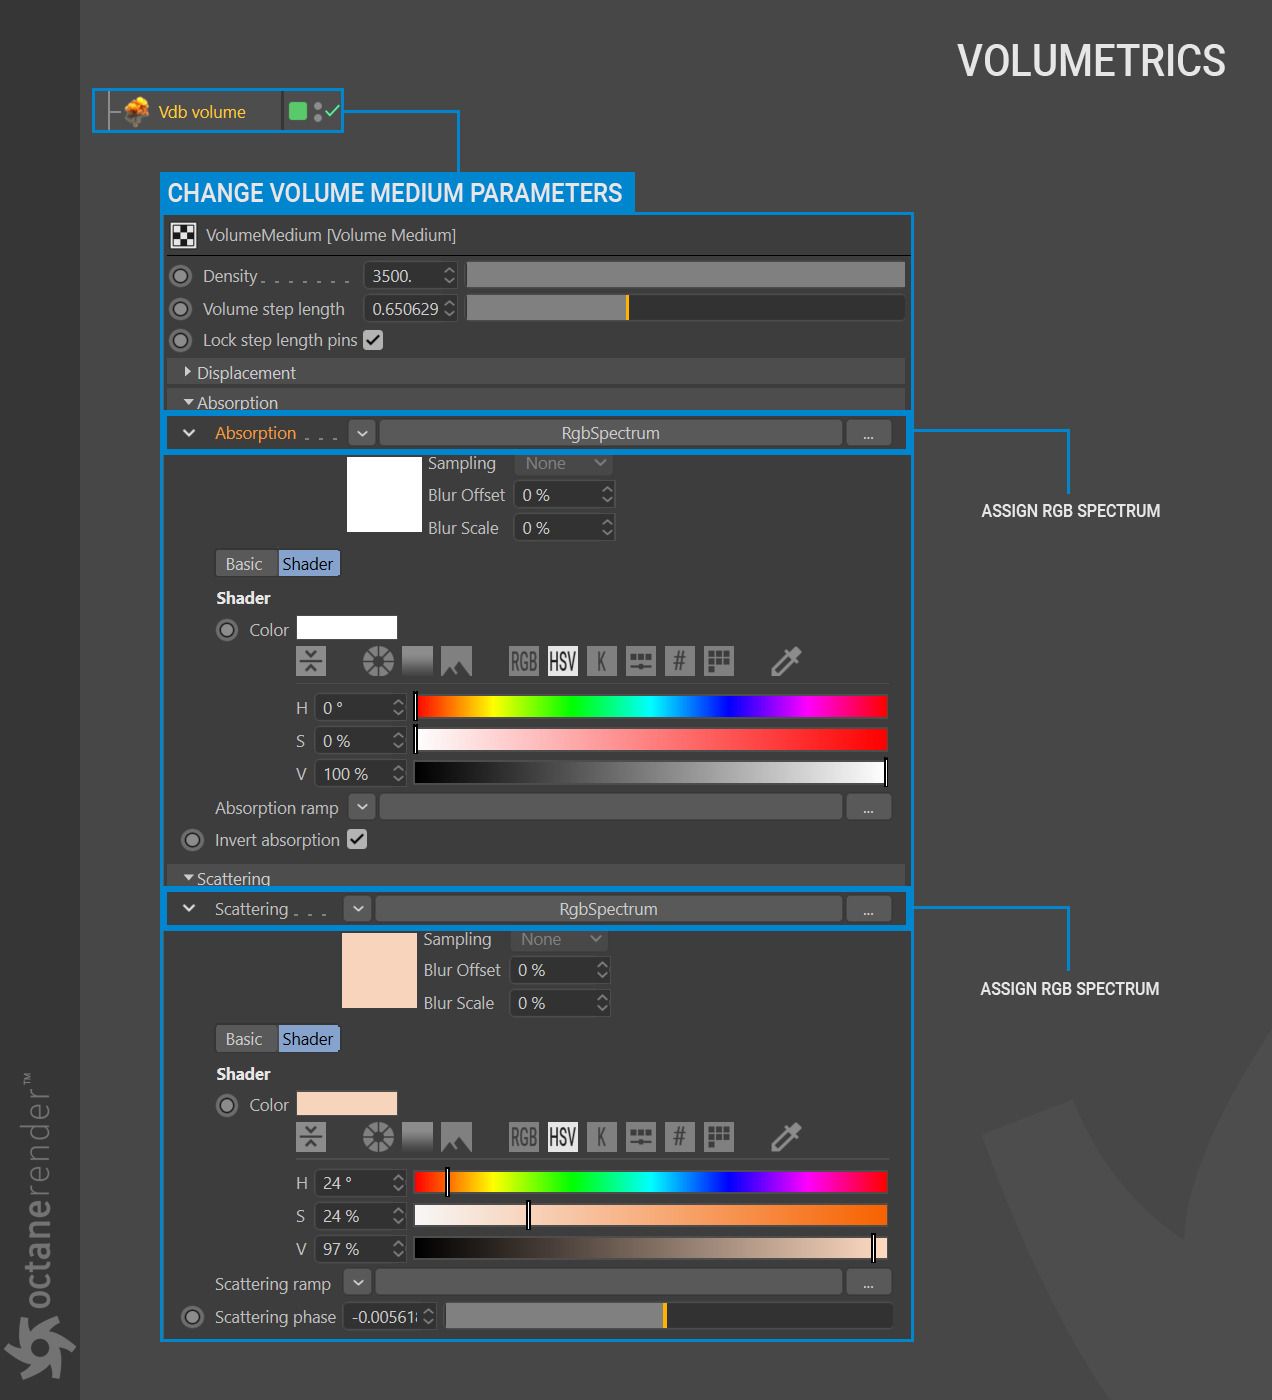
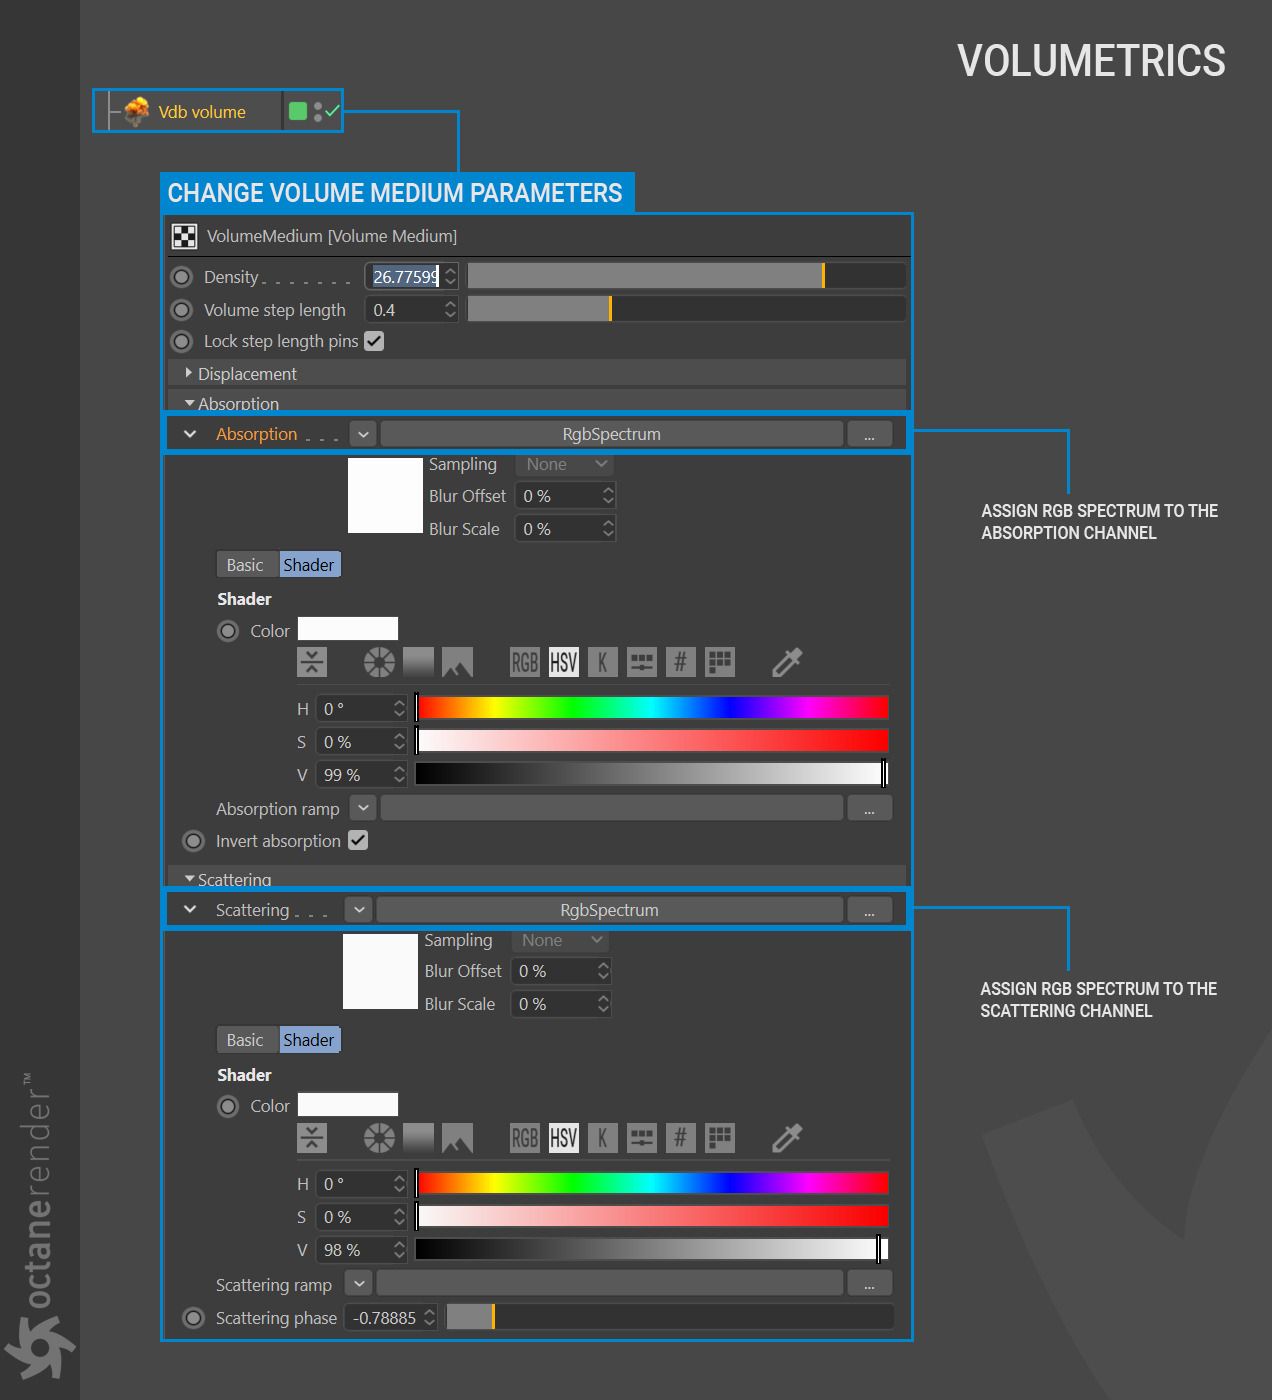
Change the parameters as seen in the image below. Review the info box after loading the VDB file, and note that the “Density” channel is used when creating the cloud. Adjust this volume reference for absorption and scatter in the Volume Medium. The Emission channel is ignored for this example, as the cloud will not be emitting any light.

Now create an Octane Daylight and change the settings and coordinates as shown in the image below.

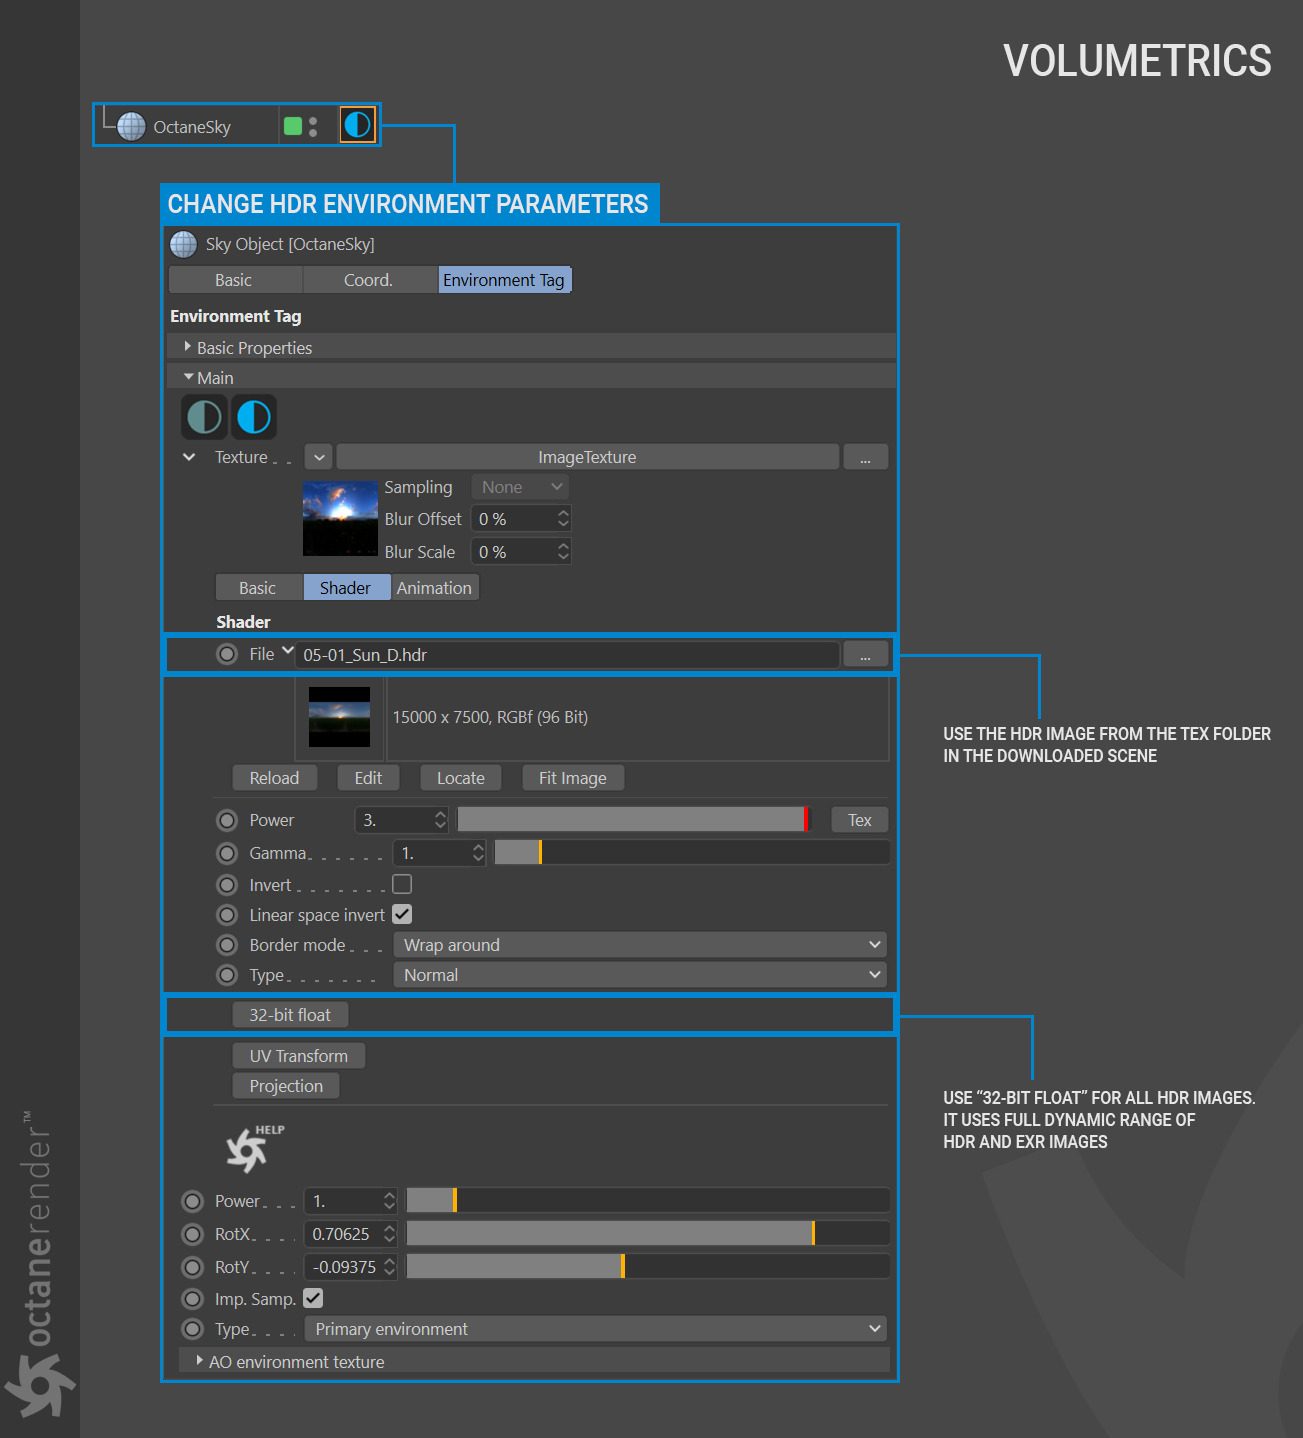
Create an HDR environment from Live Viewer/Objects menu. Load the “05-01_Sun_D.hdr” picture in the “Tex” folder of the downloaded scene file and change the settings as presented in the image below.
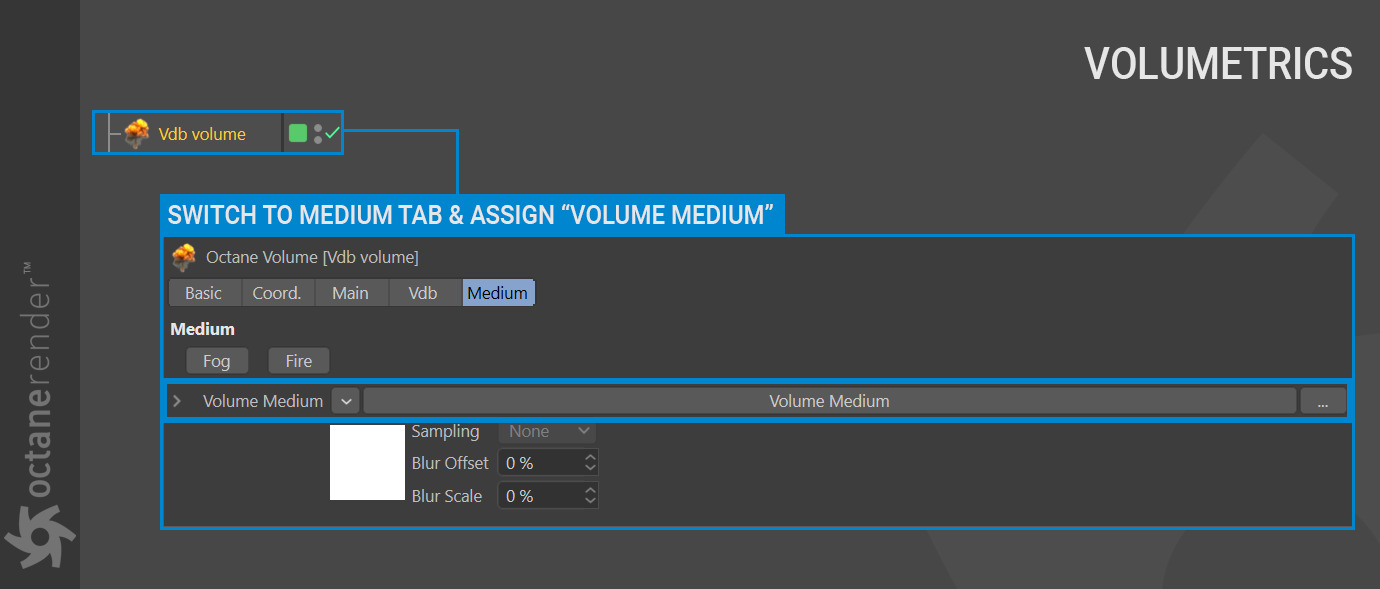
Select the VDB Volume from the object manager and go to the Medium Tab. Click on the drop-down menu icon next to the texture slot and add a “Volume medium” from plugs > c4doctane to the Volume Medium slot.
Next, click on to the Volume Medium and change the volume parameters as shown in the image below.
Run the Live Viewer
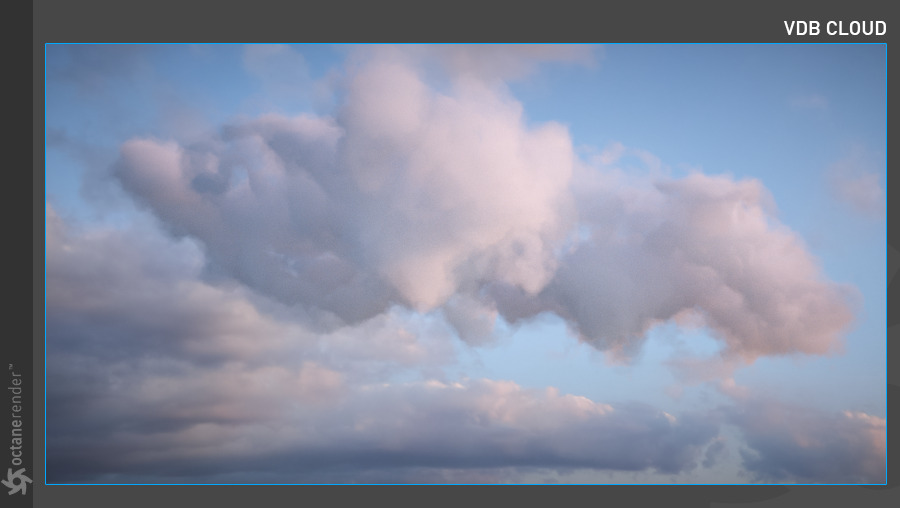
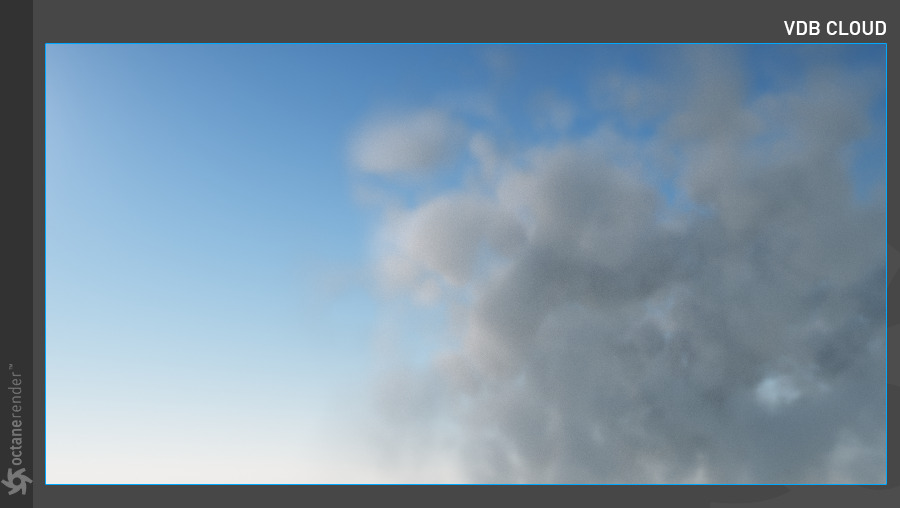
The image should match the illustration below. As shown in the picture, there is a fairly massive cloud in the foreground, and it is matched to the HDR image. For such a cloud mass we kept the density high while we decreased Step Length. The important thing here is the Scattering parameter. In reality, even if they are very small, the clouds are optically thick. This will cause the clouds to scatter a significant amount of sunlight; in other words, the probability that the sun will pass through the cloud without being scattered is very weak. Clouds are also weak absorbers of sunlight at the same time. As a cloud grows, the percentage of sunlight that it reflects increases.
The cloud in the picture absorbs little light. By changing this value, you can make the cloud darker (you can, for example, make a rain cloud). Octane Daylight was set up to provide the necessary illumination to the cloud balanced with the HDR image.
Making Volumetric Clouds using Generate (Unrealistic but fast)
There is still another way to Make Clouds on Octane render. In this mini tutorial, we will produce a volumetric cloud that is not so realistic but yields fast results, using Cinema 4D noise in the “Generate Tab” section. As this section is intended to be created from scratch, there is no file to download.
Create Objects/Octane Fog Volume from the Live Viewer menu. Then select the volume from the object manager and go to the “Generate” tab. From there, assign Cinema 4D noise to the texture section and change the settings as you see in the image below.
Important notes:
You can increase your Voxel size (editor) to work comfortably (e.g., 5). Then you can decrease to 2 or 3 in final render. Be very careful if you enter a voxel size fewer than 2 — small steps increase the number of voxels considerably, rapidly consuming VRAM.

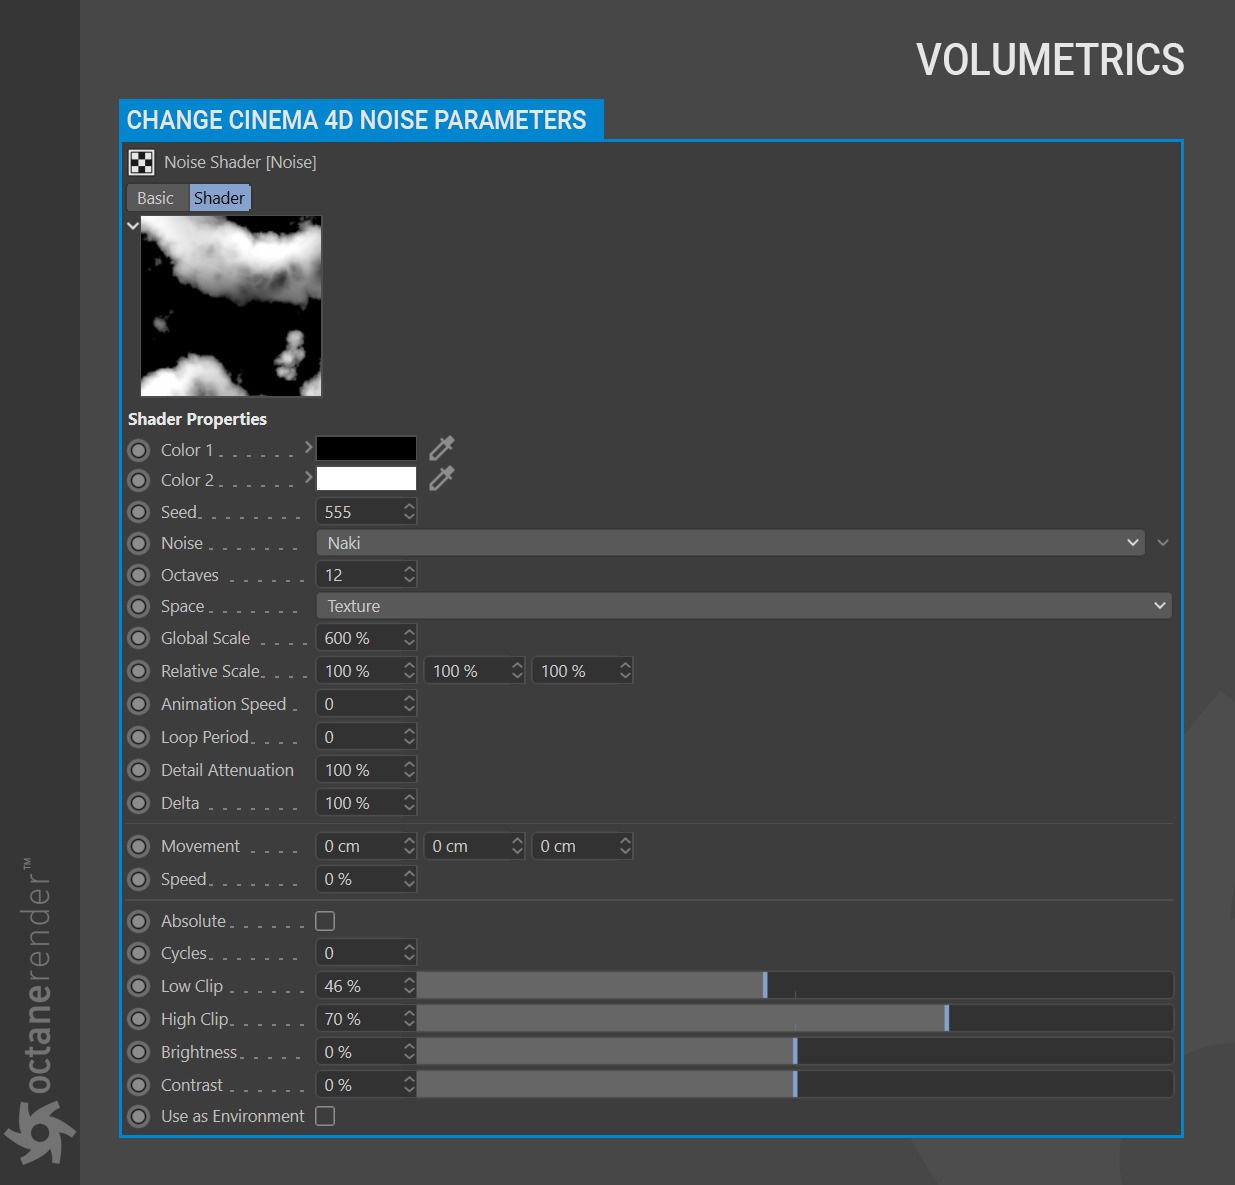
Click on Cinema 4D Noise in the Texture slot and change the settings as you see in the image below. The cloud voxel will be generated by this noise texture.
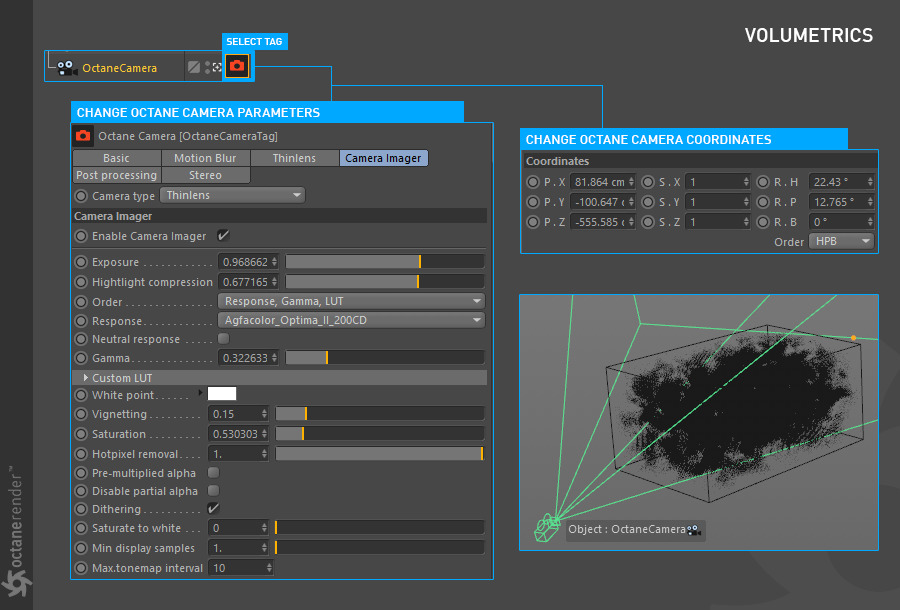
The next step is to create an Octane Camera and change both the coordinates and parameters as shown in the image below.
Time to light the cloud. To do this, choose Objects/Lights/Octane Daylight from the Live Viewer menu and change both the parameters and the coordinates as illustrated in the image below.

From the Object Manager, select the “Volume” object and go to the Medium Tab. Add “Volume medium” from the-drop down menu > plugins > c4doctane > Volume Medium.
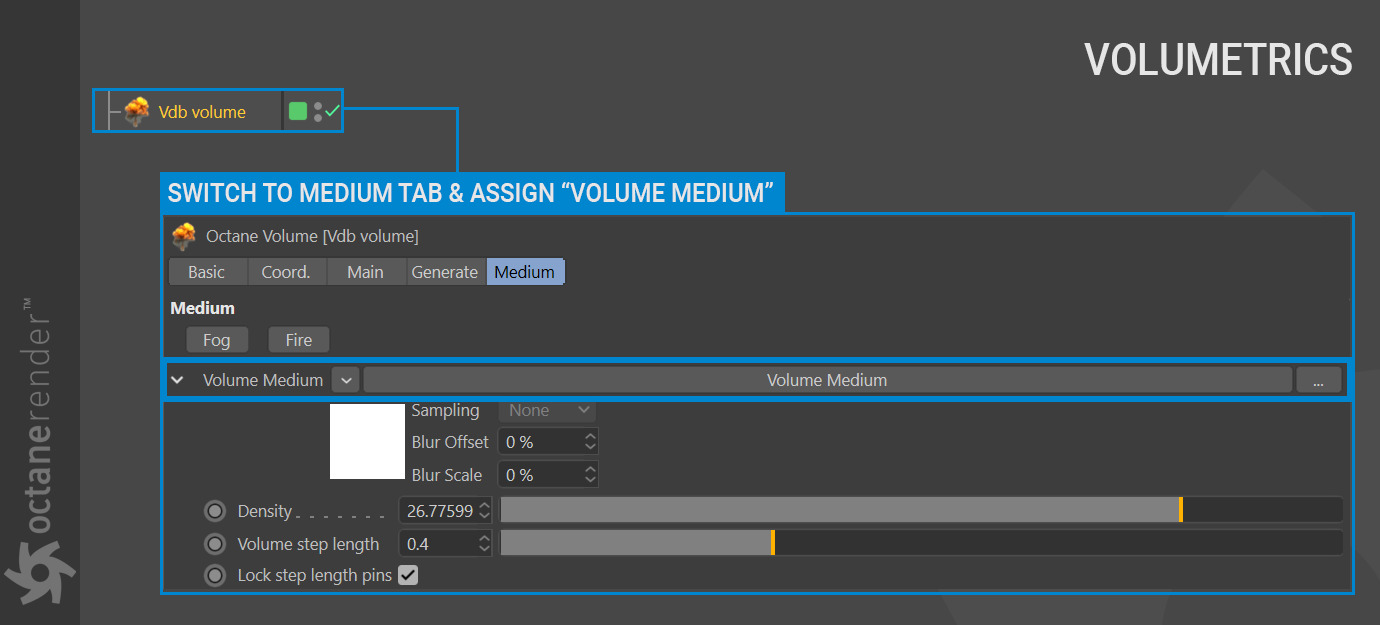
Click on “Volume Medium” and change the volume parameters as shown in the image below.
Now run Live Viewer. A result similar to the image below should be shown. This cloud can be animated by a value in the entering “Animation Speed” found in the noise settings. Or create another type of cloud by changing the Noise Type. Keep the voxel size at reasonable levels (above 2) for faster quick renders.
Conclusion
Hope that this tutorial is useful for you to make Clouds on Octane render. And don’t forget that iRender has many other features which would help you to render faster and easier. For example, if you wish to run Octane on more than one computer at the same time, you will need to purchase an additional license to do so. One great solution is to become iRender Prime customer. You will have a chance to use Octane Enterprise license at no cost.
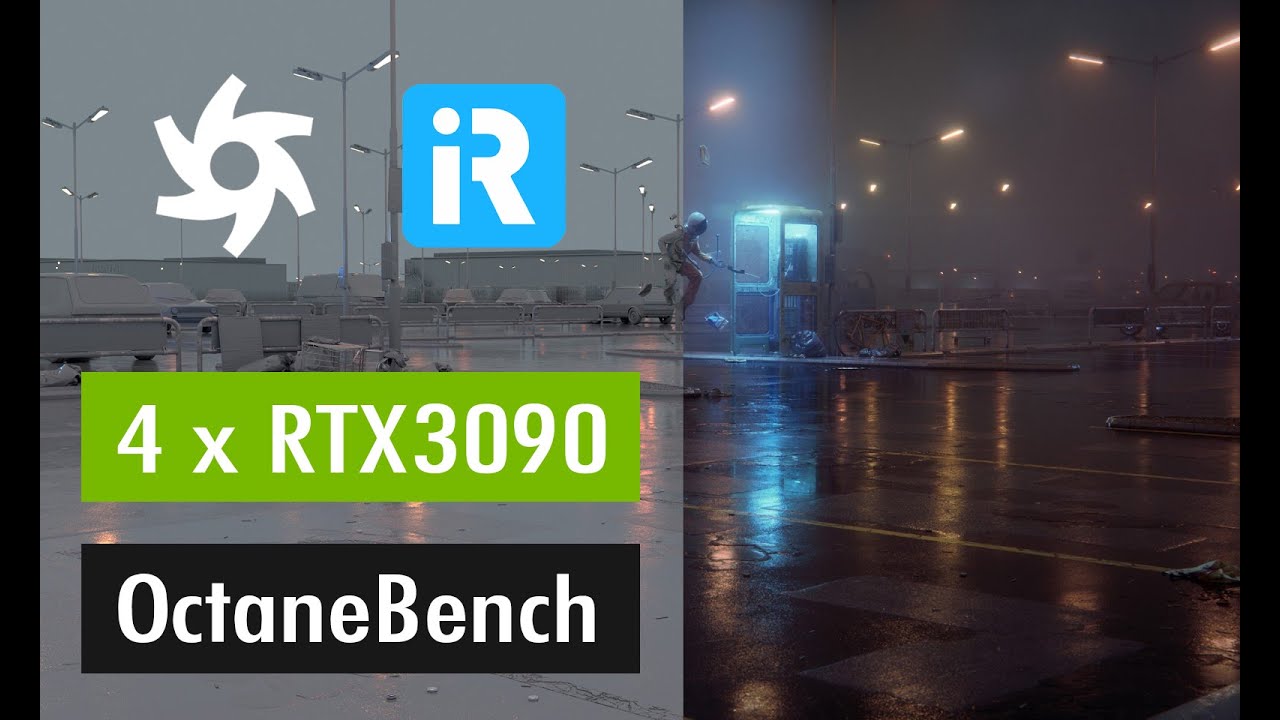
Let’s see some of iRender’s tests with Octane for Cinema 4D on iRender powerful servers below:


Here are some rendering test with Octane project at iRender:

You can create an account via this link to experience our service. And don’t hesitate to contact us at any time for advice and support. We are always available 24/7 and would be happy to assist you.
Sincerely thank you & Have a very great day!
Related Posts
The latest creative news from Octane Cloud Rendering.