
Making fire with Turbulence FD on iRender Cloud Rendering service
TurbulenceFD is a groundbreaking solution to create complex physical animations of gaseous fluid phenomena. More specifically, it adds fire, smoke, vapor, dust, clouds, and similar effects into your existing scenes with an intuitive workflow. This great tool integrates seamlessly with your pipeline supporting Cinema 4D, Lightwave, Realflow, X-Particles as well as Redshift, Arnold, Octane, and Cycles 4D render engines.

While iRender is one of the most recommended Cloud Rendering services for Octane render and many other plugins including TurbulenceFD. We provide service in the form of IaaS with cutting-edge technology (thousands of RTX 3090, powerful Intel Xeon W-2245 @ 3.90GHz/AMD Ryzen Threadripper Pro 3955WX CPU, Nvlink technique, API integrated, etc) on the market. Here users will remotely connect to those powerful servers, install Octane, or any other software/ plugins on the server and easily start their work same as using their local computers.
Now you might wonder how you can take advantage of this cloud service to speed up your workflow/simulation/ render speed. In this article, we will figure out how to produce a fire simulation and show how to create a realistic shader using the OctaneRender® volume medium and TurbulenceFD plugin on iRender Cloud Rendering service.
Install Octane & TurbulenceFD plugin on iRender Server
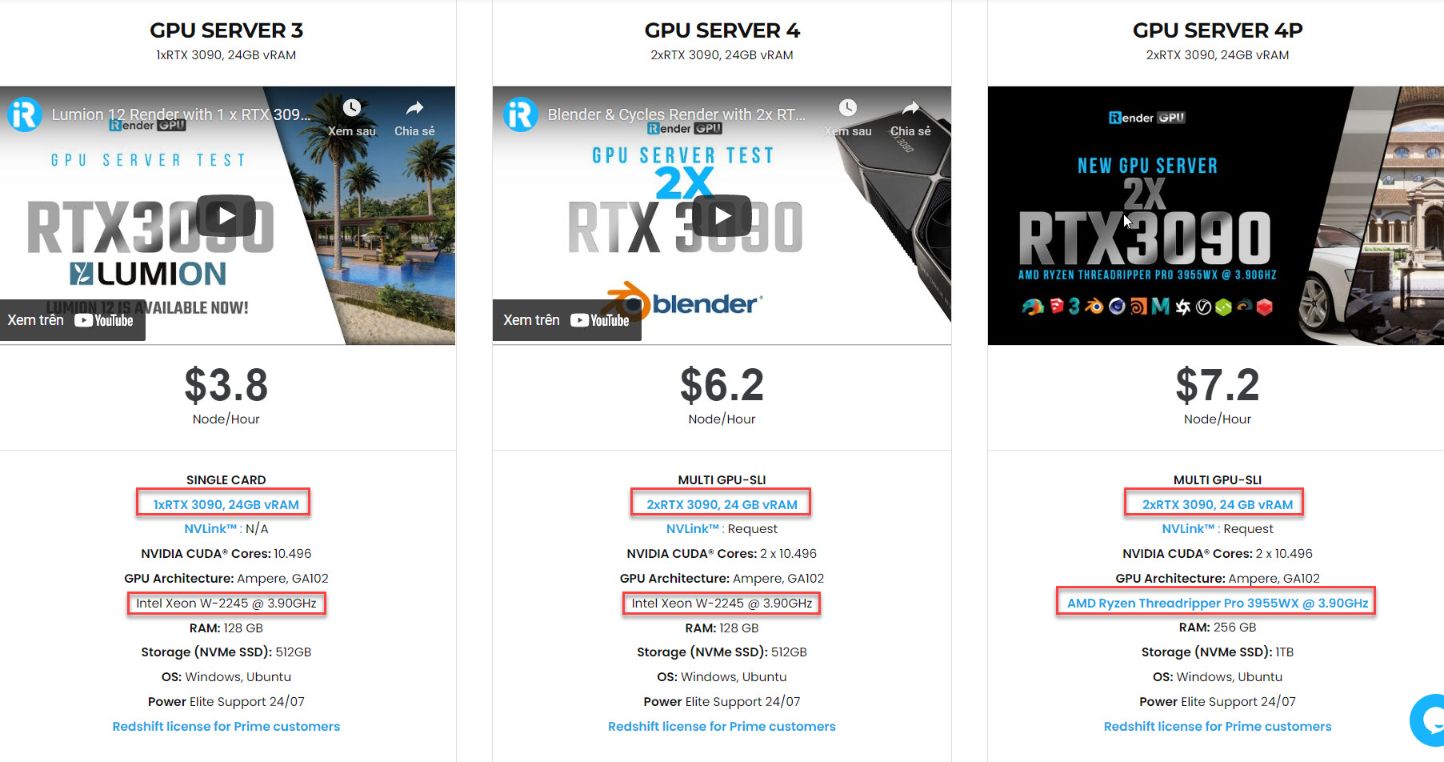
Step 1: Choosing the suitable server on iRender Service
To start with iRender Cloud Rendering, you will need to create an iRender account first. The next step is to choose the most suitable server for your project. All of our servers have 1/2/4/6//8 GeForce RTX 3090 24GB – which is highly recommended for most GPU-intensive tasks, the RTX 3090 provides the best performance in Octane while also having a tremendous 24GB of memory. Besides, we offer clients the powerful processor Intel Xeon W-2245 @ 3.90GHz/AMD Ryzen Threadripper Pro 3955WX @ 3.90GHz and 512 GB – 2 TB SSD – a great option if your project requires a strong super powerful CPU.

Step 2: Connect and set up software on iRender servers
After choosing yourself the most suitable server for your needs, you start this iRender server and connect with the server. Then you can see that a new computer screen will appear, which means you can now take full control of the iRender server.
You can use the server as if it’s your own computer. You can download and install any software on this server and all will be saved for your next session. This tutorial will use Turbulence FD to create a volumetric fire effect If you don’t have this plugin, this section is still worth reading if you have a need for smoke or fire shading for VDB assets from other applications. You then start to install TurbulenceFD in the system before opening the scene.
Making Fire with TURBULENCE FD
After installing the plugin, open the “fire_01” scene. No solved simulations are included, due to the size of the cache file (124 GB) for the fire, so the cache file will need to be generated locally.

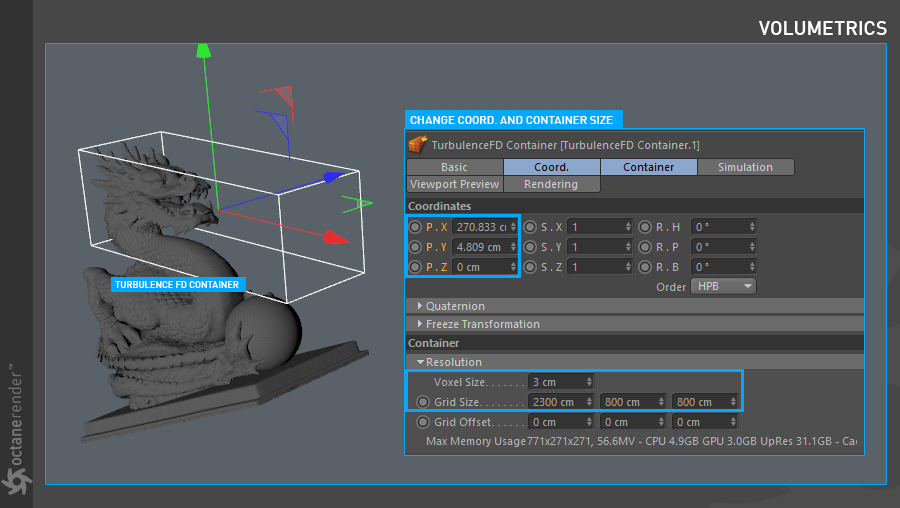
Open the “Fire_01” scene. Create a container from Plugins > Turbulence FD and change the location and size as shown in the image below. Set the size of the voxel grid and place it around the head of the dragon. Increase the Voxel size to 7-8 instead of 3, as this will make the TFD run faster for preview simulation until the final cache.
Continue Making fire with Turbulence: Adding Emitter tag
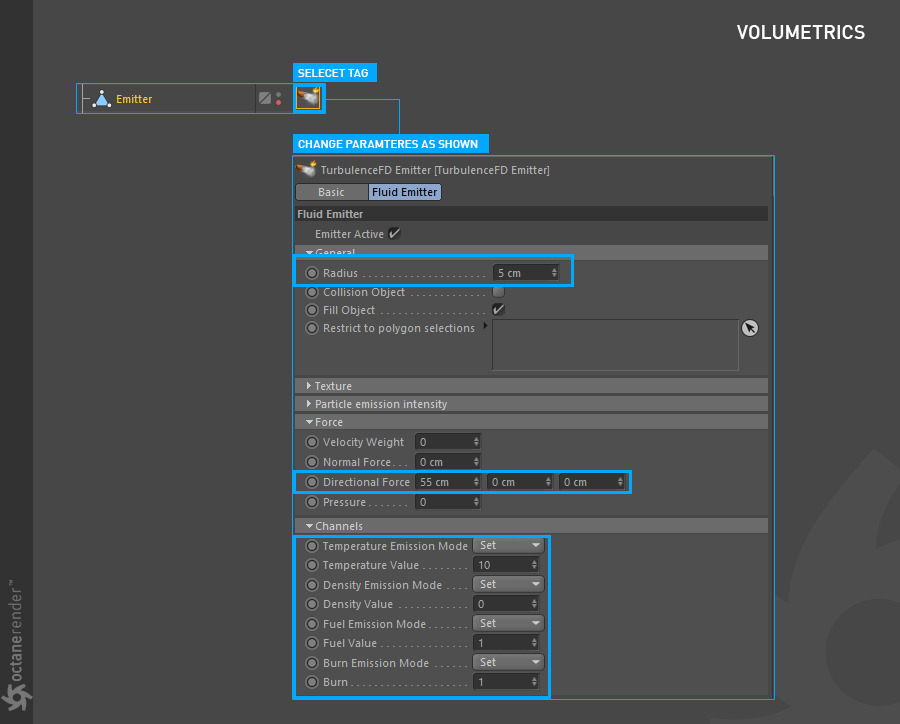
Now add an Emitter tag to the Emitter object, by using the Tag menu in the Object Manager and choosing “Turbulence FD Emitter” from the Turbulence FD menu. Change the parameters as you see in the image below.
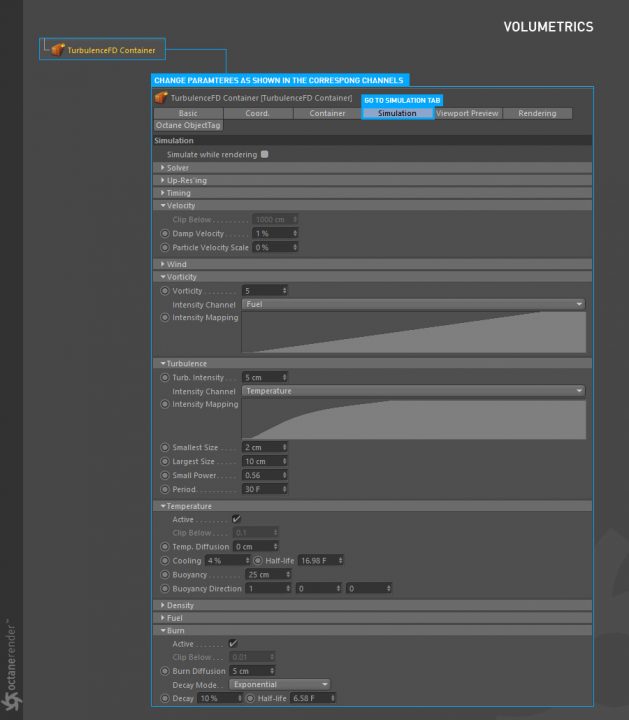
Set the Timeline duration to 300 frames and select “TurbulenceFD container” from the object manager. Change the parameters as you see in the images below.
Viewing the result in the viewport
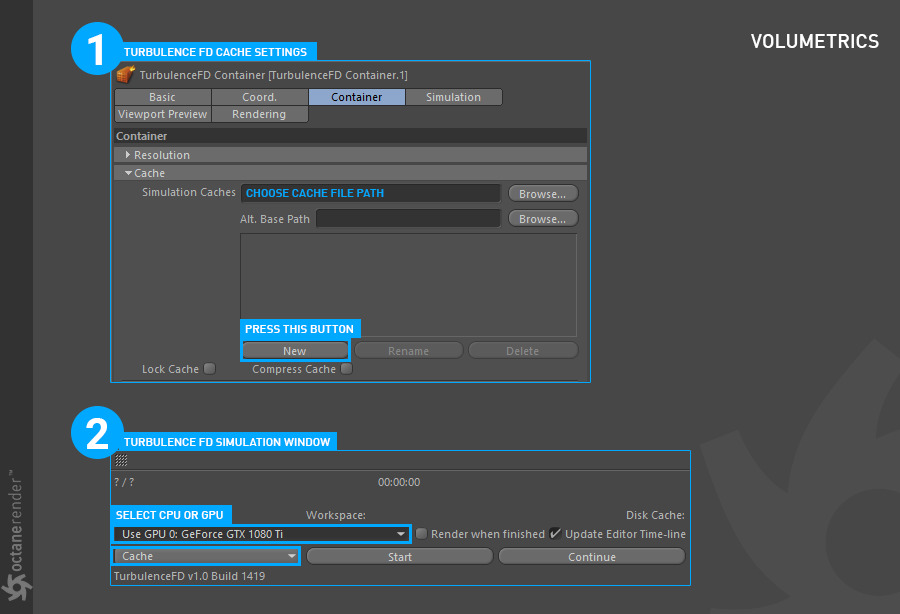
The simulation results can be viewed in the viewport once the simulation has been processed. To do this, first select TurbulenceFD container from object manager and go to the cache tab from the container tab. From here, press “New” and select a fast hard drive (SSD) to save the cache file. Then go to TurbulenceFD from the plugins menu and select “Simulation Window”. Press “Start” and wait for it to finish.
Once the simulation is finished, play it in the viewport. The result will look like the image below.

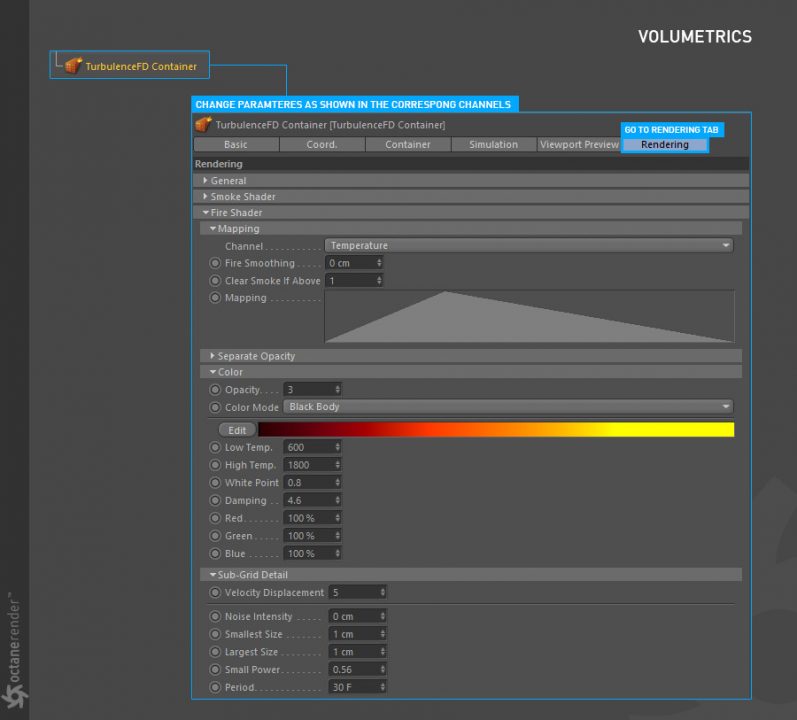
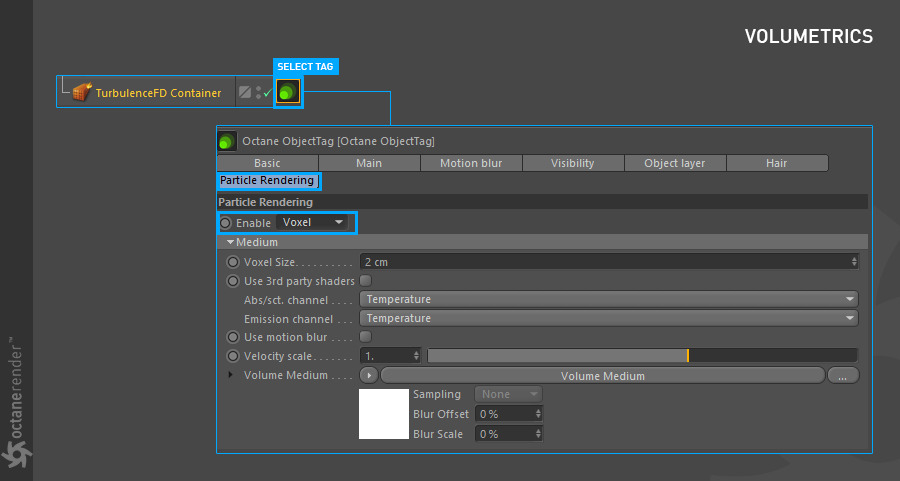
Go to the desired frame (e.g., 265) and select “TurbulenceFD Container” from the object manager. Right-click and assign an Octane Object tag. Go to the Particle rendering tab in the Object tag settings. If it is not active, select “Voxel” from Enable. “Voxel size” sets the voxel resolution. “Abs / Sct.” channel will be used in corresponding channels in the Volume medium, discussed below. “Use motion blur” is for simulating blur if velocity has been cached. “Velocity scale” increases motion blur effect. Volume medium is how the fire is shaded when rendering. Set the Voxel size to 2, abs / sct and the emission channels to “temperature”.
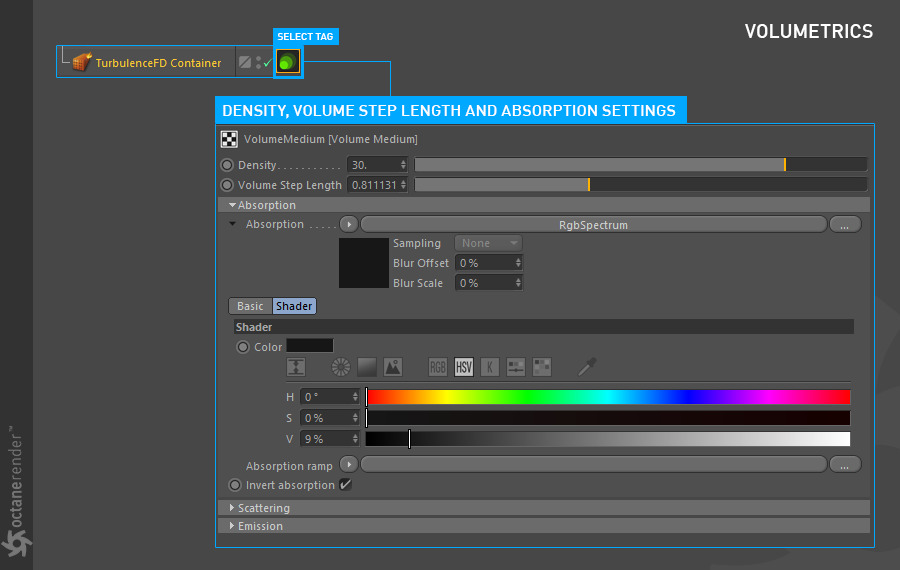
Then click on Volume Medium and change the parameters as you see in the images below.


Run the Live Viewer
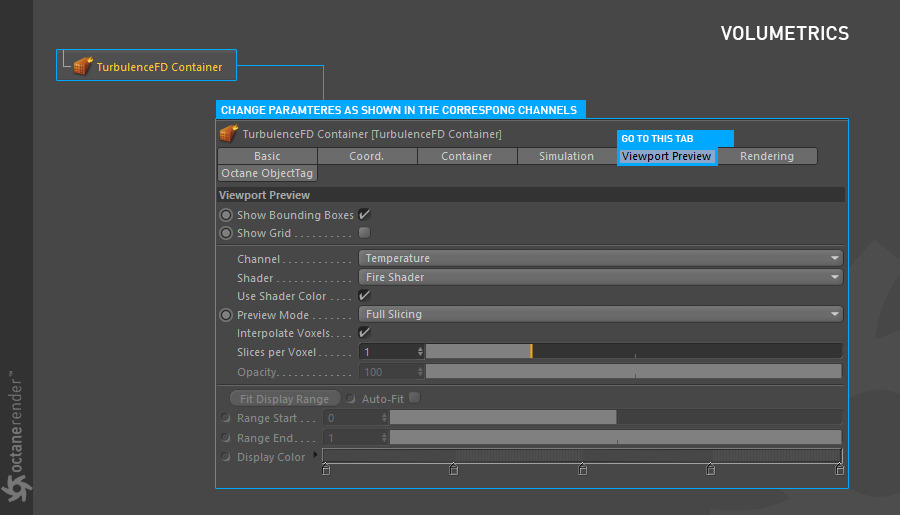
Now run Live Viewer. The results in Live Viewer should match the image below. The volume has been given a relatively low density to give the flames some transparency and detail and the Volume Step length set to make the smoke visible, but not overpowering. Decreasing the Volume Step Length will make the smoke more opaque. It might be necessary to adjust the Max value of the Emission volume gradient to control the brightness of the fire. Lower values will allow the fire to have greater detail before being over exposed. Combine that with the Emission Power to further control the brightness of the fire and balance the overall look.
Conclusion
And let’s check render performance on server 4 (2x RTX 3090) at iRender:


Here are some rendering test with Octane project at iRender:

Hope that today’s article is useful and it can ease your workflow in making fire on Turbulence FD. And don’t forget that iRender has powerful computer that support Octane render and Turbulence FD well. Besides, we still many other features which would help you to render faster and easier. You can create an account via this link to experience our service. And don’t hesitate to contact us at any time for advice and support. We are always available 24/7 and would be happy to assist you.
Sincerely thank you & Have a very great day!
Related Posts
The latest creative news from Octane Cloud Rendering.


