Easy Ways to Create Wireframe Renders in Blender (2025)
Wireframe renders are a simple yet effective way to showcase the structure of your 3D model. They work well for showing off clear topology, creating a technical feel, or adding a unique visual style to a project. Blender makes it easy to create wireframe renders using diverse methods, each with its own pros. In this article, iRender will introduce three simple ways to create wireframe renders in Blender, as well as a few tips to help you get the best results.
Buckle up and let’s go!
3 Easy Ways to Create Wireframe Renders in Blender
Wireframe renders are visualizations of a 3D model, showing the edges of a mesh instead of solid surfaces. They are often used in technical visualizations, architectural previews, educational tutorials, and art projects. Unlike shaded or textured renderings, wireframes focus entirely on the model structure.
In Blender, the quickest way to view wireframes is to enable them in the Overlays panel. This feature works in any frame mode, allowing you to adjust wire thickness, opacity, lighting, and even wire color to get the look you want. It’s perfect for previewing the structure while you work. However, these settings only affect what you see in the viewport, but when you hit render, the wireframe won’t show up in the final image.

This is where specialized rendering methods come in. To really capture the wireframe in your final image, you’ll need to use one of Blender’s built-in tools or modifiers, depending on the look you’re going for and how much control you want. These methods not only make the wireframe visible in your render, but also give you more control over its style, color, and thickness. They make for a more engaging presentation, portfolio, or stylized 3D art piece. Each method has its own pros and cons, and choosing the right method depends on your workflow and purpose.
Let’s take a look at three simple methods you can use.
Use Viewpoint Render
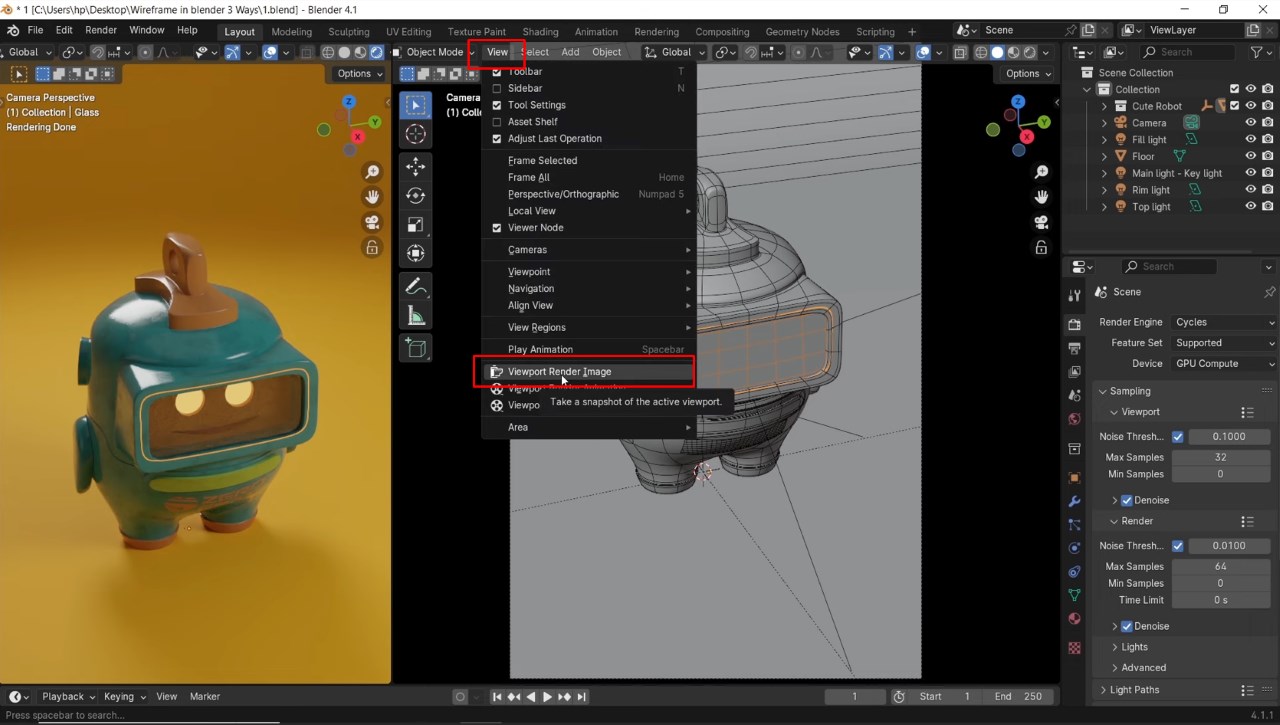
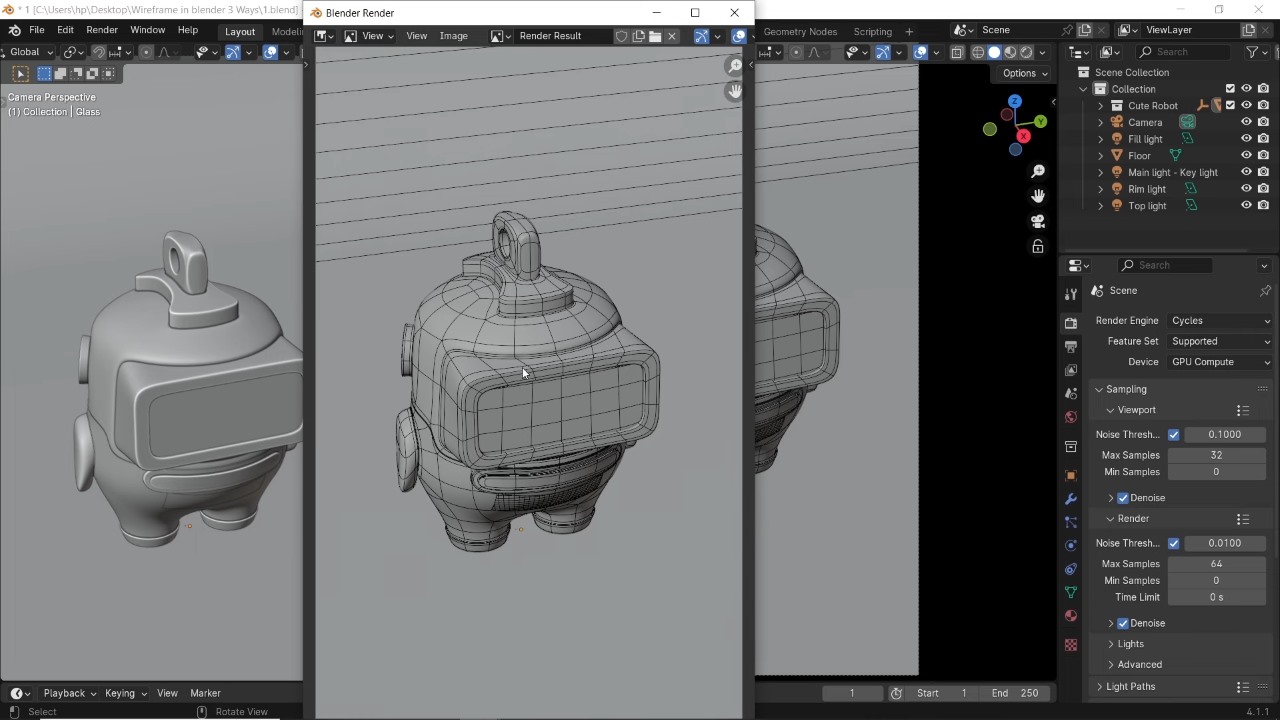
The quickest way to create wireframe renders in Blender is to use the Viewpoint Render option. You’ll find this option in the View menu in the top bar. This will capture exactly what you see in the camera view, including all the grid lines.
Before rendering, you should adjust the Overlays settings to hide any extra lines you don’t want, and press Alt + A to deselect them all. This will give you a clean wireframe result.
Since Viewpoint Render only uses 8 samples, the quality isn’t perfect, but it’s pretty fast. This method is great for quick previews, inserting reference numbers into presentations, or even testing out quick animations. For animations, eight samples are usually good enough to keep things looking smooth without taking up a lot of render time.
Note: Before rendering an animation from the viewpoint, set an output file (as a video or PNG sequence) so Blender knows where to save the results.
Freestyle Render Method
If you want more control over the look of your wireframe, Freestyle rendering is the next step. First, turn off the wireframe overlay to keep your viewport looking clean. Then, in the Render Properties panel, scroll down to the bottom and enable Freestyle, which is off by default. You’ll see two settings for mode and pixel size (background line thickness), but leave those alone.
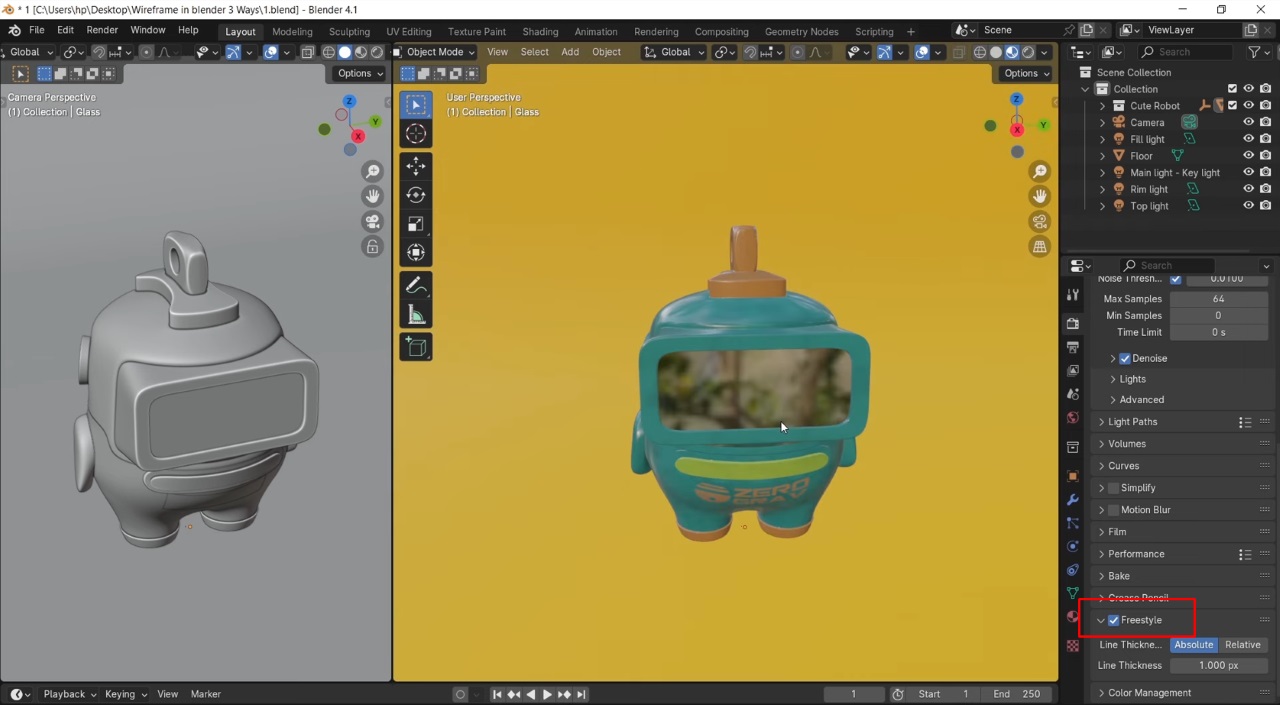
Next, create an override material – a single material that will be applied to all objects in the scene. Add it to any object without assigning it, give it a recognizable name, and choose a neutral gray color. In the View Layer Properties, under Override, assign this material so it appears in both the viewport render and the final result.
Note: the override tab is only visible when Freestyle is enabled.
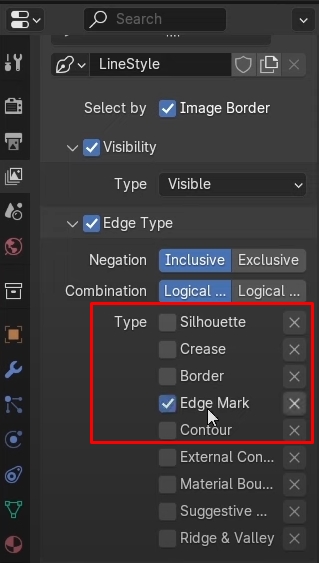
When Freestyle is enabled, you’ll see a new Freestyle Line Set section in the Layers tab. Under Edge Type, there are three styles enabled by default, turn them off, as we only need Edge Mark for this method.
Now select all the objects in the scene, switch to Edit Mode, and set the selection mode to edges (shortcut: 2). Open the Edge Menu and mark all as Freestyle Edges. This will tell Blender exactly where to draw the lines.
You can adjust the line style, color, and thickness to suit your needs. A small pixel size is best, 1px is too thick. So pixel size around 0.3px usually gives a cleaner result.
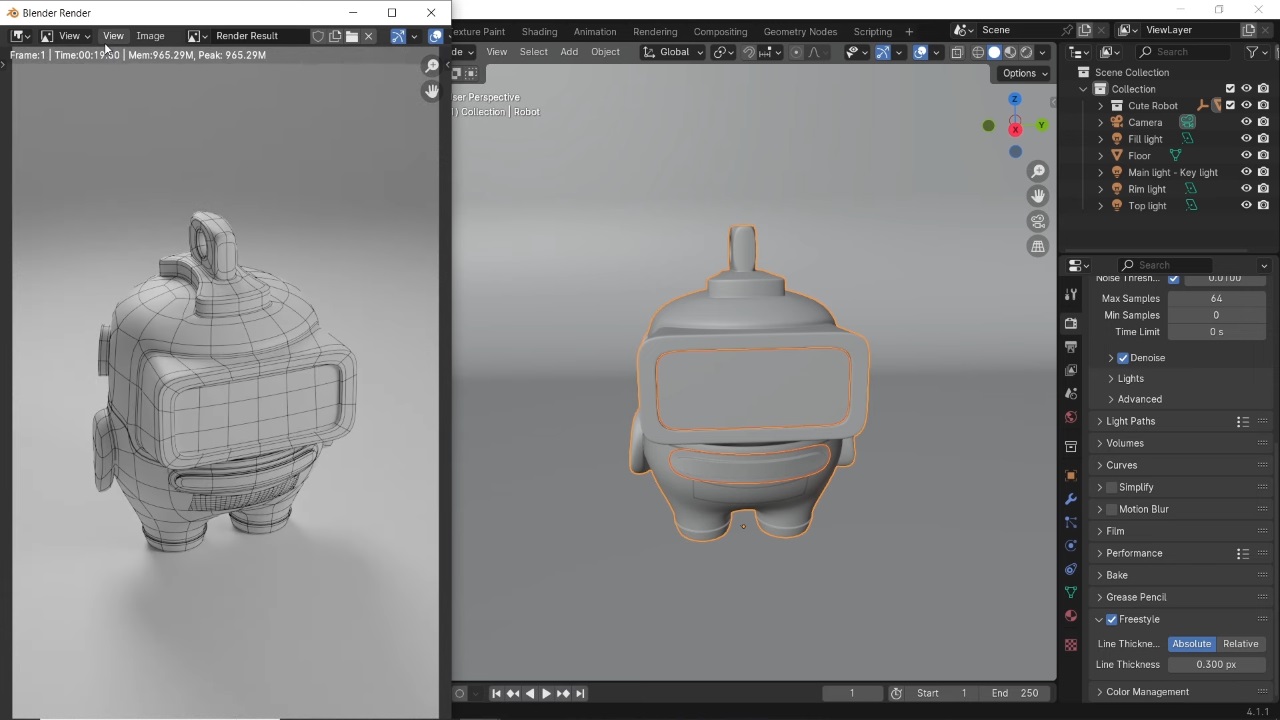
When you render, Blender will process the main image first, then add the Freestyle lines on top. This process takes a little longer, but you get a sharp, stylized wireframe effect. Also, if the render quality is not satisfactory, you can easily improve it by increasing the render resolution and sample count.
Use Grease Pencil and Line Art Modifier
The third method is also the simplest. We’ll still use the overlay material from before, but this time, add a Grease Pencil stroke from the Add menu and move it outside the camera’s view. With the stroke selected, go to the adjustments panel and add a Line Art modifier.
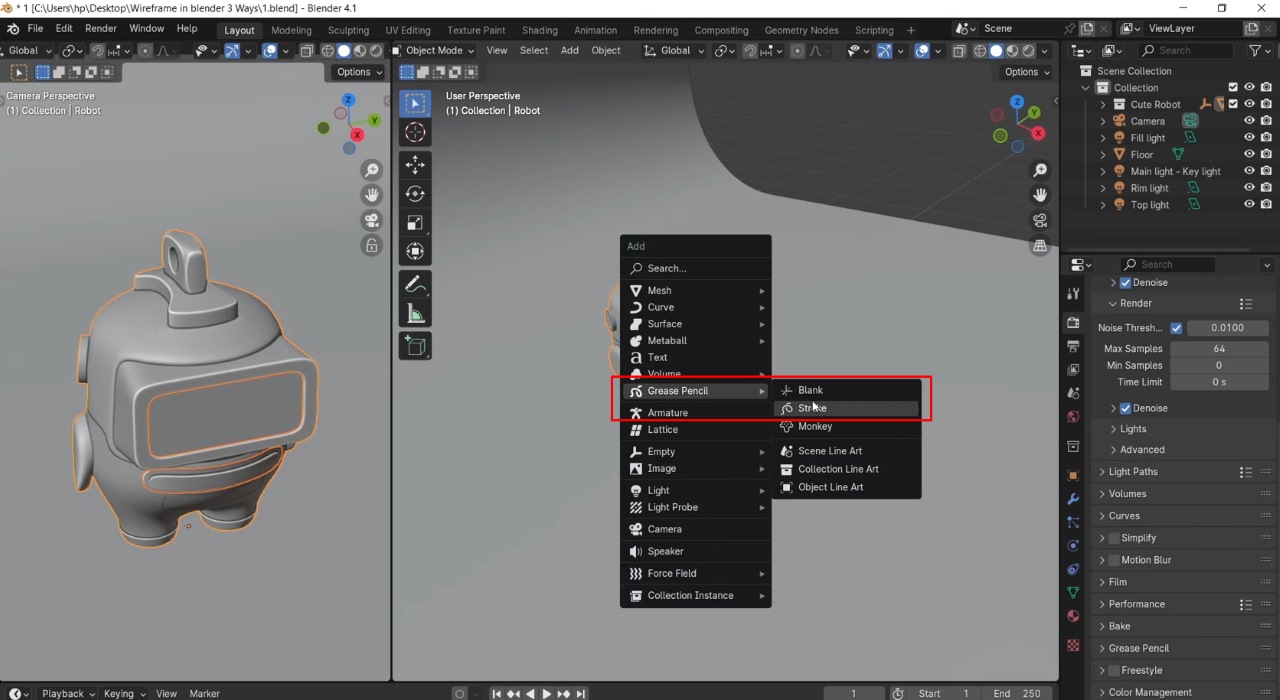
For the Source Type, you can choose to apply the wireframe to a single object or the entire set. The character here is split into three parts but grouped into a set, so I’ll stick with the default style and select that set. Set the layer color to black so it stands out against the white overlay material.
With the Line Art modifier enabled, you’ll see the wireframe right in the viewport, making it easy to adjust before rendering. For small objects, a thickness of 1 or 2 is fine. You can also adjust the opacity to fine-tune the look. The rest of the settings are similar to the Freestyle method, just make sure Edge Marks are enabled and experiment with the other options to suit your style.

Once you are happy with the settings, hit render. This method is quick, easy to copy between files, and great for quick results, but can be more taxing on the viewport than other methods. Choose this method when speed and flexibility are most important.
Some Tips for Better Wireframe Renders
Here are a few techniques that can make a big difference if you want your wireframe renders in Blender to be clean, legible, and visually appealing.
1. Use flat shading for crisper edges
Switch your shading mode to flat instead of smooth before rendering. This helps define edges more clearly, as smooth shading can blend faces together and make the wireframe harder to read, especially in dense meshes.
2. Minimize overlapping geometry
Overlapping faces or duplicate geometry can cause messy, flickering lines in the wireframe. Before rendering, check your model for hidden overlaps or mesh intersections and clean them up. This step is especially important if you are exporting from CAD or importing from other 3D tools.
3. Combine methods for more flexibility
You don’t have to stick with just one wireframe technique. For example, you can render once with Freesyle for stylized edges and once with Viewpoint Render for a rough, technical look. You can then combine them in an image editor for more control over the final result.
4. Add a solid background material
If your model uses a white or light wireframe, place a slightly darker solid material behind it. This contrast will highlight the edges and prevent them from blending into the background. For darker wireframes, use a light or neutral background color.
5. Optimize for large or complex scenes
Rendering wireframes can become slow with high-poly models or heavy scenes. If your computer is struggling, consider using a cloud rendering service like iRender. We offer GPU-accelerated rendering, which significantly reduces wait times. Especially useful when working under tight deadlines.
iRender - The best render farm for Blender
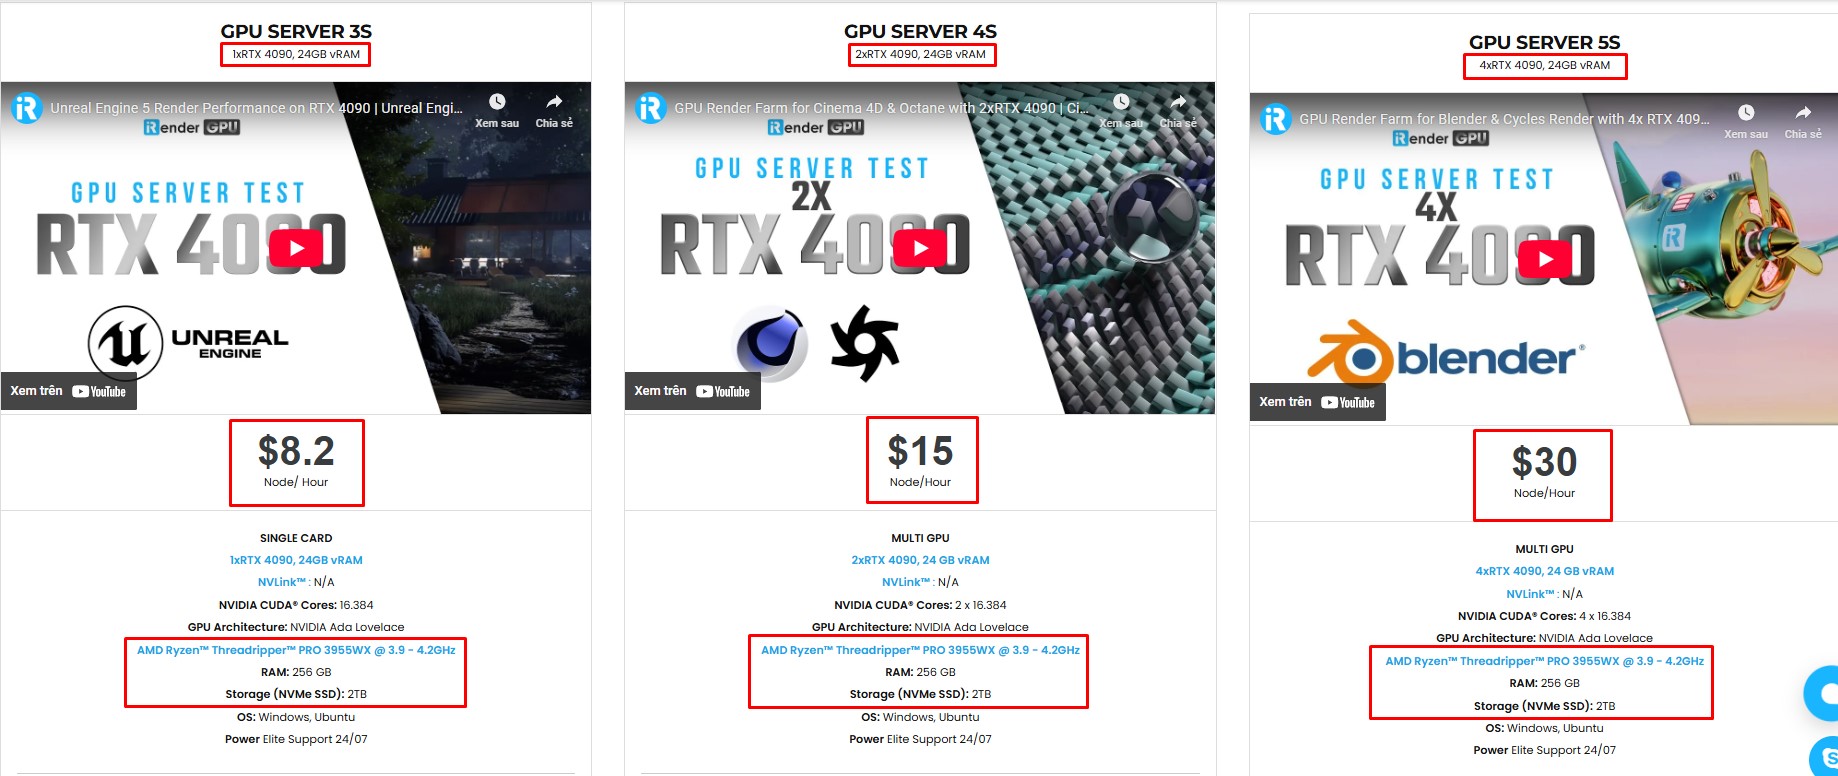
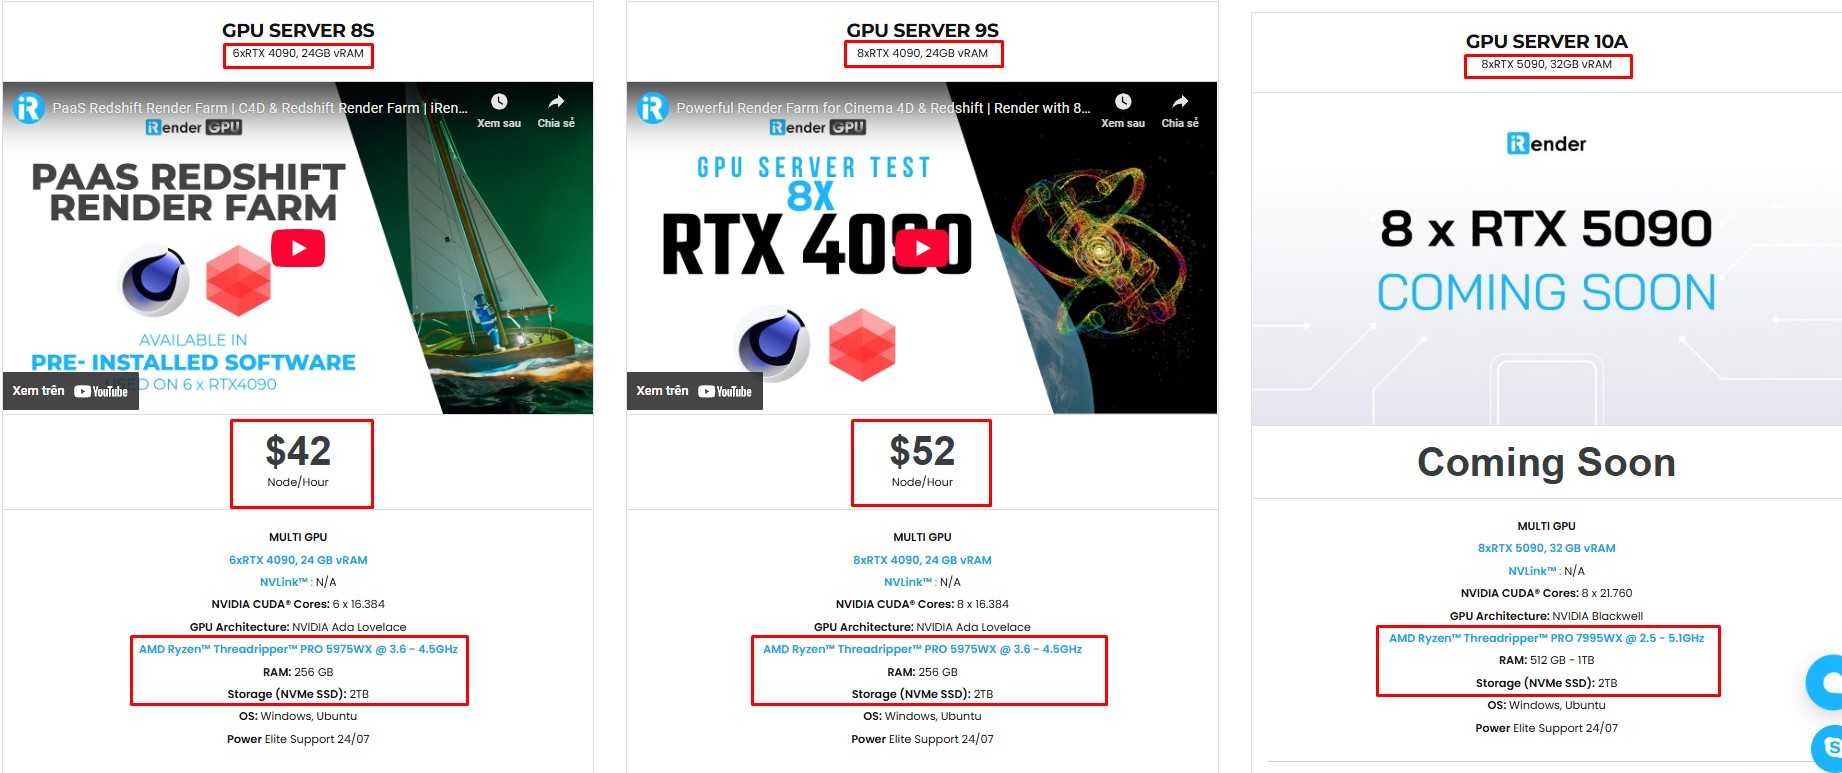
iRender is the best render farm for Blender with support for all Blender versions, and any render engines or plugins needed. We give you access to high-performance GPUs, so you can render faster and more efficiently, no need to upgrade your own hardware. All servers are equipped with:
- AMD Ryzen™ Threadripper™ PRO 3955WX (3.9-4.2GHz) or
- AMD Ryzen™ Threadripper™ PRO 5975WX (3.6-4.5GHz)
- (1/2/4/6/8x) – RTX 3090/4090
- 256GB RAM
- 2TB NVMe SSDs
Simple Your Workflow with Blender Preinstalled
Our servers have Blender 4.4.1 preinstalled. You just need to transfer your files, connect to the remote machine. Then you can render yourself like the way you do on your local PC. Setting up ONCE and your working environment will be saved and ready to use at any time.
Why choose iRender?
Unlike other services, iRender lets you upload and download files without starting the server, saving you both time and money. We offer a Desktop app for Windows with a full feature set and a simple Drive app for macOS for easy file transfers. Here’s why iRender is a top choice for your rendering needs:
- 100% Software Support: We support all 3D software, their plugins, and render engines.
- Full Control: Our service will give you full control over the servers you rent. Therefore, you are free to create your own working environment.
- Go Green: We are committed to using 100% solar renewable energy towards environmental sustainability.
- Real-human 24/7 Support: Our professional support agents and technicians guarantee to bring you the best rendering experience.
Let’s see our latest performance test for Blender Cycles on our servers! The results will surprise you!

If you still wonder if this is the right place for your project, REGISTER NOW to get a trial and receive a 100% bonus promotion for your first transaction within 24 hours of registration with us.
This August, let’s wrap up summer and enjoy exclusive up to 120% bonus points!
For more detailed information, please contact us via Live chat 24/7 or WhatsApp: +(84) 912-785-500 or Email: [email protected]
iRender – Happy Rendering!
References: Architecture Topics
Related Posts
The latest creative news from Blender Cloud Rendering.