Explaining Houdini Volumes rendered by Octane
Houdini and Octane are one of the most used combo in the VFX industry. Octane is fast, unbiased, rich features and have a long history supporting Houdini. Its features include Volumes, where you can render and modify to get the best result. In this article, let’s explain Houdini Volumes rendered by Octane.
Volumes
You can use Octane to render many things from Houdini, including Volume and VDB primitives, as well as OpenVDB files.
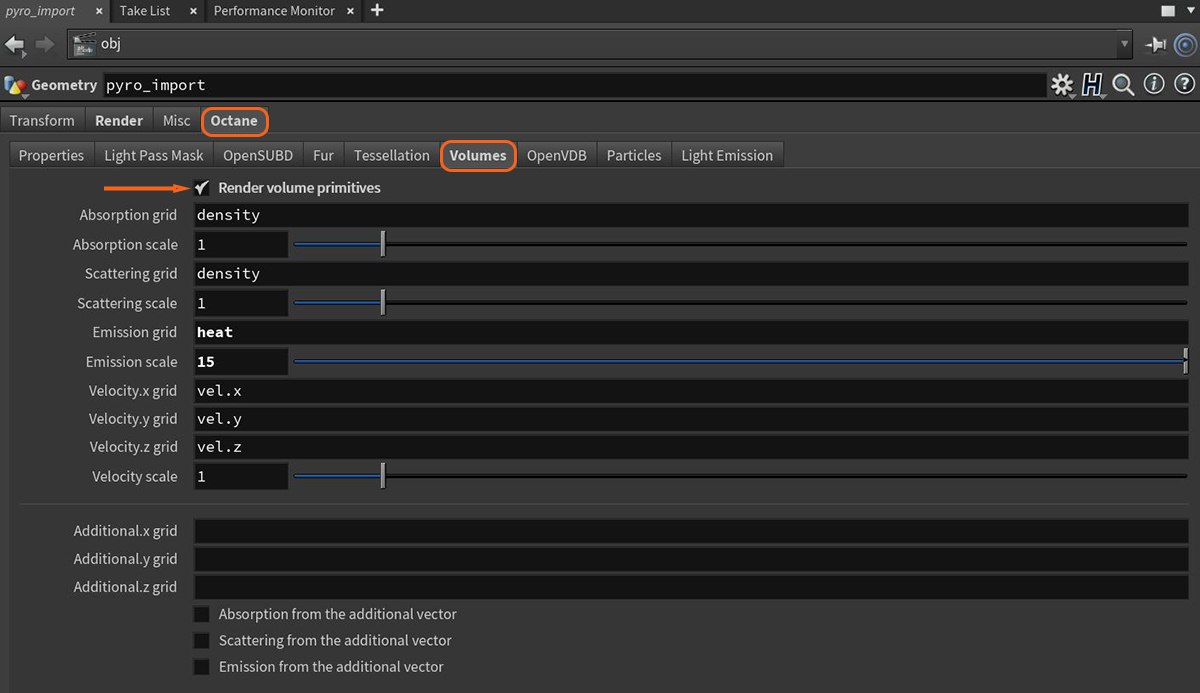
You can render the internal Houdini Volume or OpenVDB Primitives by enabling the volumetric rendering in the Octane ObjParms – Volume tab on the Pyro or Volume geometry node like the picture below.
In this tab, you can configure volume grids and scale, velocity grids and additional vector grids.
If you want to render external OpenVDB files, you can come to VDB_import tab > Octane > OpenVDB and configure the all the parameters as you want.
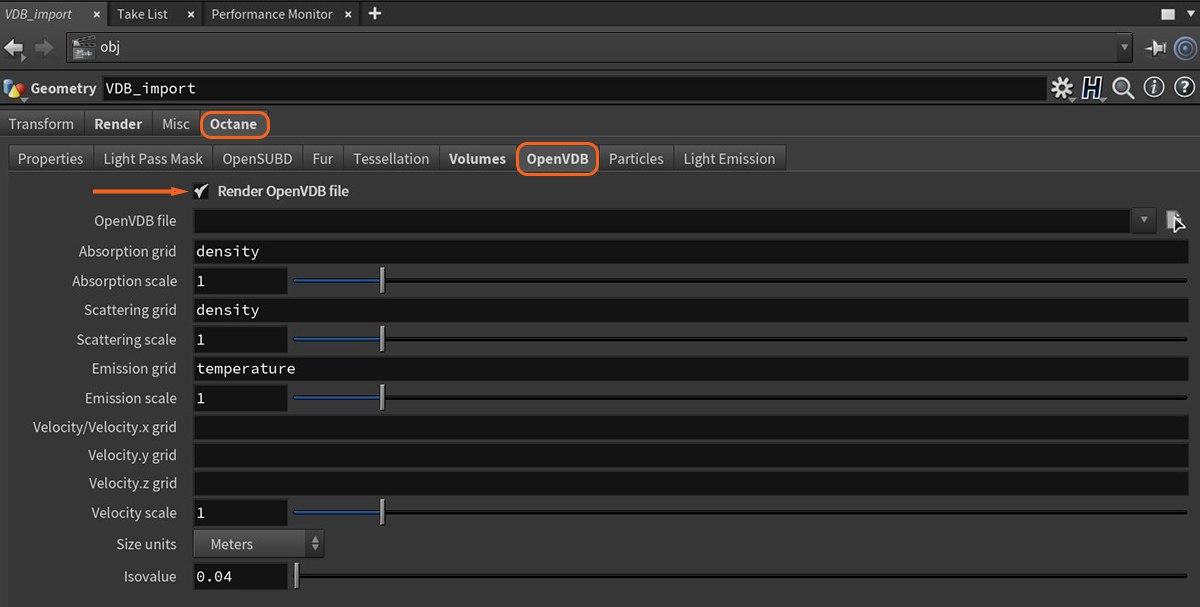
VDB files can include more volume datasets or grid than just one. For example VDBs saved from a fire simulation will contain temperature and density grids, which are Volume’s absorption and emission characteristics in terms of rendering. You can edit the import preferences of your Volume node to change what volume dataset or grid is applied to Scattering, Absorption, and Emission – similar to the Mesh node. To export the Volume VDB from your simulation software, you can name each grid. Enter these into the import preferences in OctaneRender as you desire.
Octane also supports loading volumes with datasets as level sets, and these are encodings to store a thin eggshell surface. You can use Isovalue parameter to set the surface thickness.
Volumetric Shading
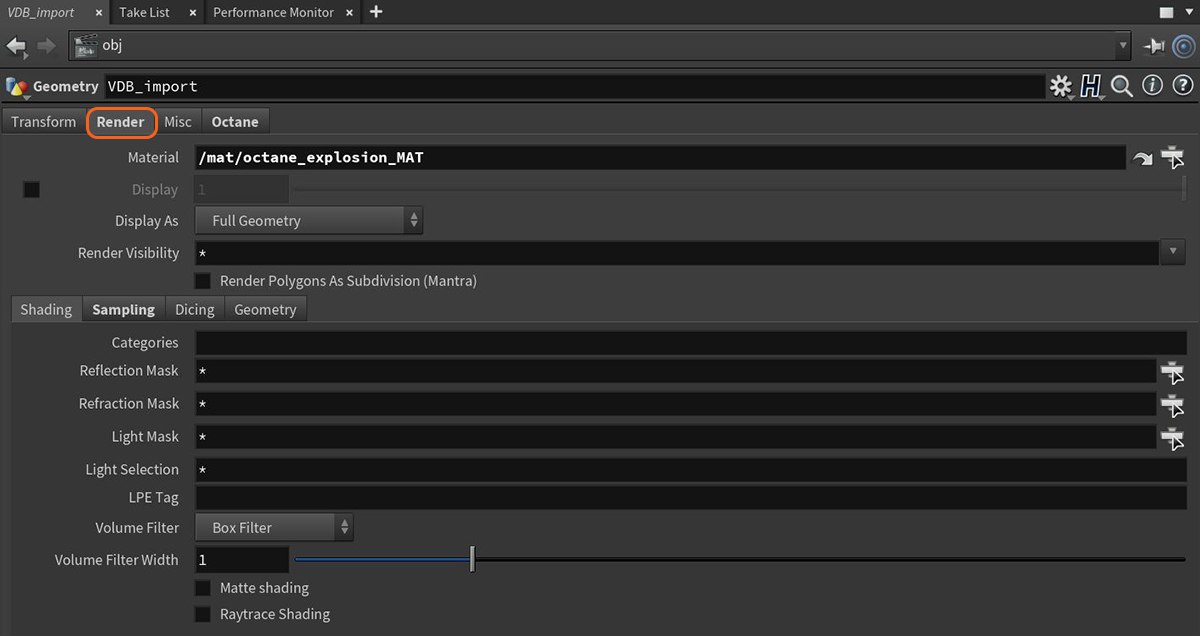
You can add a material to the volume from the Render tab on the Pyro or volume import geometry node.
The Medium Volume VOP node handles volumetrics shading when you link it to the Medium input in the Octane material’s Output VOP like below.
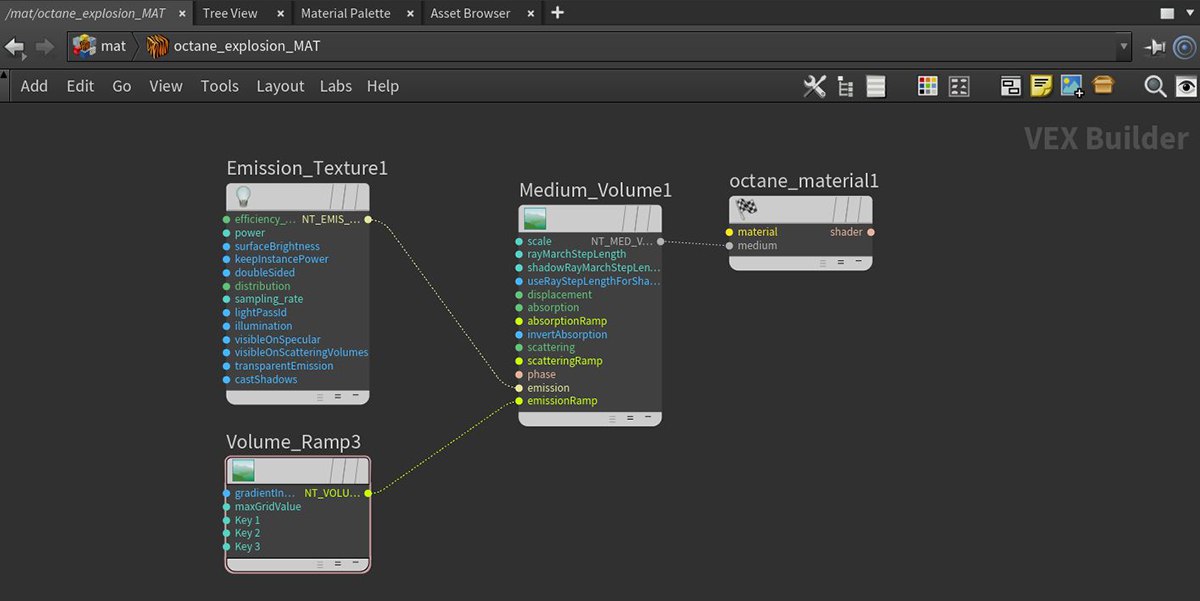
Volumes have Scattering, Emission, and Absorption settings just like Medium node. When you change the settings of them, it will influence the volume appearance. The Phase Function also affects a Volume as it would affect a Medium node. If you increase or decrease Volume’s Scale, Emission or Absorption values, it will create the effects on the volume density or particle density.
The Volume node’s Volume Step Length parameter has a default value of 4m. You can decrease this parameter if your volume is smaller than this, and it results to slow render speed. Increasing this value causes the ray marching algorithm to take longer steps. If the Step Length exceeds the Volume’s dimensions, then the ray marching algorithm takes a single step through the whole Volume. If you want to get the most accurate results, keep the Step Length as small as possible. To simplify your workflow, first set the Volume Step Length to an acceptable value.
Because volumes are rendered in an unbiased way, they can scatter multiple times and cause self-shadowing effects. You can reduce the maximum scatter events in a volume by reducing the Diffuse Depth parameter in the Kernel node.
A Blackbody or Texture emission node configures the shading of the emission grids. You should make sure that the data used for the Emission grid contains temperatures in Kelvin when using the Blackbody node. It is common to find VDBs that have unitless temperatures with arbitrary ranges such as 0 – 1, or even 0 – 45, as is the case with some sample VDBs from openvdb.org.
Typical temperature values range between 0 to 6500, where lower values tend towards longer wavelengths (red colors), and higher values tend towards blue or white. To get realistic results from the Blackbody emission for volumes, you should disable Normalize in the Emission node. Lower temperatures give off less light than higher temperatures, but when normalized, the radiance emitted by all temperatures is equal.
When using the Texture node, the input temperature grid is interpreted as emission power, not emission temperature. This is more linear in that the higher the temperature value, the more light is given off at that point. If you use Volume gradients, you have more precise control of the color.
Using the Volume medium node, you can apply Color Ramps independently to the Absorption, Scattering, and Emission parameters.
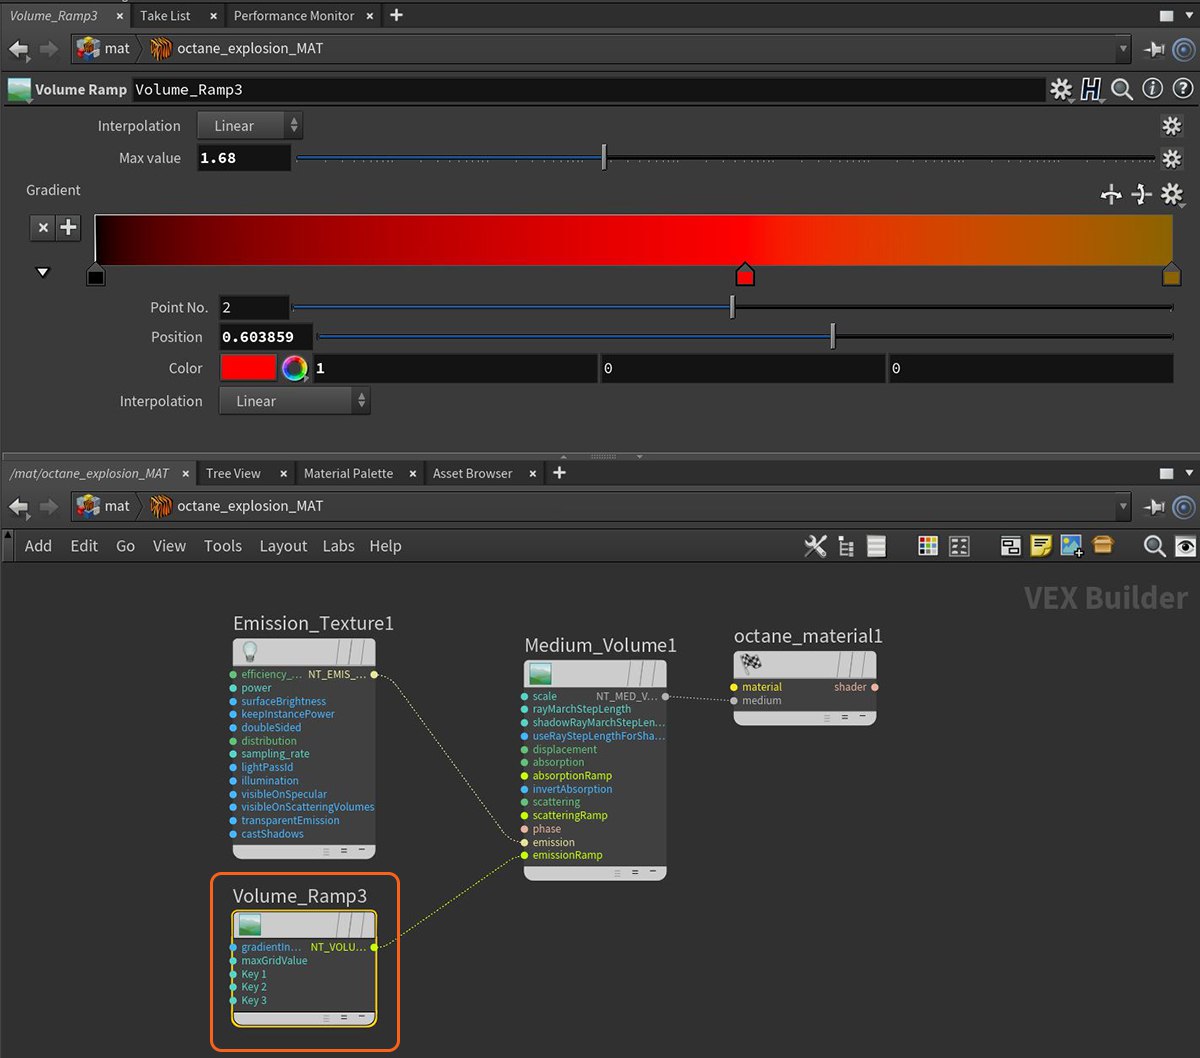
Note: Volume ramps are restricted to static colors for performance reasons – it is not possible to attach a series of other texture mappings or generators to colors in the ramps.
There is an important consequence of volume animations specifically related to Volume ramps: ramps have a Max Value, which you must set to a reasonable value. This value scales grid values between 0 and 1 so that the ramp can map these back to colors in the Color gradient. This is needed because maximum values in the grids sometimes have wide variances throughout VDB sequences. If you set a Max Value too high or too low, this will still work, but you will only see a subset of the colors in the gradient that you specify. The maximum values for grids in the current VDB selected are now shown in the Volume node’s Inspector window. A good rule of thumb is to choose a value near these, but you can customize as you like. The Max Value should be set to the channel’s highest value for all the volumes in a sequence. Please see the info provided by the Volume node in the node stack.
The Absorption ramp takes the grid value as input. In the Color gradient, the colors near 0 on the left are used for mapping low grid values to some custom color (as in this case, the lowest values are mapped to white). Higher grid values are mapped to colors to the right of the color gradient. Bear in mind that less saturated colors cause less-pronounced absorption. Emission and Scattering ramps operate in the same way.
It is important to ensure the volume is not too dense. Don’t be tricked into thinking a Volume is less dense by a higher Volume Density and a higher Volume Step Length in the kernel. We recommend reducing the Volume Step Length to an acceptable performance and accuracy level, and then reduce the Volume Density. Otherwise, you may risk rendering a solid object at a high Step Length, giving deceiving results.
iRender – The best cloud rendering service for Houdini and Octane
This article helps you to understand more about Volume and Volume Shading in Houdini rendering by Octane.
iRender provides you a high-performance and configurable server system for 3D rendering, AI Training, VR & AR, simulation, etc. We believe that design and creative activities are private and personal that only you artists will know what you want with your animation.
As Octane can scale up linearly when you use a multiple GPUs system, we offer you from single RTX 4090 to multiple RTX 4090s/3090s. Check out these articles to know why RTX 4090 is still the best for Octane rendering: Top GPU for Redshift, Octane and V-Ray in 2023 and Compare RTX 4090 vs RTX 6000 Ada vs RTX A6000 for content creation.
We are not only providing you the most powerful graphics card, but also the same level of hardware, such as AMD Ryzen Threadripper processor, 256 GB RAM, 2 TB of storage (NVMe SSD).
For Octane, we suggest our multi RTX4090s or RTX3090s. Below is our test with Octane and Houdini:


Not only those powerful configuration, iRender also provides you more services. Free transferring tool named iRender drive for macOS or Linux users. For Windows users, we recommend using our all-in-one application iRender GPU to work, and you don’t need to come to our website. Our price is flexible with hourly rental which has pay-as-you-go basis, daily/ weekly/ monthly subscription with discount from 10-20%. Plus, you have 24/7 support service with real human who will support you whenever you encounter an issue.
Register an account today to experience our service and enjoy a very big promotion 100% bonus for new user. Or contact us via WhatsApp: (+84) 916806116 for advice and support.
Thank you & Happy Rendering!
Source and images: docs.otoy.com
Related Posts
The latest creative news from Octane Cloud Rendering, Houdini Cloud Rendering