How to Convert a Mesh to a Wireframe in Blender
You can do many cool things with a wireframe in 3D animation. A wireframe is what a 3D model looks like when the maps and even the polygon faces have been removed to leave only the outlines of its component polygons, consisting of vector points connected by lines. A wireframe can also be called a wire mesh.
But can we turn a mesh into a wireframe in Blender? Sure, and it can be a really nice effect if you play your cards right. In today’s article, we will explore five best ways to convert a mesh into a wireframe in Blender. Let’s find out!
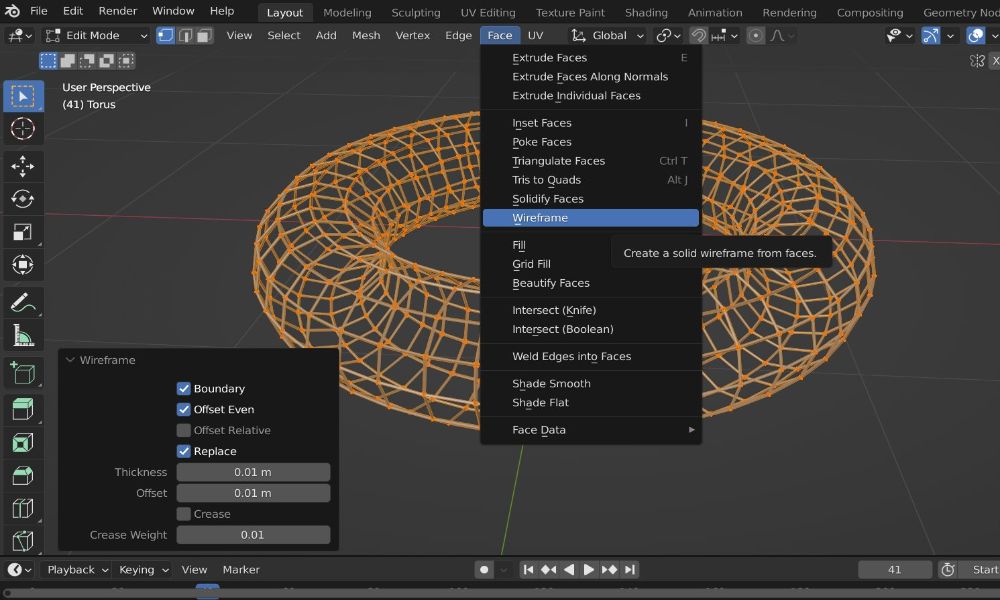
1. Use the Wireframe Tool
Blender’s Wireframe tool is a degenerative modifier that turns your object into a network of “pipes” that encases each edge in the mesh. Under the Face dropdown in Edit Mode, you’ll discover it.
It’s the simplest method for creating a wireframe in Blender. You can Offset the new mesh, Replace the old one, adjust its Thickness, and even utilize a couple of toggles to ensure a uniform gauge throughout the new model under the Adjust Last Operation panel.
For general instances and simple primitives, it’s recommended to utilize the Wireframe tool. The Wireframe modification may be what you’re looking for if you want a more refined sense of delicacy.
2. Use the Wireframe Modifier
The Wireframe modifier takes every edge in a mesh and transforms each one into a four-sided polygon, all of which are then welded together to form a new mesh. Unlike the Wireframe operator, modifiers are non-destructive until the moment you apply them; you can even adjust them by switching up the order that each modifier is applied within the modifier stack.
To use the Wireframe modifier:
- Select the object that you would like to turn into a wireframe.
- In the Modifiers tab under Properties, select Wireframe from the Modifiers dropdown.
- Adjust your settings until you’ve got what you want in front of you.
- Lock it in by tabbing back to Object Mode and selecting Apply.
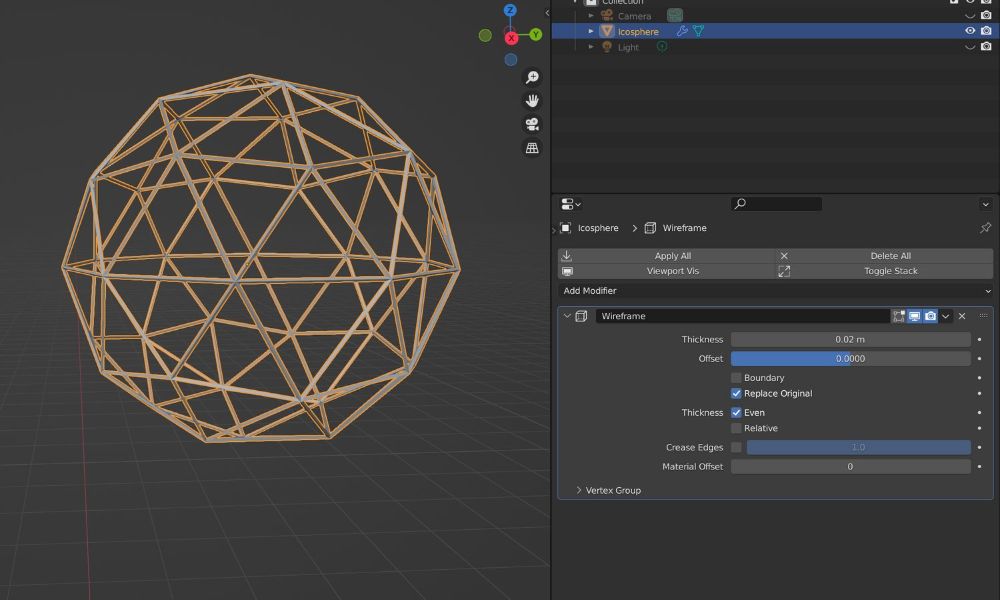
In the Wireframe modifier’s settings, you’ve got many of the same options as before, as well as a couple of extra provisions that you may find useful:
- Thickness, the width of each arm of the wireframe.
- Offset, which you can use to dial in your wireframe’s placement relative to the original geometry.
- Boundary, which you can use to manage the eventual mesh’s UV island boundaries.
- Replace Original, allowing you to retain the original mesh underneath the new wireframe mesh.
- Thickness, the protocol by which the gauge of the wireframe “piping” is determined around things like sharp corners; Relative determines the thickness of each wireframe arm by the length of the span itself.
- Crease Edges, which irons in distinct edges in anticipation of a Subdivision Surface modifier on top of this effect.
- Material Offset, which coordinates the original material index with the new geometry of the wireframe, offsetting it accordingly.
- Vertex Group, conferring an extra degree of control over the wireframe piping now caked around each edge—vertices of lower weight will end up with thinner wireframes between them.
This approach is only applicable if your mesh actually has faces, however. If you want to create a wireframe out of something like a Grease Pencil object or a NURBS curve, you might need to try something else instead.
3. Use the Skin Modifier
Dimensionless lines and curves take some time and effort to create, especially if you want a neat mesh with minimal cleanup. You must first convert a NURBS curve or a Grease Pencil object to a mesh before applying the Skin modifier.
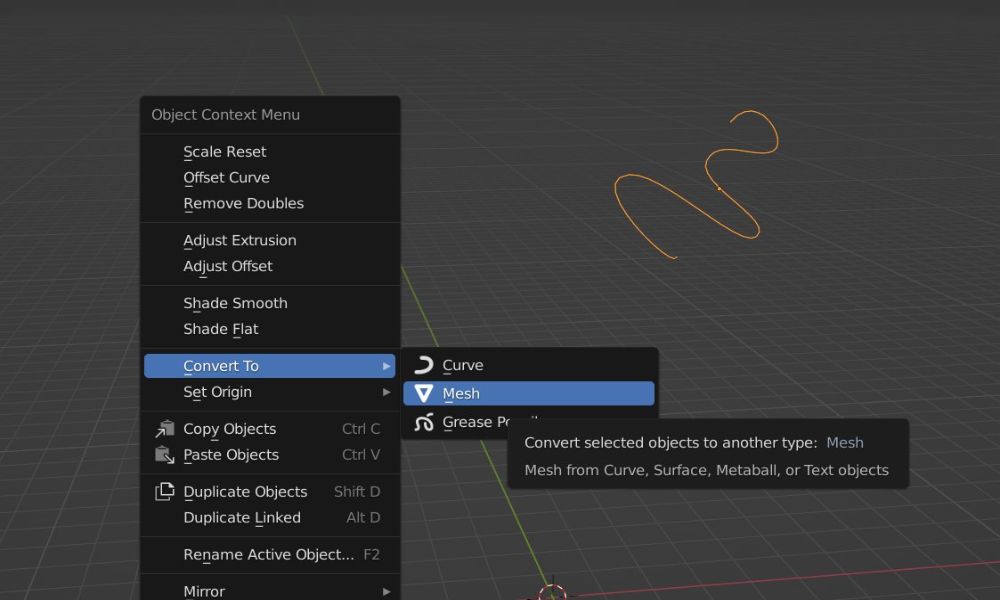
To do so, tab into Object Mode and right-click with your curve or Grease Pencil layer selected. Hover over Convert, and you should see a Mesh option; select it and tab back into Edit Mode.
Now, you’re free to apply any modifier that you want, including the Skin modifier. This will encase your curved mesh in a solid mesh that you can work with just like any other type of ordinary geometry. Construct any shape you want with NURBS or with the Grease Pencil, and volumize it once everything has been nudged into place.
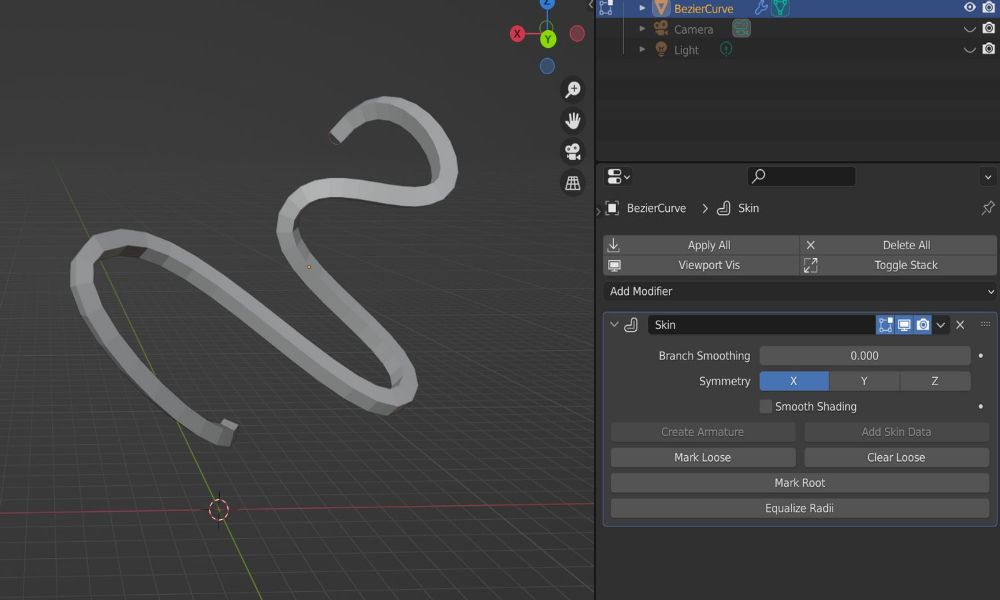
The Skin modifier should be able to handle your “wireframe” if it’s just the skeleton of the intended subject that requires dimensional geometry to work with. If your model is sophisticated in some parts, you might run into some issues, but if this is your method of choice, you’ll be able to work your way around the problem with a careful once-over in Edit Mode.
You can also add dimension to a curve by using the Bevel slider in the Properties panel.
4. Use Geometry Nodes
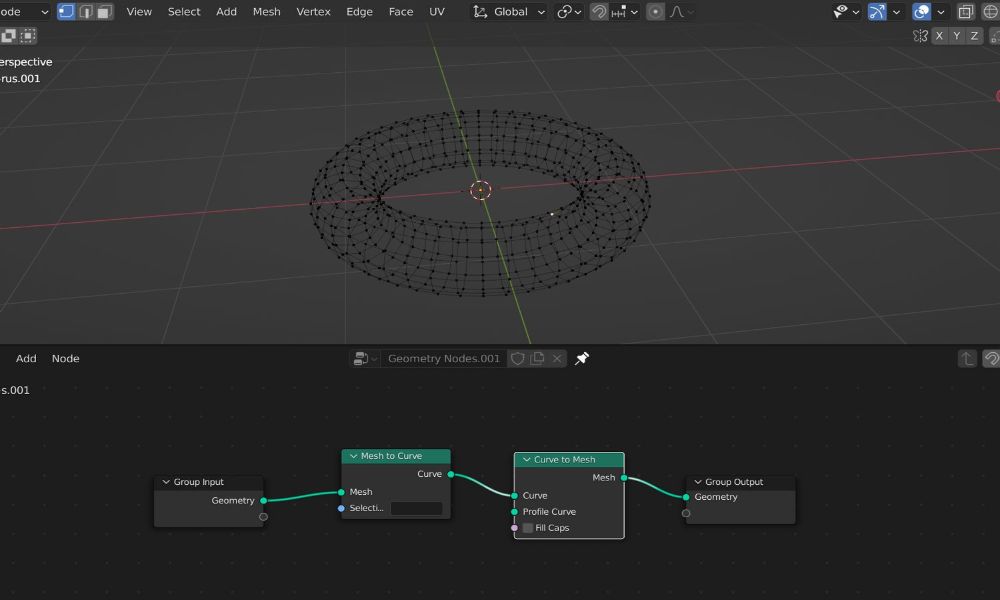
There are several Geometry Node workflows that will result in the wireframe mesh of your dreams—the Mesh to Curve Node eliminates every face making up your mesh, leaving only edges and vertices behind.
Nothing is decimated or simplified; instead, you’re left with your object in its raw form:
- In the Geometry Nodes workspace, create a new Node Tree.
- Add two linear Geometry Nodes: a Mesh to Curve Node, followed by a Curve to Mesh Node, all between your Group Input and Output Nodes.
- Apply the effect in the Modifiers panel, or continue to explore this effect as it relates to other live Nodes within the tree.
Without this second Node, applying this effect outright would result in your mesh completely disappearing. Nodes may seem tricky at first, but one solution to many common issues is always ensuring that your intended geometry has a destination to land in. In some cases, this will simply be the Group Output. If that doesn’t suffice, you might need an additional Node, like the one we’ve used here.
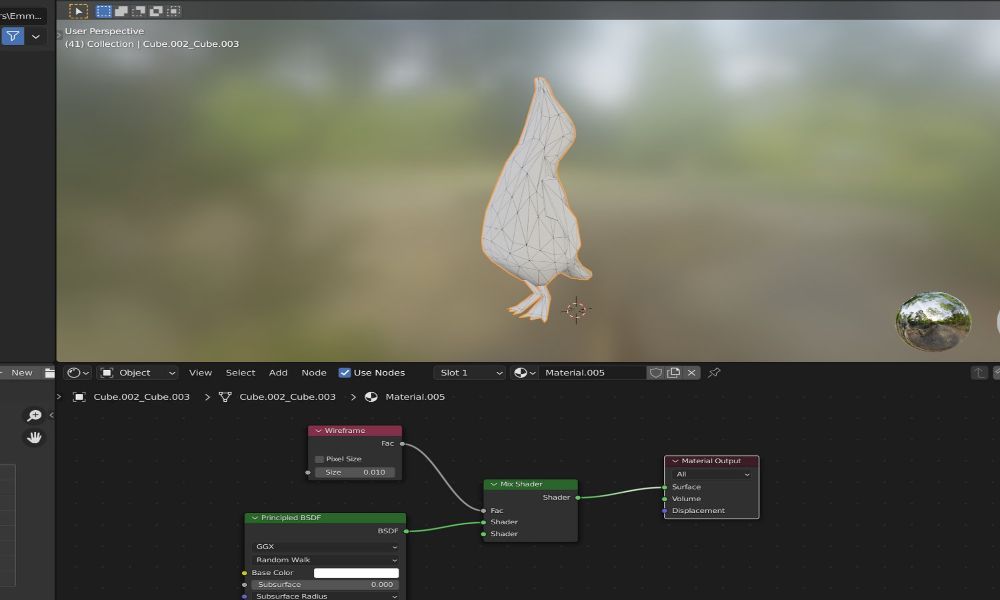
5. Use Texture Nodes
Contrary to popular belief, the Wireframe Node is actually a Texture Node, not a Geometry Node. The Wireframe Node in Blender analyzes your mesh through the Cycles processor, triangulating your topology and extracting it as a new set of edges, which are then simplified into a new texture shader over top.
To use the Wireframe Node, click into the Shading workspace and create a new material in the Nodes panel.
- Use the Add dropdown to create two new Nodes: a Wireframe Node, and a Mix Shader Node.
- Connect your BSDF output to one of the Shader inputs in the Mix Shader.
- Link the Factor output of the Wireframe Node up with the Factor input of the Mix Shader.
- Use the Mix Shader’s lone Shader output to connect the entire scheme to your Material Output Node to the right.
It’s not exactly a wireframe you can grab; in fact, it’s totally invisible outside the Material Preview overlay and the Render Preview overlay. It is, however, one unique way to stylize a model and to create a variety of interesting wireframe-inspired effects and designs.
Wrap Up
There are so many effective ways to covert a mesh to a wireframe in Blender. Whether you love low-poly work or are interested in creating something more terrifying and demonic, wireframes in Blender are the perfect way to immerse the viewer in a digital world of your design.
iRender - The Best Cloud Rendering for Blender
iRender is a GPU-Acceleration Cloud Rendering Service that provides high performance computing with the latest GPUs (GeForce RTX 3090). The core difference between iRender compared to other render farms is our extremely unique solution – IaaS, completely different from the old SAAS solution, which is gradually revealing many limitations. In other words, this is a hardware service, not a software service, modern artists will choose a machine configuration to suit their design needs and requirements of the graphic software, subsequently have full authority to set up and control directly the remote machine through their own personal computer.
High-end hardware configuration
- Single and Multi-GPU servers: 1/2/4/6/8x RTX 3090. NVIDIA RTX 3090 – the most powerful graphic card.
- 24 GB vRAM capacity, fitting to the heaviest images and scenes. NVLink/SLI requested for bigger vRAM.
- A RAM capacity of 128/256 GB.
- Storage (NVMe SSD): 512GB/1TB/2TB.
- Intel Xeon W-2245 or AMD Ryzen Threadripper Pro 3955WX CPU with a high clock speed of 3.90GHz.


Let’s see rendering tests with Blender with 2/4/6x RTX 3090 – the latest NVIDIA CARD RTX 3090 with 24GB VRAM will help you reduce your render time very much at iRender:


Reasonable price
With all the outstanding advantages mentioned above, you must have found yourself the perfect choice for Blender 3.1. We provide unmatched support tailored to your specific needs and goals. SPECIAL OFFER for this March: Get 20% BONUS for all newly registered users. Let’s CHECK IT OUT!

For more advice and support, please do not hesitate to reach us via Whatsapp: +(84) 915875500 or email: [email protected].
Become a member of the iRender community today to get FREE COUPON to save your precious time of rendering. Always at the forefront of cutting-edge graphics technology, we do the rendering, the creativity is yours!
Thank you & Happy Rendering!
Source: Emma Garofalo via makeuseof.com
Related Posts
The latest creative news from Blender Cloud rendering.