How to install Redshift renderer on iRender’s Remote Machine
Redshift is a powerful GPU-accelerated renderer designed to meet the unique requirements of modern high-end production rendering. To put it another way, Redshift is designed to help creative individuals and studios of all sizes. Redshift, in fact, provides a slew of powerful features and integrates with industry-standard CG applications. Over the last few years, an increasing number of designers have begun to use Redshift for rendering, dramatically shortening their render times as a result of this renderer. In today’s article, let’s explore how to install a Redshift Renderer on iRender’s Remote Server.
Downloading Redshift
There are two primary ways to download Redshift, one option is to manually download and run the Redshift installer and the other is to use the Maxon App. Both methods require you to follow the same installation process but Maxon App has the added benefit of being able to automatically check to see if there are new versions of Redshift available compared to what is currently installed on your system.
Manual Download
To manually download the latest Redshift customer installer, visit
https://www.maxon.net/en/downloads.
You will need to be registered and logged in to access the download links.
Maxon App Download
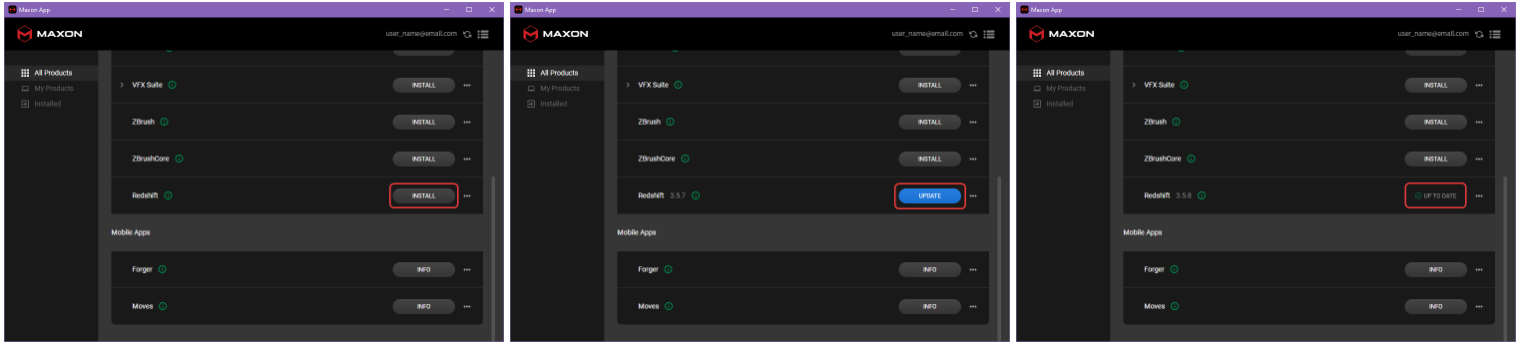
To download the latest version of Redshift with the Maxon App, launch Maxon App and find Redshift in the list of available software. The install button will change between the following options depending on the current status of Redshift on your system.
- Install – Redshift is not detected on your system, the install button can be used to download the newest version.
- Update – Redshift is detected on your system but is not the newest version, the update button can be used to download the newest version.
- Up To Date – The newest version of Redshift is detected on your system.
After downloading, proceed to the installation section below for the next steps.
Redshift Installation Process
The installer will help guide you through the installation process, the first screen pictured welcomes you to this process. To continue, just click “Next”
Note: Any running instance of Maya, 3ds Max, Cinema 4D, Houdini, Katana, and Blender should be closed before continuing with the installation. The installation may fail if these applications are left running.
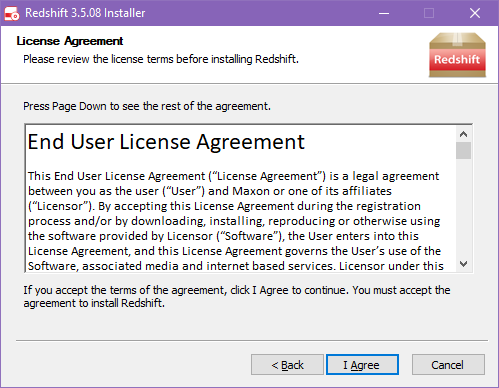
Please carefully review the Redshift Software License Agreement before continuing with the installation.
By clicking the I Agree button, you are agreeing to be bound by the terms of the Redshift license agreement.
If you do not agree with the terms, you must click the Cancel button instead and proceed to remove the installer from your system.
After you agree to the licensing terms the Auto-configure Redshift plugins screen is next, here you control which DCCs are automatically configured for use. By default, the installer will select all compatible versions of Maya, 3ds Max, and Cinema 4D that are detected on your system, however, these can be manually deselected if you do not want a particular version to be set up with the Redshift plugin. Redshift always installs all the files necessary for each DCC, even if they are not found on your system.
( DCC stands for Digital Content Creation, we use this term to refer to the various host applications that are supported by Redshift. This includes Maya, 3ds Max, Cinema 4D, Houdini, Solaris, Katana, and Blender.)
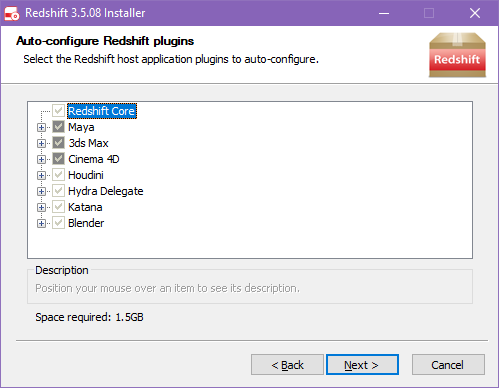
Houdini, Solaris (Hydra Delegate), Katana, and Blender require additional steps outside of the installer before Redshift can be used with them, for this reason, they cannot be selected or deselected here.
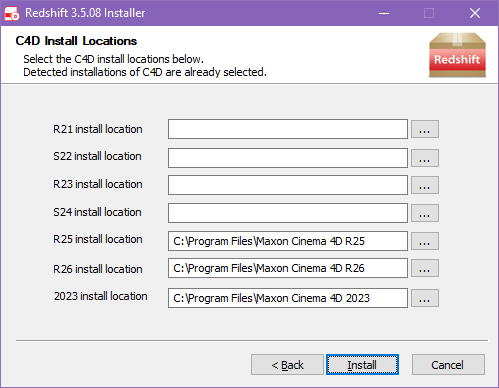
If Cinema 4D was selected for automatic configuration the following screen will appear and allow you to set the install location for each version. Each detected version will be filled with the default Cinema 4D install location but this can be overwritten with a custom install location.
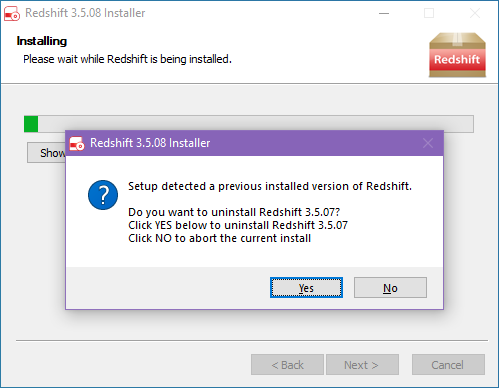
If you are updating from a previous version of Redshift you will be prompted with verification to proceed in overwriting the currently installed version as pictured below. Click Yes to proceed with the installation and start copying files to your system.
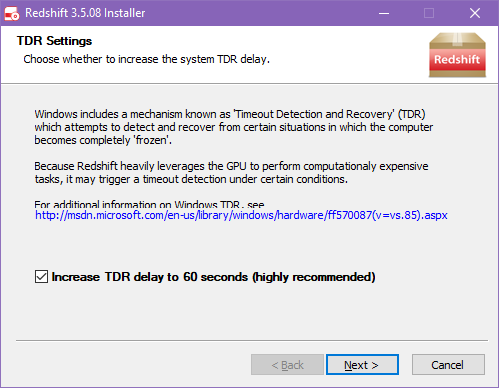
After all files are finished being copied you may be prompted to modify the TDR delay (Timeout Detection and Recovery) setting on your system. If you do not see this screen, it means your system’s TDR delay is already suitable for Redshift, or your system does not support TDR.
If you do see the TDR Settings screen, you can accept the default presented by the installer. Any changes made by the installer will be reverted when you uninstall Redshift.
Modifying your system’s TDR delay settings involves making changes to your system’s registry.
Redshift installation is now complete, click Finish to exit the installer.
From iRender Redshift Installation
Besides using your own Redshift license on our servers, iRender also provides Redshift Floating license(s) for our Prime Customers (who top up >=3000$).
It might take a little time for users to transfer their Redshift license(s) from their PC to our servers but activating our provided Redshift Floating license(s) has never been easier.
First, let’s become our Prime Customer(s), you will receive a lot of benefits including using Redshift license at no cost. If you’re already a Prime Customer and have a license need, please contact your personal assistant at iRender or our chat live to process. Follow this doc: https://docs.gpuhub.net/system-features/software-licenses-irender/redshift-license-management-app/ or watch our tutorial video about how to use Redshift license from iRender License Management.

iRender - The Best GPU Render Farm for Redshift Renderer
iRender is proud to be a professional GPU Accelerated Cloud Rendering Service provider in HPC optimization for Render, CGI, and VFX tasks with more than 25,000 clients. We are appreciated in many global rankings (e.g. CGDirector, Lumion Official, Radarrender, InspirationTuts CAD, All3DP, BlenderBaseCamp, VFX Rendering.)
Our Services
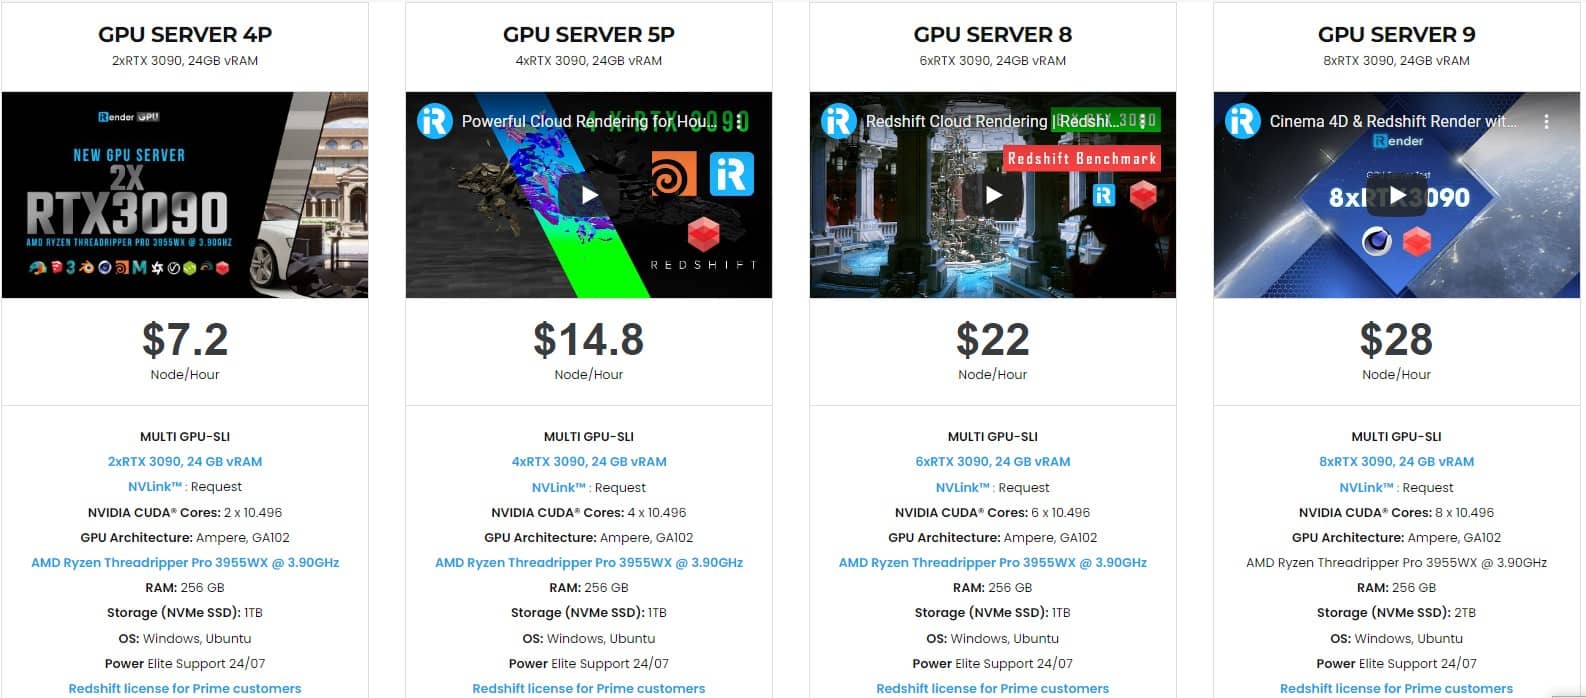
We have developed multiple RTX 3090 server packages that are specifically configured and optimized for GPU rendering. With a range of GPU servers from a single RTX 3090 to multiple 2/4/6/8 x RTX 3090 and dual RTX 4090, you can choose a server that meets your needs and your software to start the rendering process. All information on the server configuration is publicly posted on our website. You can know exactly what the server specification contains, the type of CPU and GPU it has, and its cost as well.
Let’s enjoy working on our RTX 3090 and RTX 4090 beast machine with the provided licenses. Moreover, we are running a SPECIAL OFFER: 20% Additional Bonus for new users who register an account and make a top-up within 24 hours after registration.
If you have any questions, please do not hesitate to reach us via Whatsapp: +(84) 972755742. Register an ACCOUNT today and get FREE COUPON to experience our service. Or contact us via WhatsApp: +(84) 972755742 for advice and support.
iRender – Happy rendering
Source: Maxon.net
Related Posts
The latest creative news from Cinema 4D Cloud Rendering , Redshift Cloud Rendering, Octane Cloud Rendering, 3D VFX Plugins & Cloud Rendering.