
Learning basic render settings on Redshift for Cinema 4D
Redshift is a powerful GPU-accelerated renderer designed to meet the unique requirements of modern high-end production rendering. To put it another way, Redshift is designed to help creative individuals and studios of all sizes. Redshift, in fact, provides a slew of powerful features and integrates with industry-standard CG applications. Over the last few years, an increasing number of designers have begun to use Redshift for rendering, dramatically shortening their render times as a result of this renderer.
For today’s article, let’s look at the overall basic render settings on Redshift for Cinema 4D, so that users can get a full understanding from the ground up, laying the groundwork for more advanced render settings in the future.
Let's get started!
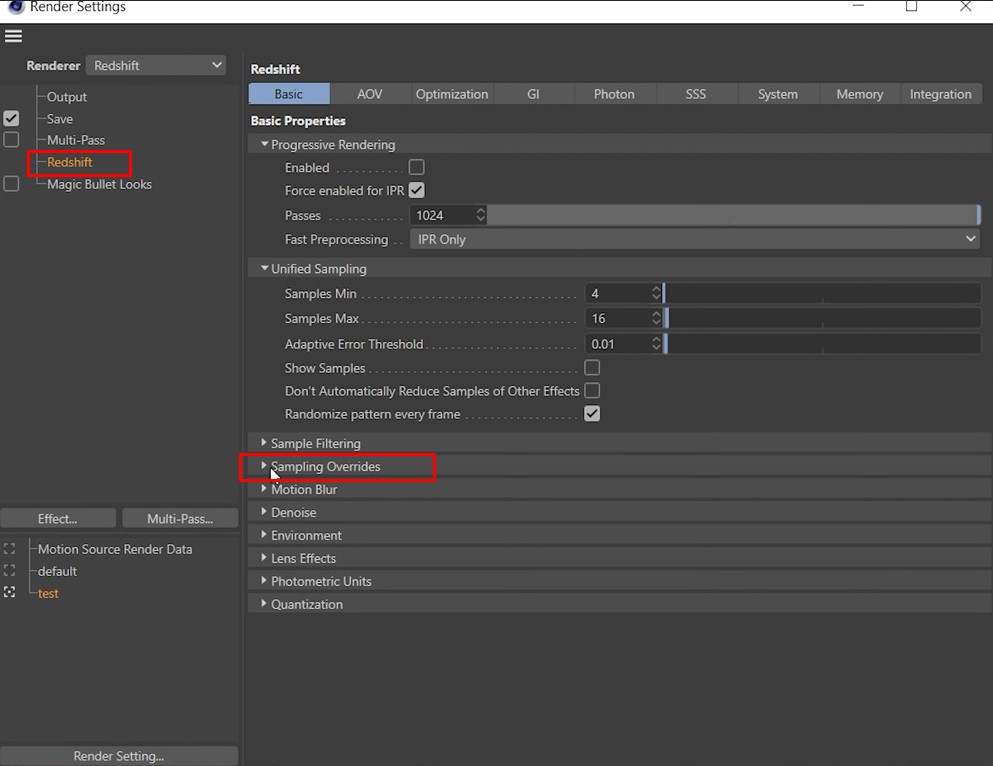
If your scene contains a lot of reflective materials, consider increasing the sample count to 512. We will set the value to 128 with the light samples. For reflection, we’ll need to increase the sample count to 256.
You don’t want to crack the samples too much because it will take longer to render.

We’ve optimized our sampling overrides now. We are going to use unified sampling. The most common values should be used are 32 and 64.

Next step is to set the Primary GI engine to “Brute Force” for global illumination.
The Brute-Force GI Engine is the most basic GI Engine. It doesn’t attempt to interpolate any results and, as such, is very accurate but also the slowest.
Pros
- Accurate
- No flickering in animations
- It’s easy as it only has one setting to tweak (“Num Rays”)
- Does not require any storage so the final image resolution and scene detail does not matter
Cons
- It’s the slowest technique. But due to Redshift’s speed, it’s more practical compared to other renderers.
- Unless many rays are shot per pixel, it can produce grainy images – especially in difficult lighting situations
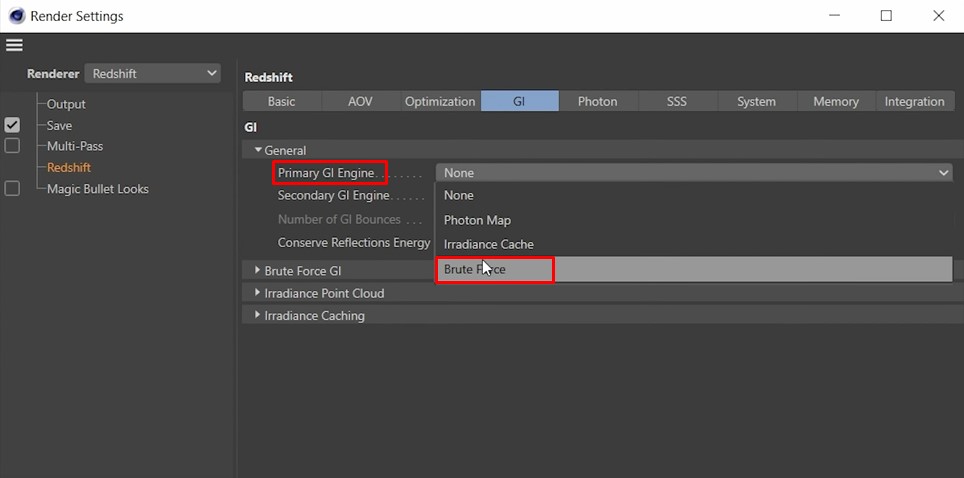
With the secondary engine, set it to “irradiance point cloud”

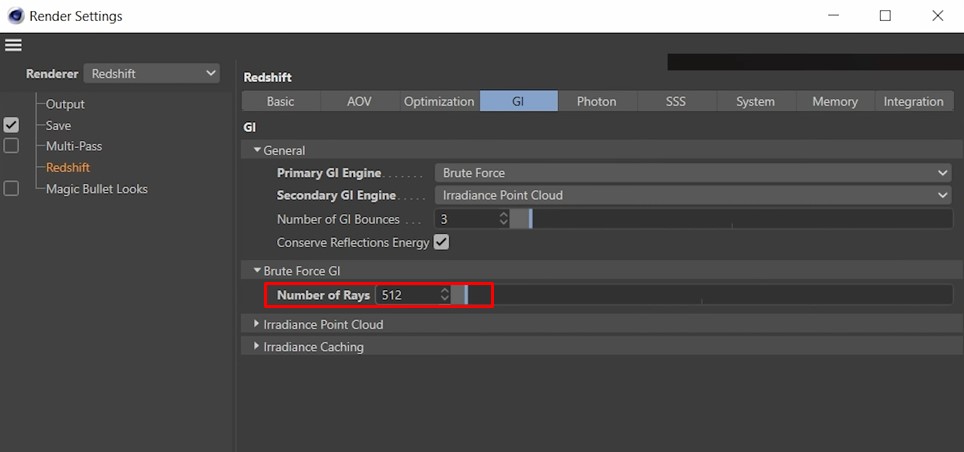
After that, you should go to the Brute Force GI drop down and enter a reasonable value.
With Brute Force GI, each pixel on the screen has its GI computed by shooting out a number of rays. The more rays are shot, the cleaner (less “grain”) the result but the longer the computation time. Scenes that have few small bright light sources might need many rays to produce grain-free results. As recommended on Redshift document, you can use number of rays is 512.
Depending on your project, you can tweak the parameters a bit differently. However, today’s basic settings will help optimize the time you spend rendering your scene.
iRender - The Best Render Farm for Redshift
iRender is proud to be a professional GPU Accelerated Cloud Rendering Service provider for 3D Render, CGI, and VFX tasks with more than 30,000 clients. We are appreciated in many global rankings (e.g. CGDirector, Lumion Official, Radarrender, InspirationTuts CAD, All3DP, BlenderBaseCamp, VFX Rendering.)
Our service
We provide high-configuration servers (machines) that are specifically configured and optimized for GPU rendering. Using our service, you have complete control and flexibility over the server(s) you operate. Therefore, you can customize your creative working environment as you wish. With a range of multiple GPU servers (2/4/6/8x RTX 3090), you can choose the one that meets your need to start the rendering. Furthermore, we provide useful features to help you switch among the server packages without having to reinstall anything. You can even run multiple machines simultaneously to speed up the renders, not having to re-install anything, either.
Why choose us for your Redshift projects?
Redshift is a fully GPU-based renderer. This means that the graphic cards (or GPUs) in your system impact how long the renders take to complete. Also, Redshift scales very well with multiple GPUs and can significantly improve your render times. Therefore, the more powerful the GPU, the better, the more GPUs the faster the render will be.
At iRender, we have both powerful GPU and multiple GPU servers that absolutely speed up Redshift rendering. Our multiple GPU machines are designed with 2/4/6/8x RTX 3090. Also, they all have a strong AMD Ryzen Threadripper Pro 3955WX processor, allowing you to extract mesh data, load textures, and prepare scene data more quickly. Moreover, the workstations are ideal with 256GB RAM capacity and 2T NVMe SSD storage. We highly recommend you try the highest configuration server, the 8x RTX 3090. This server will be a super-configured one that brings crazy speed to Redshift. It is rated as one of the most worth-trying workstations so far for Redshift.

Redshift speed test videos
Let’s check out the rendering performance in Redshift for Cinema 4D on our RTX 3090 servers in the following videos.


Let’s get started!
Get the FREE COUPON to try our high-end computers for your Redshift projects now! For further information, please do not hesitate to reach out to us 24/7 on our website.
iRender – Happy Rendering!
Related Posts
The latest creative news from Redshift Cloud Rendering.


For people who have just started using Redshift and have no idea how to do the setting for your first Redshift scene, let’s dive into the basic and useful redshift settings. In today’s article, we use C4D R23 and Redshift 3.0.50.
So the first step is to navigate to the sampling overrides menu.