Look development using the Hypershade in Maya
The Hypershade is an artist-friendly and intuitive tool that allows you to easily build and edit materials and visualize the results in real-time in Viewport 2.0. The Hypershade is the central working area of Maya rendering, where you can build shading networks by creating, editing, and connecting rendering nodes, such as textures, materials, lights, rendering utilities, and special effects.
You can customize the layout of the Hypershade by undocking and rearranging the panels. In addition, you can add panels such as the viewport or the Render View to your layout by selecting from the Hypershade Window menu. In this article, let’s get an overview about how to improve look in Maya with Hypershade.
Build and create materials using the Hypershade
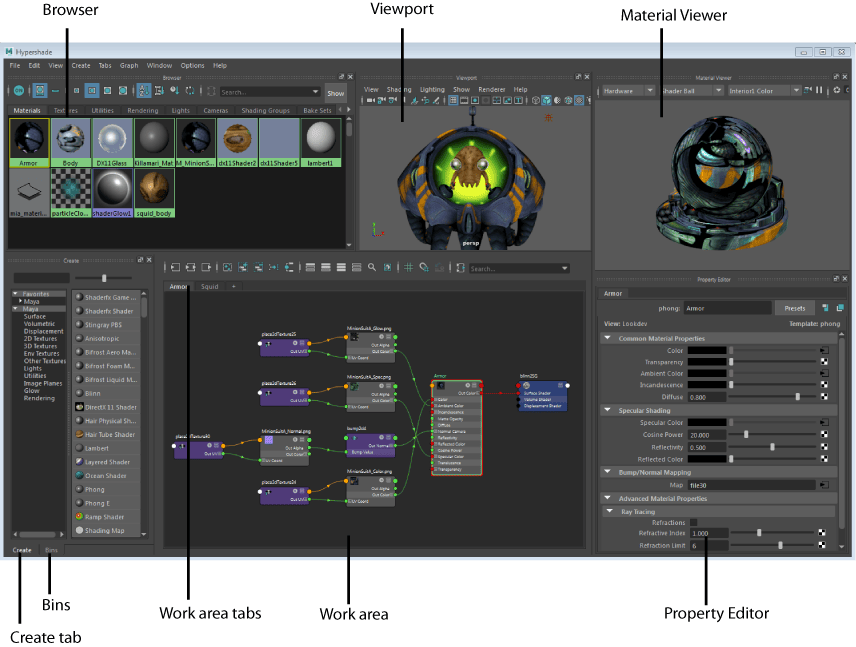
The Hypershade is made up of several panels that you can use to build and edit materials while instantly previewing your results.
- Click
 on the Status line (toolbar).
 - Select Windows > Rendering Editors > Hypershade.
A Node Editor tab is automatically created in the work area. This is where you create your shading networks.
The Hypershade includes the following panels by default, each of which helps to simplify your look development workflow and enable you to achieve your results faster:
- Browser : This panel lists your materials, textures and lights, sorted by tabs.
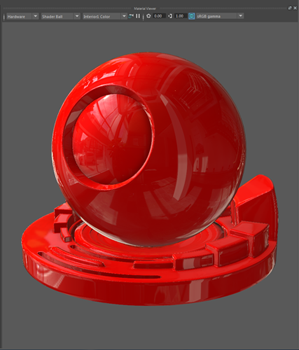
- Material Viewer : This panel renders your shader or soloed material. Choose between the hardware renderer and Arnold for Maya, and choose from among several geometry types. Adjust your shading network and see the render update in real-time.
When rendering with Arnold for Maya, you can add image based lighting to your render by selecting from various preset environments or adding your own.
Bump maps and flat textures can be rendered in the Material Viewer, and you can apply color management to your renders as you would in the Render View
- Create : Click a node in the Create tab to create and add nodes to your shader graph.
Alternatively, you can also click Tab and enter the type of your node, or drag and drop a node from the Create tab to the work area.
-
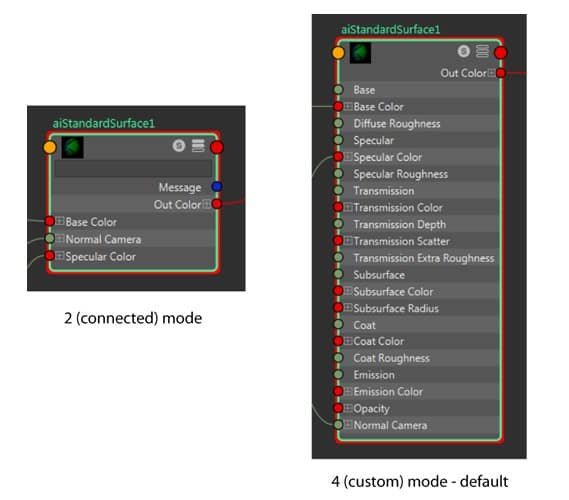
Work area: This panel allows you to create nodes and build your shader network as you would in the Node Editor. You can also display the nodes in the same view modes: simple, connected, full, and custom. By default, nodes in the Hypershade appear in custom mode where only the commonly used attributes are displayed.
Select Show > Objects from the marking menu to determine the nodes that are displayed in the work area. By default, cameras, shading groups and shading nodes are shown, but you can customize this set of filters.
You can create multiple tabs, each with its own set of nodes displayed. This way, you can work with multiple shader graphs and edit them simultaneously without the need to regraph.
To create additional tabs, click + beside the right-most tab. You can create new tabs, delete them, rename or duplicate them, and re-order them in the work area. Right-click any tab for its tab menu options. Your tabs are retained when you close the Hypershade and when you save your file.
- Property Editor : View your shading node attributes in the Lookdev template view. This template is optimized for look development workflows. It has a simpler layout that lists only the most commonly used attributes, making it easier for you to find and adjust your shading node attributes. Click
 to switch to the classic Attribute Editor view.
 - Bins: Sorting bins act as containers for shading nodes (materials, textures, and so on), to help you organize and track shading nodes in your scenes.
Include other panels, such as the viewport, Render View, or the Outliner, as one of your panels by selecting from the Window menu and docking it into the Hypershade. You can further customize the layout of the Hypershade by undocking and rearranging the panels.
Customizing the view of the nodes in the Hypershade
When you first create a node in the Hypershade work area, its most commonly used attributes are displayed (hotkey 4 mode in the Node Editor). You can display nodes in the Hypershade in the same view modes as you can in the Node Editor: 1 (simple), 2 (connected), 3 (full), 4 (custom). You can also use hotkey 5 to display the node type instead of its name, or not to show a node title at all.
Furthermore, you can also customize the view of your nodes in many of the same ways; for example, you can display the search field to easily locate the attribute you want, or toggle the node swatch size.
If you find that specific nodes do not appear in the Hypershade, they may have been filtered out.
Add image based lighting with a preset or custom environment in the Material Viewer
Select any of the options from the preset environment drop-down list.
For each preset, a color and a neutral option are provided. The two have the same intensity, but the neutral option is without color so that the environment does not influence the shading of your object.
When using the Hardware renderer, the HDRI environment affects the material swatch, but the environment is not shown in the background.
When using Arnold with the Material Viewer, the Ray Depth settings and the Sampling settings in the Render Settings window are used for the render. Upon changing these settings, you must trigger a re-render in the Material Viewer by pausing and unpausing the viewer, or changing renderers from Arnold to Hardware and back to Arnold in order for these values to take effect.
Conclusion
Hypershade is one of Maya’s most versatile features, once you master how to use Hypershade you will open yourself up to a whole new world of using Maya.
At iRender, we have developed multiple RTX 3090 workstations specifically optimized and configured for GPU rendering workflows, from single- GPU 1x RTX 3090 to Multi-GPU 2/4/6/8 x RTX 3090, you can choose one server that is suitable for your demand and your software to get started. You are guaranteed to experience maximum performance for your budget. Users will remotely connect to our server, install their software only one time and easily do any intensive tasks like using their local computers. We offer clients the powerful processor Intel Xeon W-2245 @ 3.90GHz / AMD Ryzen Threadripper Pro 3955WX @ 3.90GHz and up to 1 TB SSD to load your scene quickly.
Register an account today for FREE TESTING COUPON to experience our service. Or contact us via WhatsApp: (+84) 912 785 500 for advice and support.
Thank you & Happy Rendering!
Reference source: knowledge.autodesk.com
Related Posts
The latest creative news from Maya Cloud Rendering, Redshift Cloud Rendering, Cinema 4D Cloud Rendering , 3D VFX Plugins & Cloud Rendering.