Overview of mPath renderer for Modo
Modo is a 3D modeling and animation software that includes powerful and flexible sculpting, texturing, lighting, and rendering toolsets. Modo is used by artists around the world to create assets and shots for various industries including animation, VFX, games, architecture and design.
mPath is a ground-up redesign of the Modo renderer, with dramatic reduction in controls, versatile hybrid compute capabilities, and granular refinement features. It offers many improvements over the Default renderer, including GPU acceleration for Ray Tracing when NVIDIA OptiX is selected as the Ray Tracing Engine. In this article, iRender will show you overview of mPath renderer for Modo.

Why choose mPath for Modo?
If you have scenes with many lights and you want to render out separate light passes, mPath is a better option for you over the Default renderer as each light can be rendered to a separate render output as part of one single render process. This dramatically reduces render times and improves flexibility in compositing workflows.
The mPath rendering workflow is also best utilized for speed improvements in Ray Tracing and Shadow Ray Tracing, and for effects like depth of field. Shading results are also more accurate with mPath, for example in Fresnel and refractive materials.
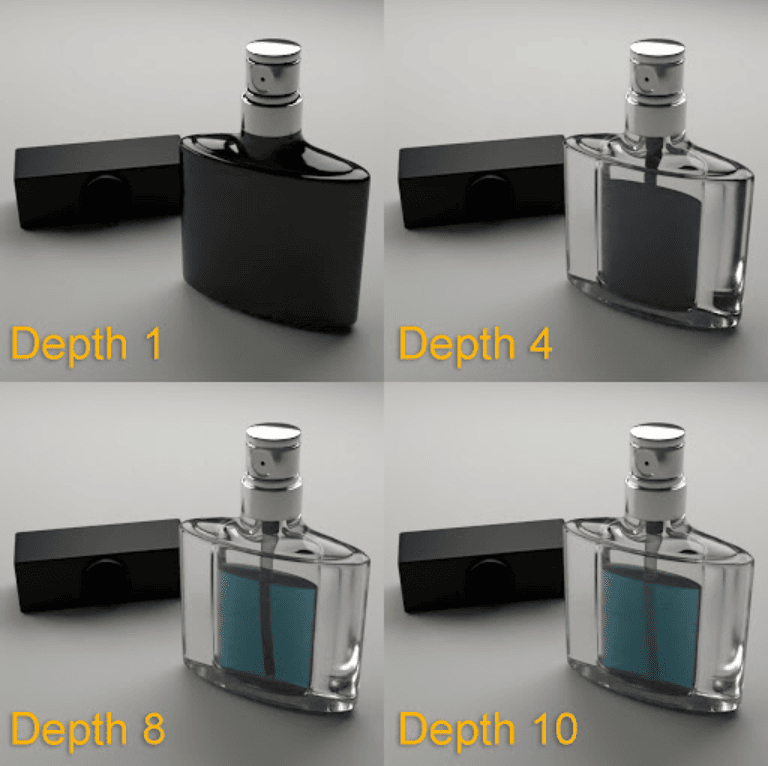
The following images demonstrate different ray depth values. Improved contact shadows, and improved reflections between close reflective components occur as Reflection Depth increases. There is increased accuracy with transparent components as Refraction Depth is increased. Accurate refractions require high depth values.
System requirement
Officially Supported Operating Systems
• macOS 10.14.x, 10.15.x, and 11.x
• Windows 10 (64-bit only)
• Linux 64-bit operating system (CentOS/RHEL 7.6+)
Minimum Hardware Requirements
• Intel processor(s), Core i3 or higher
• 10 GB available hard disk space (for a full Modo and content installation)
• At least 2 GB RAM
• Display with 1920 x 1080 pixel resolution
• Internet connection for product activation and online videos access
• The Advanced viewport mode requires an NVIDIA or AMD graphics card with at least 1 GB of GPU memory and drivers that support OpenGL 4.4 or higher.
• AMD AI Denoiser requires a minimum of 4 GB of GPU memory.
Recommended System Requirements
• 2.5+ GHz quad-core processor
• 250+ GB disk space available for caching and temporary files, SSD is preferable
• 16 GB RAM with additional virtual memory*
• Display with 1920 x 1080 pixel resolution
• An NVIDIA or AMD graphics card with the latest drivers
• 2+ GB of graphics memory
• OpenGL 4.4 or higher support
*The use of virtual memory improves stability and helps prevent data loss on large projects.
General guide to start render
1. In the Shader Tree, select your Render item.
This opens this render item’s Properties.2. In the Frame sub-tab, set Renderer to mPath.
3. In the Settings sub-tab, select your Ray Tracing Engine.
Tip: mPath is a hybrid renderer and can take advantage of the CPU and GPU in tandem. The default Foundry SSE (CPU) setting uses only the CPU for raycasting. To use the GPU for raycasting, select NVIDIA OptiX (GPU), or to use improved performance for CPU raycasting, select Intel Embree (CPU).
4. Adjust the mPath settings in the Render Item’s Settings sub-tab.
For more information on what the different options are, see Render Item: mPath Renderer Settings.
Note: mPath automatically uses Environment Importance Sampling if an active texture layer such as an HDR image map is affecting the environment. See Environment Importance Sampling to learn more.5. Render your scene by pressing F9 or along the menubar, clicking Render > Render.
The render starts and the Render window opens.
Note: To decrease noise in the rendered image, we recommend using a Denoiser. See Denoising mPath Renders for more information.
Note: Press P during a mPath renderer for Modo to pause to rendering. The current render can then be saved as an image.
To denoise your mPath renders before rendering:
1. Select your Render Output item in the Shading list, for example the Final Color Output.
2. In the Render Output Properties, select a denoiser from Denoising.
If a denoiser is not available on your system, Modo displays a warning icon next to it. You can still select it, allowing you to set up the scene for rendering on a different system, but a warning dialog is produced when the render is started on an unsupported system.
3. In the Render Output Properties, enable Denoise Per Iteration if you are using Render Outputs per Light.
4. Render your scene by pressing F9 or along the menubar, clicking Render > Render.
The render starts and the Render window opens. You can verify the denoiser in the Denoising section in the Statistics panel of the Render window.
The render starts and the Render window opens. You can verify the denoiser in the Denoising section in the Statistics panel of the Render window.
Conclusion
With the mentioned system configuration requirements for the Vray render for Modo, you may consider investing in your own machine or upgrading your existing computer. Or another attractive option is to use the service at iRender to get great advantages. Why we can confirm so:
- As you all know, iRender provides high performance and configurable server system to customers who need to utilize the power of CPU & GPU such as 3D rendering, AI training, VR&AR, simulation, etc. With iRender IaaS and PaaS services, you can access our server through the Remote Desktop Application and do whatever you want and install any software you need on it. It is like you are using your own computer but with a powerful configuration and much higher performance. In particular, you only need to install the software for the first time, the next time you connect to the computer everything is ready for you to use.
- You can use iRender’s machines to render, and use yours for other purposes (such as designing or editing other files). This could save you time a lot, especially when you have a large project and a deadline is coming.
- iRender provides you powerful configuration packages with high performance that can speed up your rendering and improve your job quality. These are configurations of multi-card GPU servers that you should take into consideration if you want to have great performance with Vray for Modo. And it also depends on the scale of your project to decide which is the most suitable server package.
- Another great feature that iRender brings to customers is day/ week/month rental packages with high discounts (10% for daily packages, 20% on weekly and monthly packages) which is extremely beneficial for regular long-term users or large projects.
- Real human 24/7 support service, helping you to handle the problem quickly, effectively, saving you both time and money.
With the benefits iRender gives you as well as the configuration that is very suitable for every Modo version, do not hesitate to use the service at iRender to have a great experience with your rendering time. Register for an account today to experience our service. Or contact us via WhatsApp: (+84) 912 515 500/ email [email protected] for advice and support.
Related Posts
The latest creative news from V-Ray Cloud Rendering , 3D VFX Plugins & Cloud Rendering.