Tips for Beginning with Lighting in Cinema 4D
If you’re studying lighting in CINEMA 4D for the first time, you’re probably perplexed by all the lights and their many settings. To help you get started, let’s clarify a few fundamental concepts. Let’s navigate to a normal omni light’s general tab.
Color & Intensity
These two qualities should go without saying, but there are a few less obvious possibilities that I’d like to share with you. Choosing the appropriate color for the mood is crucial when it comes to color, but by selecting the Kelvin option, you may further adjust that color temperature.
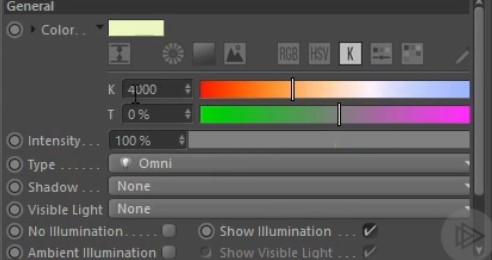
Instead of the usual RGB or HSV, the button “K” is active.
You can use this to adjust the light’s temperature to your liking, or you can enter a known light’s Kelvin value to get a reading of the light’s actual temperature.
When we talk about light intensity, we’re talking about how brilliant or faint the light is. If you click in the number field or use the arrows to the right of the number, you can drag the value over 100%. If you use the slider, you can only drag intensity between 0 and 100%. You can also add an intensity value as a calculation in CINEMA 4D. For illustration, suppose you wanted a light that was set to 243% intensity to be only half as intense. You don’t have to figure out what that number would be; just write 243%/2 into the field, and it will calculate it for you.
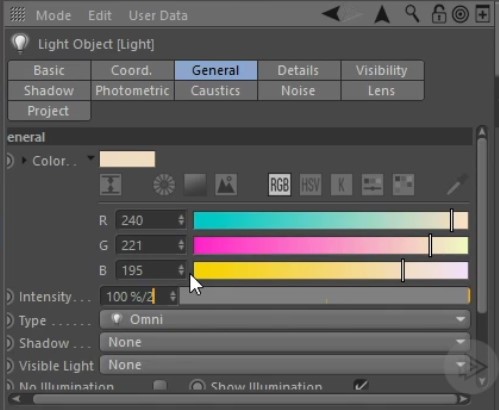
It is simple to cut the intensity value in half by dividing it by two. CINEMA 4D will compute the value of the equation and swap it in automatically.
Types of lighting in Cinema 4D
In CINEMA 4D, there are many different sorts of light, and once you’ve generated one, you can alter your mind. This is useful if you have many of the parameters already chosen, but you still want the light’s general behavior to vary depending on the kind. At that time, you may just select a different type of light from the list to continue with your process and task duplication.
Shadows
There are some considerations to address while selecting a shadow type. When you first construct a light, the default shadow type None is turned off to keep things going quickly. However, there are situations when you might like it this way. Use None when you need a light to do a secondary task, such adding a few highlights, but don’t want it to appear that there is a second light in the scene. Overlapping shadows keep things simple if this set is left at None.
The following shadow option on the list is Shadow Maps (Soft). No matter how big or how far away your light is, the shadows you make using this setting should be gentle. In the real world, shadows get harder the closer a light source is to an object. When lighting a scene with several objects at various distances, keep this in mind. Although these shadows render quickly, they consume a lot of memory. You may need to adjust the shadow map size if you ever get a peculiar error that appears as lines or blinds across the rendered region.
By navigating to the Light’s Shadow tab and raising the Shadow Map resolution, you can adjust this. Increasing this amount too much could slow down rendering, so make incremental adjustments to find the optimal balance.
The following choice is raytraced (Hard). Due to the shadows’ rough edges and somewhat unnatural appearance, as well as the fact that they take a long time to produce, this option is rarely utilized for illustrations other than technical ones.
Area is the following choice. These shadows are simply the finest! They appear to be the most lifelike, at least. They do, however, render more slowly and require a little more skill to lower noise. A square will show up when you change the shadow type on a light to Area. The distribution of light is unaffected by this square, but the distribution of shadows is. Because there is also an area light, and in that instance, the square does alter light dispersion, this is a crucial distinction to comprehend. But when it’s only an area shadow, you can easily alter how diffused a shadow seems by adjusting the size of that square.
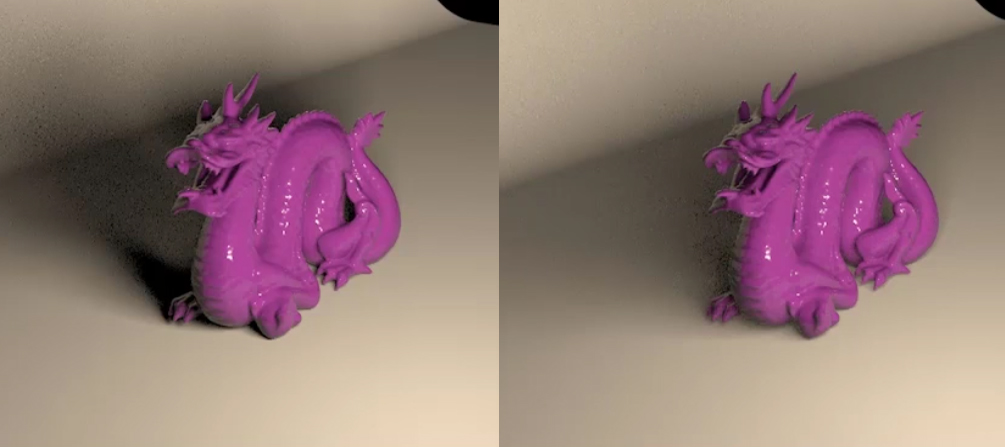
The standard Area shadow size is displayed in the picture on the left. It has been enlarged in the picture on the right. The dragon appears to be affected by the light in the same way, but the shadows to the right seem to be caused by a much larger light source. This gives us a great deal of control.
Visible Light
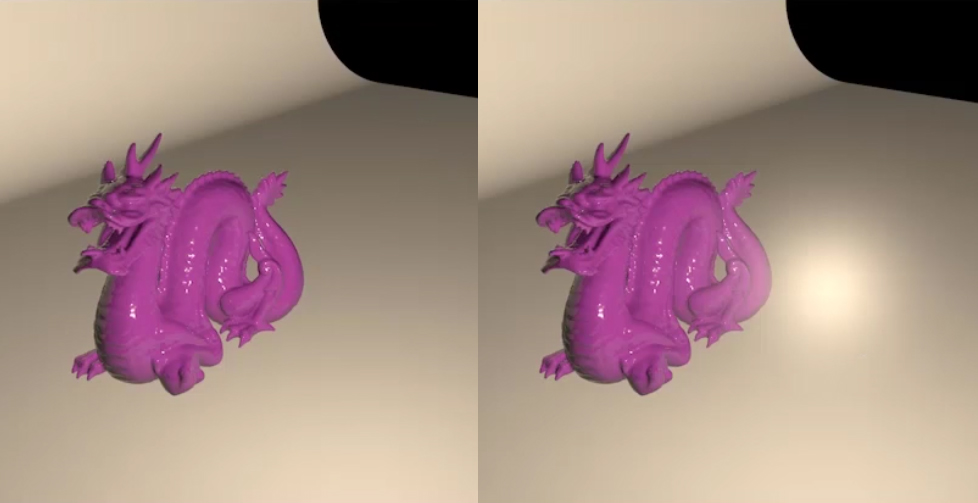
The Visible light is set to None in the image on the left. The setting for the image on the right is Visible.
Think of the appearance of a powerful flashlight in a dense environment. Since air particles scatter light differently than when the air is clear, it appears diffused. There are many choices that delve deeper into this idea of volumetric lighting. It’s more complex than what we’ll cover here, though.
iRender - The Best Render Farm Service for Cinema 4D with Redshift and Octane
About us
iRender is proud to be a professional GPU Accelerated Cloud Rendering Service provider for 3D Render, CGI, and VFX tasks with more than 30,000 clients. We are appreciated in many global rankings (e.g. CGDirector, Lumion Official, Radarrender, InspirationTuts CAD, All3DP, BlenderBaseCamp, VFX Rendering.)
How does our service work?
We provide high-configuration dedicated servers (physical computers/machines) specifically optimized for GPU rendering. Using our service, you will have complete control over the server(s) you rent through the Remote Desktop application. Therefore, you can customize your creative working environment as you wish. In short, iRender’s server is like your computer in the cloud accessible on any device instantly. You will use its full power for everything. iRender provides useful features to help you switch among the server’s configurations without having to reinstall anything. You can even run multiple servers simultaneously to speed up the renders, not having to re-install anything, either.
Why choose us for your Cinema 4D projects render with Redshift and Octane?
Redshift and OctanRender are the two best renderers for Cinema 4D. Both are GPU-based renderers. This means that the graphic cards (or GPUs) in your system impact how long the renders take to complete. Also, Redshift and Octane scale very well with multiple GPUs and can significantly improve your render times. Therefore, the more powerful the GPU, the better, the more GPUs, the faster the render will be.
At iRender, we have both powerful GPU and multiple GPU servers that absolutely speed up their rendering. Our multiple GPU machines are built with top-end rendering GPUs which are RTX 4090 and RTX 3090. Also, they are all equipped with a strong AMD Ryzen Threadripper Pro 3955WX processor, allowing you to extract mesh data, load textures, and prepare scene data more quickly. Moreover, the workstations are ideal with 256GB RAM capacity and 2T NVMe SSD storage for any project size.
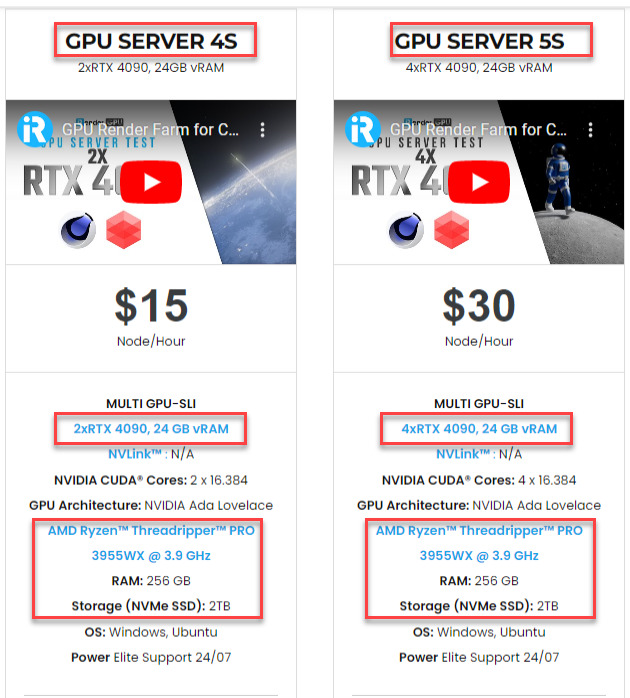
iRender’s new RTX 4090 render beast:
We just released new multiple RTX 4090 servers (4x RTX 4090 and 2x RTX 4090) that are rated as the most robust render machines on the market. They are highly recommended for speeding up Redshift and Octane with Cinema 4D rendering. Below are these two servers’ configurations:
Let’s check the rendering performance in Redshift and Octane with Cinema 4D on the 4x RTX 4090 server.


This month, we are running a SPECIAL PROGRAM: a 20% Additional Bonus for new clients who register an account and make a top-up within 24 hours of registration.
Let’s get started!
Get the FREE COUPON to try our high-end computers for your Cinema 4D projects now! For further information, please do not hesitate to reach out to us!
iRender – Happy Rendering!
Reference source: cgsociety.org
Related Posts
The latest creative news from Cinema 4D Cloud Rendering , 3D VFX Plugins & Cloud Rendering.