
Troubleshooting Displacement keeps crashing problem in Octane for Cinema 4D
Displacement in Octane is always a somewhat advanced topic. While using it, there are inevitable problems that you will encounter. “It’s not working” and “It keeps crashing” are the two biggest problems. In the previous article, we learned how to check and fix the not working displacement error. In today’s article, iRender will continue to steer you in the right direction for fixing the Displacement Keeps Crashing Problem in Octane for Cinema 4D. Let’s dive into the detailed troubleshooting steps!
Ways of troubleshooting the Displacement keeps crashing problem in Octane
1. Check your System
The first and foremost step to troubleshooting the Displacement keeps crashing error is to check your system first. You should check your VRAM, RAM, and hard drive space in your system.
VRAM: Check to see if you have enough VRAM, for example, The Live Viewer says how much it is using. Usually, if you run out of VRAM, it will overflow into Out-of-core memory. However, sometimes it might crash. If this is an issue, you should consider simplifying the scene. You should also check whether something else is eating up GPU resources in the background. For instance, you left a game running or you are rendering something in After Effects at the same time.
RAM and hard drive space: Do you have enough RAM capacity and hard drive space? The RAM should ideally be from 2 to 3 times the amount of VRAM. You should always have 30GB or 40GB of free hard drive storage at a bare minimum for any 3D work.
2. Check your Scene/Settings
You should check your scene complexity.
-
-
- Is the number of polygons too high? Different systems can manage different amounts of triangles. Nevertheless, things can start to slow down when the polygon count is usually over a few million. Over ten or twenty million can sometimes cause crashes depending on the GPU.
- Are you doing other really complicated things in the scene like caustics, sims, or something else that eats up a lot of resources?
-
Simply copy the model and displacement material into a new scene to see if that works. To find out and fix the Displacement Keeps Crashing problem, you will have to check a few things on your Scene/Settings as following:
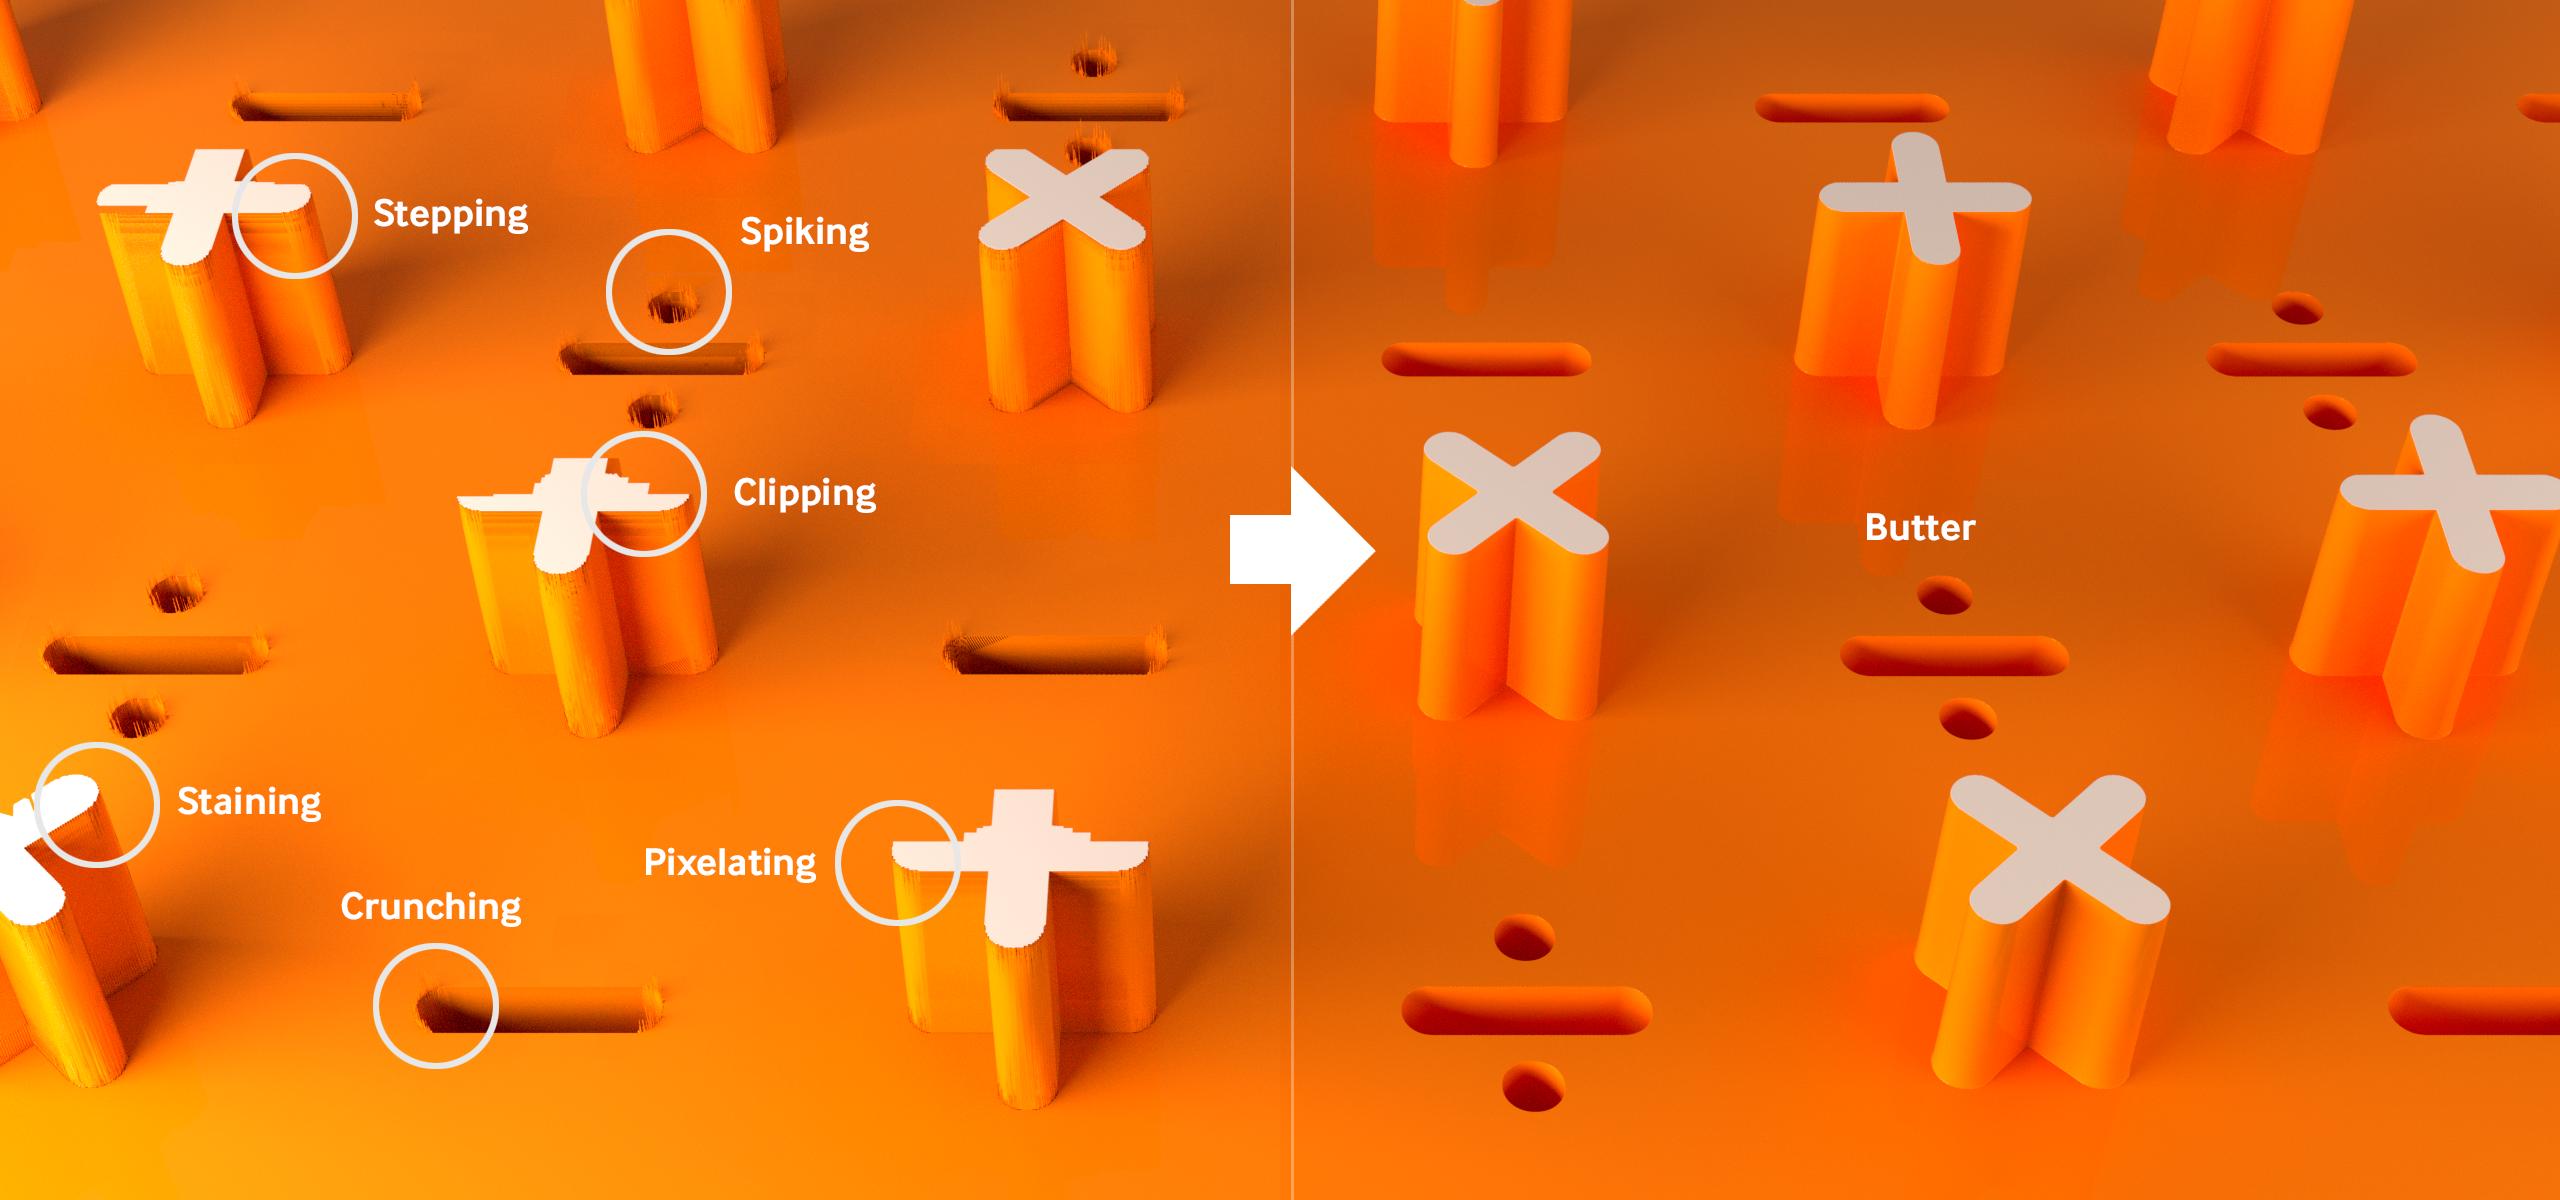
Missing polygons/clipping
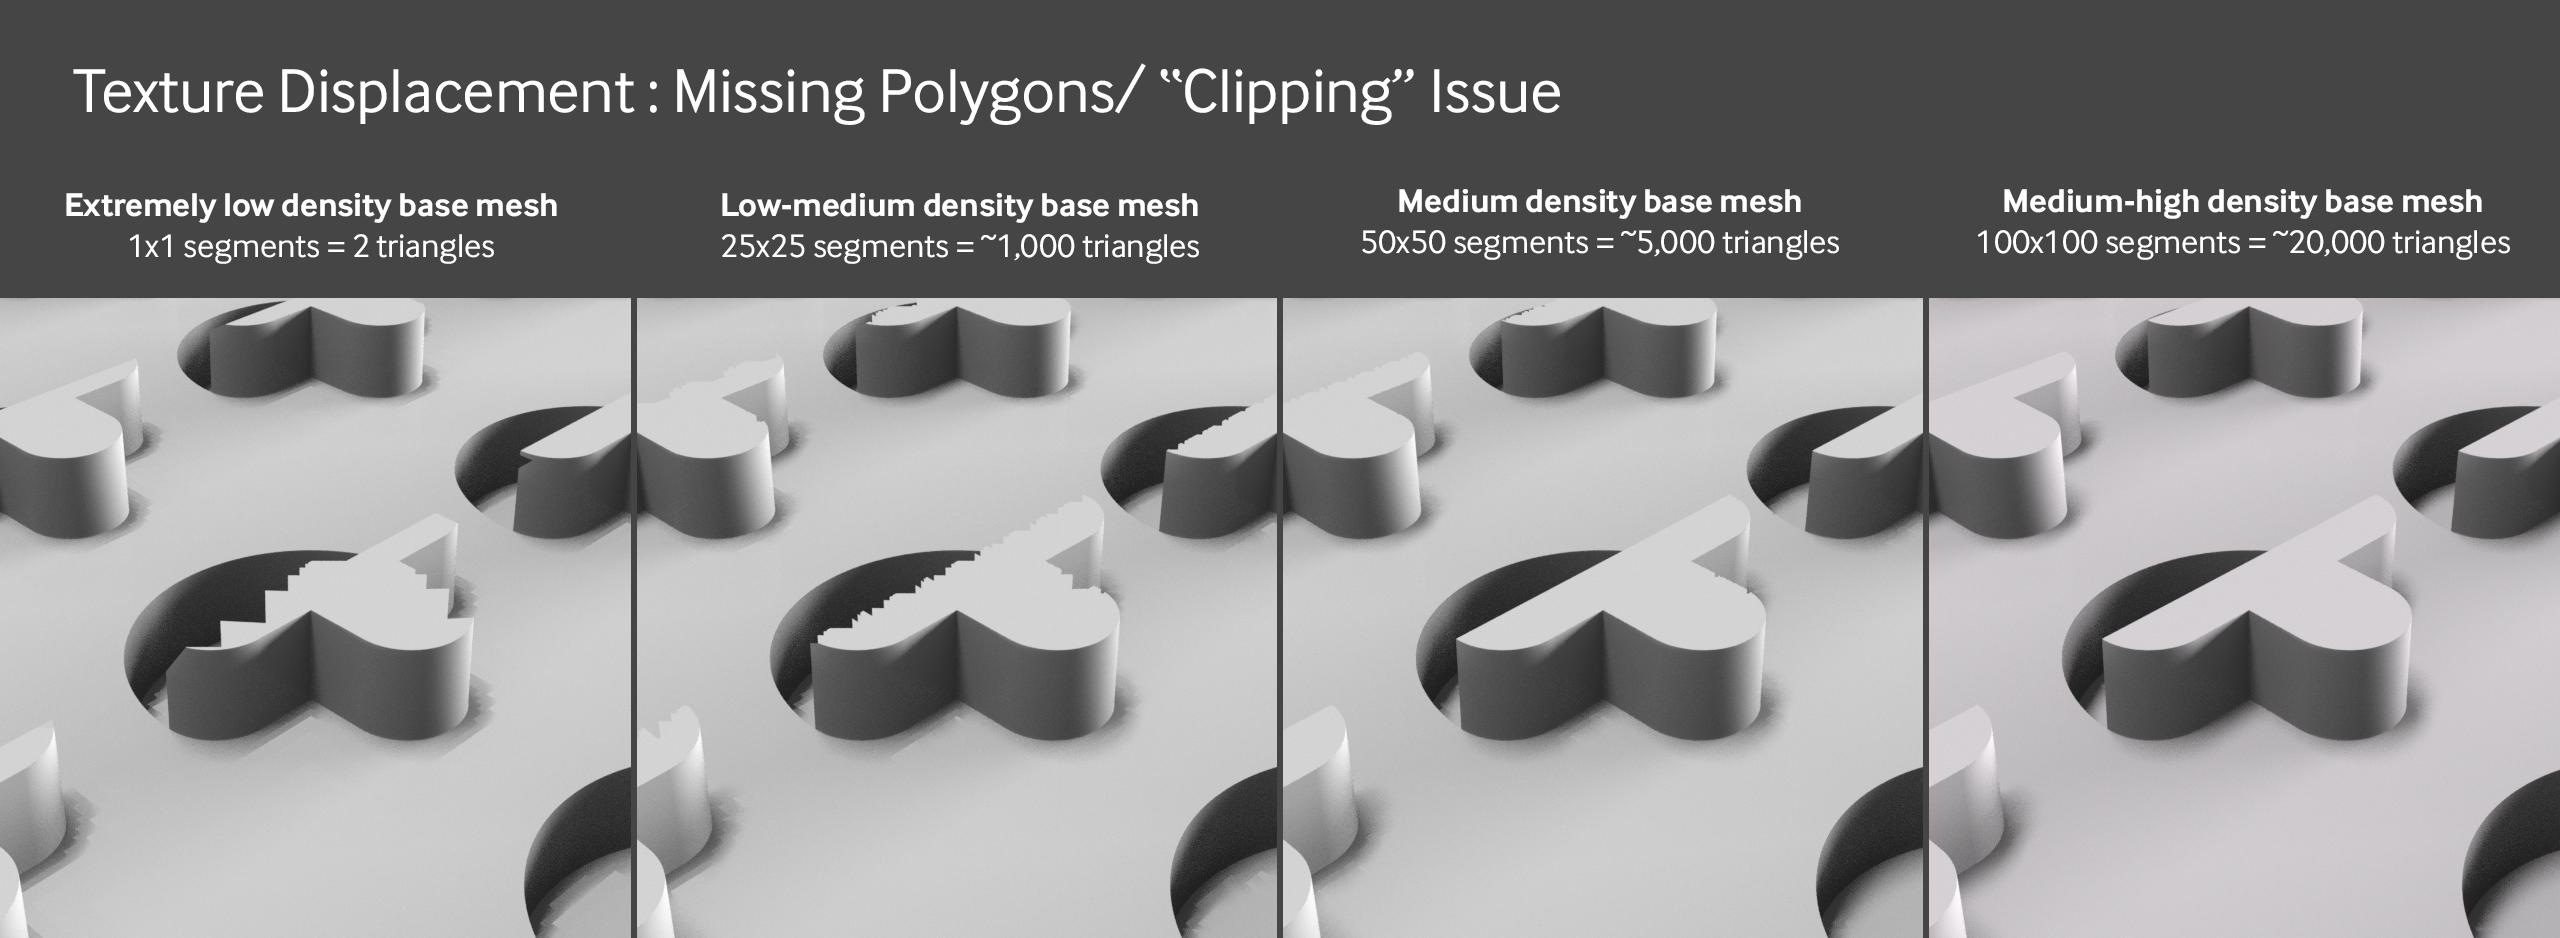
This is nearly always visible in texture displacement (not vertex). When you move the camera around, different polygons disappear. You can solve this issue by adding additional real polygons to the mesh (subdividing).
Water stains
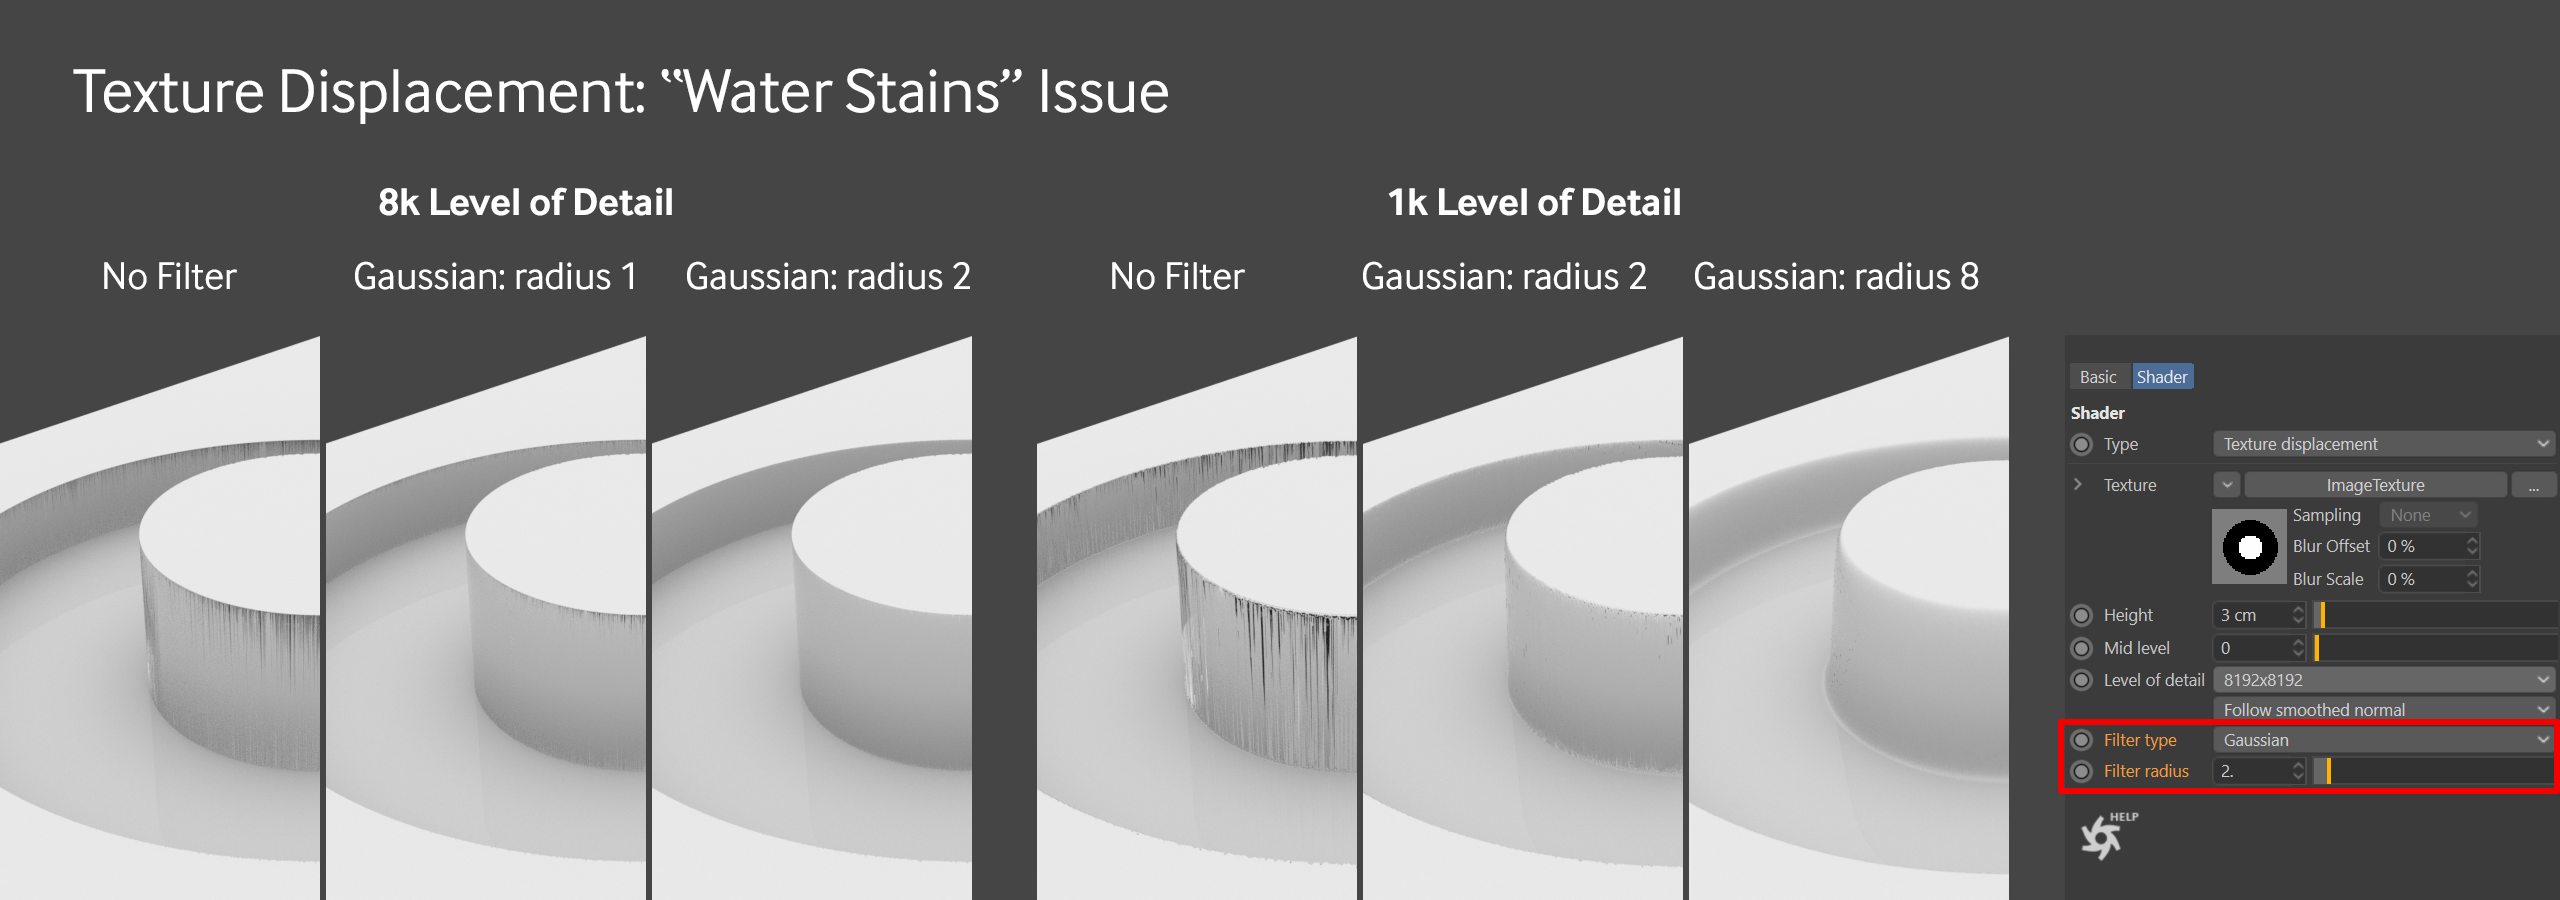
This is another typical texture displacement issue. To get corners as sharp as you wish, play with the filter value, and increase the polygon count of the base mesh and texture resolution. A higher resolution in the Level of Detail dropdown menu can also help this.
Pixelated along X & Z Axes
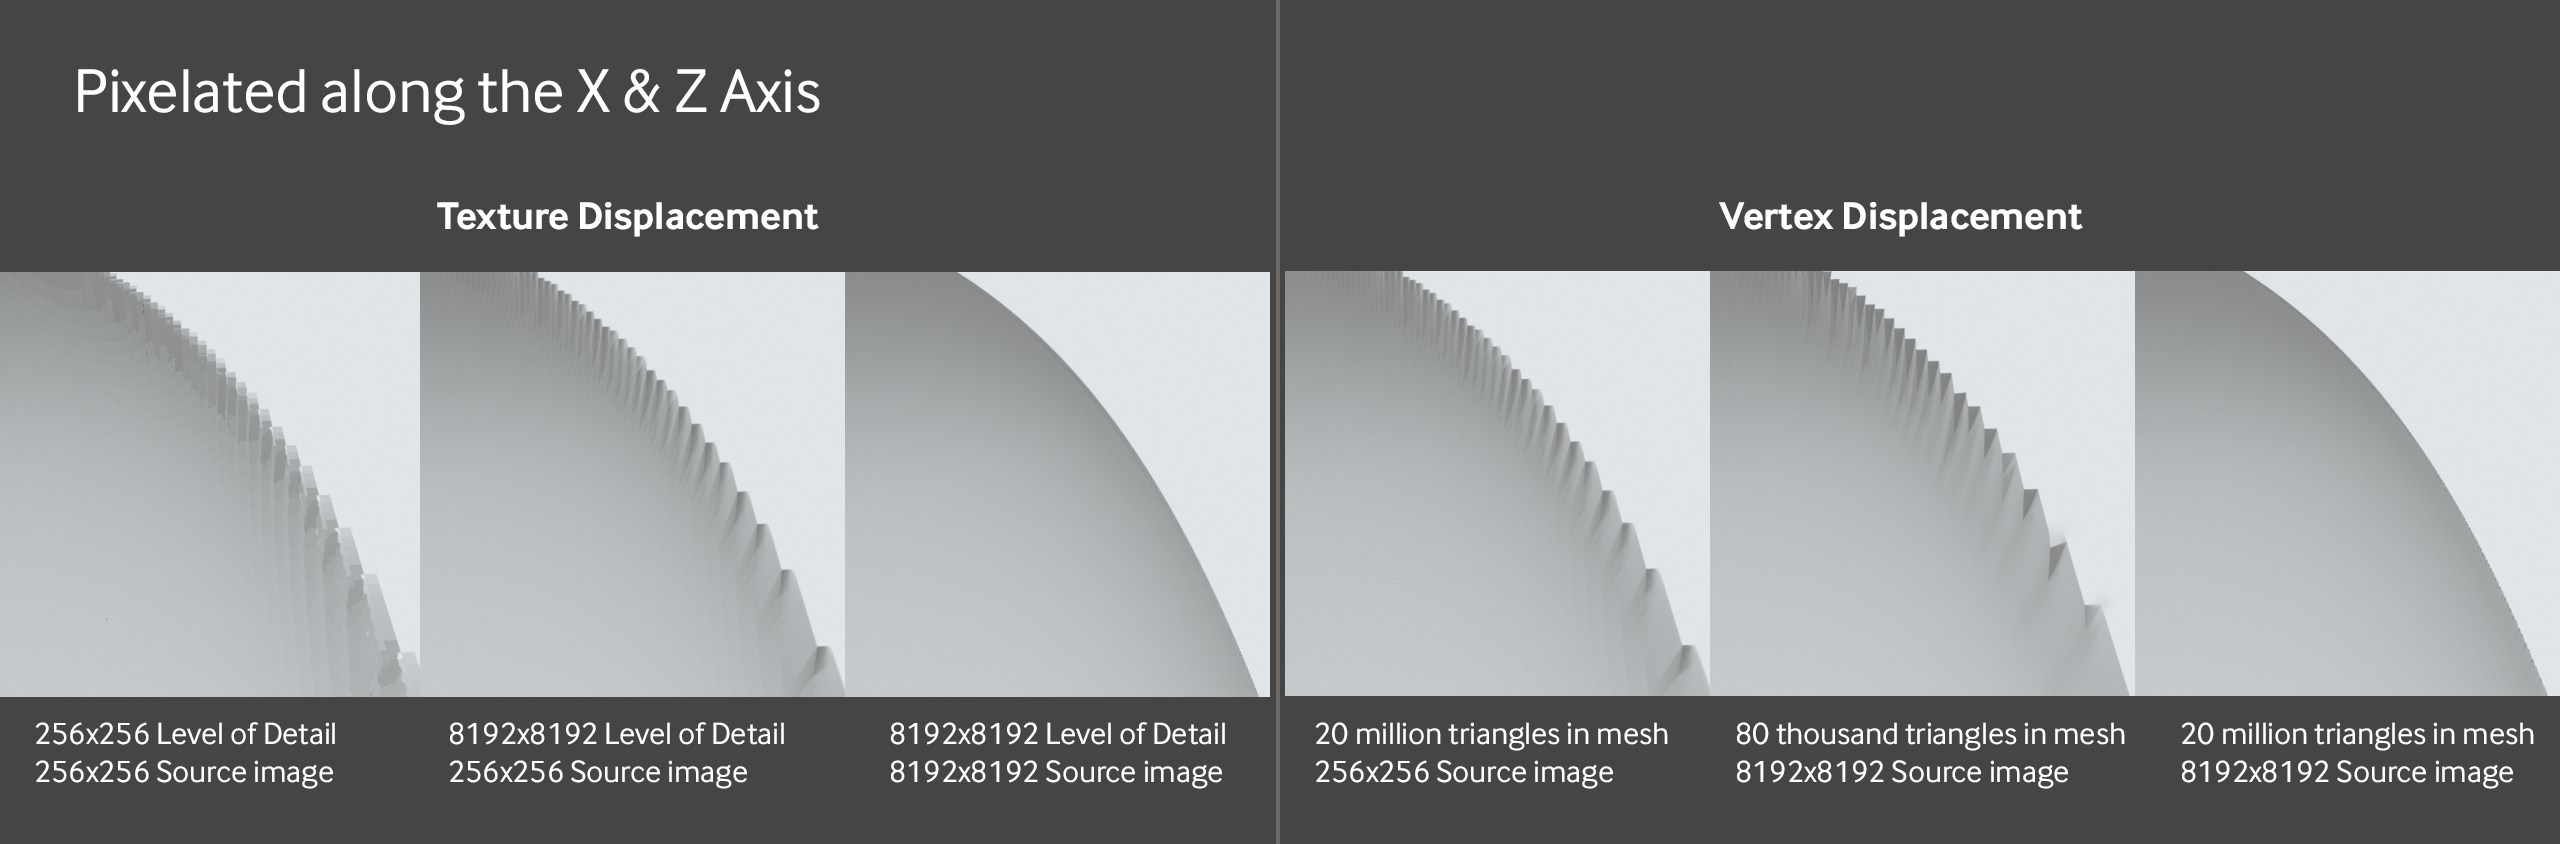
It is most likely due to a resolution problem when the image appears steppy and pixelated along the edges of curves or diagonals (but not necessarily along the displaced height axis).
-
-
- If you use texture displacement, both the source texture and the level of detail set in the displacement node must be high enough resolution to look smooth.
- In case you use vertex displacement, the source texture has to be of sufficient resolution, and the number of polygons on the surface must be dense enough to appear smooth. As you can see in the picture above, even with an 8k texture, it will not look good until there are lots more polygons in the displaced area.
-
This could possibly be due to the UV island where you have displacement being too small. Even with a very high-resolution texture, the smaller the island, the fewer pixels it has to work with and the lower resolution that area will have. This is a balancing act with the rest of the model, but it may be worth finding a higher resolution texture specifically for the area you want displacement on and splitting apart the geometry so it has its own UV map and everything can be larger.
Stepped along the Y (height) Axis
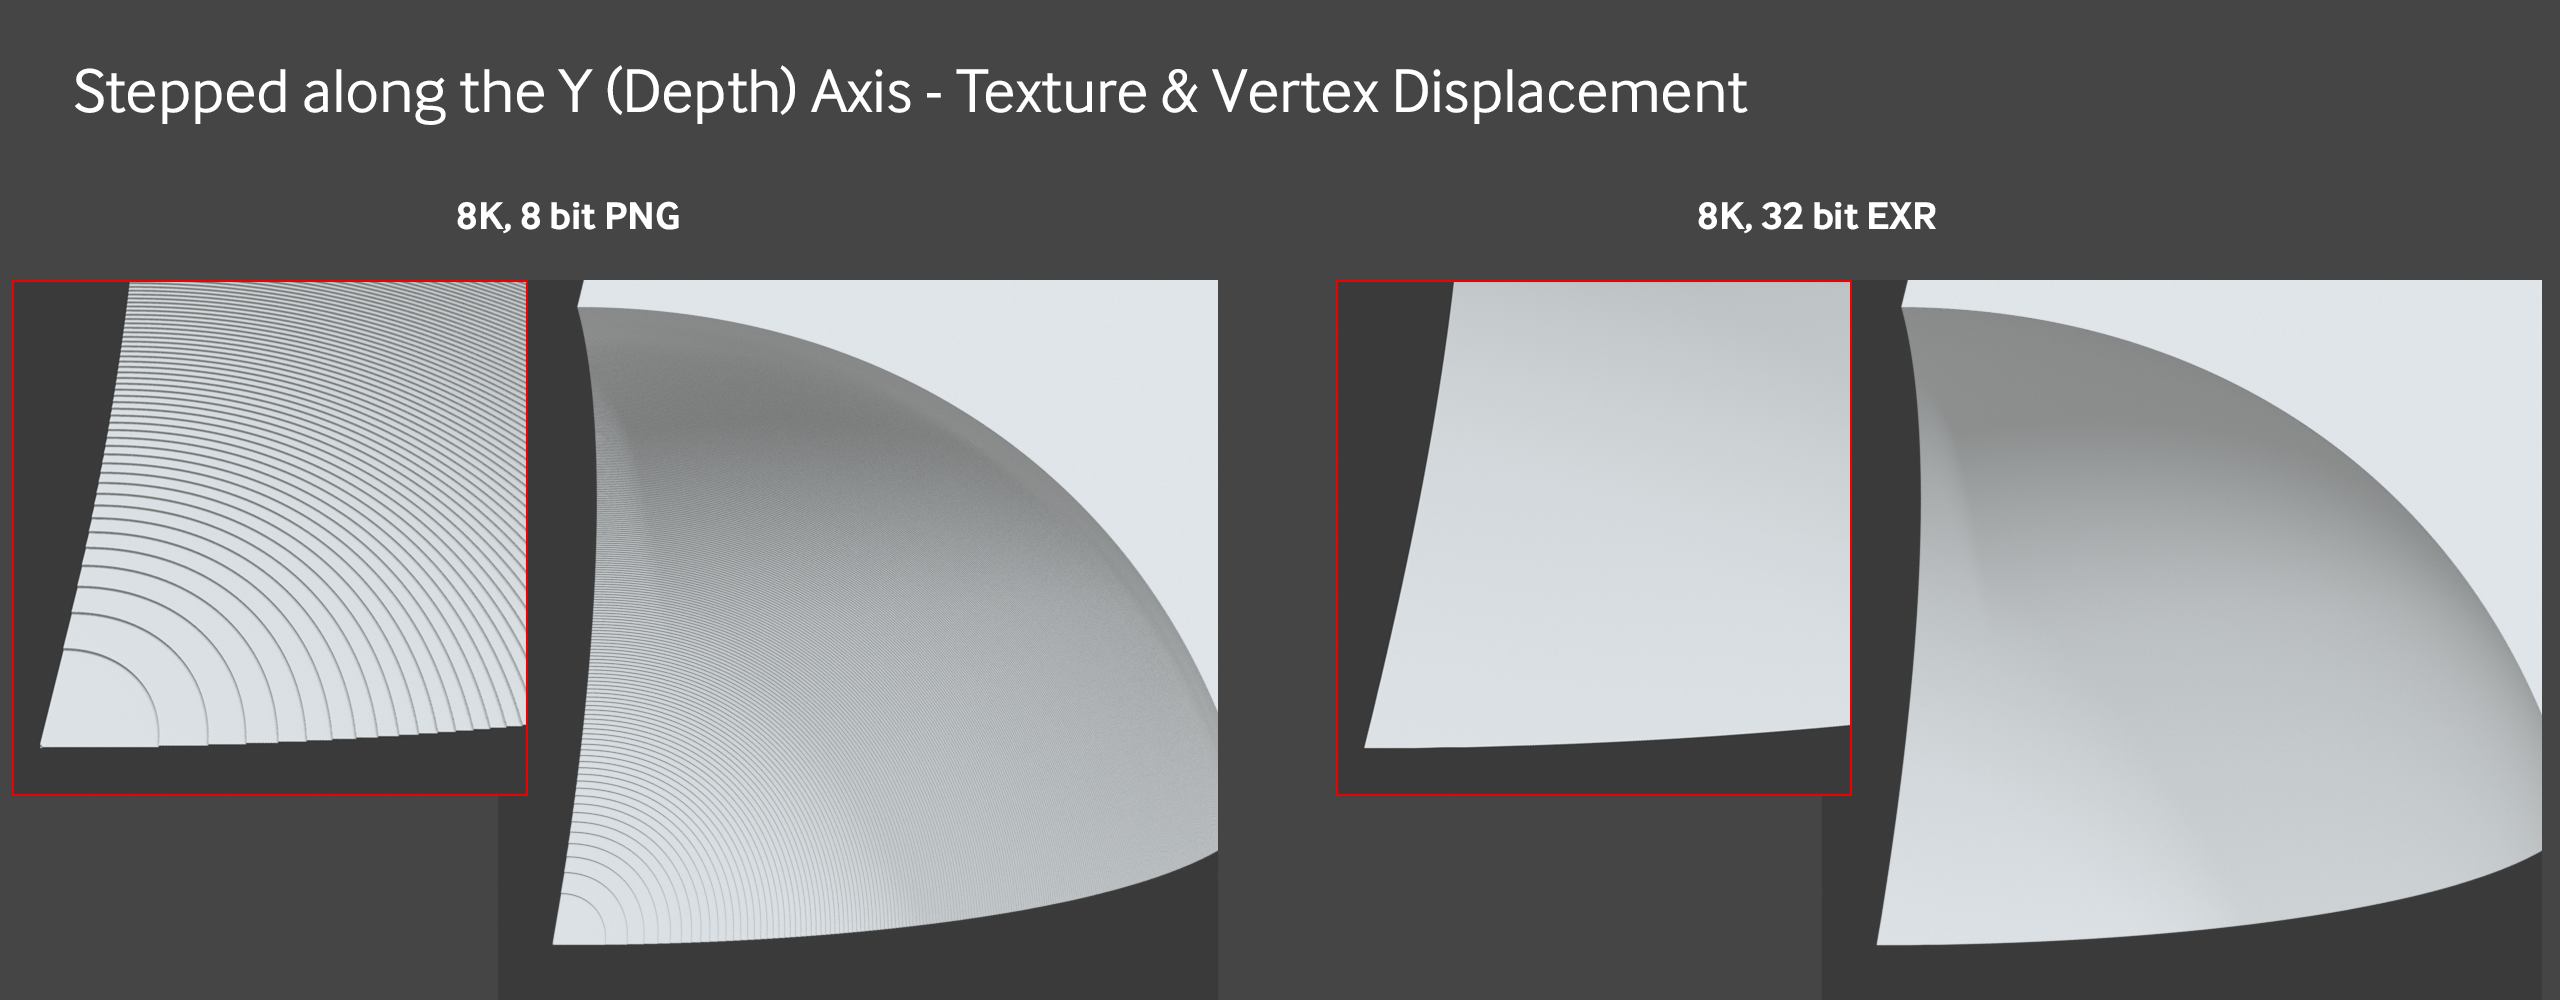
This is most likely due to the source image’s low bit depth and/or an excessively high height value. It is most common in 8-bit PNG or JPG files. However, depending on how the map was created, it could even be a problem in a 16-bit height map if you push it too far (increase the height too much).
You can’t upsample a bit depth without some serious special tools, and even then, you might not achieve the desired result. You could try blurring or dithering in a 2D application depending on the map. Nevertheless, you probably will have to find/create a higher bit depth version, lower the height value, try to cover it up with a bump/normal map, or disguise it with other objects in the scene.
If you are utilizing Texture Displacement with a Baking Texture, make sure to set the Type field to HDR linear space in the Baking Texture. This will convert procedurally produced textures into a flattened 32-bit image, preventing stepping.
Variable Resolution Issue
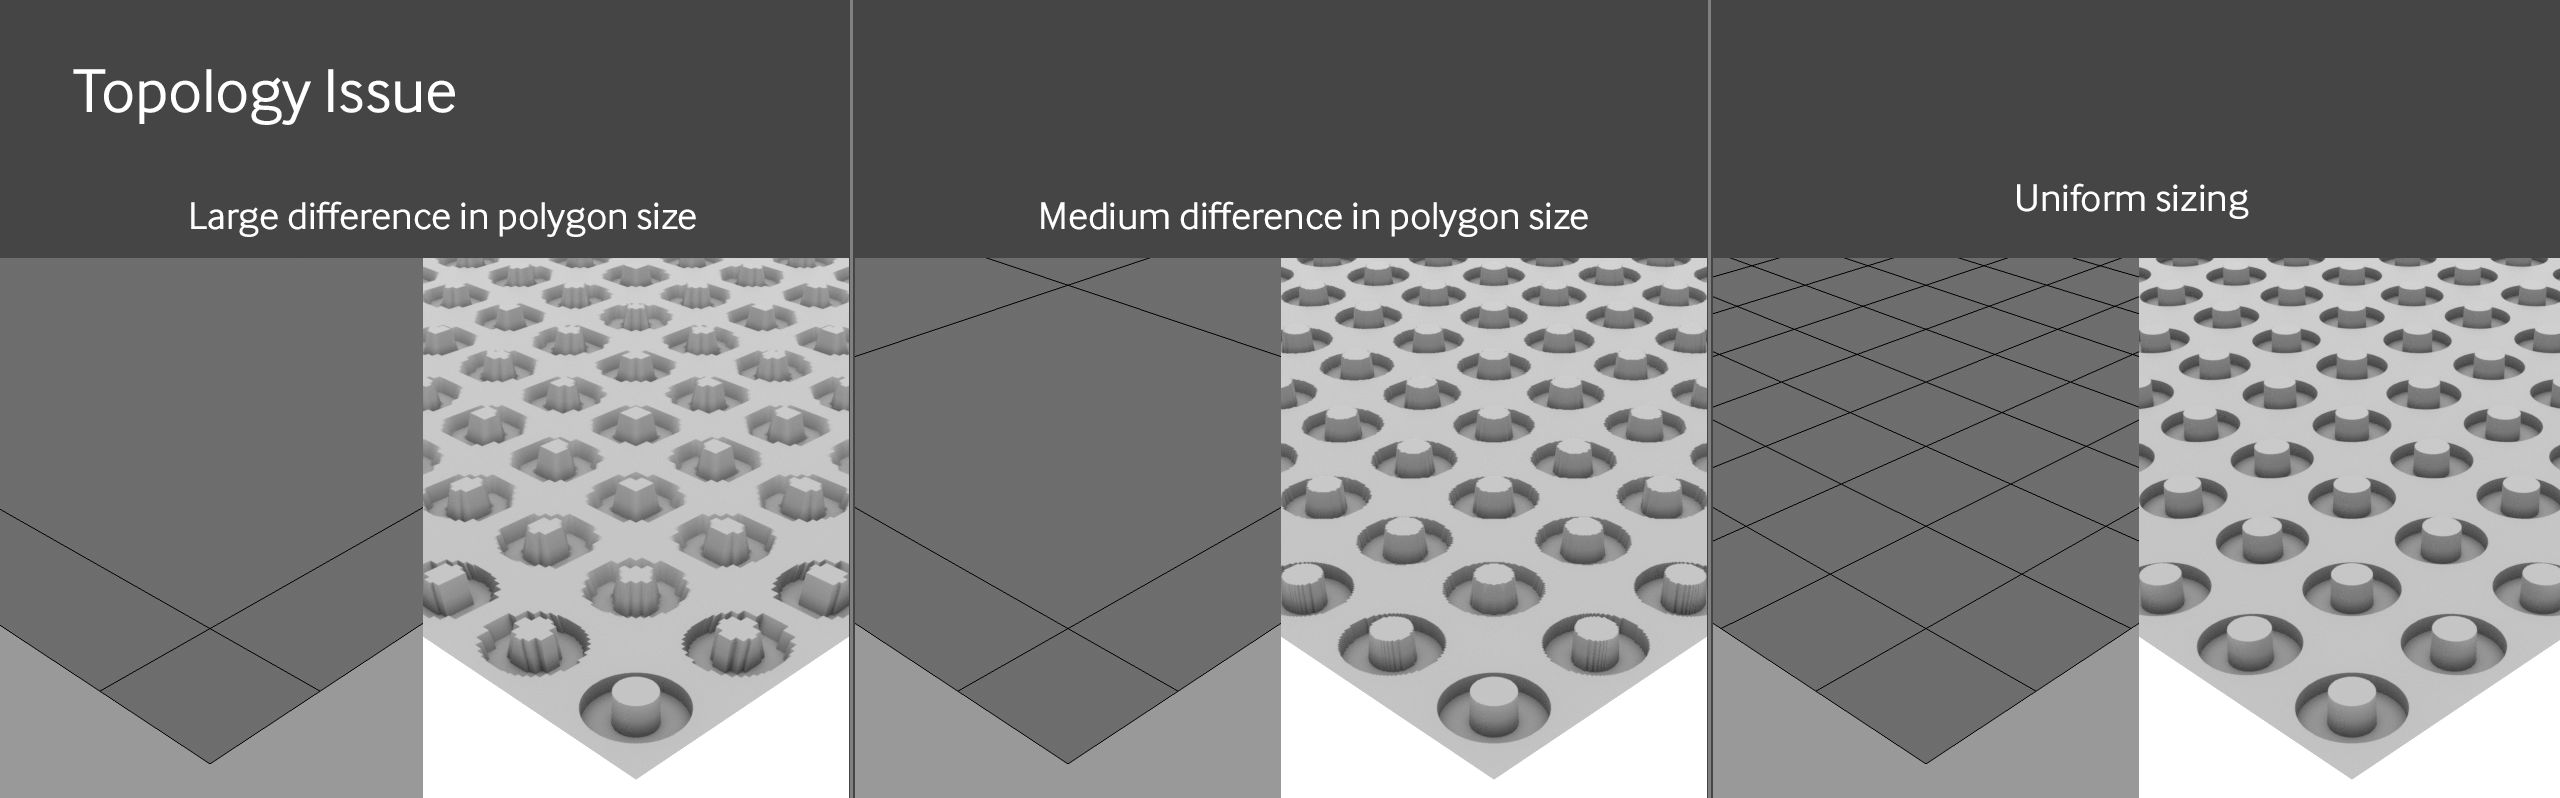
If one area of the model looks wonderful but another part right next to it seems pixelated, the problem is most likely with the model’s topology, the UV map, or both. This is significantly more of an issue with vertex displacement than with texture displacement. The reason is vertex displacement uses the model’s true polygon mesh rather than building its own voxel grid as texture displacement does. The solution is to even out the transitions on your mesh between large and small polygons and/or rework the UVs.
Intersecting/Misaligned Edges
This one is difficult to diagnose since there are several independent things that can cause it.
Mid Level Issue
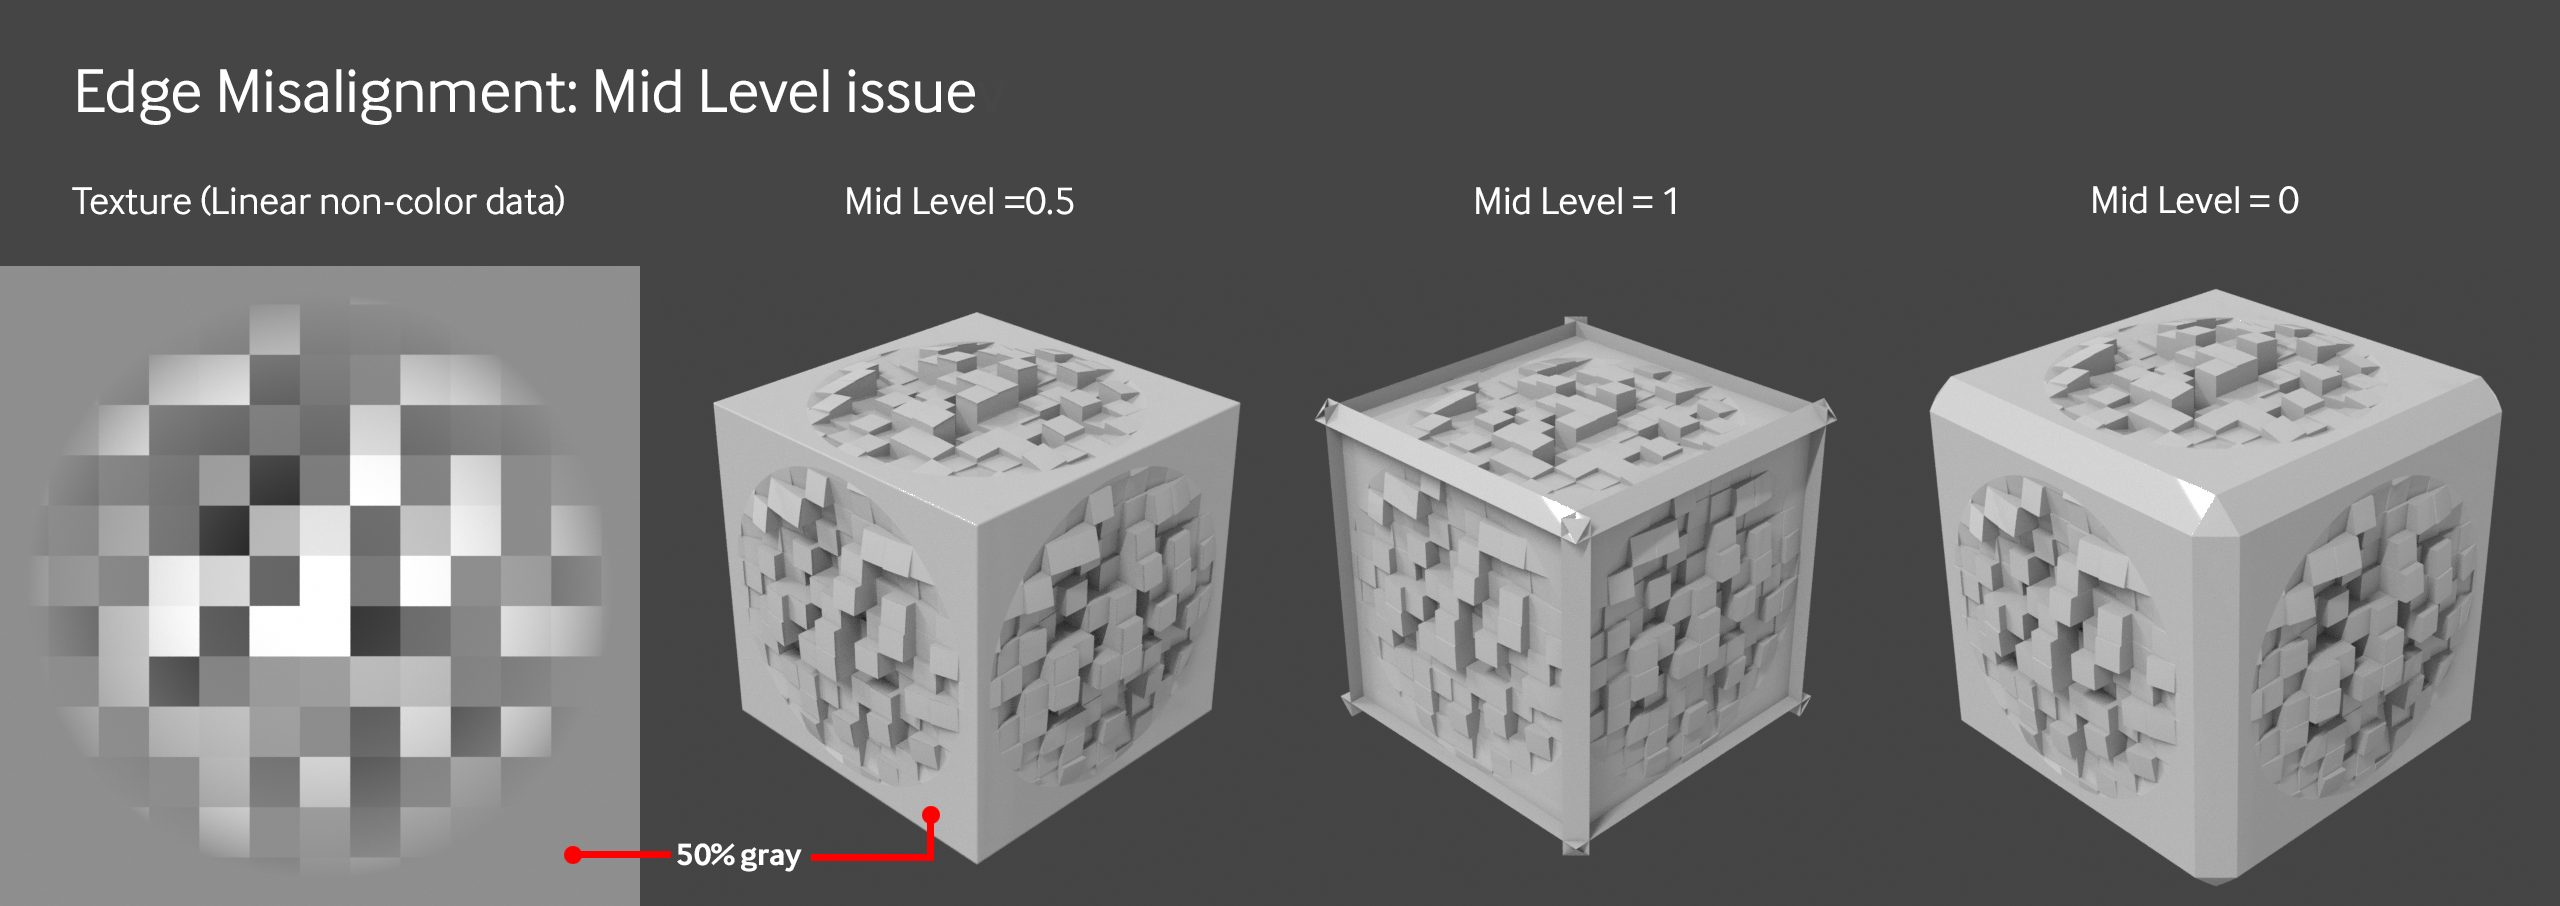
If the source texture is in Linear color space, set the mid level to 0.5. At that point, anything that is 50% gray will not be displaced, and the edges should align properly (assuming the texture tiles are properly).
Set the mid level to 0 if the texture is set up so that black is meant to be the midpoint where different UV islands should connect seamlessly. Set the mid level to 1 if white is to be the midpoint. If it is a different value, you will have to manually adjust it so it aligns properly.
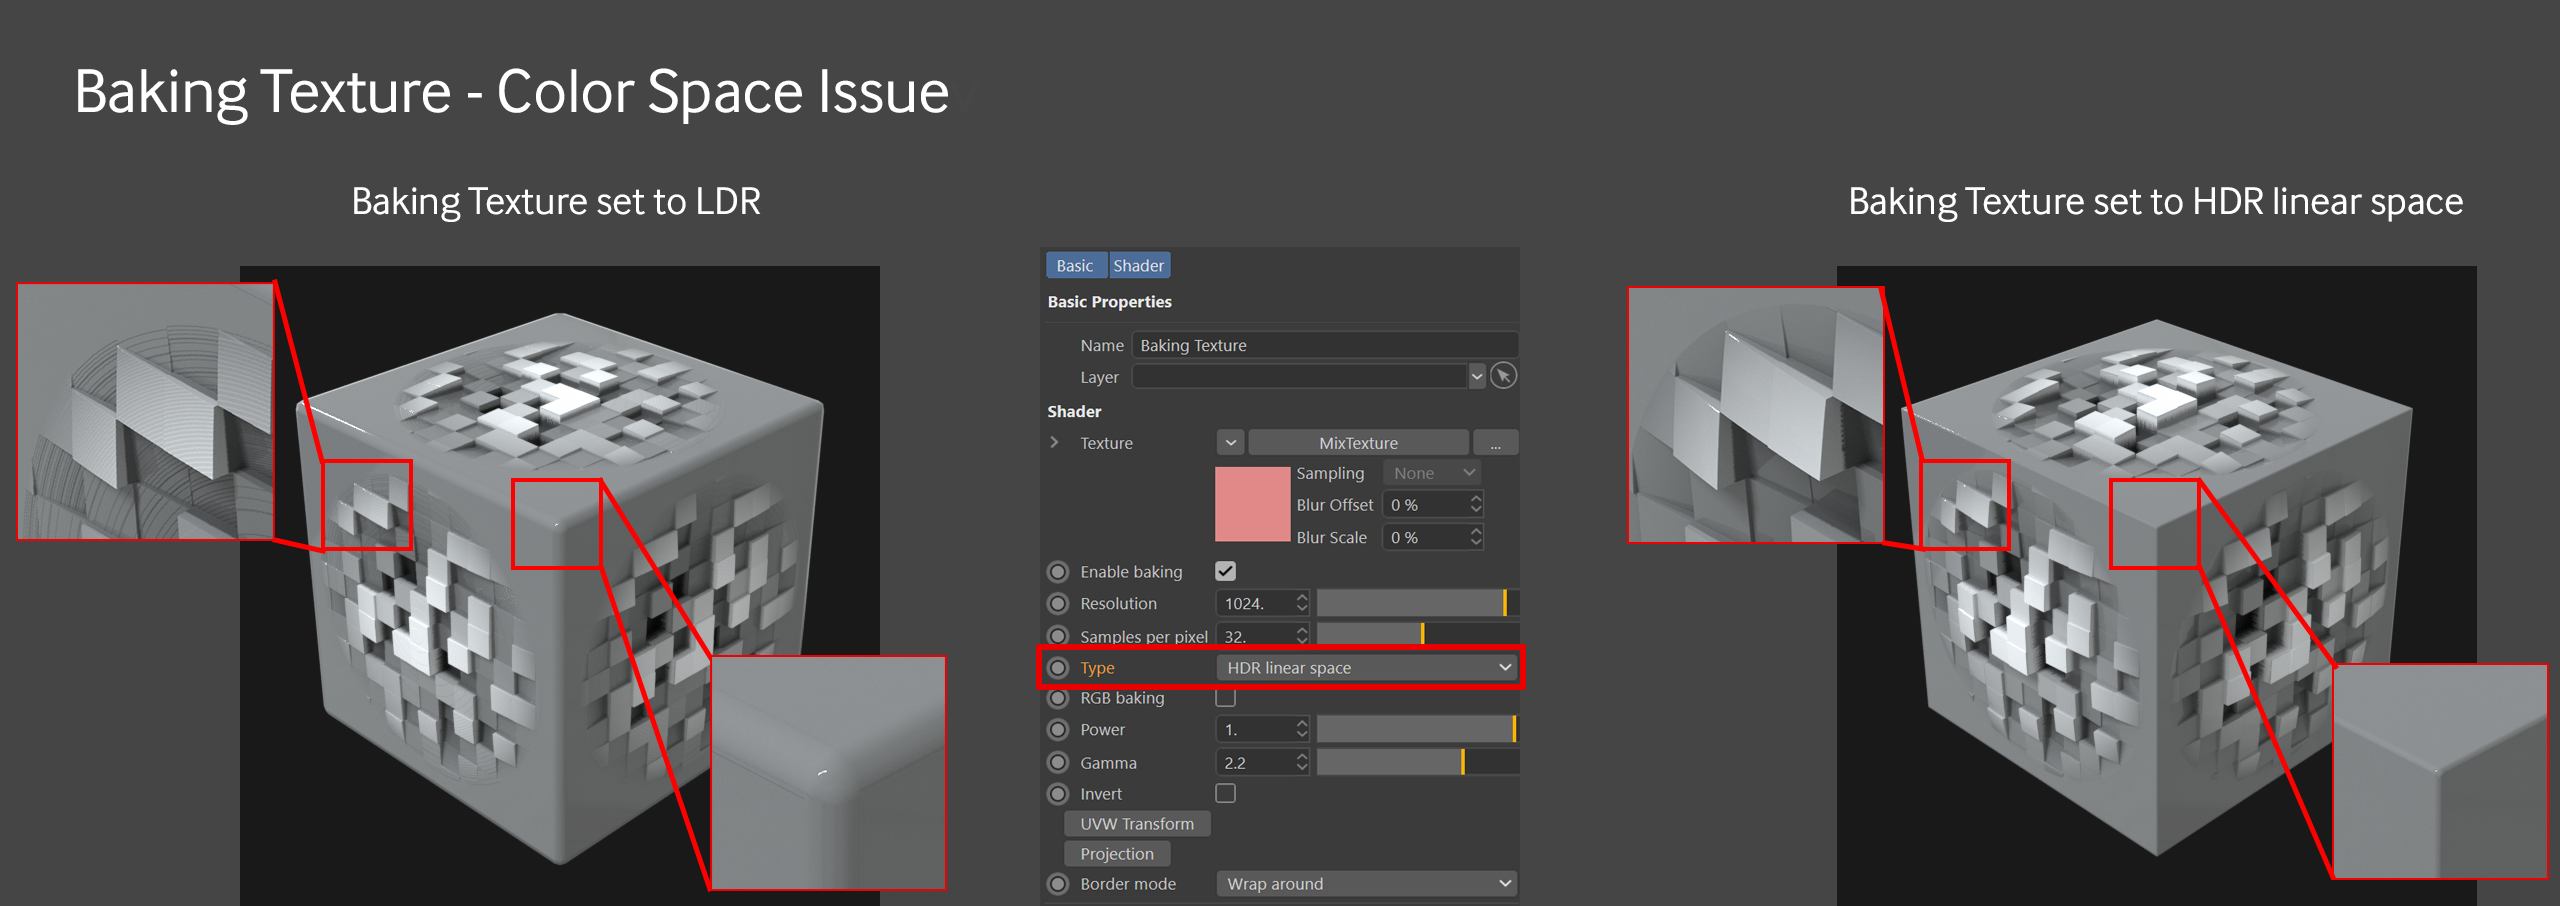
Color Space Issue
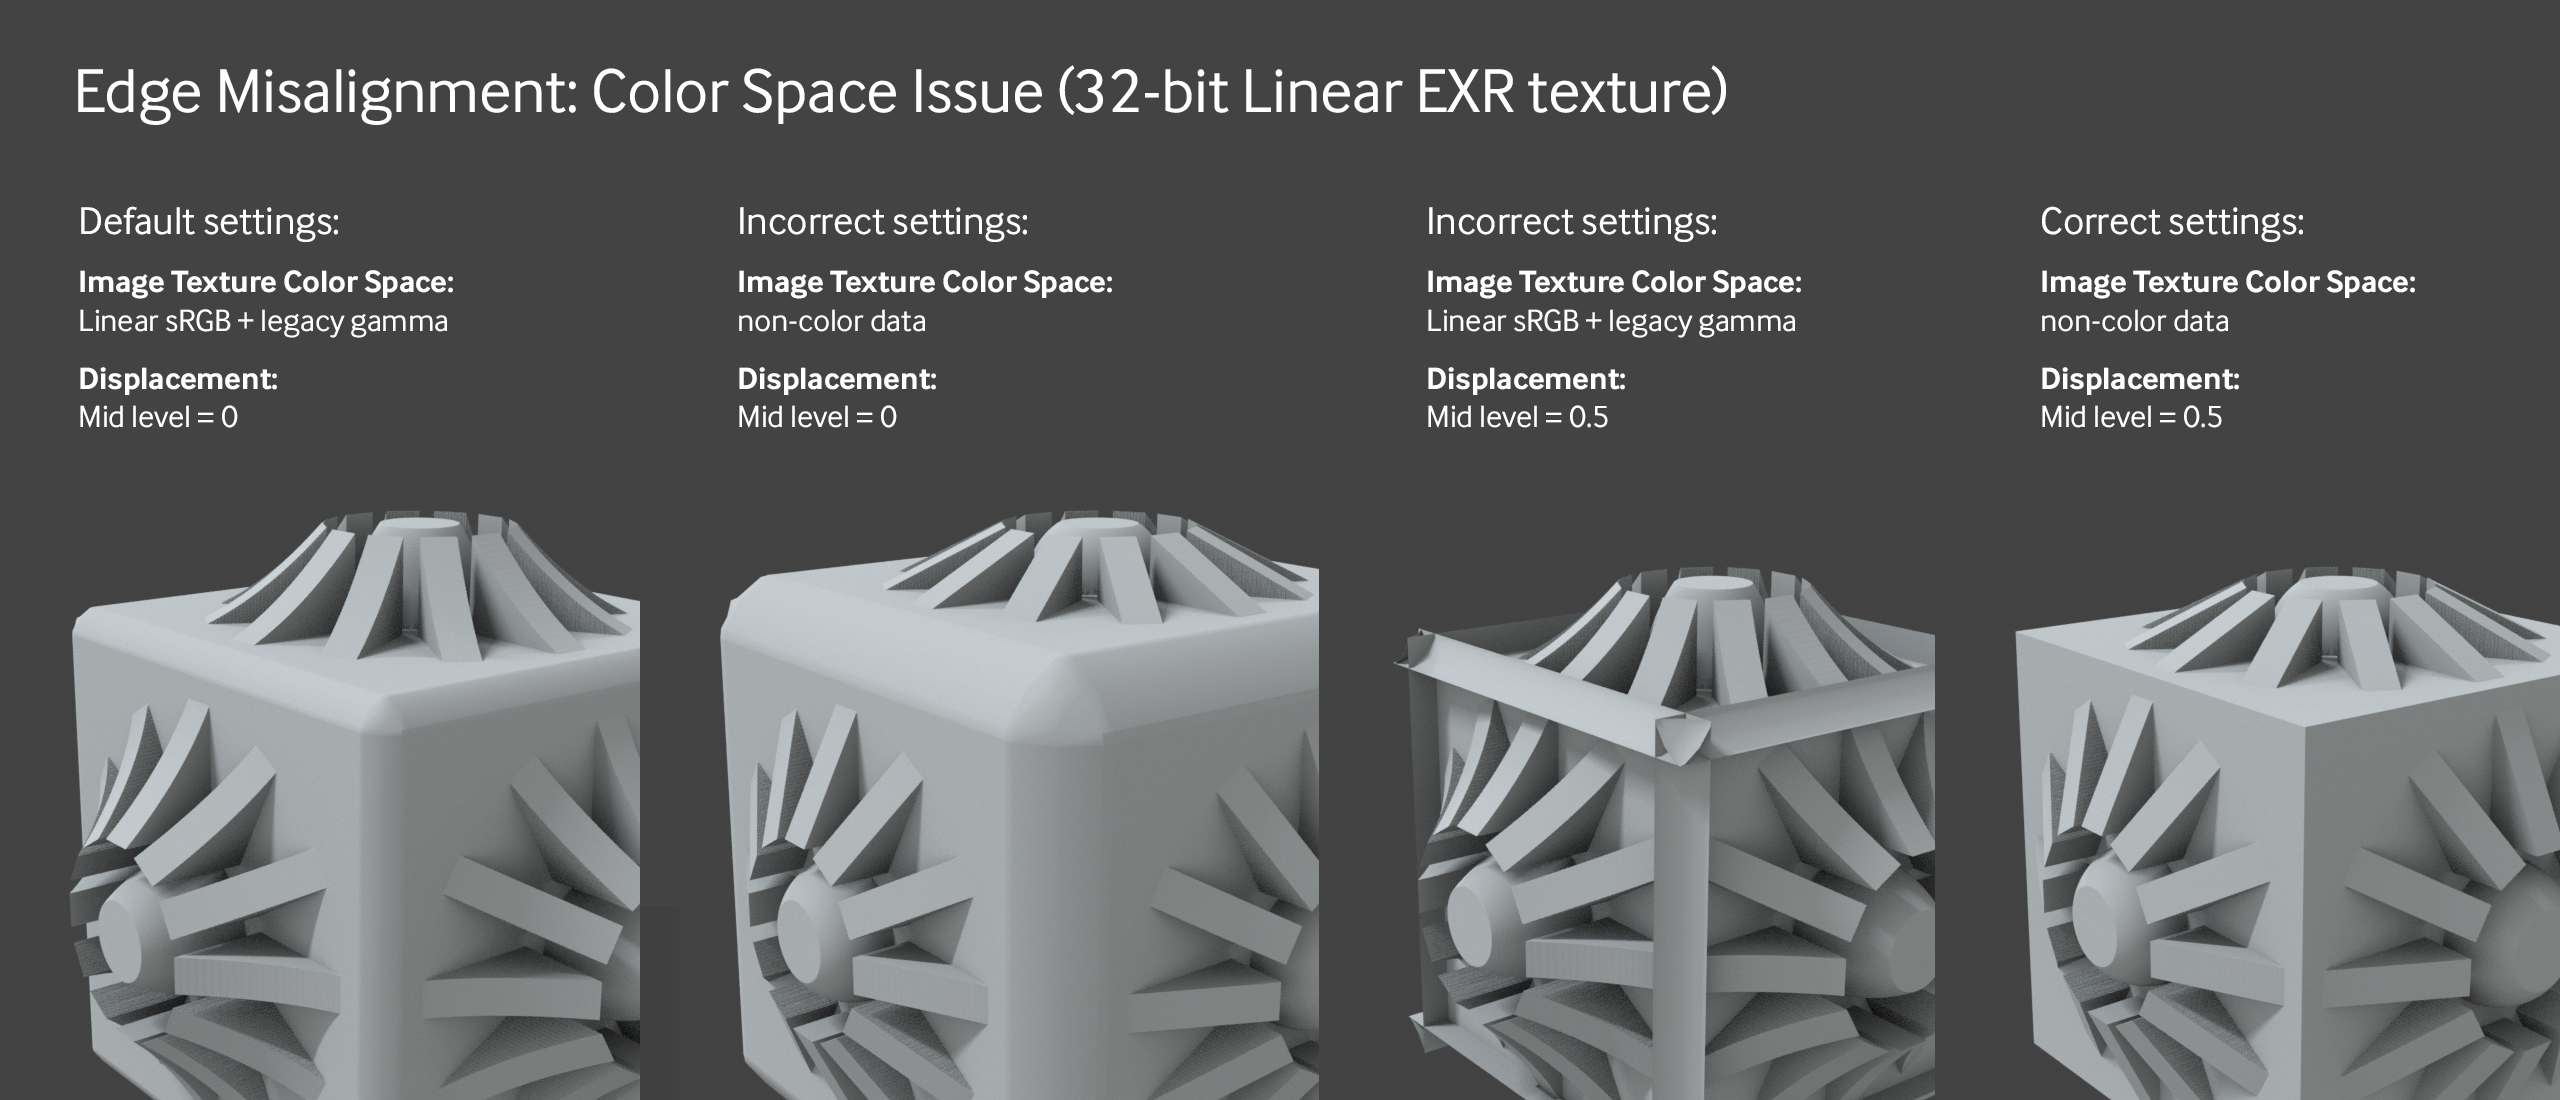
If you are using Vertex displacement and a Linear color space (16 or 32 bit) texture, you need to change the Color Space in the ImageTexture node to non-color data and set the midpoint to 0.5.
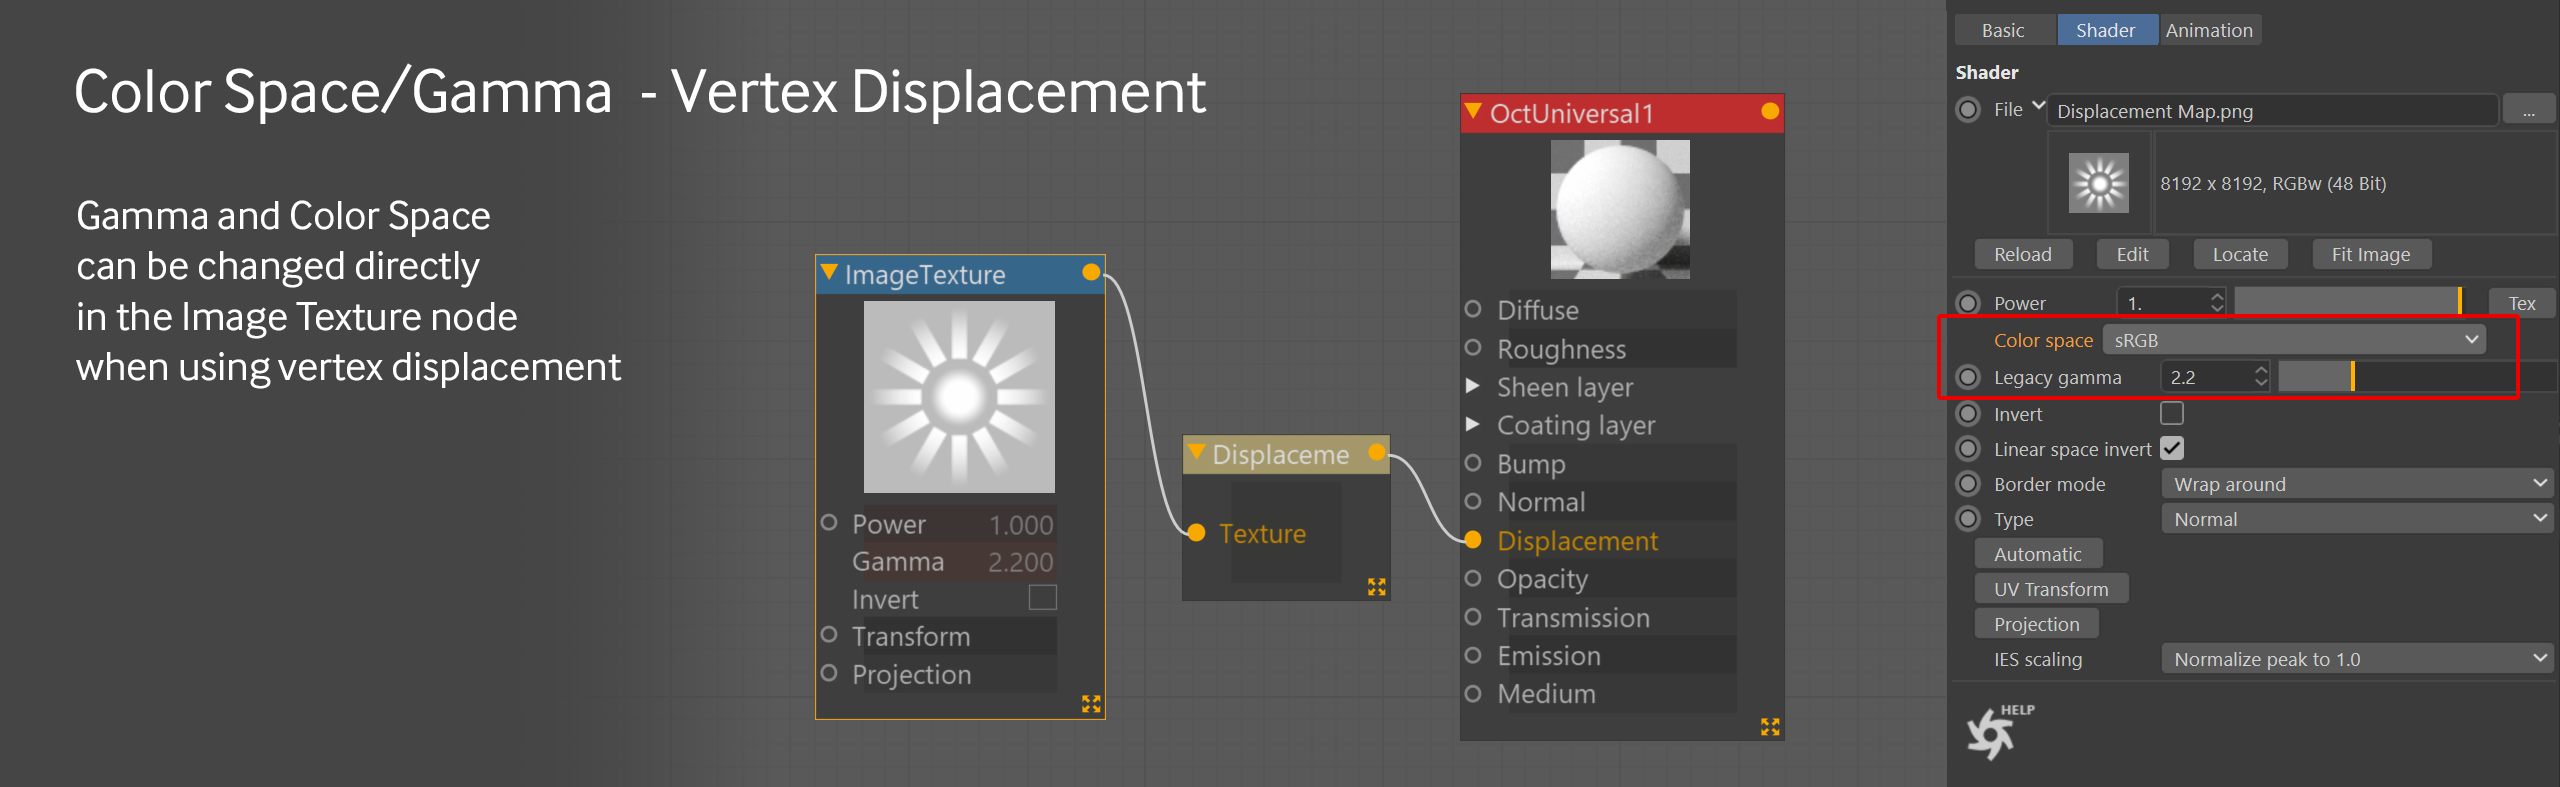
If you need to adjust the image to compensate for an sRGB or other gamma curve when using vertex displacement, you can do so in the Image Texture node by utilizing the Color Space and Legacy Gamma controls.
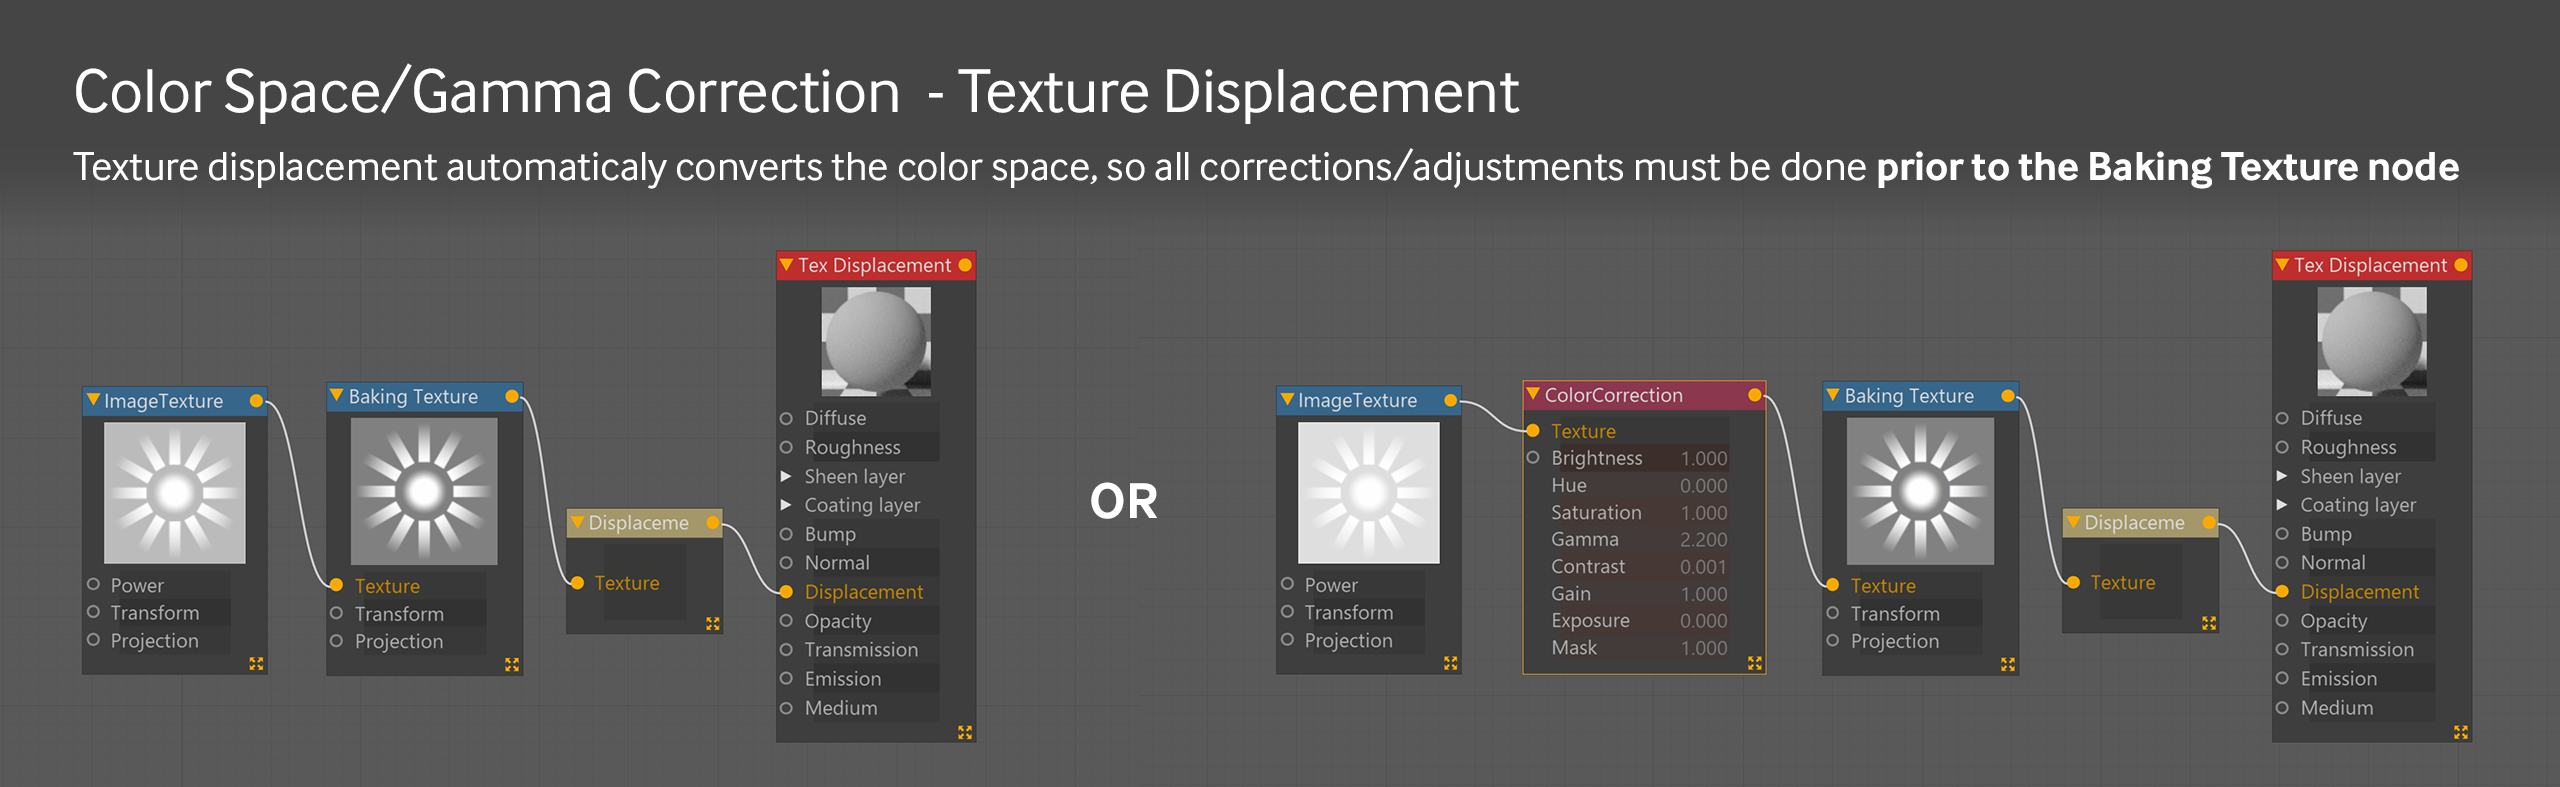
Texture displacement treats incoming data as non-color data. Therefore, changing the color space in the image texture node or changing the gamma in the baking texture node will not affect anything.
If you are having color space issues, you can try either:
-
-
- Running your original source texture into a Baking Texture node, then adjusting the gamma/color space in the original texture node (not the baking texture node),
- Placing a Color Correction node between your original texture and a new baking texture node, then change the gamma in the Color Correction node.
-
In both cases, ensure to set the Baking Texture Node to HDR Linear Space
If the source image is in a different color space (such as sRGB), adjusting the legacy gamma/color space and the mid level values will be necessary. Maps can be made in a variety of methods, and how it was done is anyone’s guess. Gamma curves affect not only the mid gray, but all of the grays along the gradient, meaning choosing the wrong one will result in curves in straight lines. Sometimes you just can’t fix a weird map, and you will either keep on changing the midpoint to prevent intersections and ignore the distortion, or you will find a new map.
UV Issue

Another possibility is that the UV islands that make the two adjacent edges are overlapping parts of the source image with different tones. As a result, one will be “lower” than the other, causing to misalignment (or disconnected panels). Check the edges of the UVs for accuracy. Fixing this may require redoing the UVs and/or editing the image.
Procedural Setups: Color Space Issue
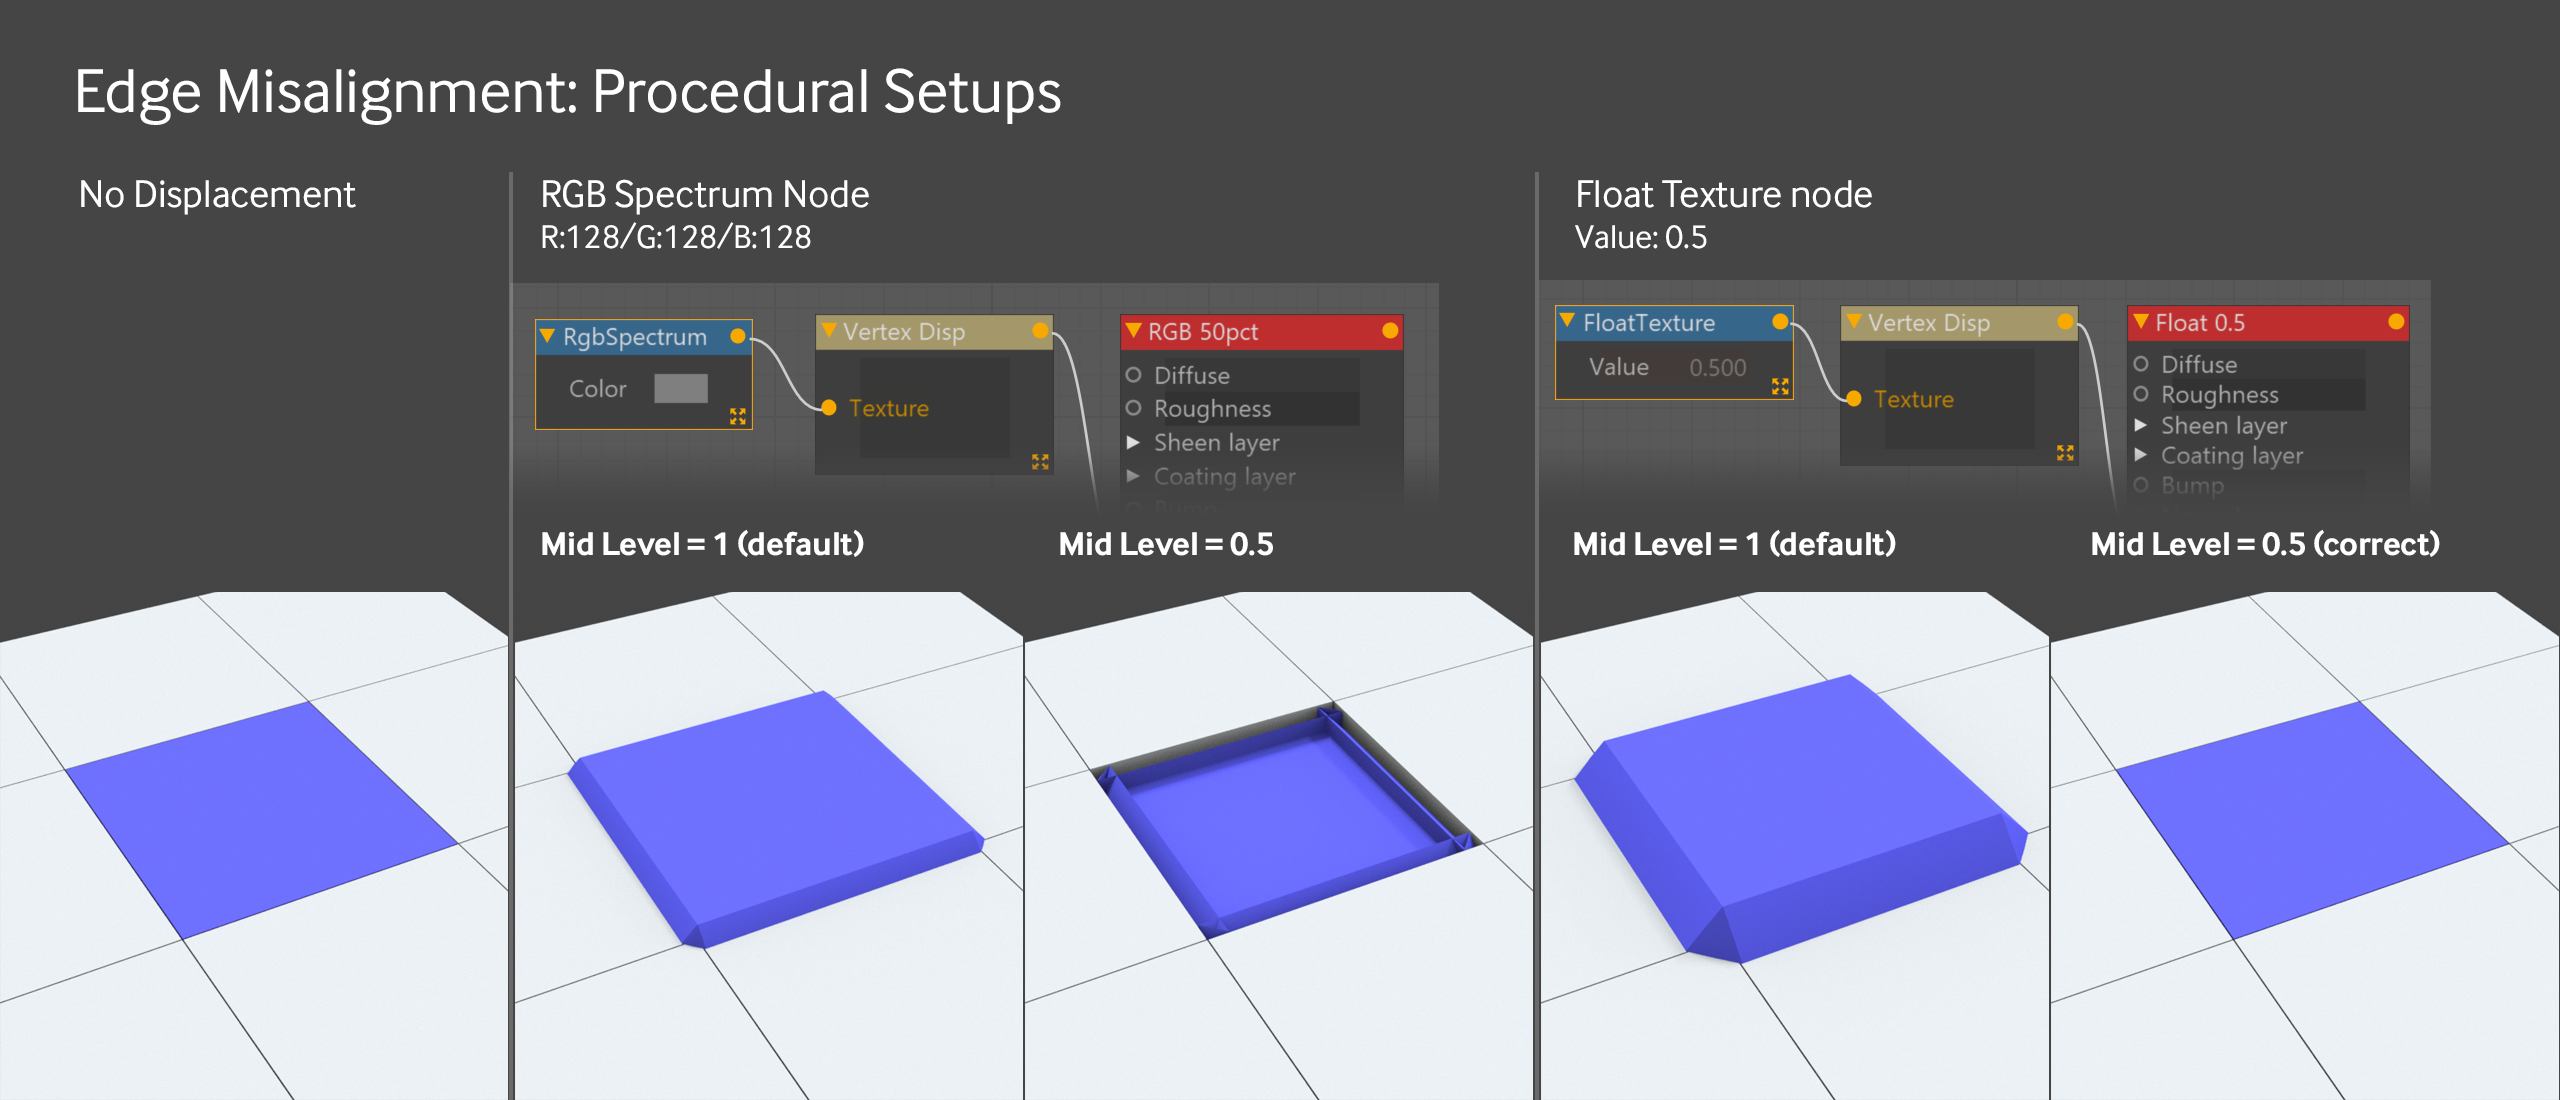
If you’re generating procedural displacement data in Octane (using color and pattern nodes to create your maps) and want a 50% gray field to act as a “baseline” (no displacement), your first instinct might be to grab an RGB Spectrum node and make it 50% gray. This will not work when you try to change the mid level to 0.5 since the RGB Spectrum node outputs values in the sRGB color space. Non-color channels in Octane, such as bump/displacement/roughness, are all expecting non-color data in a Linear space. To correct this, the mid level value would have to be around.22 or so, which may throw off the other black and white values combined with this node.
Use a Float Texture node instead of an RGB Spectrum node. This will provide a non-color linear data value between 0 and 1. When the mid level is set to 0.5, it corresponds to “middle gray,” and no displacement occurs in that portion of the final texture.
Distortion
Curve, Squash & Stretch
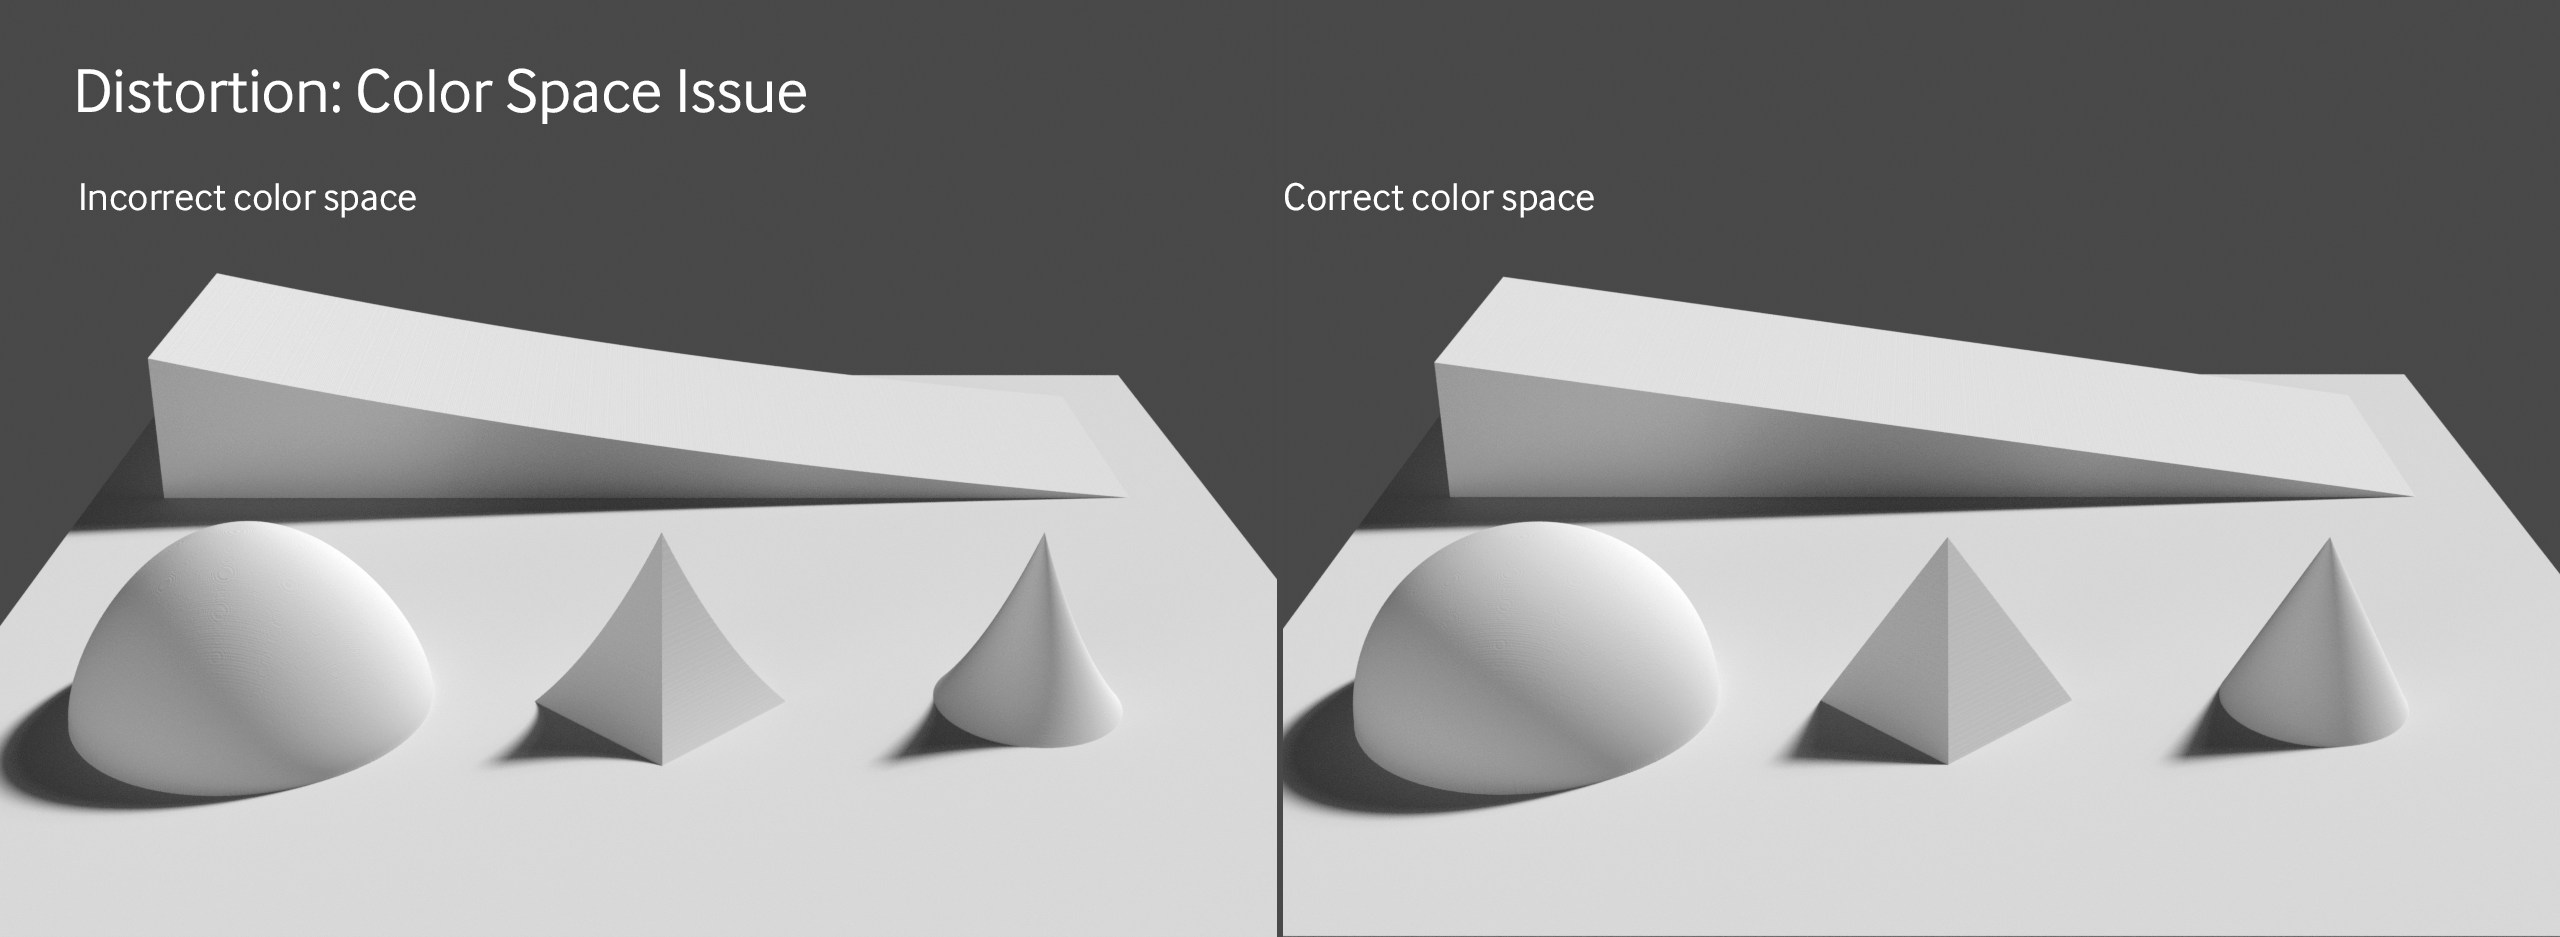
If you expect a straight linear ramp or a round hemisphere but get a curved linear ramp or the top of an egg, it’s most likely due to the color space. This isn’t normally an issue with texture displacement, but with vertex displacement, you must ensure that the color space in the ImageTexture node matches the color space in the image file.
Depending on the map (particularly those that do not use the entire black to white spectrum), having the wrong color space may also cause the overall height to appear “stretched.” This is related to where the middle gray falls on the gamma curve.
If you’re utilizing vertex displacement, you can change the values in the Image Texture node directly. If you’re utilizing texture displacement and need to adjust the image, you’ll need to run the Image Texture node through a Baking Texture node (setup to HDR linear space) to see the results of your changes.
Crunchy Surfaces and Spiky Edges
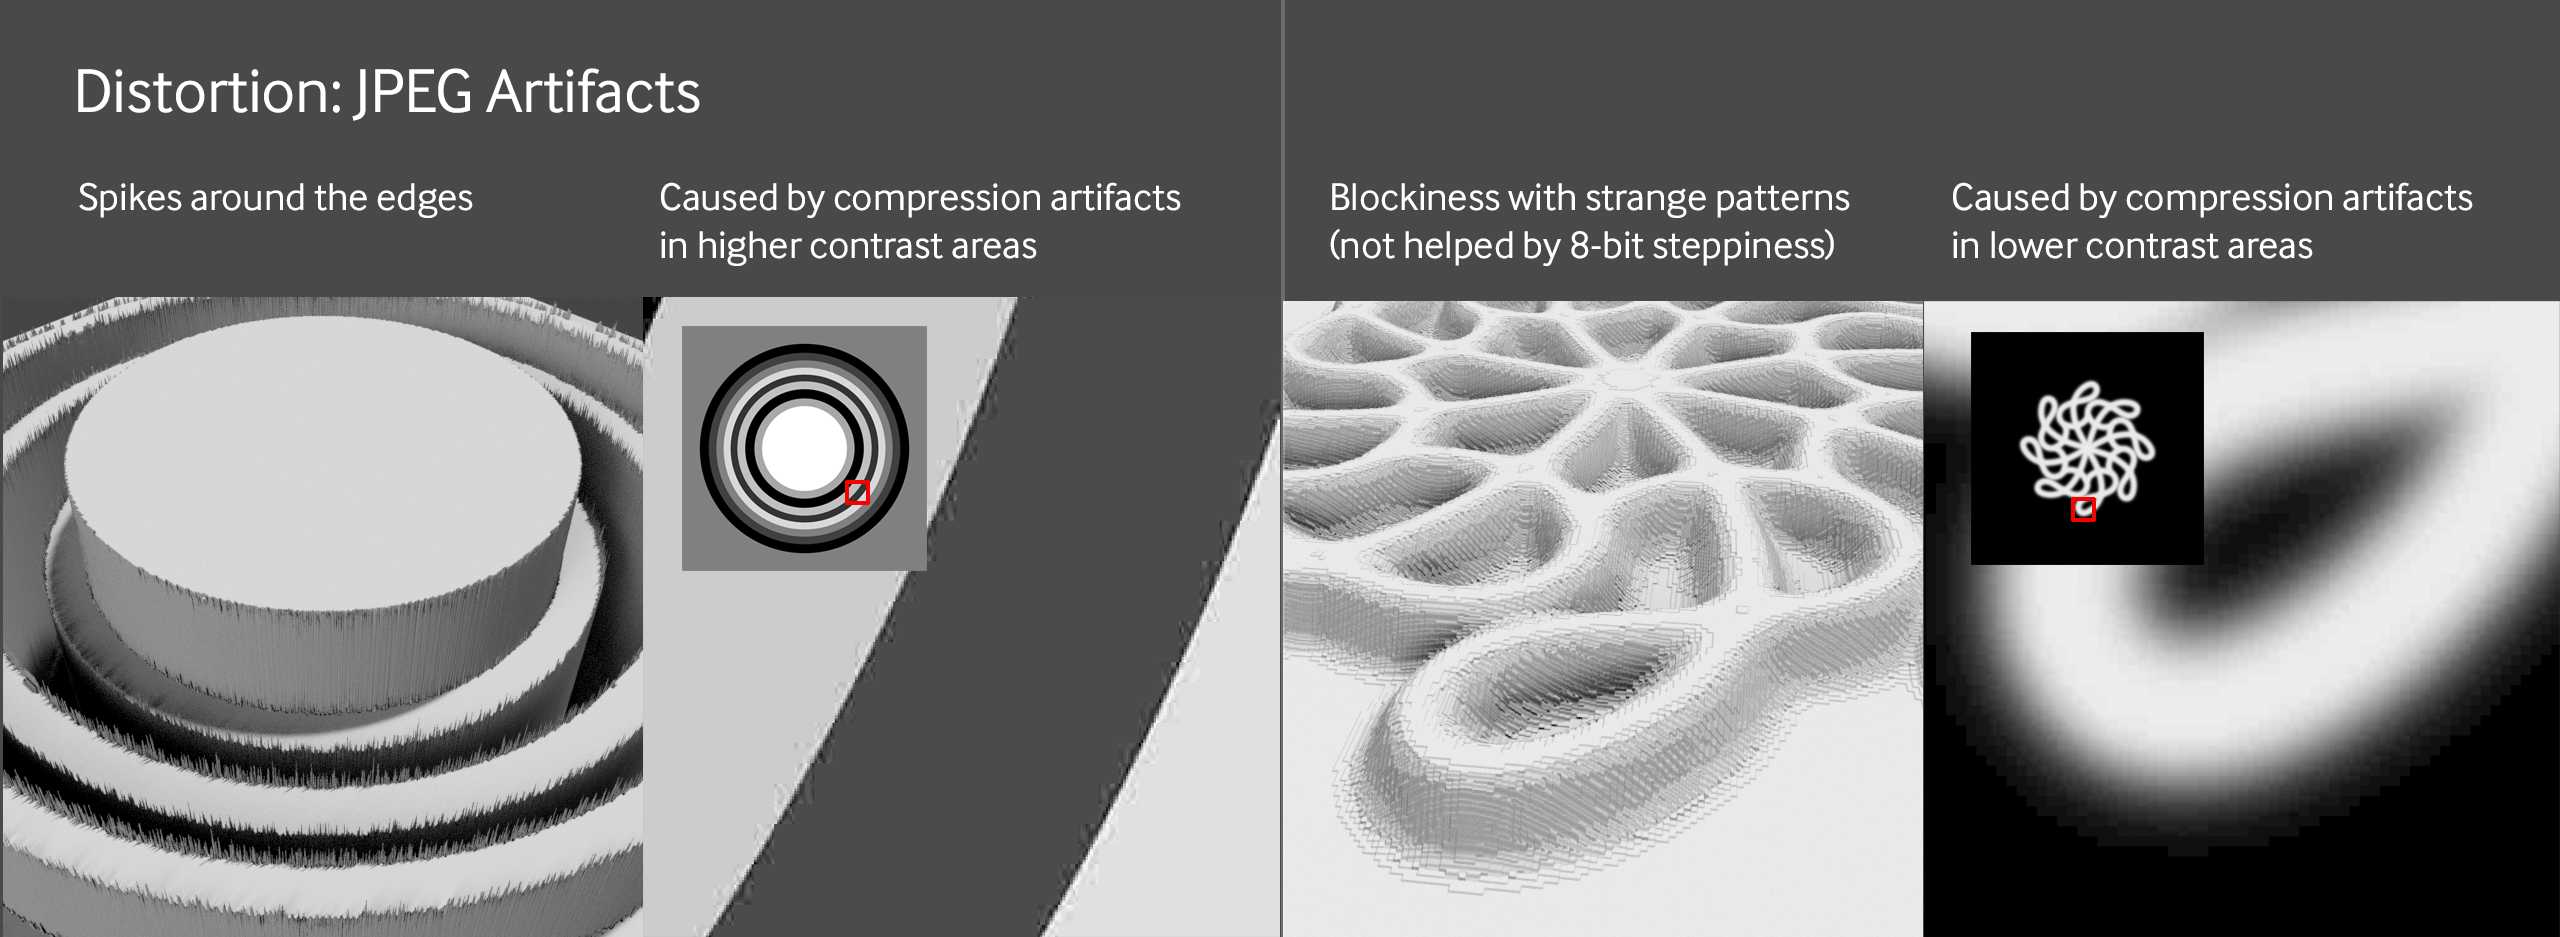
This is most likely due to JPEG lossy compression issues. To counter this, you can try the filter with texture displacement, applying a light blur to the image in your 2D image editor, or finding the source in another format like PNG, TIFF, EXR, etc.
That should cover most of the solutions and detailed steps to troubleshoot the Displacement keeps crashing problem in Octane for Cinema 4D.
iRender - The Best Cloud Rendering Solution for Cinema 4D with Octane
About us
iRender is proud to be a professional GPU Accelerated Cloud Rendering Service provider for 3D Render, CGI, and VFX tasks with more than 30,000 clients. We have been appreciated in many global rankings (e.g. CGDirector, Lumion Official, Radarrender, InspirationTuts CAD, All3DP, BlenderBaseCamp, VFX Rendering.)
Our service
We provide high-configuration servers that are specifically configured and optimized for GPU rendering. Using our service, you have complete control and flexibility over the server you operate. Thus, you can customize your creative workstation as far as you wish. With a wide range of GPU servers from a single RTX 3090 to multiple 2/4/6/8x RTX 3090, you can choose one that meets your need to start the rendering process. Furthermore, we allow you to upgrade or downgrade your workstation without having to reinstall anything. You can even run multiple servers simultaneously to speed up the renders, not having to re-install anything, either.
Why choose us for your Octane and Cinema 4D projects?
OctaneRender is a fully GPU-based render engine. This means that the GPUs (graphic cards), rather than the CPU, in your system are what impact how long it takes renders to finish. OctaneRender actually scales almost perfectly with multiple cards, unlike most software that utilizes the GPU. In other words, when you use two cards your renders will finish twice as fast as they would with just one single card. When using four cards, you will complete renders four times faster! Therefore, the more powerful the GPU, the better; the more GPUs, the faster the renders will be.
At iRender, we have both powerful GPU and multiple GPU servers that definitely speed up Octane rendering. Our multiple GPU machines are designed with 2/4/6/8x RTX 3090. Also, all of them have a robust AMD Ryzen Threadripper Pro 3955WX processor, allowing you to extract mesh data, load textures, and prepare scene data more quickly. Moreover, the workstations are ideal with 256GB RAM capacity and 2T NVMe SSD storage. We highly suggest you try the highest configuration server, the 8x RTX 3090. This server will be a super-configured one that brings fantastic speed to OctaneRender in Cinema 4D. It is currently rated as one of the most worth-trying workstations so far for Octane GPU rendering.
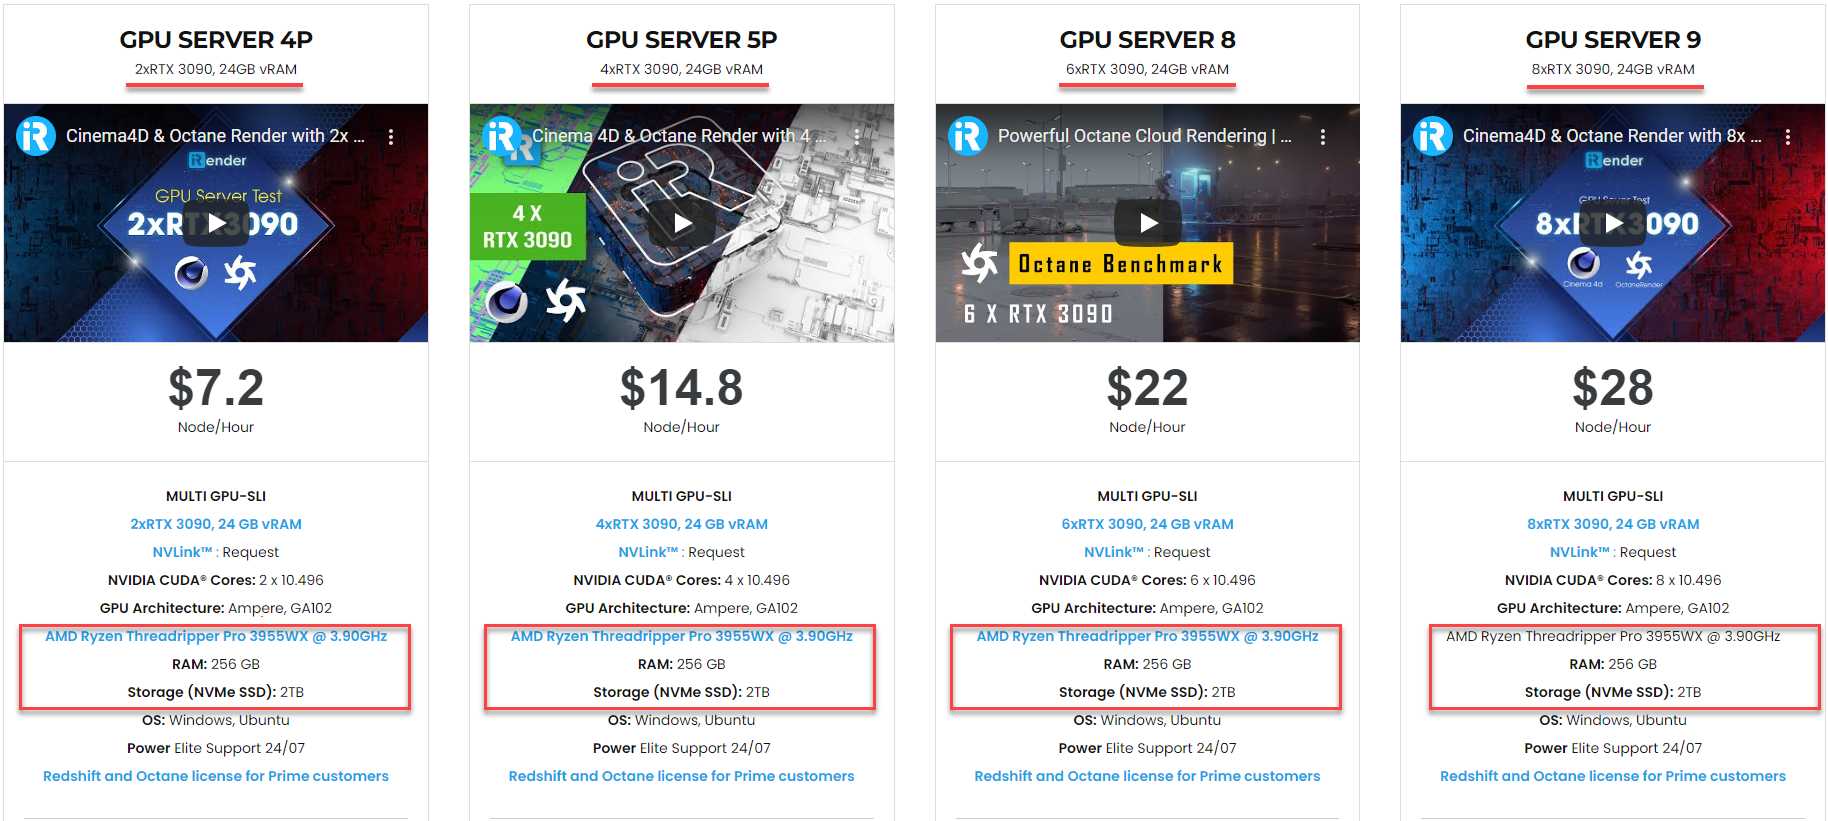
All of our servers’ configurations are publicly posted on our website. Visit HERE for more details about the configuration and the cost.
iRender also provides OctaneRender Enterprise license for our PRIME customers. When you become our PRIME, you will enjoy your rendering experience on our powerful and use the given license for free at the same time. What a good deal, isn’t it? Let’s get it!
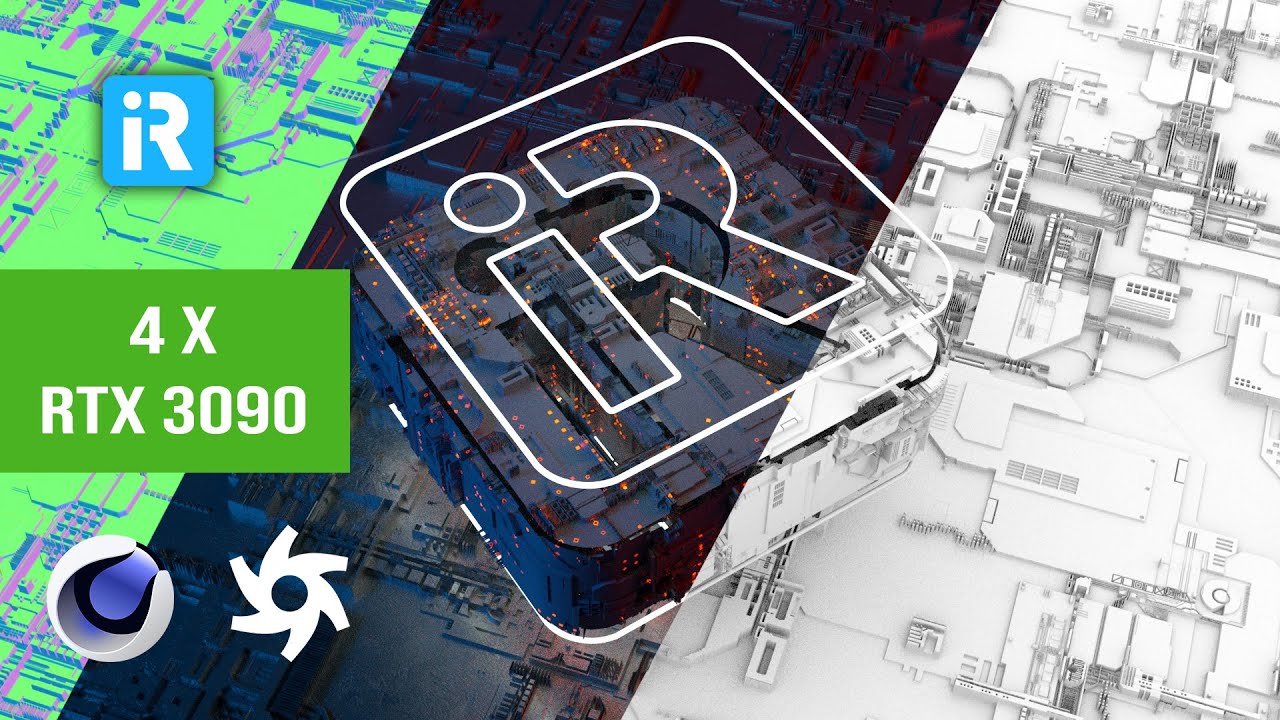
Cinema 4D with Octane speed test videos produced by the iRender Team
Let’s check out the rendering performance in Cinema 4D with OctaneRender on our 4/6/8x RTX 3090 machines in the 03 following test videos.


This month, we are running a SPECIAL PROGRAM: 20% Additional Bonus for new clients who register an account and make a top-up within 24 hours of registration.
Let’s get started!
Get the FREE COUPON to try our high-end machines for your Cinema 4D and Octane projects now! For further information, please do not hesitate to reach us at [email protected] or Whatsapp: +84915875500.
iRender – Happy Rendering!
Reference source: help.otoy.com
Related Posts
The latest creative news from Octane Cloud Rendering.


