Understand Baking in Redshift
Redshift is a powerful GPU-accelerated renderer, built to meet the specific demands of contemporary high-end production rendering. In other words, Redshift is tailored to support creative individuals and studios of every size. In fact, Redshift offers a suite of powerful features and integrates with industry-standard CG applications. Over the past few years, more and more designers are using Redshift for rendering and dramatically speeding up their render times thanks to this renderer.
For today’s article, let’s explore baking in Redshift, one of the great features of this renderer. It allows the rendering of AOVs onto texture maps using a specific UV channel. This can be useful in a variety of scenarios. One of these is “light mapping” where the user renders the diffuse lighting received by a particular object onto a texture and then re-uses the texture during animation rendering instead of having to compute the (potentially slow) diffuse lighting on each frame.
Baking can have both Pros and Cons. Firstly, let’s take a look at the advantage of it. Baking can help increase rendering performance. Besides, textures can be tweaked by an external image editing program or script for quality or look reasons.
However, this process Involves some setup effort. In addition, the quality of the baked results depends on the resolution of the texture. Extremely high resolution textures can take a long time to compute. Last but not least, when used for light mapping, changes to the lighting due to animated geometry and lights won’t be reflected on the baked texture.
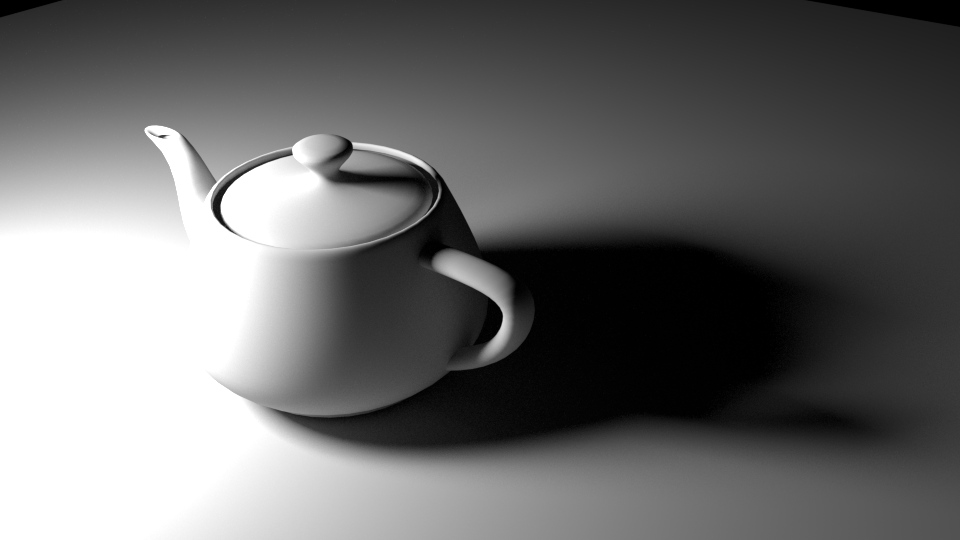
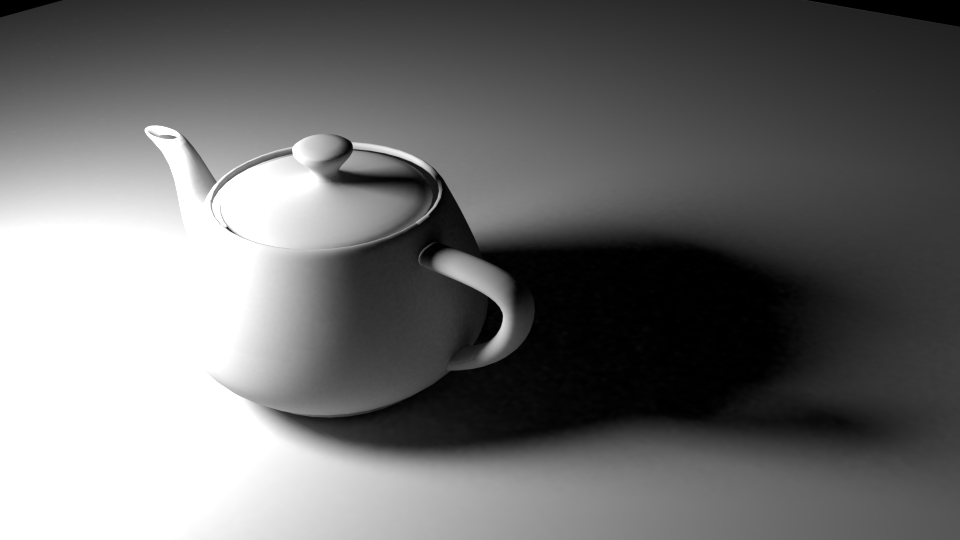
The image below shows a simple light-mapped scene containing a couple of objects. Both the teapot and the floor are using a 512×512 baked TotalDiffuseLightingRaw AOV image.
How to use Baking in Redshift
Generating baked images involves a few main steps:
- Creating an appropriate unwrapped UV channel that will be used by baking
- Creating and configuring one or more bake sets
- Setting up the AOVs
- Executing the bake
Redshift requires an appropriate UV channel to perform baking. In most 3d apps, there will be an “automatic UV” or “unwrap UV” option which will generate an appropriate UV layout for baking. Two important requirements for a baking UV channel is that the UVs should fit in the 0->1 UV range and the different parts of the object should not be overlapping in UV space. The unwrapped UVs generated by most 3d apps already satisfy these criteria.
Creating Bake Sets
Once we have our UV channel, one or more bake sets should be created and configured. Bake sets contain baking settings that can be applied to a single object or a group of objects. Each object in the group will get its own baked image.
Finally, Redshift’s AOV settings have to be configured to specify which AOVs we want baked. For example, if we wanted to bake diffuse lightmaps, we should use the “TotalDiffuseLightingRaw” AOV.
AOV Setup for Baking
Redshift’s baking capabilities rely on the AOV system for rendering out the baked images. Setting up the AOVs for baking is identical to setting them up for a render (camera-based) render.
You can find general information on AOVs here and a short AOV tutorial here.
Redshift advises that users set up a separate render pass/layer (depending on their 3d app’s capabilities) to configure the AOVs used for baking, as these might differ to the AOVs required by your main render.
When configuring AOVs for baking, the user has to make a choice regarding the baked image filenames. Since all bake sets rely on the global AOV options (which include filenames), how can this work when the scene contains multiple objects? I.e. How do we prevent the baking of all objects in the scene from writing to the same image file? This depends on the 3d app.
Limitations
Although being a great feature, the baking system currently doesn’t work with the following rendering features. First is Tessellation and displacement. If the baked geometry is tessellated or displaced, visual artifacts will appear on the baked image.Second is Point-based techniques such as point-based subsurface scattering, irradiance cache and the irradiance point cloud don’t work in conjunction with baked renders. Photons (and, subsequently, caustics) do work. And Projection mapping is not currently supported. Finally, high-res to low-res texture baking is not currently supported.
Using Baking for Lightmapping
Here are a few quick steps to generate baked lightmaps similar to the one shown above:
- Create a scene like the one shown above, with two objects
- Create unwrapped UV channels for both objects. Ensure the UV channels are named consistently.
- Select both objects and assign them a bake set on both objects. Ensure the bake set is using the correct UV channel
- Add a “TotalDiffuseLightingRaw” AOV to your scene
- Depending on your 3d app, perform the baking filename steps explained above
- Execute the bake
- Then edit the shader graph as follows:
- Remove any diffuse lighting by making the diffuse color black or the diffuse weight zero
- Connect the baked images to the incandescent (or emission) color ports of your shader and set incandescent (or emission) weight to the same value as your original diffuse weight
- Ensure that, if the image was saved out as an EXR, the gamma in the texture node is set to linear
- The above steps essentially replace the ‘real’ diffuse lighting with baked diffuse lighting
- If the diffuse port was textured, use a multiplication shader node to multiply the texture with the lightmap before connecting it to the incandescent port (or emission).
Final thoughts
Hope that after this article, you can somehow understand more about baking in Redshift and can take advantage of it to create wonderful projects in the future.
One great suggestion for you if you are looking for a Cloud Rendering Service to boost your project render time is go with us. Currently, iRender provides 3 types of multi-GPU-servers (6x GeForce RTX 2080 Ti / 6x RTX 3080/ 6x RTX 3090) which are the most effective for Redshift rendering in multi GPU cards coming with the following configuration specifications:
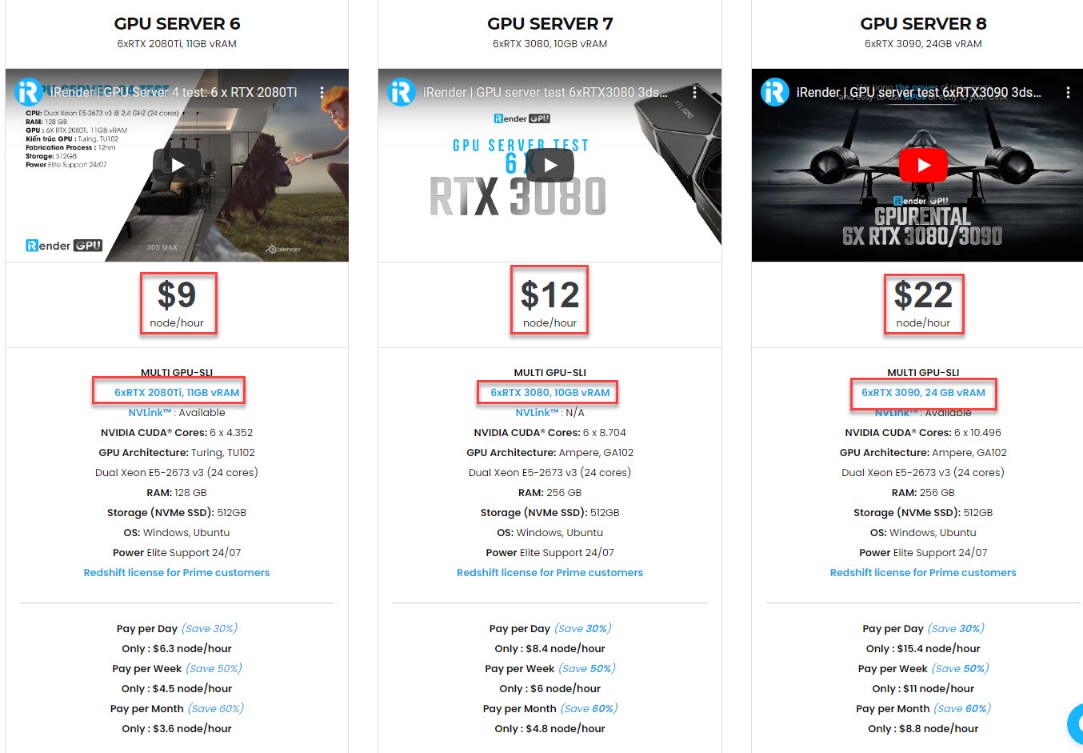
The servers’ configuration of iRender not only surpasses the minimum hardware requirements of Redshift, but it also exceeds the recommended requirements that Redshift published:
- Redshift supports multi GPUs on one machine, increasing rendering performance multiple times. This is one of the main reasons we recommend these 4 packges for designers to have flexible choice based on their budget and time.
- This package uses Nvidia GPU cards with a VRAM capacity minimum from 11GB up to 24 GB, which completely exceeds the Redshift recommendation of an Nvidia GPU with CUDA compute capabilities 7.0 and 8GB VRAM capacity or higher.
- A RAM capacity of 128GB (server 5, 6) and 256 GB (server 7,8) is many times higher than recommended.
- The Dual Xeon E5-2673 v3processor has also completely met the CPU requirement from Redshift. Although Redshift mainly depends on GPU performance, some processing stages that occur during post-processing also depend on the performance of CPU, disk or network drive. These include extracting mesh data from your 3D application, loading textures from disk, and preparing scene files for GPU. Depending on the complexity of each scene file, these processing stages can take a considerable amount of time, and as a result, lower-end processors can bottleneck overall rendering performance. Thus, CPU is also considered as one of the criteria that cannot be ignored.
- In terms of operating system, iRender currently provides services with two operating systems: 64-bit Windows 10and 64-bit distribution Ubuntu 18.04.5 LTS with glibc 2.27, ensuring the recommended operating system that Redshift offers.


Moreover, iRender provides the Redshift license to Prime customers. Users who recharge enough points to become Prime customers will be able to use the Redshift license without usage or maintenance costs. You can fully read the manual and benefits of using the Redshift license provided by iRender here.
To sum up, using redshift to render your projects is fast, using iRender’s 6-card GPU servers is definitely a lot faster. These servers are the ultimate online solution for rendering allowing up to multiple, powerful 6x GeForce RTX 2080 Ti / 6x RTX 3080/ 6x RTX 3090 GPU. These servers are the premier solutions to maximize your advantage when you need it most – to win the project, to meet the impossible deadline, or pivot your visual direction with unparalleled speed. Depending on your budget and your time, let’s pick one server to experience a new level of rendering. Register an account RIGHT HERE to get a free coupon to test our service right away!
iRender – Happy rendering!
Reference source: Redshift documentation
Related Posts
The latest creative news from Redshift Cloud Rendering, Cinema 4D Cloud Rendering , 3D VFX Plugins & Cloud Rendering.