
Understanding basic Octane Environment lights for Houdini
Octane is one of the most famous choice for Houdini as a render engine. It contains many features helping leverage your scene. In this article, let’s explore some basic Octane Environment lights for Houdini
Octane lights for Houdini, what are they?
Octane for Houdini contains 7 types of lights, they are:
-
-
-
- Daylight
- Texture
- Planetary
- Octane Light
- Octane Toon Light
- Mesh Emitter
- Spectron Light
-
-
You can access these light from many locations in Houdini. We will dive into each light and explain them.
1. Daylight
Daylight is the default lighting system when you create a Render Target node. The powerful Daylight environment system can help you to simulate real-world illumination that consists of a primary light (sun), indirect light (sky/environment), and atmosphere.
You can find the Daylight in the Main tab of the Render Target parameters window.

To adjust the parameters of Daylight system, you can come to DL Environment tab.
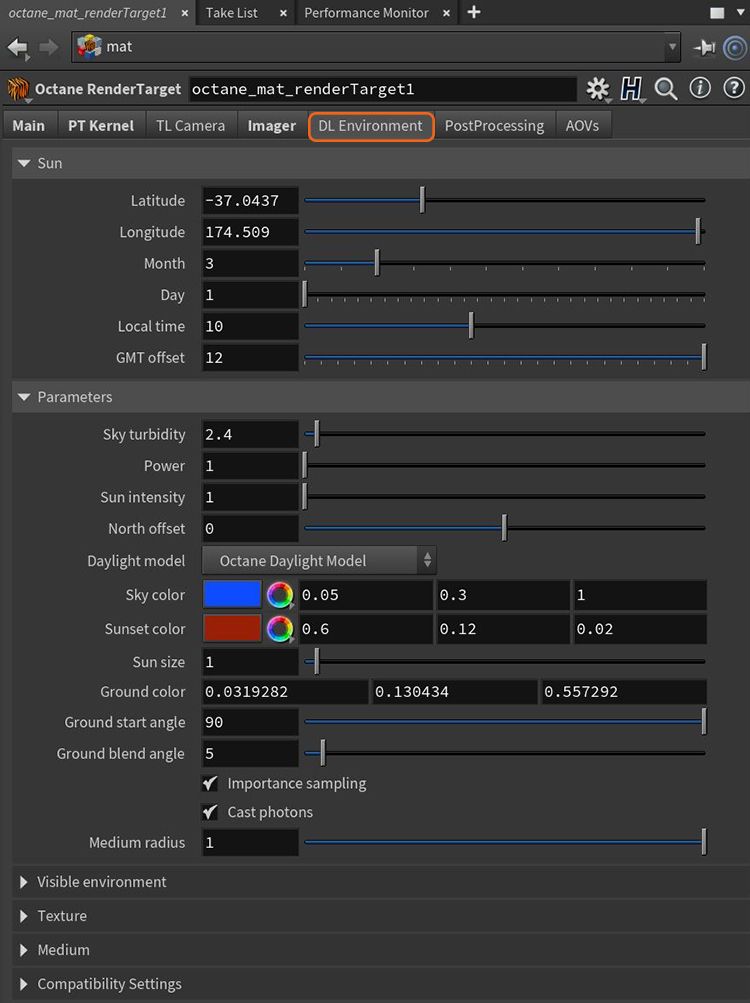
In the DL Environment tab, let’s explain the parameters:
Longitude/Latitude – Make realistic sun settings for a specified geographic location.
Month/Day/GMT Offset/Hour – Position of the sun in the sky according to the date/time for the sun at the current longitude/latitude.
Sky Turbidity – A low value creates sharp shadows like a sunny day, and a higher value diffuses the shadows like a cloudy day.
Power – Adjusts the light strength. This affects the image’s overall contrast and exposure level.
Sun Intensity – The scale factor that is applied to the sun only. Use this to adjust the relative power of the sun compared to the sky.
North Offset – Adjusts the scene’s North direction. This is useful for architecture visualization to ensure the sun’s direction in the scene is accurate.
Daylight Model – Specifies the daylight model to use as the current environment.
-
-
-
- Octane Daylight – This is the default daylight model simulates full-spectrum daylight, providing more sky color variation as the sun moves along and bearing shorter rays as the sun moves closer to the normal plane.
- Preetham Daylight– This is the old daylight model that lights a scene with basic spectral radiance as the sun moves over the horizon at a relative distance from the object.
- Nishita Daylight – Implements atmospheric scattering based on the Nishita sky model and displays the color variations, which are optical effects caused by the particles in the atmosphere.
- Hosek Wilkie Daylight – Produces more realistic and detailed results than other implementations specially in hazy conditions and near the horizon.
-
-
Sky Color/Sunset Color – The daylight model uses these settings to customize the spectral shade of light. This can affect the scene’s overall mood.
Sun Size – Controls the sun radius in the Daylight environment.
Ground Color – Base color of the ground which is an infinite plane that is only visible in the final rendering. It serves to produce a horizon line for the Daylight system. This allows the user to control the color of the infinite ground plane associated with the Sun Sky systems.
Ground Start Angle – The angle (in degrees) below the horizon where the transition to the ground color starts.
Ground Blend Angle – The angle over which the sky color transitions to the ground color.
-
-
-
- Importance Sampling – This toggles the Sky texture’s importance sampling, similar to the Texture environment’s importance sampling.
- Cast Photons – If photon mapping is used, this option casts photons from the bright areas of the scene.
-
-
Medium Radius – Adjusts the medium’s scale.
Backplate – Generates a cutout rendering where foreground elements are positioned in the scene.
Reflections – Generates the Planetary environment in scene object reflections.
Refractions – Generates the Planetary environment in scene object refractions.
Enable Texture Environment – Activates another tab where you can load an HDRI texture map as a Sky texture.
Enable Environment Medium – Activates another tab where Medium parameters can produce atmospheric effects.
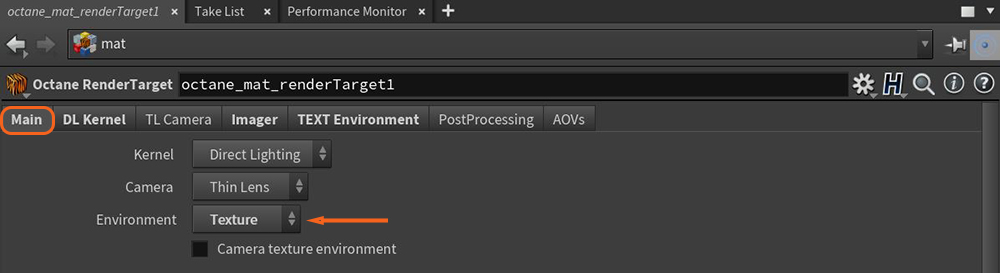
2. Texture
The second environment type of lights is Texture. It affects the environment’s color. You can use two types which are float value or HDRI texture map. The Float value will produce a uniform color for illumination. Otherwise, you can load an HDRI texture map into the Filename parameter as a lighting source.
You can access the Texture environment in the render target’s Main tab.
Some texture environment parameters:
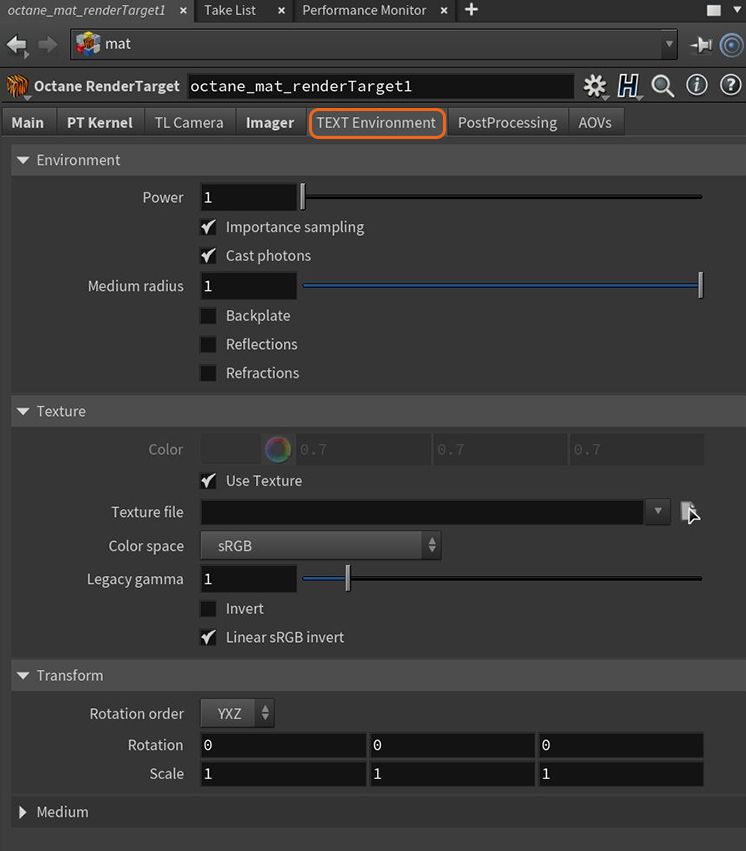
Power – Controls the illumination’s strength or brightness.
-
-
-
- Importance Sampling – This toggles the Sky texture’s importance sampling, similar to the Texture environment’s importance sampling.
- Cast Photons – If photon mapping is used, this option casts photons from the bright areas in the environment map.
-
-
Medium Radius – Adjusts the medium’s scale.
-
-
-
- Backplate – Generates a cutout rendering where foreground elements are positioned in the scene.
- Reflections – Generates the Planetary environment in scene object reflections.
- Refractions – Generates the Planetary environment in scene object refractions.
-
-
Texture File – Used to load an HDRI texture map.
Color Space – Determines the color space for the HDR image.
Legacy Gamma – Controls the HDRI file’s luminance value when the Color Space is set to Linear sRGB + Legacy Gamma.
-
-
-
- Invert – Inverts the color values of the HDRI Image.
- Linear sRGB Invert – Inverts the HDRI after conversion to linear sRGB color space, not before.
-
-
Rotation Order – Provides the rotation order that is used when the transformation matrix is calculated.
Rotation/Scale – Adjusts an imported HDRI texture map.
Enable Environment Medium – Activates the following parameters related to light absorption and scattering within an environmental medium.
Density – Controls the absorption and scattering densities. A higher value will absorb and scatter more light.
Volume Step Length – Adjust this parameter depending to the volume size. The default value is 4. If the volume is smaller than this, you need to decrease this value and it will decrease the render speed. If you want to increase the value, it causes the ray marching algorithm to take longer steps. If the Volume Step Length exceeds the volume’s dimensions, then the ray marching algorithm takes a single step through the whole volume. To get the most accurate results, keep Volume Step Length as small as possible.
Volume Shadow Ray Step Length- Step length that is used by the shadow ray for marching through volumes.
Use Volume Step Length for Volume Shadow Ray Step Length – Check box for using the Volume Step Length for the Volume Shadow Ray Step Length as well.
Absorption – Determines the absorption value of the volume where 0 (black) means that there is no absorption. Values greater than zero determine how quickly the medium absorbs white light.
Invert Absorption – Inverts the absorption value allowing the specified absorbed color to be the actual color that is visible.
Scattering – Determines how quickly light is scattered as it moves through the surface. A high value means that light is scattered sooner as it enters the surface, a low value means that light passes deeper into the surface before it is scattered. A value of 0 disables scattering entirely.
3. Planetary
The third environment type of light is Planetary, which is a flexible Nishita Sky model. It allows you to create a realistic view of the sky and beyond, especially the outer space scenes. You should have a very high altitude value to be able to move the camera out of the planet, and see it in the space.
It takes into account the conditions within and beyond the atmosphere of a planetary body and its surroundings in space. Instead of a single ground color and a sky/sunset color, there is a planetary surface that reflects and emits light. This node serves an important role to extend the environment’s medium (volume rendering and subsurface scattering) with an atmospheric scattering through the planetary body’s atmosphere. Here, the atmosphere is perceived as a layer of gas surrounding a planetary mass, and it is held in place because of gravity, so as the light travels into atmosphere either from the outer layer to the ground or from a light source within the atmosphere, then the atmosphere’s density is sampled along the ray at regular intervals, resulting in an amount of scattering based on the atmosphere’s density.
You can come to Main tab > Environment dropdown menu > Planetary.
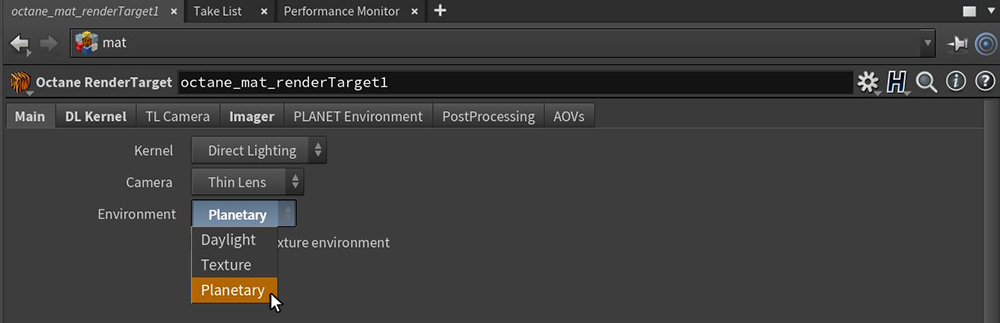
In the PLANET Environment tab you can find all the parameters.

Longitude/Latitude – Make realistic sun settings for a specified geographic location.
Month/Day/GMT Offset/Hour – Position of the sun in the sky according to the date/time for the sun at the current longitude/latitude.
Sky Turbidity – A low value creates sharp shadows like a sunny day, and a high value diffuses the shadows like a cloudy day.
Power – Adjust the light’s strength. This can affect the image’s overall contrast and exposure levels.
Sun Intensity – The scale factor that is applied to the sun only. Use this to adjust the relative power of the sun compared to the sky.
North Offset – Adjusts the scene’s actual North direction. This is useful for architecture visualization to ensure the sun’s direction is accurate to the scene.
Sun Size – Controls the size of the sun disk visible in the scene.
Altitude – The camera’s altitude. Set this to a high value in order to view the expansive horizon of the planetary body.
-
-
-
- Importance Sampling – This toggles the importance sampling of the Sky texture – similar to the importance sampling in the Texture environment.
- Cast Photons – If photon mapping is used, this option casts photons from the bright areas of the scene.
-
-
Medium Radius – Adjusts the medium’s radius.
Ground Albedo – Surface texture map on the planet.
Ground Emission – Surface texture map on the planet at nighttime.
Backplate – Generate a cutout rendering where foreground elements are positioned in the scene.
Reflections – Generates the Planetary environment in object reflections.
Refractions – Generates the Planetary environment in object refractions.
Conclusion
This article helps introduce you the environment type of lights in Octane for Houdini. They are Daylight, Texture and Planetary. In the next article, let’s talk about other Octane lights.
iRender provides you a high-performance and configurable server system for 3D rendering, AI Training, VR & AR, simulation, etc. We believe that design and creative activities are private and personal that only you artists will know what you want with your animation.
As Octane can scale up linearly when you use a multiple GPUs system, we offer you from single RTX 4090 to multiple RTX 4090s/3090s. Check out these articles to know why RTX 4090 is still the best for Octane rendering: Top GPU for Redshift, Octane and V-Ray in 2023 and Compare RTX 4090 vs RTX 6000 Ada vs RTX A6000 for content creation.
We are not only providing you the most powerful graphics card, but also the same level of hardware, such as AMD Ryzen Threadripper processor, 256 GB RAM, 2 TB of storage (NVMe SSD).
For Octane, we suggest our multi RTX4090s or RTX3090s. Below is our test with Octane:

Not only those powerful configuration, iRender also provides you more services. Free transferring tool named iRender drive for macOS or Linux users. For Windows users, we recommend using our all-in-one application iRender GPU to work, and you don’t need to come to our website. Our price is flexible with hourly rental which has pay-as-you-go basis, daily/ weekly/ monthly subscription with discount from 10-20%. Plus, you have 24/7 support service with real human who will support you whenever you encounter an issue.
Register an account today to experience our service and enjoy a very big promotion 100% bonus for new user. Or contact us via WhatsApp: (+84) 916806116 for advice and support.
Thank you & Happy Rendering!
Source and images: otoy.com
Related Posts
The latest creative news from Octane Cloud Rendering, Houdini Cloud Rendering


