Eevee Rendering In Blender & Advanced Techniques
Since the introduction of Blender 2.8, Eevee has replaced the old Blender ‘Internal’ Renderer. Eevee is focused on real-time rendering, using clever speedy tricks to sacrifice as little realism as possible when compared to Blender’s realistic Cycles renderer.
In the article today, iRender will step it up and cover four advanced settings and properties of EEVEE Rendering in Blender.
1. Indirect Lighting
Eevee is optimized for speedy rendering, not for realism, like the Cycles renderer. But with the right settings, Eevee can nevertheless deliver an impressive level of realism.
One of the most significant differences between Eevee and Cycles is that Cycles calculates bounced light rays in a scene, also known as global illumination (GI) or irradiance, using a technique called path tracing. To make Eevee calculate bounced light you need to add an Irradiance Volume. To do this, press Shift + A, go to the Light Probe submenu and choose Irradiance Volume.
A box-shaped gizmo with a 3D matrix of points appears.
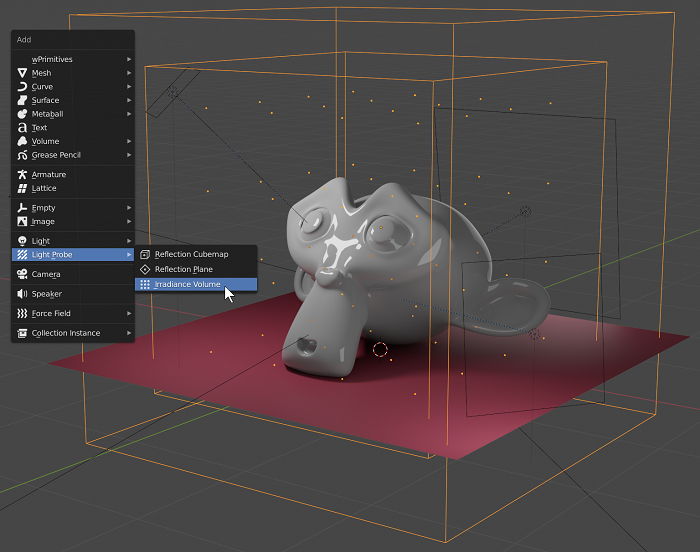
Image Source: cgcookie.com
The Irradiance Volume should be placed in such a way that the bottom of the inner cube is just below the floor of your scene, so the 3D matrix of dots is surrounding the scene’s important elements. The dots are points in 3D space where the properties of bounced light (energy level, colors) are sampled and then rendered on nearby surfaces.
The distance between the inner box gizmo and the outer box gizmo indicates the area in which the irradiance effect will fade out. This can be influenced by adjusting the Distance and Falloff settings in the Irradiance Volume gizmo’s Object Data Properties.
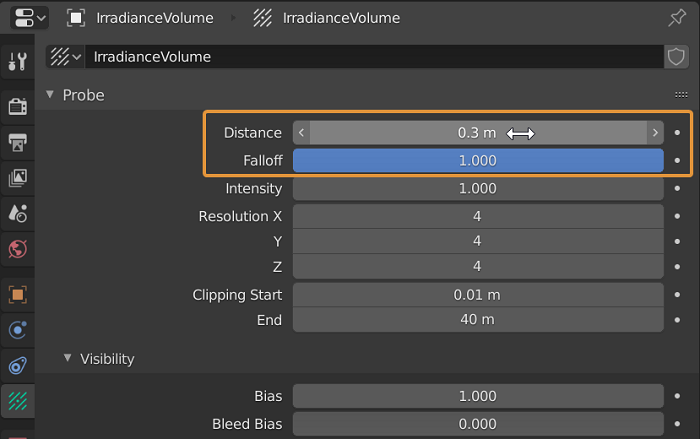
Image Source: cgcookie.com
The next step is calculating the irradiance. Go to the Indirect Lighting section in the Render Properties and press the Bake Indirect Lighting button.
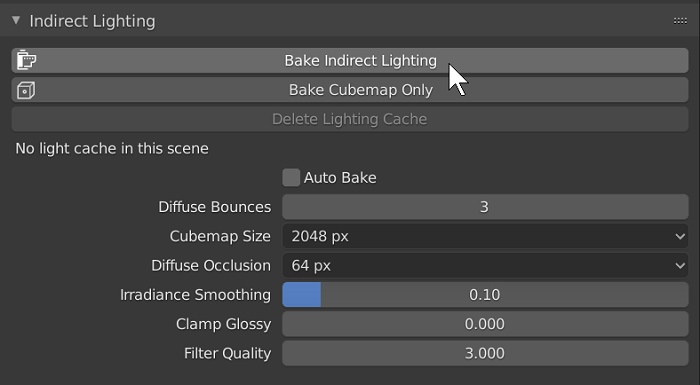
Image Source: cgcookie.com
After a short moment of calculating the irradiance will be added to the scene. The results are usually subtle, but increase the scene’s realism.
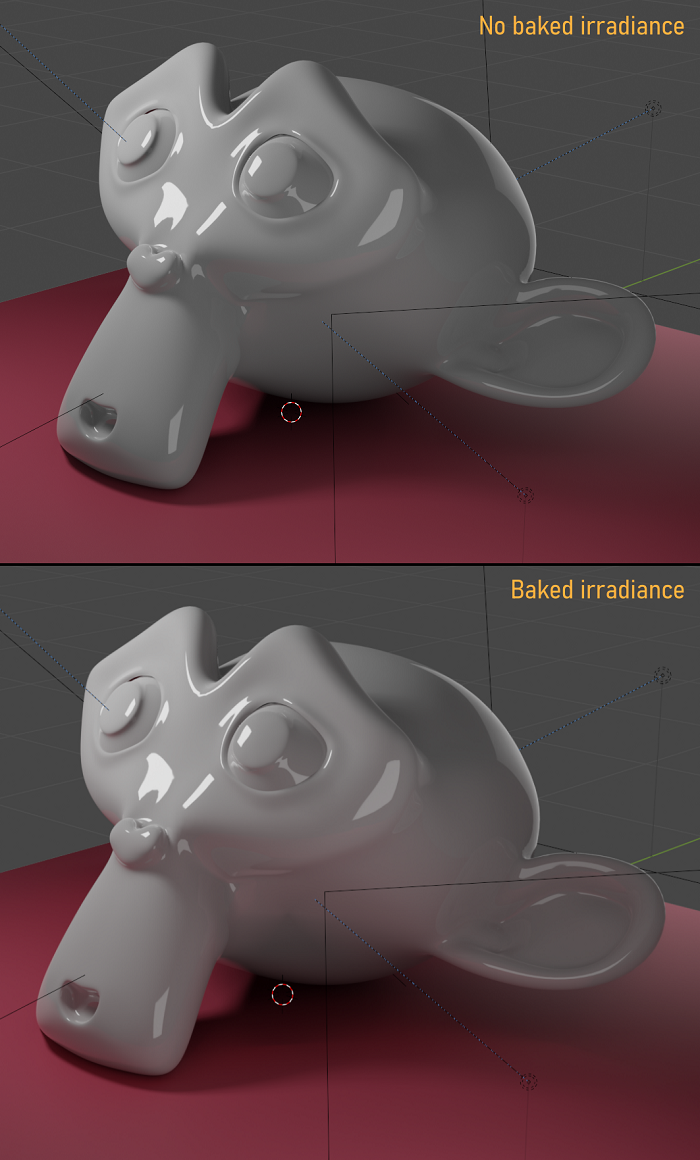
Image Source: cgcookie.com
As you can see, the red color of the floor has bounced onto the monkey head. The accuracy of the bounced light can be improved by increasing the Diffuse Bounces, Cubemap Size, and Diffuse Occlusion values, at the expense of longer irradiance calculation times.
It is important to note that the bounced light that’s calculated by an Irradiance Volume gizmo is a one-time calculation, and is not updated with each animation frame. This means that if your scene changes during an animation, the calculated bounced light will become less correct or even obsolete.
2. Emissive Objects
If you’re using Cycles, you can turn any object into a light source by assigning a material containing an Emitter shader. In Eevee, such a material does not work unless you calculate the irradiance using the aforementioned steps, because the light from emissive objects needs ray calculations from each normal angle of the object’s faces.
In the example images below, an emissive material has been assigned to an icosphere. As you can see no light is emitted from the icosphere object without irradiance. The Screen Space Reflections do reflect the icosphere without irradiance.
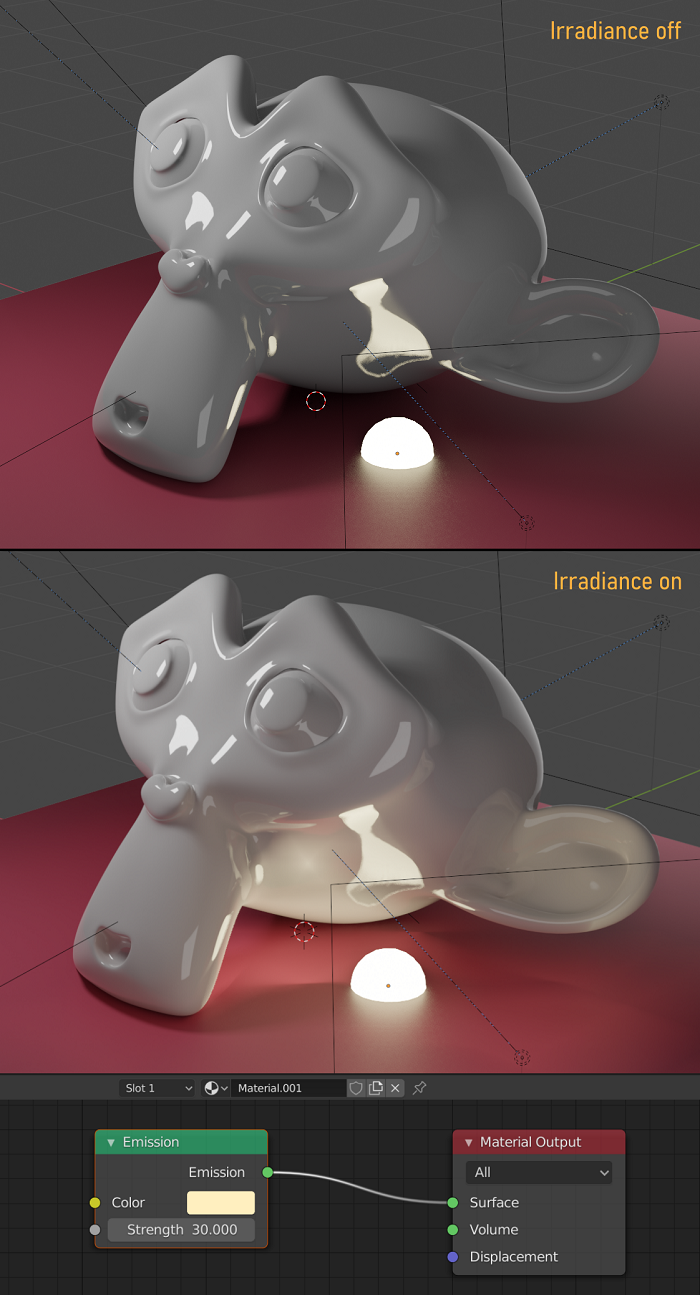
Image Source: cgcookie.com
Again: the accuracy of the indirect light calculations can be improved by increasing the Diffuse Bounces, Cubemap Size and Diffuse Occlusion values, at the expense of longer irradiance calculation times.
3. Glass and Other Refractive Materials
Establishing a refractive volume in Cycles, such as glass, is easy: just turn up the Transmission value of the default Principled BSDF material (to a value of 1 for the full effect), and Cycles starts transmitting rays through the material to render convincing glass or transparent plastic.
Eevee is not a path tracing renderer but works by performing speedy trickery, so if you turn up the Transmission value of the monkey’s default Principled BSDF material, this is what happens:
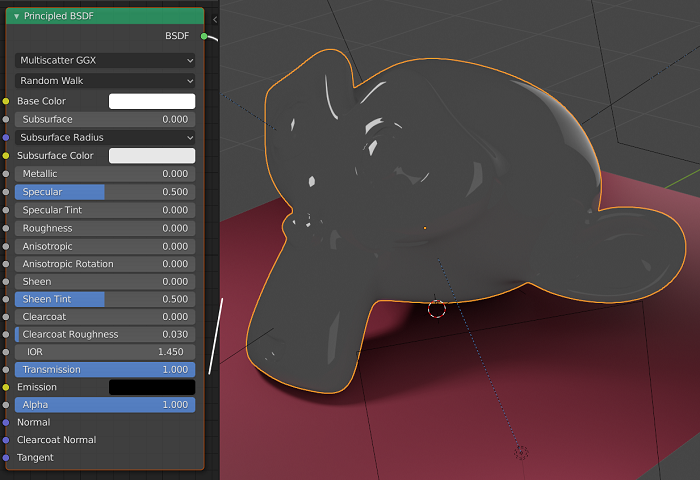
Image Source: cgcookie.com
To get you going, here are some common Index Of Refraction values:
- Air = 1.0
- Water = 1.325
- Milk = 1.35
- Plastic = 1.46
- Glass = 1.5 (average value, depends on the type of glass)
- Crystal = 2.0
- Diamond = 2.418
4. Sub-Surface Scattering
Another eye-catching effect is sub-surface scattering (SSS). This mimics the way light rays are absorbed and scattered inside a volume, causing thin parts to transmit more light than thicker parts. Think of the blood-red color you can see through your fingers if you shine a bright flashlight behind your hand. Once again, Eevee needs to establish the illusion of SSS using a smart, speedy technique instead of hardcore ray-tracing. And Eevee does this quite well. Let’s activate SSS in Eevee:
First, head to the Render Properties ➔ Subsurface Scattering section, and increase the values a little for a finer result.
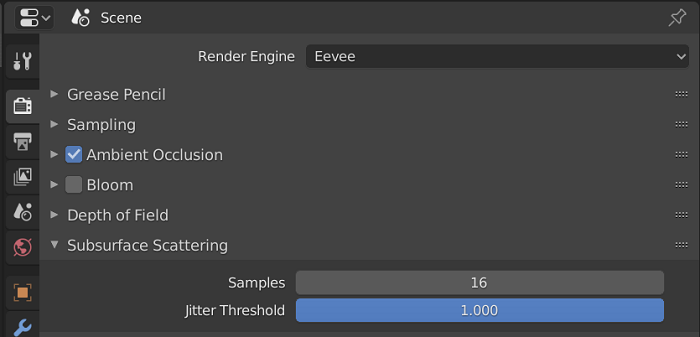
Image Source: cgcookie.com
More samples refine the SSS calculations, and a higher Jitter Threshold prevents a possible pattern caused by the algorithm. Don’t increase the values too much if you want Eevee to remain speedy/real-time.
The next steps are performed in the Shader Editor, adjust the following items in the default Principled BSDF material.

Image Source: cgcookie.com
- Usually, you’ll want the Base Color (the surface color) to be different from the Subsurface Color.
- Set the Subsurface value to 1.0 to exaggerate the effect.
- Depending on the scale and volume of your object you can adjust the Subsurface Radius values. These are essentially RGB values, so the default settings of 1.0, 0.2, 0.1 cause a red SSS color.
- To further emphasize the SSS color, turn the Subsurface Color to red as well.
- For a final bit of refinement, activate the Subsurface Translucency option in the material settings.
- Make sure the Screen Space Refraction option is unchecked, or the refractive properties will override the SSS effect.
You will see that Eevee SSS can create quite a nice candle wax material, but SSS is also very useful for achieving convincing skin, plastics, milk, orange juice and much more.
The Best Cloud Rendering for EEVEE
Eevee is only going to make use of one of graphic card. The reason is that multiple graphic cards CANNOT work together to render a single frame using rasterization which is what Eevee uses , so it will perform best when it benefits from high VRAM capacity. If EEVEE is your primary application, then we recommend using NVIDIA Geforce graphics cards as they generally have higher performance at a lower cost. The best NVIDIA GPUs for Rendering are:
- RTX 3060 Ti (4864 CUDA Cores, 8GB VRAM)
- RTX 3070 ( 5888 CUDA Cores, 8GB VRAM)
- RTX 3080 ( 8704 CUDA Cores, 10GB VRAM)
- RTX 3090 ( 10496 CUDA Cores, 24GB VRAM)
Let’s check the NVIDIA Geforce performance in Blender EEVEE:
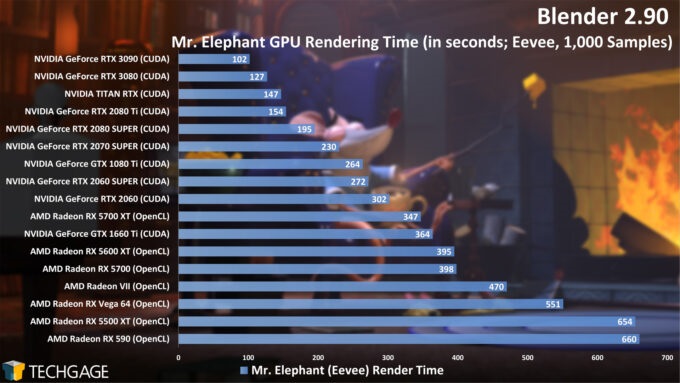
Image Source: techgage.com
Keep this in mind, iRender provides server 3 owning Xeon W-2245 CPU Processor with a high clock speed of 3.9 GHz- 4.7GHz and 512 GB SSD to specifically support the software only make use of a single card. This server comes with the latest RTX 3090 card from NVIDIA with the VRAM capacity up to 24GB.

With the above advantages and the machine configuration package that iRender has released, we believe that EEVEE users will have the most comfortable and effective rendering time.
Now go forth and create! Become a member of the iRender community today to stop wasting pointless hours of rendering. Always at the forefront of cutting-edge graphics technology, we do the rendering, the creativity is yours!
iRender – Happy Rendering!
Source: cgcookie.com
Related Posts
The latest creative news from Blender Cloud Rendering, Redshift Cloud Rendering, Houdini Cloud Rendering , Octane Cloud Rendering, 3D VFX Plugins & Cloud Rendering.