Explain Volume Shader's parameters in Redshift for Cinema 4D
In the first article about Volume shader, we got to know some setup and requirements. In this article, let’s explain volume shader’s parameters in Redshift for Cinema 4D, they are scatter, absorption, emission, advanced.
Scatter

Channel
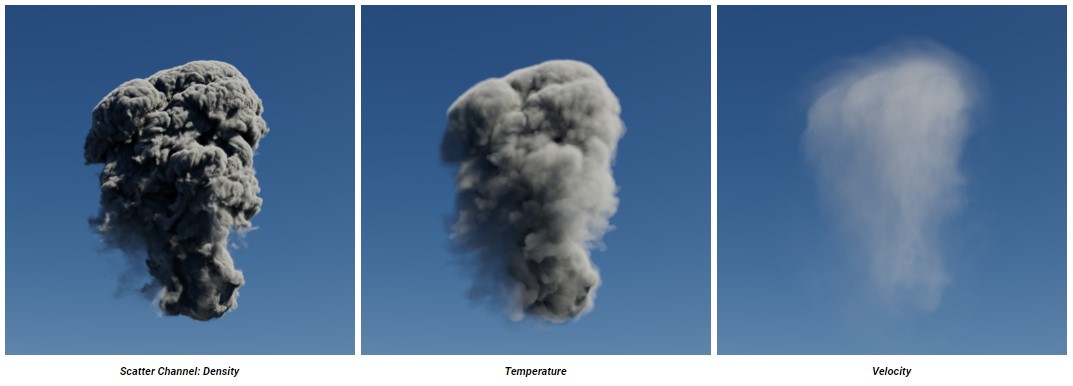
The scatter channel is the primary shading component for clouds and smoke helping to drive the overall look of a volume objects scattering contribution. It should be specified a name here before any scatter rendering starts. The most common name for a scatter channel is ‘density.’
*Note: Scattering can be driven by most available volume grids – as demonstrated in the example images below – but it’s important to use the intended grid to drive a channel when trying to achieve a specific result.
If you want to render only emissive type effect such as flame with no smoke, you can left scatter channel blank and use only emission.
Scatter Coefficient
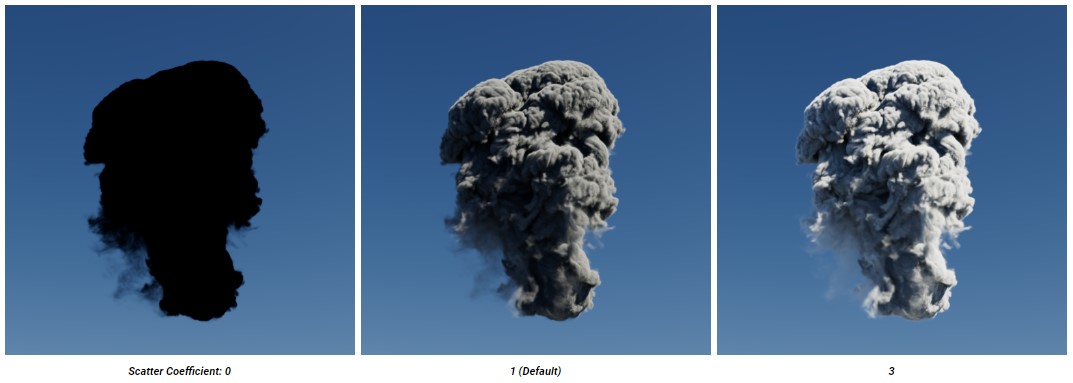
Increasing the scatter coefficient makes the volume brighter by increasing the strength of the scattered light when it hits a volume object. If you decrease this value, it reduces the strength of the scattered light and a scatter coefficient of 0 will result in a volume that is completely black even if in direct light.
Scattering vs Absorption
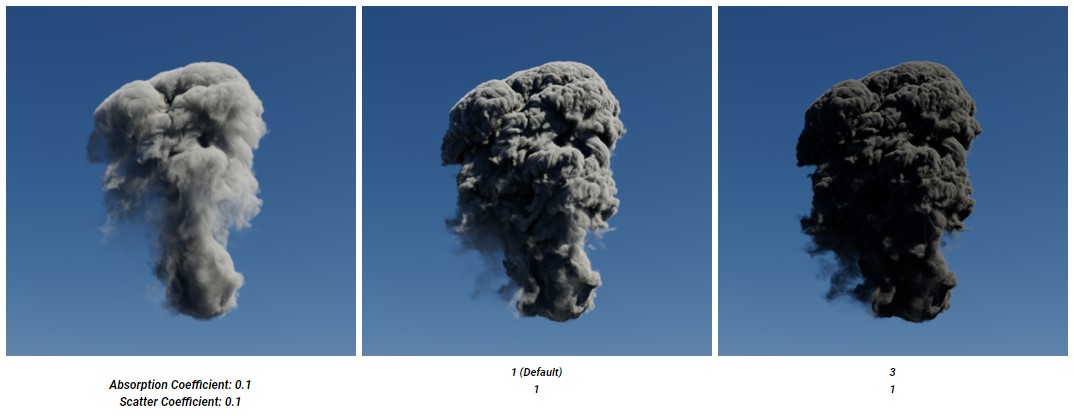
Scattering works in combination with absorption as they are both controlled by the same volume grid being used to drive the scatter channel. To preserve energy conservation, when you adjust an amount to the scatter coefficient, you should also do that to the absorption coefficient, which controls how much light is absorbed by the volume.
In the image below, you can notice that the overall brightness of the volume hardly changes despite raising the scatter coefficient since the absorption coefficient is raised the same amount each time. Instead, the apparent density is increased make changes in particular to the thin areas of the volume in the bottom left of the images.
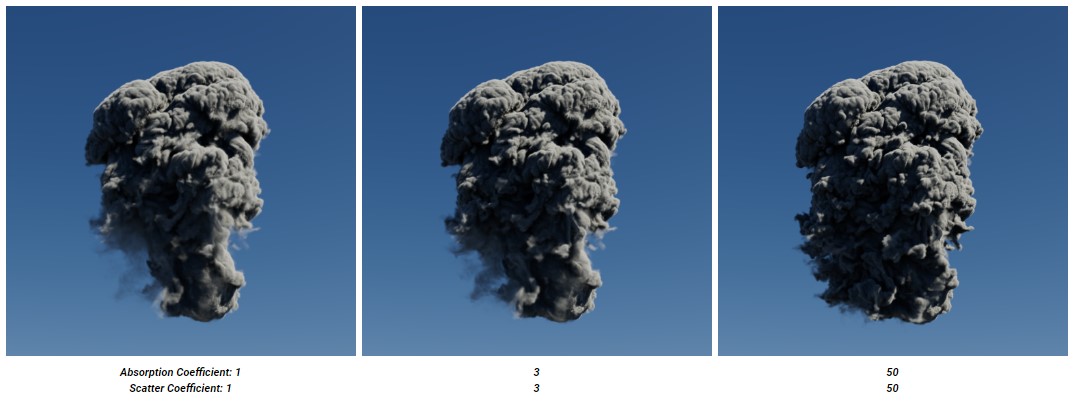
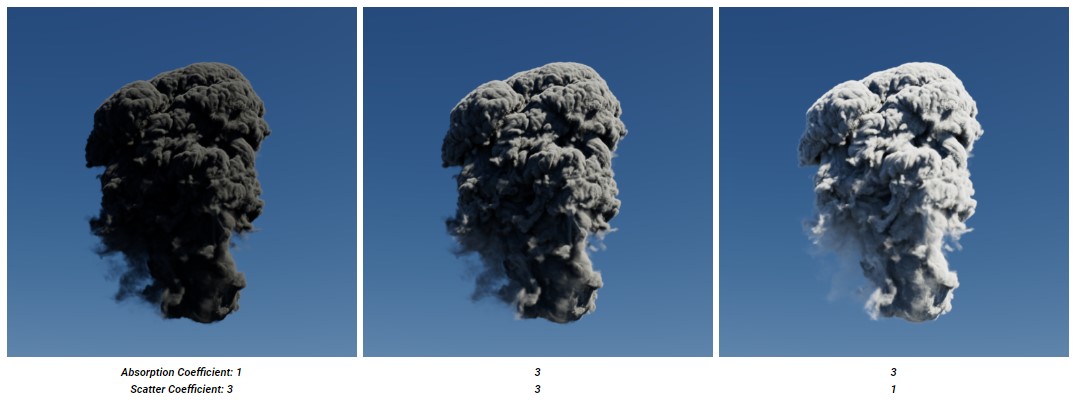
When scatter coefficient is more than absorption coefficient, the volume is darker and more dense. In contrast, if absorption coefficient is more than scatter coefficient, the volume is brighter and more airy.
Tint
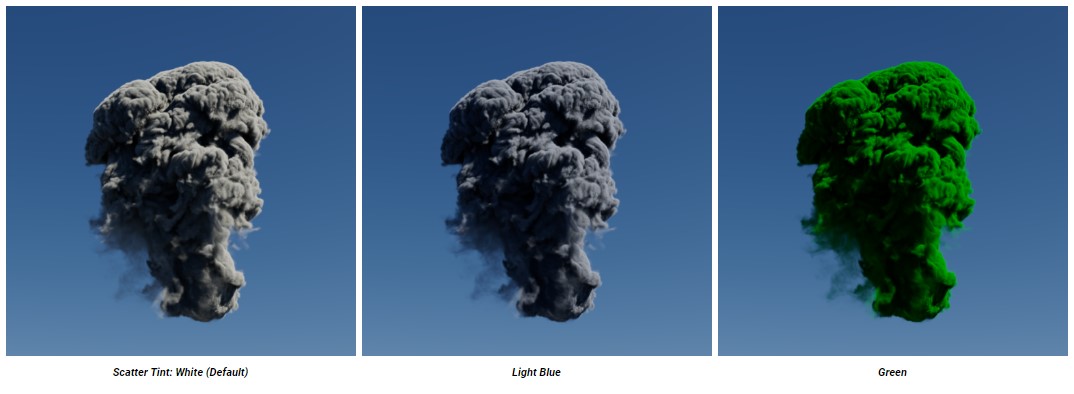
Tint controls the overall color of the volume, by default scatter tint is left white resulting in a grey smokey color.
Scatter Remap Ramp
You can also remap the scatter channel by using the Scatter Ramp color gradient. Low density values are colored by the left side of the gradient, while high density values are colored by the right side of the gradient. By default a black and white gradient drives the scattering color but multicolored gradients can be used for more artistic effects as depicted below. Bright colors result in more scattering and dark colors result in less scattering.

Color Channel
Instead of setting your own Tint or Scatter Ramp, you can specify an OpenVDB grid here to color the scatter component of the shader. This is useful when the coloration of a volume has already been determined.
Anisotropy
Anisotropy controls the direction light scatters inside a volume within a -1 to 1 range, adjusting a volume’s anisotropy allows for more artistic control and increased realism.
The default anisotropy of 0 results in isotropic scattering, when the light scatters equally in all directions, which is generally appropriate for smoke.
Positive values increase the chance for forward scattering, when more light is scattered in the direction the light rays are already traveling. Negative values increase the chance for back scattering, when more light is scattered back towards the location of the light source.
*Note: Values close to the extreme ends (-1 and 1) can result in unexpected or unwanted results as the light scattering becomes highly concentrated in a single direction.

Absorption
Redshift computes Absorption using the same OpenVDB grid used for Scatter channel.
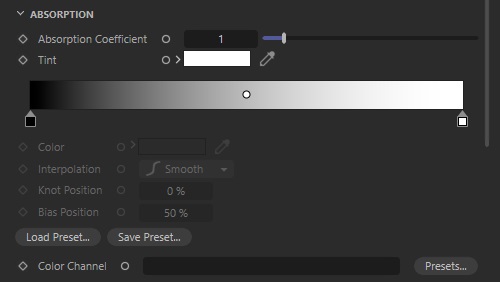
Absorption Coefficient
Increasing the Absorption Coefficient makes the volume more opaque as volume absorp more light. The more opaque the volume the less light will travel through it, high absorption coefficient values generally result in darker volume renders, particularly when the absorption coefficient is higher than the scatter coefficient.
Tint
Help you adjust the absorption color of the volume. Darker colors will reduce light absorption and make volumes brighter, this is why the red and blue examples below look brighter compared to the white default.

Absorption Remap Ramp
You can also remap the scatter channel by using the Absorption Scatter Ramp color gradient. Low density values are colored by the left side of the gradient, while high density values are colored by the right side of the gradient. By default a black and white gradient drives the scattering color but multicolored gradients can be used for more artistic effects as depicted below.

Color Channel
Instead of setting your own Tint or Scatter Ramp, you can specify an OpenVDB grid here to color the absorption component of the shader. This is useful when the coloration of a volume has already been determined.
Emission
To create effects such as fire, explosions, or emissive volumes, you can use the emission component.

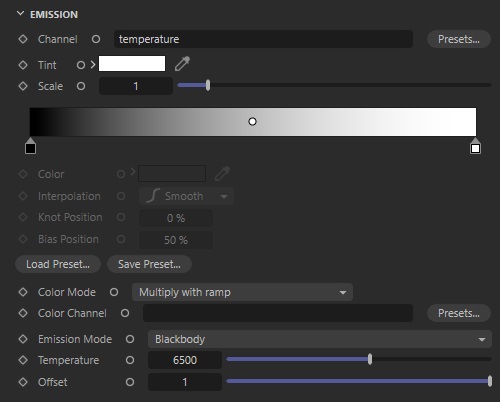
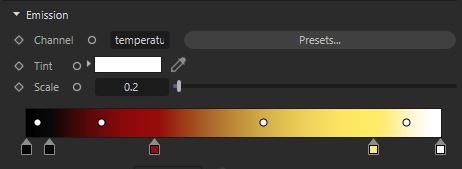
Channel
The emission channel is the key shading component for fires and explosions helping to drive the overall look of a volume objects emission contribution. It should be specified a name here before any emission rendering starts. The most common name for a scatter channel is ‘temperature.’
Emission can be driven by most available volume grids but it’s important to use the correct grid to drive a channel when trying to achieve a specific result.

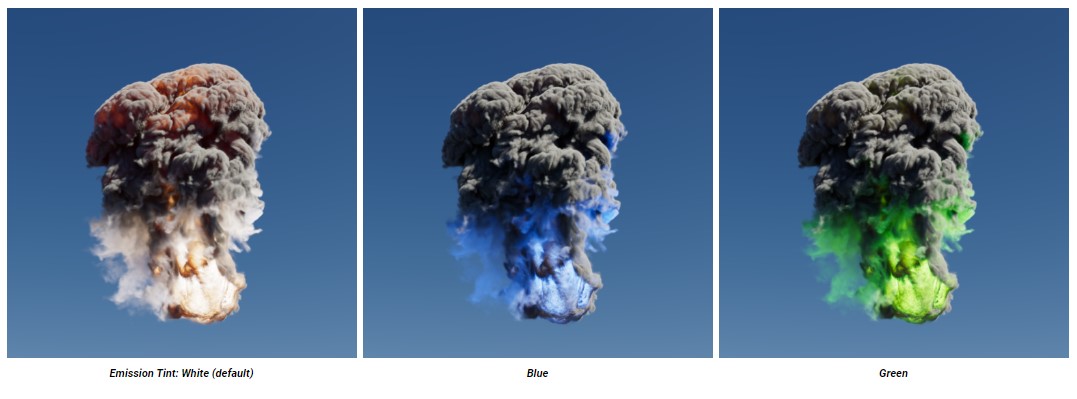
Tint
Help you apply an overall color to the emission. Darker colors will result in a reduction of the emission intensity.
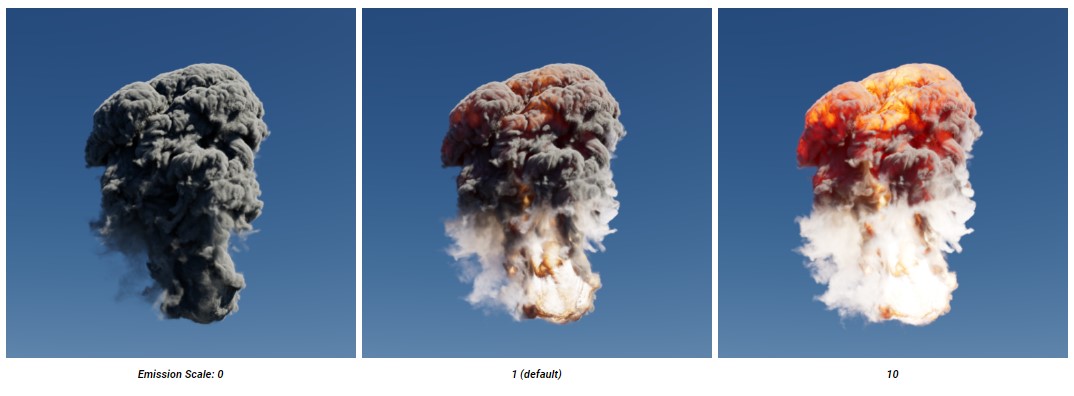
Scale
Use Scale as a multiplier for the emission Channel to increase or decrease emission intensity. A value of 0 results in no emission.
Emission Remap Ramp
You can also remap the emission channel by using the Emission Ramp color gradient when the emission mode is set to “Color Ramp”. Low emission values are colored by the left side of the gradient, while high emission values are colored by the right side of the gradient. By default a black and white gradient drives the scattering color but multicolored gradients can be used for more artistic effects as depicted below.
When using the Color Ramp mode it’s up to you to adjust the Emission Ramp to ‘translate’ the temperature channel into the appropriate emissive colors.
A simple flame look can be achieved using a gradient ramp that looks like the following image:
One way to read the above ramp is:
-
-
-
- For low temperatures, use black/gray
- For medium temperatures use red
- For higher temperatures use yellow/white
-
-
With the end result looking something like this:

Color Mode
This mode controls the results of the Color Channel in combination with the Emission Remap Ramp and Tint. This is only relevant when you use a Color Channel to drive emission for Color Ramp emission mode.
The following options are available:
-
-
-
- Multiply with ramp: The loaded Color Channelis multiplied by the Emission Remap Ramp and Tint.
- Multiply with temperature: The loaded Color Channelgets multiplied with the Emission Channel values, before it gets used with the The Emission Remap Ramp has no effect on the emission color.
- Replace: The Emission Remap Ramphas no effect on the emission Color Channel.
-
-
Color Channel
Instead of setting your own Tint or Scatter Ramp, you can specify an OpenVDB grid here to color the emission component of the shader. This is useful when the coloration of a volume has already been determined. Noted that this is only relevant when using the Color Ramp emission mode.
Emission Mode
Emission Mode controls how emission color is determined with the following options:
-
-
-
- Color Ramp– Emission color is controlled by the user defined Emission Remap Ramp.
- Blackbody– Emission color is controlled by a physically correct method of rendering volumes based on temperature for things like explosions and flames. Blackbody mode controls the both color and the intensity of the emission.
-
-
Achieving a certain look for emission can sometimes be challenging for two main reasons:
-
-
-
- Smoke (Scatter/Absorption) naturally obstructs fire (Emission) so it can reduce its effect. Therefore, care has to be taken to ensure that scattering and absorption are adjusted so that they do not interfere too much or too little with the emission.
- The Emission Rampis commonly driven by a temperature volume grid. Depending on the 3D app used to author the OpenVDB file, the temperature ranges can be pretty dramatic. In certain cases, range remapping may help as described in the Emission Remap Range section.
-
-

Temperature
The temperature parameter maps the emission value to a Kelvin temperature range. If you adjust this value, it will change both the color and the emission intensity by making the volume hotter with higher values or colder with lower values. Noted that it’s only relevant when using Blackbody emission mode.
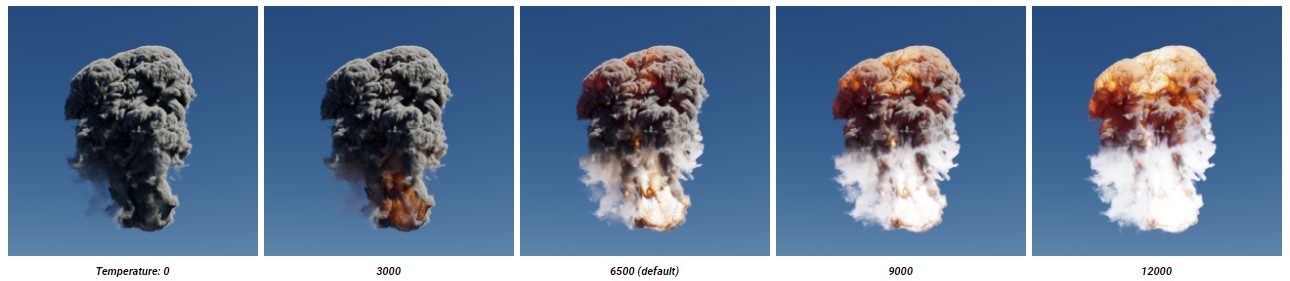
Note as the temperature parameter is increased the color of the emission changes and the emission intensity increases as well.
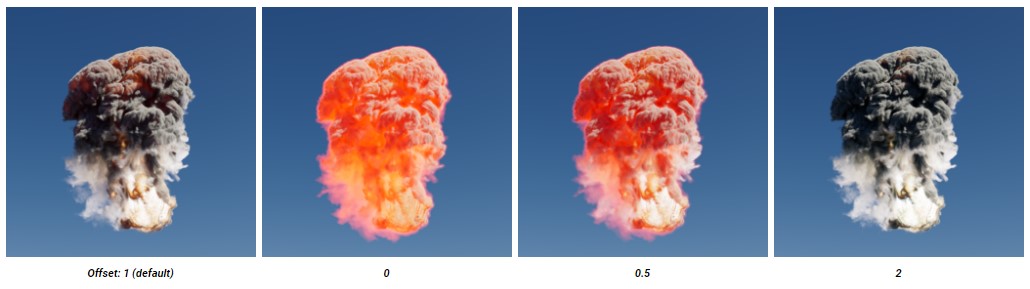
Offset
Offset interpolates the emission intensity between the emission channel value and the calculated physically correct radiance. Noted that it’s only relevant when using Blackbody emission mode.
For physically correct results you should leave offset at the default value of 1. Lower values will result in a more even and constant emission.
Advanced

This section offers additional settings to tune the overall Shadow, Density and Emission evaluation
Shadow Density Scale
This parameter help you control the density of a volume without affecting its overall shape. It’s the same as making adjustments to scatter and absorption. In effect it is a “trick” that can help emulate multiple scattering, i.e. the effect of light bouncing around a volume with a less severe impact to render times than actual multiple scattering by increasing the volume trace depth. You can achieve an increased multiple scattering look by setting the shadow density scale to a value below 1.0 while setting higher values will make a volume look more dense.
Absorption could be reduced to allow more light to pass through a volume, however, this would also make it appear more ‘puffy’ and transparent. Shadow density scale, on the other hand, retains a volume’s overall shape while still allowing more light to pass through it.

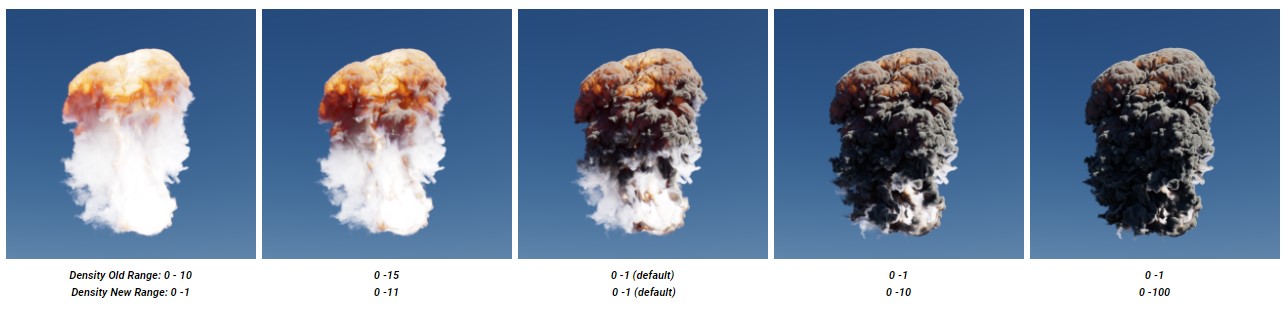
Range Remapping for Density and Emission
The values stored in OpenVDB channels can vary wildly depending on the 3d app that was used to author them. This can be true for both density and emission channels.
The range remapping controls allow the adjustment of these values before Redshift uses them. The Old Min/Old Max range is remapped to the New Min/New Max range.
Density Remap
If your volume looks blocky, sometimes you can remap the density ranges. It allows for a more gradual falloff in volume shading, frequently this can be achieved by increasing the Old Max value.
Emission Remap
A temperature channel might contains values that range between 0 and 100 but the Emission Ramp only accepts inputs ranging between 0 and 1. In this case, you should use old min=0, old max=100 and leave new min and new max at your default 0 and 1 respectively. In essence, this would remap or ‘squash’ the 0-100 range into a 0-1 range.

iRender - The fastest Redshift cloud rendering
If you are a Redshift users, iRender is one of the best render farm you can consider. We provide you supercomputers, with high-end specifications like AMD Ryzen™ Threadripper™ PRO 3955WX @ 3.9 – 4.2GHz or AMD Ryzen™ Threadripper™ PRO 5975WX @ 3.6 – 4.5GHz, RAM 256GB, Storage NVMe SSD 2TB. Most importantly, we always update to the latest GPU technology, with 1/2/4/6/8 x RTX3090/RTX4090.
You are free to install any 3d software or rendering engines on our remote servers, add your own license then render or modify your project by yourself.
iRender is proud to be official render farm partner of Maxon. And for anyone who use Cinema 4D, or Redshift, or use both software, at the moment you don’t need to install and transfer your license key to our remote machine. You can choose to create a machine with pre-installed software, and use our license for your project. This will reduce time of installing and setting up, maximizing the rendering time of yours, while still enabling you to freely adjust your project like you are on your local machine.
Let’s see how our RTX4090 performs when rendering with Redshift:


iRender also provides you more services. Free transferring tool named iRender drive for macOS or Linux users. For Windows users, we recommend using our all-in-one application iRender GPU to work, and you don’t need to come to our website. Our price is flexible with hourly rental which has a pay-as-you-go basis, daily/ weekly/ monthly subscription with discount from 10-20%. Plus, you have 24/7 support service via livechat with real humans who will support you whenever you encounter an issue.
Register an account today to experience our service and enjoy a very big promotion 100% bonus for new user’s first top up. Or contact us via WhatsApp: (+84) 916806116 for advice and support.
Thank you & Happy Rendering!
Source and images: help.maxon.net
Related Posts
The latest creative news from Cinema 4D Cloud Rendering , Redshift Cloud Rendering