Explore an overview of DAZ Studio with iRender
As you know, Daz Productions, Inc. is a 3D-content and software company specializing in providing rigged 3D human models, associated accessory content, and software to the hobbyist as well as the prosumer market. Daz Studio is a powerful 3D rendering software that is super easy to use.
Today, iRender team will show you the highlight features, overview of Daz studio, and step-by-step instructions on rendering in Daz3D.
Highlight features & overview of Daz Studio
Take a look into the software and check overview of Daz Studio

All your Assets in One Place
Our content manager, Daz Central, is simple, clean, and easy to use. It organizes your items into categories, making them easy to find, and it’ll open your selected item into Daz Studio with a single click. It also allows you to manage and update your plug-ins easily.
Rendering Presets and Render Engines
Shine light on your scene to bring out its best features. With easy to use rendering presets, the right look is not only feasible but simple in closeup and distance shots. Choose from several render engines, including 3Delight, Iray, and Filament, to find the one that best suits your project’s needs.
Animation Made Easy
Bring your characters to life in Daz Studio with animations. From full-body movements like jumping and dancing to small movements of the face, animation presets make every movement a breeze. You can even apply the preset and adjust it to make a new movement of your own.
Pose and Modify
Building your 3D universe is as easy as 1-2-3 with Daz Studio. Pose your characters in your unique environment, modify to your heart’s content, and render for a stunning finished product. You won’t believe the photorealism you can achieve with Daz Studio, our expansive 3D library, and a bit of imagination.
Render your images
After creating all settings on the scene, you will go to the process rendering in the 3D product pipeline. This is the combination of all the information held within a scene (objects, materials, lights, cameras) to produce a single or sequence of final rendered images.
Step 1 – Open the Render Activity
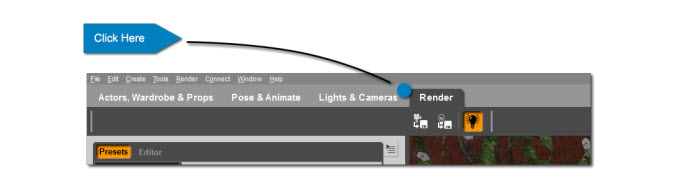
Now that the scene is set up with lights and cameras, you are ready to render your scene. Rendering is done in the Render activity. To open the Render activity click on the Render activity tab
Step 2 – Load a Render Settings Preset
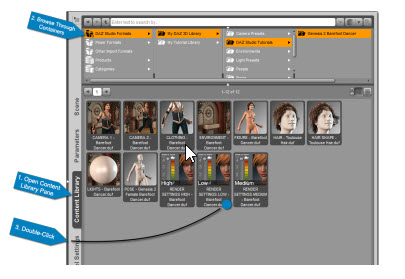
To load the Render Settings Preset we will introduce a new location to load your content. Open the Content Library pane on the right-hand side of the interface by clicking on the tab labeled ‘Content Library’. Any content you see in the Smart Content pane can also be loaded from the Content Library pane. You can learn more about this pane in the DAZ Studio User Guide.
The “Container View” at the top of the Content Library pane goes to DAZ Studio Formats → My DAZ 3D Library → DAZ Studio Tutorials → Genesis 2 Barefoot Dancer. You will see several icons below the containers. Many of these icons may look familiar as we’ve loaded them from the Smart Content pane, Shaping pane, Posing pane, Lights pane, and Cameras pane. You should see three render settings icons. Double click the ‘Render Settings Low – barefoot Dancer’ icon to load the lower render settings. You can also use the medium or the high presets but the render time will increase.
Step 3 – Open the Render Settings General Page
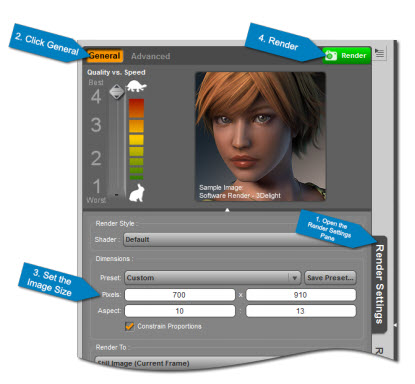
The Render Settings pane is on the left hand side of the interface. To open the pane click on the tab labeled ‘Render Settings’. Once the pane is open click the ‘General’ label at the top of the pane to open the General page of the Render Settings pane
Step 4 – Set the Image Size
The Render Settings Preset we just loaded set the image size at 700 x 910 pixels. You can increase or decrease the size of the image by adjusting the number of pixels in the ‘Dimensions’ fields.
Step 5 – Render the Image
You are now ready to render your image. Click the green Render button in the top right corner of the Render Settings pane to begin your render. You can also use the Ctrl/Cmd + R keyboard shortcut.
Step 6 – Wait
Rendering is a lengthy process. Depending on the speed of your machine and the render settings you chose the render could take as long as an hour, sometimes more. Be patient as your computer renders your image. You can watch the progress of your render in the “Render Window.
Save and share your render
Step 1 – Name and Save Your Render
When your render is complete you can save and name the render. Name the render in the ‘Name’ field. When you are satisfied with the name click the ‘Save’ button. You will be able to find your render in your Render Library.
Step 2 – Open the Render Library Pane
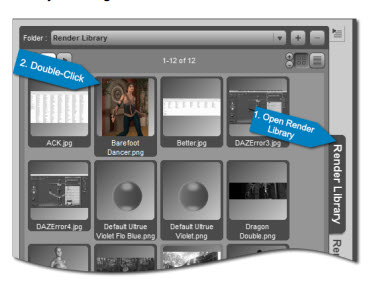
You can open your saved renders through the Render Library. Open the Render Library pane by clicking on the tab labeled ‘Render Library’ on the left hand side of the interface. Remember, we are still in the Render activity
Step 3 – Open your Render
In the Render Library pane you will see an icon that looks like your render. The icon will have the same name as your render. Double click the icon to open it. The rendered image will open in whatever program you have set to open that type of file. If that software has editing capabilities you can edit and save your image.
Step 4 – Share your Render
If you’ve edited your rendered image make sure you save it. Browse to the location that you have saved your render to. Your Render Library can be found in /Users/ [your user name]/Documents/DAZ 3D/Studio/Render Library. You can upload your render to Facebook, Twitter, or email it to your friends.

DAZ Studio Cloud Rendering Service

On the other hand, you want to boost speed rendering in Daz 3D and catching your deadline soon, you should refer to iRender’s service. We have multiple servers which are suitable for all your needs and your budget. You can pick one and experience our service to know how effective is it.
Through this article, iRender hopes you will have an overview of Daz Studio. If you want to speed up rendering in Daz 3D, don’t forget to register here and let’s iRender support team contact you to support you better.
You’re in trouble with rendering speed? Okay, we’ve got you!
Happy rendering!
daz3d.com
Related Posts
The latest creative news from Daz3d Cloud Rendering, Octane Cloud Rendering, V-Ray Cloud Rendering , 3D VFX Plugins & Cloud Rendering.