How To Improve Speed Of Blender’s Cycles X Rendering Engine
Cycles X is essentially a set of improvements to Blender’s Cycles X rendering engine. It was announced on April 23rd, 2021 by the Blender Foundation. The ‘X’ on Cycles X represents the number ten. Cycles render engine is celebrating its tenth anniversary. It ships with Blender version 3.0 and later. The core was rewritten from the ground up to render much faster than Cycles’ render engine. Furthermore, the new core makes it easier for Blender developers to add future improvements.
In today’s blog, we’ll look at some of the settings you can change to speed up the Cycles X rendering engine.

1. Enable GPU rendering in your Blender’s user preferences settings
GPU rendering allows you to use your graphics card instead of the CPU to render. Modern GPUs are built to handle a lot of number crunching, which can significantly speed up rendering. However, due to relatively limited memory, they have limitations in producing complex scenes, as well as interaction issues when using the same graphics card for display and rendering. It all depends with the graphics card you are using.
How to enable GPU rendering in Blender version 3
Go to Edit > Preferences > System.
If you have an Nvidia graphics card, select either CUDA or Optix. If you have an AMD graphics card, select HIP. Then select your graphics card.
2. Optimize your Light Path settings
Light bounces are Cycles engine’s way of simulating the natural properties of light and how it reacts, or bounces, on walls and other objects. It’s what helps the rendered scene look so realistic when compared to the viewport. The problem with realism is that it requires longer rendering times. Light bounces are one of the most significant causes of a slow render.
This is easily fixed by navigating to the Render Properties panel in Cycles and then to the Light Paths section. Turning down the Max Bounces total can quickly speed up rendering. The default setting is 12, but anywhere between 3 and 6 will give you the same amount of realism without overworking the GPU when it comes time to render.
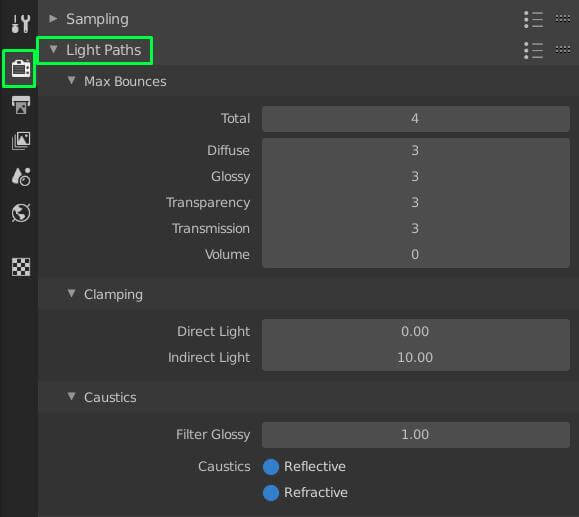
You can fine-tune the lighting setup even further by adjusting the individual light path types, such as Glossy or Diffuse, which are also be found in the Light Paths section. Transmission should not be changed too much because it will reduce the final render’s realistic quality.
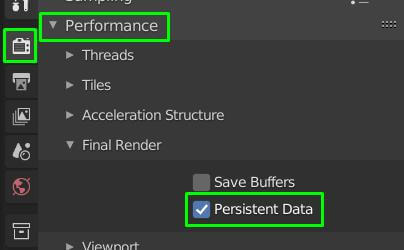
3. Activate Blender’s Persistence Data
Here’s how it works: When you press the render button, the first frame of your scene is calculated and cached. The frames that follow rely on the cached data from the first frame. This can sometimes speed up your renders by up to 5 times. Because your scene’s elements are no longer calculated in every frame, as they were previously.
Limitations of Persistent data
- Persistent data performs best in static scenes. Scenes in which no objects move. As an example, consider an interior architectural rendering. As of now, the Persistent data feature does not support caching animated objects in the scene.
- Persistent data comes at a cost of increased memory usage.
How to activate Blender’s Persistent data
Under render properties, go to the Performance Tab then the subtab ‘Final Render’
4. Optimize your HDRI multi-importance sampling
When working with high-resolution hdr environments, Blender can become very unresponsive when the hdri is first loaded. This is due to the time required to create an importance map that Cycles X needs to avoid fireflies during rendering. The importance map informs cycles about the bright areas of the hdri so that it can favor those join renderings and produce a better result.
How to optimize your HDRI multi-importance sampling in Blender
Go to the World settings > Settings tab. Change the ‘Sampling’ setting from Auto to Manual. Now, adjust the ‘Map Resolution’ value as needed.
You simply need to set it high enough to avoid fireflies but low enough to prevent Blender from responding inaccurately. I’ve found that values of 512 and 1024 work best for me.
5. Set a render region when working on shading or lighting of a single object
You can improve viewport rendering tremendously when doing shading or lighting a single object. Because cycles will concentrate all resources to the render region instead of the whole viewport. Since a selected render region is smaller than the viewport, cycles will render the region faster.
To select a render region, click Ctrl+B. Then with your mouse draw a box around the object you would like to view as rendered. Below is a .gif to help you select a render region in Blender.

6. Reduce your Cycles X sampling count
Sampling is a render setting in Cycles X rendering engine. It is basically the number of light calculations Cycles X needs to do, in order to render a scene. The higher the samples count, the more accurate light calculations will be. The higher the samples count, the cleaner your render will be. Unfortunately, the higher the sample count, the longer your render time will be.
More samples are generally good. But there comes a point where more samples do almost nothing. Therefore, it is important to do test renders to come up with the sample count that will reduce your render time at the same time produce clean renders.
In Blender 3, you can set Noise Threshold, Max Samples, Min Samples and Time limit. To set samples count, go to Render Properties > Sampling > Render.

For Noise Threshold, Min Samples and Time Limit values, leave them as default. Adjust Max Samples value from around 500 samples adjusting upwards until you are satisfied with the quality of render.
The Best Cloud Render Farm Service for Blender & Cycles X
iRender Render Farm is a GPU-Acceleration Cloud Rendering Service for Blender & Cycles Multi-GPU Rendering with Powerful Render Nodes: 2/4/6/8x RTX 3090/4090, provides high computing performance on the model of IaaS (Infrastructure-as-a-Service). Users will remotely connect to our server, install any version of Blender only one time and easily do any intensive tasks like using their local computers.
High-end hardware configuration
- Single and Multi-GPU servers: 1/2/4/6/8x RTX 3090. Especially, NVIDIA RTX 3090 – the most powerful graphic card.
- 24 GB vRAM capacity, fitting to the heaviest images and scenes. NVLink/SLI requested for bigger vRAM.
- RAM capacity of 128/256 GB.
- Storage (NVMe SSD): 512GB/1TB/2TB.
- Intel Xeon W-2245 or AMD Ryzen Threadripper Pro 3955WX CPU with a high clock speed of 3.90GHz.
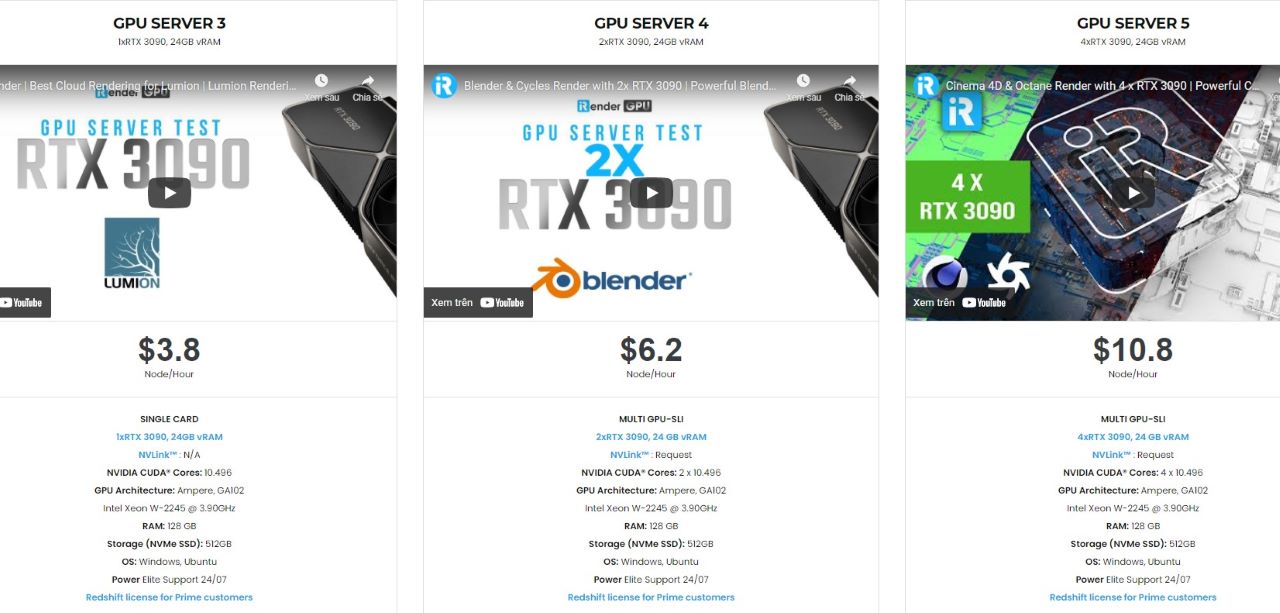
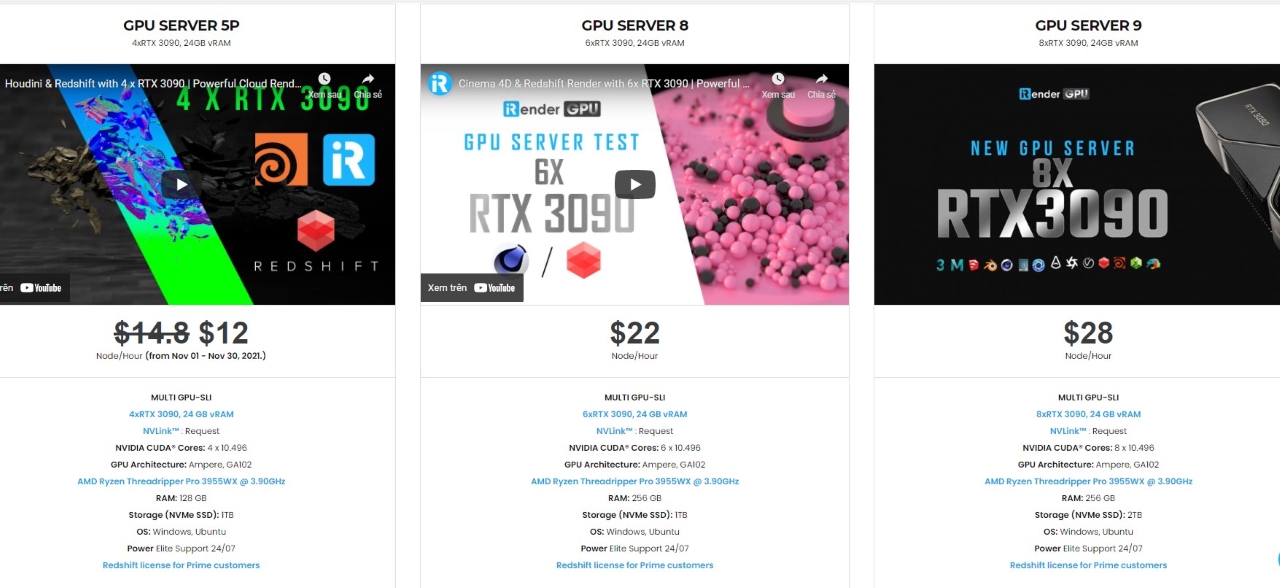
Let’s see rendering tests with Blender & Cycles Render with 2/4/6/8x RTX 3090/4090 – the latest NVIDIA CARD RTX 4090 with 24GB VRAM will help you reduce your render time very much at iRender:


Reasonable price
iRender provides high-end configuration at a reasonable price. You can see that iRender’s package always costs much cheaper than packages of other render farms (in performance/price ratio). Moreover, iRender’s clients will enjoy many attractive promotions and discounts.
SPECIAL OFFER : Get 100% BONUS for all newly registered users.

For more advice and support, please do not hesitate to reach us via Whatsapp: +(84) 915875500. Register an ACCOUNT today and get FREE COUPON to experience our service.
Thank you & Happy Rendering!
Source: gachokistudios.com
Related Posts
The latest creative news from Blender Cloud rendering.