How to Install C and C++ support in Visual Studio
An IDE is a coding environment that includes both an editor and a language-specific toolchain. It also contains many other features to support many aspects of software development. Today, we will talk about Visual Studio IDE and how to install it and Microsoft C/C++ tools.
You can use Visual Studio IDE to edit, debug, build code, publish an app. And Visual Studio is not just a normal IDE, with normal features like editor and debugger, it can provide your more than that such as compilers, code completion tools, graphical designers, etc. to enhance the software development process. Now, let’s get started.
Visual Studio 2022 Installation
This article is only about how you can install Visual Studio 2022 on Windows. If you want to know the instruction for Mac, please see Install Visual Studio for Mac.
Step 1 - Check your system if it is ready for Visual Studio
Before installing Visual Studio on your PC, you will need to reboot your PC to make sure there’s no pending installs or updates that hinder the installation of Visual Studio. Then, you should check some of the information below:
-
-
-
- System requirement to know if your PC support Visual Studio 2022.
- Latest Windows updates to ensure your PC has latest security updates and system requirement for Visual Studio.
- Free up space by running the Disk Cleanup app to remove unnecessary files from your %SystemDrive%.
-
-
Step 2 - Download Visual Studio
In this step, we download the bootstrapper file of Visual Studio. You should go to Visual Studio download page, select the edition you need and click the Free trial or Free download button.
Step 3 - Install the Visual Studio installer.
Now you should find the bootstrapper file of Visual Studio you have downloaded then install it. It will install on your PC a lightweight installer which contains everything you need.
First, you double click the bootstrapper that matches or is similar to one of the following files:
-
-
-
- vs_community.exe for Visual Studio Community
- vs_community.exe for Visual Studio Professional
- vs_community.exe for Visual Studio Enterprise
-
-
Then you will receive a User Account Control notice. Please click Yes to run the bootstrapper.
Choose Continue if it asks you to acknowledge the Microsoft License Terms and the Microsoft Privacy Statement.
Step 4 - Choose workloads
Once you installed the installer of Visual Studio, you can select the workloads and feature sets that you want. Let’s see how you do it.
Below is the Installing Visual Studio screen you will find the workload on it.
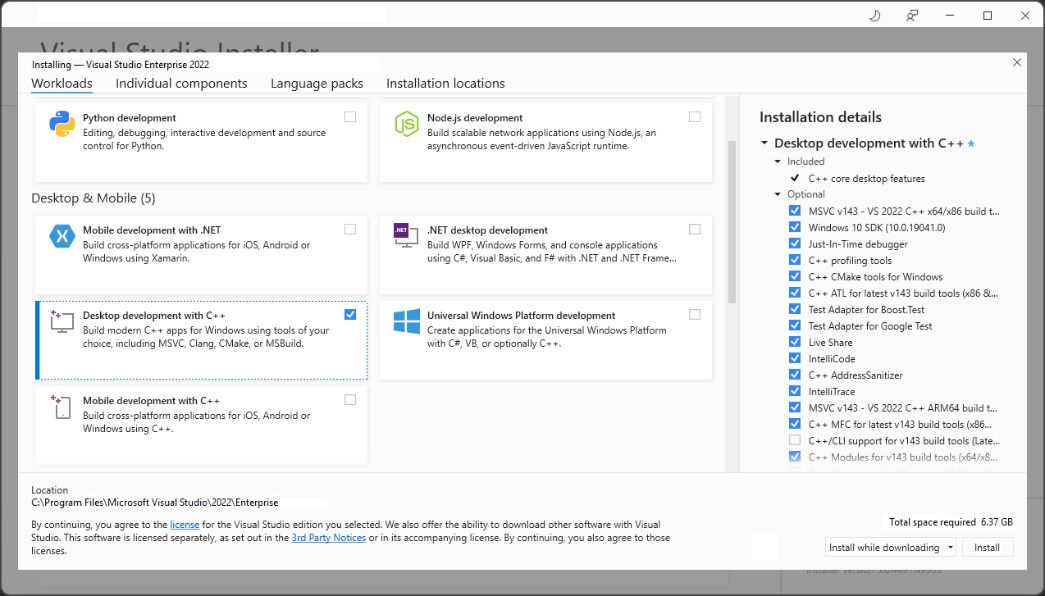
For core C and C++ support, choose Workloads menu > Desktop development with C++ (the third one). It will show you details on the right side of screen. You can select or deselect optional components in this list.
You can see that it has other workloads support other kinds of development, like the Universal Windows Platform development, Mobile development with C++, etc.
After you choose the workload(s) and optional components you want, choose Install.
Before that, there are some optional installation you can set up:
Choose individual components (Optional)
There’s a case when you want to add more components than what is available in workload installs list, you can do so by using the Individual components tab. You can install and add individual components that you need, and follow the prompts.
Install language packs (Optional)
When running for the first time, the installer program will match the language of your OS. If you want to change the language of Visual Studio, choose Language packs > select language you want, then follow the prompts.

Change the installation location (Optional)
If you install Visual Studio and its stuffs on one drive, it will be heavy. You can reduce it by install Visual Studio on one drive runs it the fastest, and move the download cache, shared components, SDKs, and tools to different drives.
Step 5 - Start developing
After completing installation of Visual Studio, you can now choose Launch to start developing.
To start a new project, choose “Create a new project“. Then you type the app you want to create in the search box and select a template.
Now Visual Studio will open a new project for you, and you can code.
Start your project in C++ and Visual Studio now with iRender
Above is the guideline on how to install C and C++ support for Visual Studio. You can follow and do it on your PC, or on our Windows server.
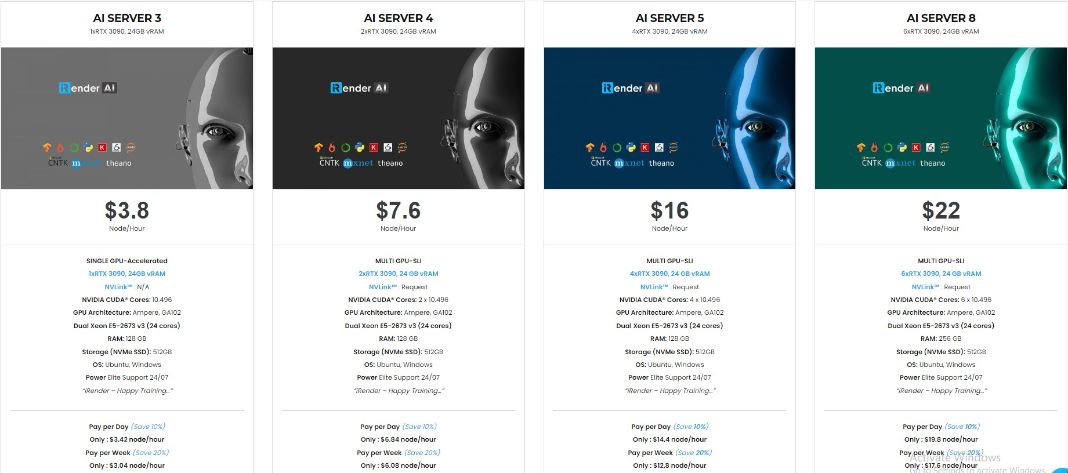
At iRender, we are proud to be one of the few who provides multiple GPUs for renting with state-of-the-art RTX3090. Our remote machines are Optimized for Scientific Computing, Machine Learning, Deep Learning with Windows and Linux OS.
We support many programming language including C/C++ and IDE like Visual Studio. You can install them on our server, then start to develop your program now.
This is our packages tailored for AI/ Deep Learning:
You can also read our article about how RTX3090 be the best choice for AI/ Deep Learning (Is RTX3090 the best GPU for Deep Learning).
Moreover than that, we provide other features like NVLink if you need more VRAM, Gpuhub Sync to transfer and sync files faster, Fixed Rental feature to save credits from 10-20% compared to hourly rental (10% for daily rental, 20% for weekly and monthly rental).
You can register an account today to experience our service. Or contact us via WhatsApp: (+84) 916806116 for advice and support.
Thank you & Happy Training!
Source: docs.microsoft.com
Related Posts
The latest creative news from Cloud Computing for AI,