How to work with Ground Planes in Keyshot
KeyShot is well-known as one of the best 3d rendering software to create amazing visuals. It is a real-time ray-tracing and global illumination program that displays results instantly and reduces the time to create realistic product visuals. Keyshot is gradually becoming one of the most favorite and popular 3D software chosen from artists all over the world with its amazing features. It supports importing the greatest number of 3D file formats out of any rendering software and has an incredibly simple user interface with drag-n-drop material and environment presets, interactive labeling, texture mapping, physical lighting, animation, and much more. Additionally, the software includes native support for over 30 leading 3D file formats, allows keeping the design in sync across applications, reduces the time for loading, and increases time for creating.
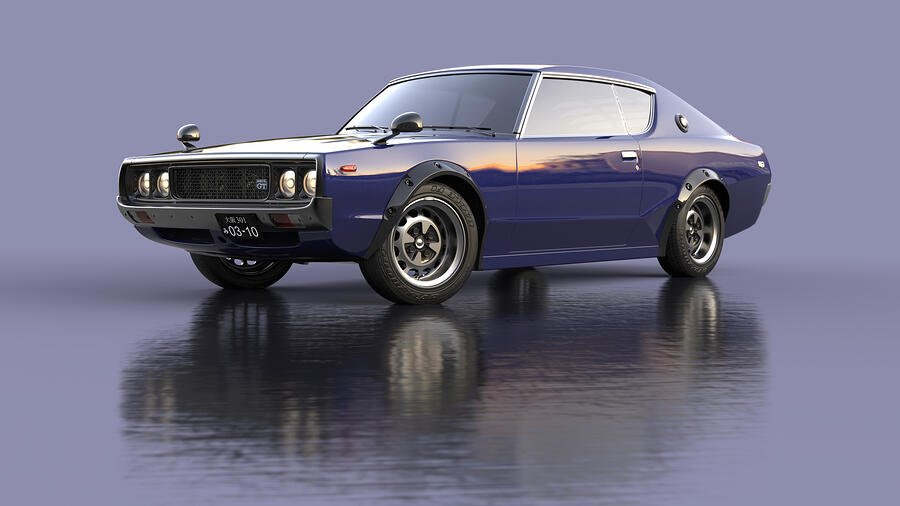
And one of the quickest and easiest ways to give your product or vehicle renderings more realism is to add presence in your scenes by setting them on a surface and adding a nice shadow or ground reflection. You may have used KeyShot geometry, a table or podium model, or even a duplicate of the object itself to showcase the product on what appears like a real-world surface. But hands down, the easiest way to achieve that effect is to add a Ground Planes in Keyshot. Let’s take a look at how to do so and how to work with them.

Add a Ground Planes in Keyshot
To add a ground planes in Keyshot to your scene, simply click on the Edit on the main menu, select Add Geometry and choose Add Ground Plane from the menu, or use the Ctrl+G hotkey to add it quickly.
Add Models with a Hotkey (and Customize it!)
If there are Library Models you add to your scene regularly, you can assign a hotkey to add them more quickly. You can update the hotkeys under Edit, Preferences, Hotkeys or, in the Library, Models tab, right-click on the model, select Assign Hotkey, and choose the one you would like to use.
Once selected, the ground planes in Keyshot will be added to your scene. You may not see it but, don’t worry, it’s there. In the Project window, select the Scene tab, then select the Ground Plane under the Model Sets. You’ll see an orange outline appear around the edge of the ground plane in the Real-time View.At this point, you may also notice that shadows and ground reflections appear no different than before adding the geometry. Let’s look at two ways to change that.
Add a Material to a Ground Plane in Keyshot
A common method is to apply a material that has the qualities you’d like for a ground surface. For instance, when you add a rough black metal material you’ll see a nice, diffused reflection on a neutral-colored surface. From this point, adjust the ground material as you would any other material in KeyShot.
Depending on your camera angle, this can create a horizon line in your scene which may or may not be desired. If you prefer a seamless ground plane you can adjust the camera angle, increase the size of the ground plane, or adjust the ground plane material settings.
Adjust Material Properties of a Ground Plane
For this method, double-click the ground plan in the Real-time View to view the Material properties in the Project window.
Adjust Specular Color: Click the Specular color and change it from black to white. You should see a reflection of your model appear on the ground plane’s surface. Next, adjust the Reflection Contrast slider from 0 (a very faint reflection) to 1 (a very defined reflection).
Adjust Roughness: Once you have a desired appearance, adjust the Roughness slider to diffuse the model’s reflection, if desired. Generally, even highly reflective surfaces have a little texture, so unless you’re trying to make your object look like it is sitting on top of a mirrored surface, it’s a good idea to give the ground surface a small amount of roughness. On the other hand, if your goal is to create a more emphasized shadow, you can crank up the roughness to diffuse the reflection to a point where it is unrecognizable and appears more shadow-like.
Adjust Refractive Index: You can also adjust the Refractive Index to increase or decrease the amount highlights/colors are picked up in the ground’s reflection. Increasing this will make the colors more pronounced.
Clip geometry below ground: The Clip geometry below ground option will ensure any geometry below the ground plane is not visible. While this is generally not needed for most product renders, this is often used on automotive images to clip the tires and provide a more realistic appearance of tire compression. Without this, you would see a portion of the tires below the ground plane.
Activate Ground Illumination: It’s also good practice to activate Ground Illumination so light is reflected off the ground back onto your model in a more natural way. To do so, simply click the checkbox.
Bonus tips
At this point, your scene should have a ground shadow and/or reflection that makes your model pop, but there are a couple more tips to share.
One advantage of the second method above is the ability to seamlessly blend a background. Whether you use an HDRI, a solid background color, or a backplate image, this method allows you to quickly and easily make your models fit naturally into any environment of your choosing. Then, you can add multiple environments to explore your model under different lighting and background conditions.
Lastly, if you use KeyShot Pro, you have the ability to jump into the Material Graph and add textures to the ground plane as you would any other material. Give it a try to explore some of the different texture options within the graph and add some interesting effects or a bit more realism to your scenes.

Conclusion
Hope that with these above instructions, designers could have more understanding about ground planes in Keyshot and could give more realism into your scene to feast customers’ eyes. And if you are having troubles in selecting a render farm for Keyshot? And you don’t know what the best cloud render farm for your needs, don’t worry. iRender provide 3 types of multi-GPU-servers (6x GeForce RTX 2080 Ti / 6x RTX 3080/ 6x RTX 3090) which are the most effective for Keyshot rendering in GPU, coming with the following specifications:

These servers are the ultimate online solution for KeyShot rendering allowing up to multiple, powerful 6x GeForce RTX 2080 Ti / 6x RTX 3080/ 6x RTX 3090 GPU. And, you can control the power and performance for the highest level customization and configuration in application resource usage. These servers are the premier solutions to maximize your advantage when you need it most – to win the project, to meet the impossible deadline, or pivot your visual direction with unparalleled speed.
For CPU rendering, iRender also provides CPU servers with unmatched speed for rendering Keyshot with Dual Xeon E5-2670 v2 @ 2.50 GHZ, 20 cores, 40 threads, RAM 128 GB, Storage 256 GB and a Geforce GPU Nvidia 1050 2GB, which is totally higher than recommended system requirements. As a result, Keyshot users will be satisfied with CPU server performance at iRender.

At iRender, we try our best every day to offer our beloved customers the power and expedience they need to put the project, concept, or presentation together quickly and beautifully. Keeping that in mind, iRender aims to facilitate such people by providing our own cloud render services for everyone. Even a low-performance computer can turn into a supercomputer using the cloud services by iRender. You don’t need to buy expensive computers and then install heavy software, just make use of the services by iRender and start creating.
If you are a new iRender user, just register HERE to get FREE COUPON to test our servers with your Keyshot scenes and stay tuned for more interesting and useful articles related to rendering everyday.
iRender – Happy Rendering!
Reference: Keyshot.com
Related Posts
The latest creative news from KeyShot Cloud Rendering , Cinema 4D Cloud Rendering , 3D VFX Plugins & Cloud Rendering.