UV Unwrapping in Keyshot Instructions
KeyShot is a real-time ray tracing and global illumination application that you may use to generate 3D renderings, animations, and interactive images. You could make photo-realistic real-time rendering on both Mac and PC, including laptops. Because of its CPU-based architecture, it eliminates the need for high-end graphics cards.
In this article today, iRender will show UV Unwrapping in Keyshot Instructions. Let’s get started!
Why should we utilize the UV coordinate in Keyshot?
When you need to position labels on complex surfaces, employ materials like RealCloth, or manage the seams and direction of a texture on your item, good UVs are vital. If your geometry lacks useful UVs, you can use the Unwrap UV tool to produce UV coordinates for your objects.
You may control how UV coordinates are generated by selecting seams, charts, and directions. When you’re pleased with a group of charts, press unwrap, you can then adjust the angle and scale of each chart to make them match.
The UV Unwrapping tool in Keyshot can be accessed from the Ribbon’s Tools section, or by right-clicking on a part in the scene tree or Real-time view. A selection dialog will appear if you do not choose anything when launching the tool. You can either click on the Real-time View to highlight the part you want to unwrap in the list, or you can pick the part you want. You have two options to approach depending on the sort of item you want to unwrap: quick and advanced unwrap.
Quick UV Unwrapping
You could use Quick Unwrap, Unwrap Shell if your item is a basic shell (an object with open edges). With just one click, you’ll be able to unwrap your object. For sphere geometry (closed meshes), the method will not work, and for cylinders, the Advanced Unwrap method will get the best results.
Advanced Unwrap
Advanced Unwrap allows you to build several charts, determine where seams should be placed, and regulate the UV-coordinates’ U-direction as well.
Add the Seam
Click the Add Seam button to add a seam. Then, in the preview, click on the surface where you want the seam to begin. Click once more to add more knots and draw the seam (red line). If you add more than one knot, the preview will propose a path for you to follow (dotted line). With a single click, the seam will be extended to that point along the indicated path. Simply click somewhere else on the surface if you don’t want to use the selected path. After that, the seam will be extended to the chosen location, and a new proposed path will be formed. If you want to commit to the complete proposed path, double-click.
You can choose whether the seam should additionally define the UV coordinates’ U direction while drawing it (the seam will turn orange when this is selected).
When you’re satisfied with your seam, apply it by clicking the green checkmark. If you want more seams in the UV map, repeat the process. It is not a good idea to have the seams cross one other. To ensure that the surface is split into two charts, close the seam. You may also make seams by utilizing the By Existing Chart or By Angle techniques to add charts.
Add chart
You may require one or several charts to cover your geometry when you unwrap your item, depending on its complexity. Use the By Existing Charts technique if your object already has a set of UV coordinates that are close to what you desire. Use the Flood Fill if you only need one chart or to fill the empty space between charts/seams. You can use the By Angle approach if you want more control over what is added. Set the angle to choose how much of the chart you want to include, and then click on the surface to create a chart. The chart will expand until it reaches a triangle angle greater than the angle chosen using the slider.
If you check the Extend Chart box, you can combine the approaches. You add to an existing chart by clicking on a triangle that shares an edge with the chart while it is activated. Or you can use this method to combine two existing charts, or to generate the outline of a chart and then fill it in with Flood Fill.
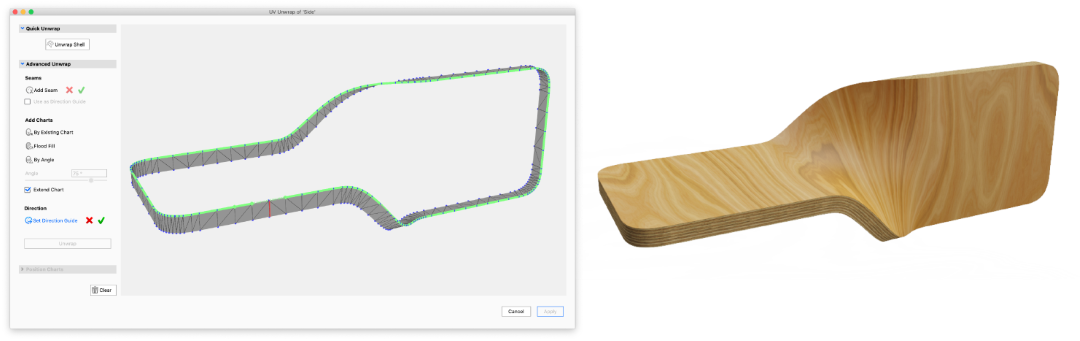
Add a Direction Guide
You can add one or more direction guides to control the direction of the UVs. The direction guide allows you to choose a line in the geometry that will be followed by the U direction. The texture in the example below follows the twisted edge of the plywood thanks to the usage of a direction guide
Unwrap
When you’ve specified all of the charts, seams, and directions you believe are required, press Unwrap. If the entire surface is not covered, KeyShot can generate charts for the remaining triangles automatically. The charts will now have a texture that depicts how the UVs flow on each one.
Position Charts
Once the charts have been unwrapped, they can be adjusted to match each other as closely as feasible. If your component contains a UV mapped texture, you can use the Use Material Texture On UV Charts option to see the part with the texture before applying the new UVs to the object.
Apply
When you’re satisfied with the outcome, click Apply. You can now apply labels, textures, and other effects to the object using the new UV coordinates.
You can always undo the UV map if you aren’t satisfied with it, as long as you haven’t applied the new UVs to the part yet. Otherwise, pressing the Clear button will return the UVs to where they were when the tool was first started.
Ultilize UV Unwrapping with The Professional Cloud Rendering Service iRender
iRender is a GPU-Accelerated Cloud Rendering Service with Powerful Render Nodes: 1/2/4/6/8x RTX 3090. On the basis of the IaaS paradigm, we deliver high computing performance (Infrastructure-as-a-Service). Keyshot Users can easily choose their machines configuration, ranging from recommended system requirements to high-end options, which suit all your project demands and will speed up your rendering process many times.
High-end hardware configuration
- Single and Multi-GPU servers: 1/2/4/6/8x RTX 3090.
- 24 GB vRAM capacity, fitting to the heaviest images and scenes. NVLink/SLI requested for bigger vRAM.
- A RAM capacity of 128/256 GB.
- Storage (NVMe SSD): 512GB/1TB.
- Intel Xeon W-2245 or AMD Ryzen Threadripper Pro 3955WX CPU with a high clock speed of 3.90GHz.
Let’s look at some Keyshot rendering tests on single and multi-GPU (NVLink) servers at iRender.


iRender – Happy Rendering!
The Reference: blog.keyshot.com
Related Posts
The latest creative news from KeyShot Cloud Rendering , Cinema 4D Cloud Rendering , 3D VFX Plugins & Cloud Rendering.