What is the best denoiser in Blender?
Denoising is increasingly popular in speeding up rendering, especially since the introduction of noise reduction features with AI / Machine Learning algorithms. So what is Denoising? When we render with a ray-traced render engine such as Cycles, we send rays from the camera into the scene to gather information. We then use this information to determine the final color of each pixel in the image. With enough rays cast into the scene, we get a fairly accurate image. But if we don’t have enough samples, the data is not sufficient, and we end up with differences in the result between the pixels. This variation comes out as noise or graininess.

Image Source: Artistrender.com
Denoising is looking at the finished render and adjusting the color of each pixel, smoothing out any inconsistencies. There are three denoising methods in Blender:
- Traditional denoising tool (built-in tool of Blender)
- OptiX viewport denoise ( based on NVIDIA GPUs)
- Intel denoise (it does not matter what CPU or GPU we have)
In the scope of this article, iRender will find out the two most popular names in AI / ML denoising tools – the best denoiser in Blender: Intel Denoising and OptiX viewport denoising.
1. OptiX Denoising
You can use OptiX denoising for the viewport. We activate it in the tab Render Properties ➔ Sampling ➔ Viewport Denoising roll-out. Right now the only options are None and OptiX AI-Accelerated.

Image Source: Blender.org
An OptiX-compatible GPU is required for the Optix viewport denoiser. Cycles use NVIDIA’s OptiX ray-tracing renderer to create a more realistic effect. Previously, OptiX only used CUDA technology, but thanks to the generation of RTX cards designed for ray-tracing, it has much better performance. Currently all machines at iRender are equipped with NVIDIA graphics cards from the RTX2080Ti to the latest generation of 30-Series super products including the RTX 3080 and RTX 3090 with up to 24GB of VRAM. Single-card, double-cards and multi-cards configurations are sure to get you the fastest and smoothest results with Cycles.

The first time you start viewport rendering with the OptiX denoiser activated, the render kernels have to be loaded, which may take a while. But once it works, the results are pretty impressive. You only need a low amount of samples such as 16 to already achieve an acceptable result.

Regular Cycles viewport rendering with only 16 samples

OptiX-denoised Cycles viewport rendering with only 16 samples
2. Intel denoising
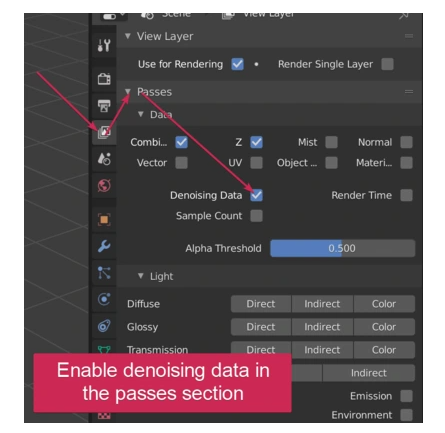
As opposed to Optix used in viewport, Intel denoiser is implemented as a render pass. This means that before we render, we need to enable it so that the necessary data becomes available once the render is complete. We enable it in the view layer tab in the properties panel ➔ Passes➔ Data ➔ Denoising data.
Now you can press F12 to render, and denoising data will be part of your finished render. Alternatively, press Ctrl+F12 to render animation. When the render is complete, the denoise data won’t automatically apply to your finished render. Intel’s OIDN denoiser is only accessible in the Blender Compositor. You access the Compositing workspace at the top and check use nodes in the compositor editor. You will be presented with a render layer node and a composite node. The render layer node will have quite a few outputs. Most of these are added by the denoise data checkbox.
The main benefit Intels denoiser has is that it is hardware independent. Meaning that it does not matter what CPU or GPU we have while OptiX requires your machine an Nvidia graphics card. In case it takes advantage of your CPU, it is well-optimized for multithreaded CPU rendering.
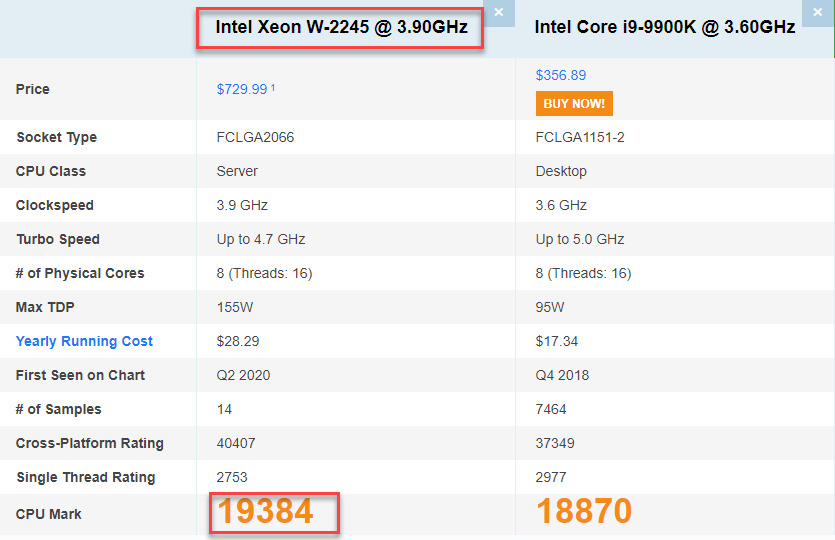
The entire machine of iRender is equipped with CPU Dual Intel Xeon E5 2678 v3 belonging to socket 2011-3 and owning 24 cores 48 threads thanks to Hyper Threading technology. The basic clock speed is from 2.4Ghz and Turbo Boost up is 3.3Ghz (clock speed of all cores is 3.0 Ghz) – which will be the most suitable choice to do render task and far beyond Blender’s optimized requirements.
Final thoughts
As with every denoiser there’s some loss of detail, particularly in the textures, but it’s still a lot better than looking at tons of noise. I hope that through the two best denoiser in Blender above, you have a good choice to use noise reduction and get nice renderings.

If you have any questions, please do not hesitate to reach us via Whatsapp: +(84) 981-868-890. We will be ready to help you in any way! Become a member of the iRender community today to stop wasting pointless hours of rendering. Always at the forefront of cutting-edge graphics technology, we do the rendering, the creativity is yours!
Keep an eye on my blog for more coverage of exciting new Blender features!
Thank you & Happy Rendering!
Related Posts
The latest creative news from Blender Cloud Rendering, Redshift Cloud Rendering, Houdini Cloud Rendering , Octane Cloud Rendering, 3D VFX Plugins & Cloud Rendering.