
Lighting in Octane for Cinema 4D: HDRI (part 2)
From the first part, all the basics of HDRI lighting in Octane for Cinema 4D are covered, now let’s come to the next part of this series, which will introduce us all about using HDRI in the background image.
Compositing
Until now we’ve been using the HDRI for Lighting in Octane, reflections, and the background image, but through a few workflows here, we can pick and choose which of these we want to use.
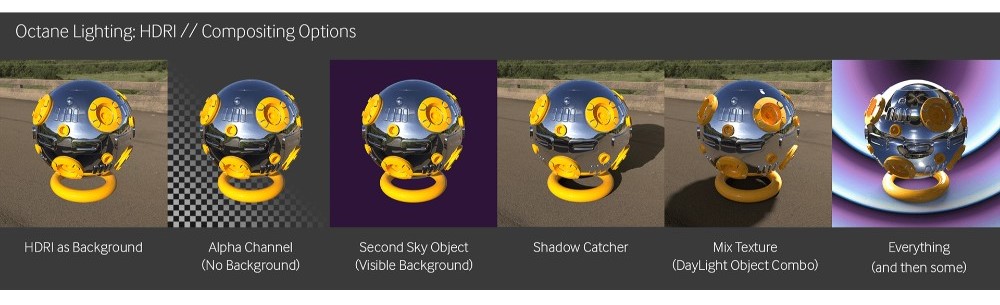
The first image above is the basic setup we already covered. However, it’s just an HDRI image in an ImageTexture node in an Environment Tag on an Octane Sky and the rest of these are a little trickier.
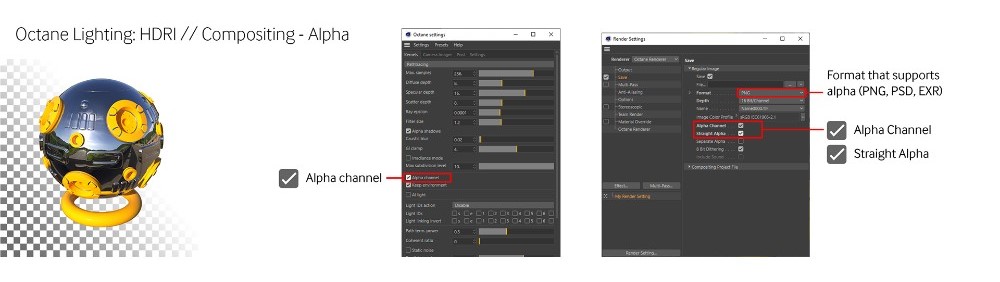
Alpha Background Setup
The first thing we might want to do is wipe out the background altogether and end up with an image (or sequence) that can be placed over anything in the post. For this, in the Octane settings, Alpha Channel needs to be enabled. Meanwhile, the Keep Environment option should generally be left on, but in some cases where the environment bleeds through semi-transparent pixels and it doesn’t look good, that can be turned off.
Then in C4D’s render settings, it’s a good idea to choose a format that supports an alpha channel, like PNG, PSD, EXR or TIFF. If something like JPG is chosen, Octane will automatically create a separate file for each frame that’s just the alpha mask that will need to be composited in the post. When Render to Picture Viewer is chosen, it will still show the background (and have a thin white line around the objects), but when viewed in a post-application (Photoshop, After Effects, etc), it will have a transparent background. Also, note that Alpha affects ALL environments, so if there’s a second environment being used as a Visible environment, that will also be matted out in the final render.
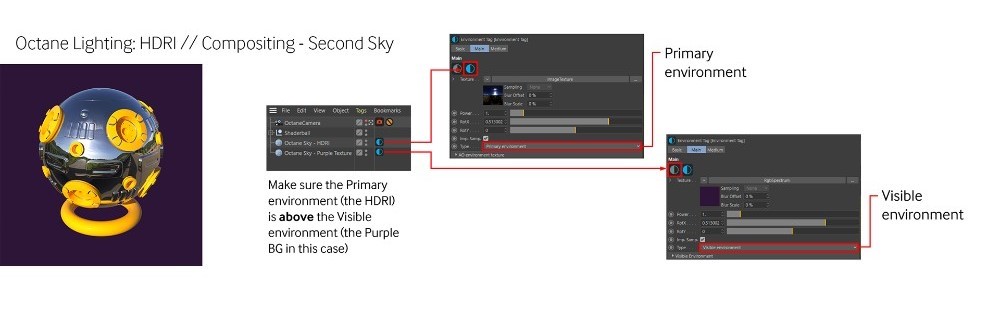
Background Replacement Setup
We can completely replace background with another image, solid color, or gradient. To do this, we need a second Octane Sky by duplicating or getting a new one from the Objects Menu. We need to tell Octane which environment we want to be used for lighting and reflections (Primary environment, default), and which we want as a background image (Visible environment). For the second sky, in Environment Tag options, pick Visible environment from the Type dropdown.
And if we were after a different image for our visible background, we go into ImageTexture node and swap the HDRI with something else. In this case, JPEG or PNG would do better than a .HDR image because we don’t need all the extra exposure data. JPEGs are smaller and less resource-intensive. For a solid color, click the green circle icon under the word “Main” in the Environment Tag for Visible environment. That replaces the ImageTexture node with RGB Spectrum node. Same as choosing “Texture Environment” from Objects menu in the Live Viewer. If we were to look at it in the Node Editor, it would now have an RGB Spectrum node piped into Environment tag instead of ImageTexture node.
Then click the white box in RGB Spectrum section, change it to whatever color. Swap the RGB Spectrum out with a gradient by clicking the little dropdown carat to the left of where it says “RGB Spectrum”, and selecting either a C4D Gradient or in plugins >c4doctane>Gradient. The regular C4D is fine for a quick background, but Octane is more useful for complicated things with the node network. The gradient is tricky because it’s covering the whole sky, so try dragging the gradient knots close together first, and then moving them both to the left or right until it looks right.
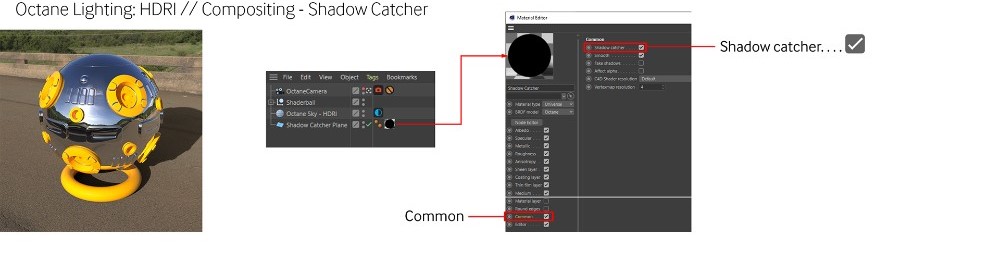
Shadow Catcher Setup
HDRI lights cast shadows from the brightest points in the texture. Until now we haven’t seen that because we just have one object floating in space with a background image behind it. If we were to throw in a plane that our object could sit on so we can get shadows, that would show a shadow, but the plane itself would also show over the top of the HDRI, breaking the illusion. This is where the Shadow Catcher material comes into play. It will hide the geometry of the plane and only show the shadows.
First we need to add a plane under our object and size it up to accommodate the shadows of all the objects in the scene. Next, we have to make an Octane Material (prefer Universal Materials), and apply it to the plane. It doesn’t matter what’s turned on or off in all the channels in this case, so just leave it at default.
Next, we need to go to the Common section of the material and enable Shadow catcher. Now the material will only show shadows, and it will look like the object is sitting on the ground in the HDRI. This trick works best with HDRIs with relatively smooth, flat ground textures like pavement. The shadow will be flat because it’s being cast on a plane, so there won’t be any interaction with, say, a tall grassy material or big cobblestones. If the ground plane is uneven, we could spend some time trying to mimic the contours by using a displacer deformer on the plane, or just rough up the edges of the shadow in post if we’re in a hurry.
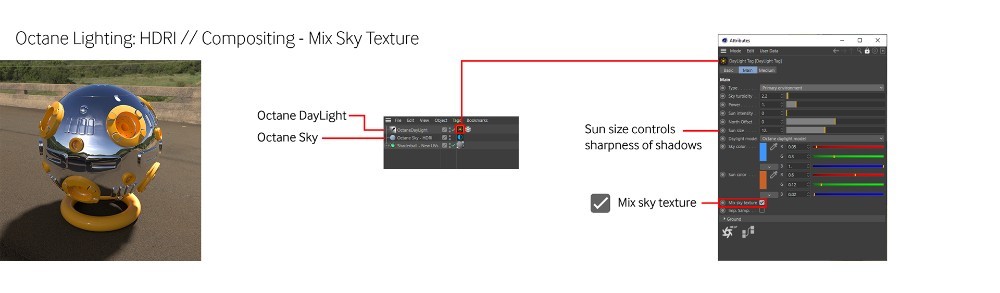
Mix Sky Texture Setup
If we don’t like the shadow quality HDRI Lighting in Octane produces, or we pick an abstract HDRI that we only want to use for reflections but would prefer the shadows and lighting come from another light source. We can achieve this by using an Octane Daylight Rig in conjunction with an HDRI Octane Sky.
The worklow
First, we need an Octane Sky with the Octane Environment tag on it and an HDRI loaded into the ImageTexture tag. Having a plane with a shadow catcher material on it is useful as well to see the shadows. Next, we can drop in Octane DayLight by going to the Live Viewer, and under Objects>Lights, choose Octane DayLight. This makes a C4D Infinite Light with a C4D Sun tag, and also an Octane DayLight tag on it. We can ignore the Sun tag and the Infinite Light settings because what we want to focus on is the Octane DayLight tag. In the DayLight’s tag options, we need to enable Mix sky texture.
After that, we can change the position of the light by simply rotating the Infinite Light around. Rotating the light on the P axis (red handle) makes the sun rise and set (and colors it accordingly) while rotating it on the H axis changes the position of the sun in the sky. B doesn’t do anything. If we want to be physically accurate about it, we’ll need to match the position of the sun’s light source with the one in the HDRI. Above all, the important ones here are the Power which makes it brighter or darker, and the Sun size, which makes the shadows sharper or more diffuse. One interesting trick is that if we use this Mix sky texture method, we can turn the sun’s power to zero, and then use other Octane Lights to light the scene and control the shadows while still keeping the reflections and background from the HDRI. This is essentially using the DayLight rig as an override so we can separate out the lights from the reflections since there’s no option to do this in the area lights themselves.
Conclusion
In conclusion, that wraps this section on HDRI lighting. Hope that with the above basic information, you could have a general overview and a better understanding of HDRI light in Octane for Cinema 4D.
iRender - Best Cloud Rendering for Octane Render
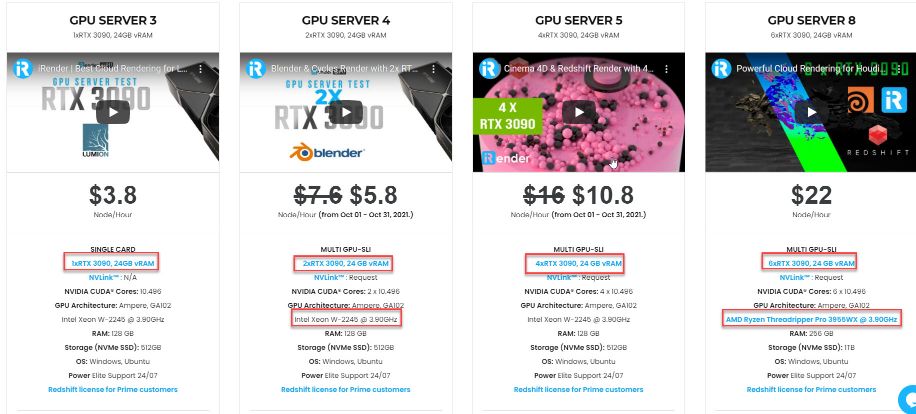
Are having trouble choosing a suitable render farm to speed up your render time with Octane Render? Thanks to our leading technology, and with our diverse and powerful servers including servers with 1/2/4/6/8 x RTX 3090, we help Octane users create high-quality images and videos in the shortest time ever. Moreover, what you need to do is just 5 simple steps including Creating an iRender account, Recharging money, Transferring your files to the remote server, Selecting a package, and connecting to the server then finally Taking full control of the server and doing whatever you want.

Therefore, do not hesitate to become a member of the iRender community today to get FREE COUPON to stop wasting pointless hours of rendering. Always at the forefront of cutting-edge graphics technology, we do the rendering, the creativity is yours!
iRender – Happy Rendering!
Reference source: otoy.com
Related Posts
The latest creative news from Cinema 4D Cloud Rendering , Redshift Cloud Rendering, Octane Cloud Rendering, 3D VFX Plugins & Cloud Rendering.


