
Understanding basic Octane lights for Houdini: Other lights
In part one of the article about Understanding basic Octane light for Houdini, we have explored three Environment lights. In this part, we continue to dive into more Octane lights for Houdini, which are Octane Light, Octane Toon Light, Mesh Emitter and Spectron Light.
Other Octane lights for Houdini
1. Octane Light
The Octane Light provides a light source object for quick lighting setups, and it doesn’t require adding new geometry and materials. This object produces geometry and material for render and makes light setup much easier.
An Octane light can be added to a scene from the Octane shelf.

An Octane Light has three parameter tabs: Transform, Light, and Shader.
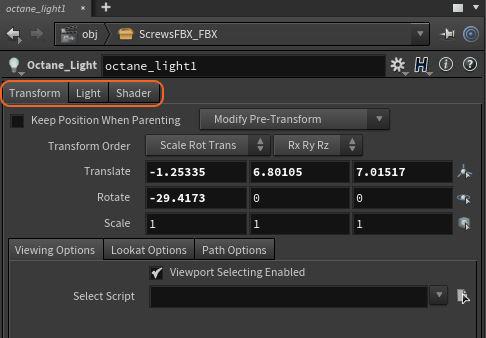
Let’s see what’s inside the three tabs:
Transform Tab Parameters
-
-
-
- Translate/Rotate/Scale – Determine the position and orientation of the light source in the scene.
- Viewing/Look At/Path Options – Contain parameters for constraining a light source via a script, a path, or another object.
-
-
Light Tab Parameters:
-
-
-
- On – Specify whether or not the light source is active.
- Enable In Viewports – If enabled, the light source illuminates the Viewport, providing an approximation of how a light source illuminates the scene. However, having the Octane Lights illuminate the Viewport can result in a dark Viewport, making in-Viewport editing difficult. In this case, you should disable this option to allow Houdini to return to default Viewport lighting.
- Light Type – Provide various light shapes (Quad, Circle, Sphere, Torus, Tube, Spotlight).
- Orientation – Change the direction in which the light source is oriented.
-
-
Shader Tab Parameters provides various sub-tabs for light options.
-
-
-
- Main – Provide options for choosing between a Blackbody Emission and a Texture Emission for the light source, also general options such as the color of the light source and light opacity.
- BlackBody Emission – Provide options related to the BlackBody light type.
- Layer Settings – Manage light sources via object layers. Provide a Camera Visibility and Shadow Visibility option allowing a light source to illuminate but stay invisible to the render camera.
-
-
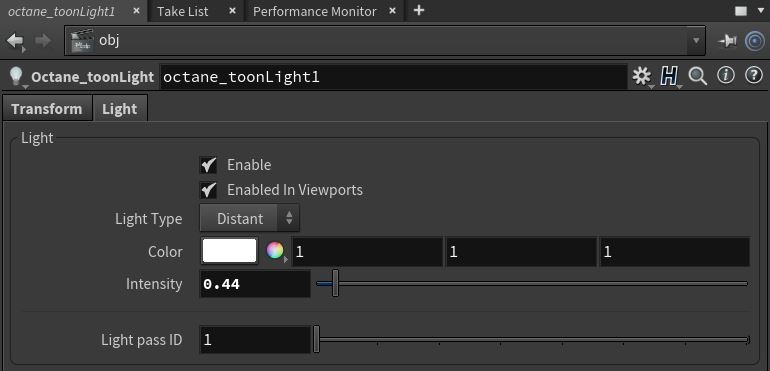
2. Octane Toon Light
You can use the Toon Light with Toon materials.
It has two parameter tabs. The Transform tab provides access to data related to the position and orientation of the light source. The Light tab provides access to Light Type, Color, Intensity, and Light Pass ID.
3. Mesh Emitter
If you want to use Mesh as a light source, applying a Diffuse, Universal, or Standard Surface material to the Mesh is needed. The material’s Emission parameter offers two different options for creating light-emitting materials: BlackBody and Texture.
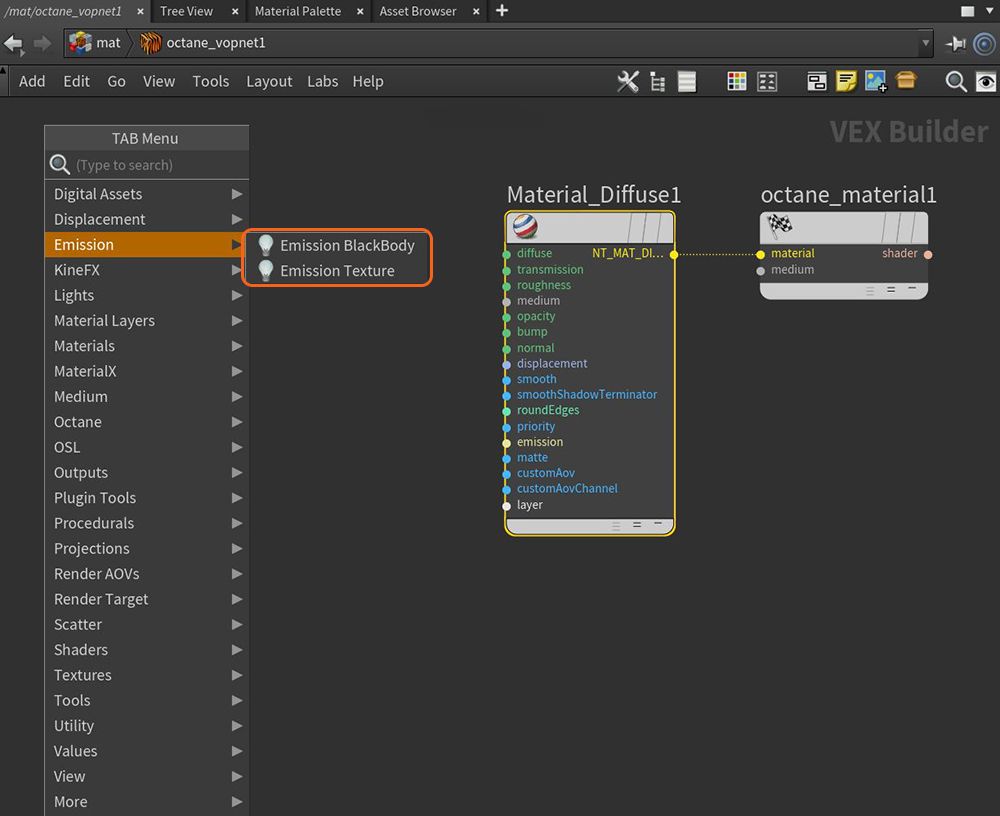
BlackBody Emission will use Color Temperature (in Kelvin) and Power to control the light’s color and intensity. While Texture Emission will allow any valid Texture type to set the light intensity. This creates effects such as TV screens by using a TV image texture as the source.
Most of the emission parameters between Texture and BlackBody emissions are similar, with the exception that the illumination color comes from the Blackbody’s Temperature parameter or from the Texture emission’s Texture parameter color.
Texture – Set the light source’s efficiency.
Power – The light source’s wattage. You should set each light in the scene to its real-world wattage. This power is multiplied by the Texture input, where 1.0 means 100% of the power.
Surface Brightness – If enabled, Power specifies the surface brightness, and not the total emitted power. This is useful when the emitter’s brightness is independent on the surface area. Enabling this option causes emitters to keep the surface brightness constant, independent of the emitter surface area.
Keep Instance Power – Enabling this option with Surface Brightness disabled and Uniform Scaling applied to the object causes Power to remain constant.
Double Sided – Allow emitters to emit light from the front and back sides.
Temperature (Blackbody Only) – The temperature (in K) of the light emitted by the BlackBody emission.
Normalize (Blackbody Only) – Ensure all the normal vectors have the same length for the BlackBody emission in order to keep the emitted light’s luminance from a BlackBody constant if the temperature varies.
Distribution – Control the light pattern. It can be set to an image (Greyscale or RGB) in order to load an image texture or IES file. Then the Image texture’s Projection map adjusts the light’s orientation or direction.
Sampling Rate – Choose what light sources receive more samples.
Light Pass ID – ID of the light pass that captures the emitter’s contribution. It works in conjunction with the Light Pass ID Render Element.
Visible On Diffuse – Enable light source visibility on diffuse surfaces. Illumination or shadows could be casted on diffuse objects if you use Black Body or Texture emission light sources. Therefore, disabling this option disables emission – it’s invisible in diffuse reflections, but is still visible on specular reflections. It’s also excluded from the Direct light calculation.
Visible On Specular – Enable the light source’s visibility on specular surfaces, and hides emitters on specular reflections/refractions.
Visible on Scattering Volumes – Enable the light sources’ visibility on scattering volumes.
Transparent Emission – Light sources cast illuminations on diffuse objects, even if the light source is on transparent material.
Cast Shadows – Enable light sources to cast light and shadows on diffuse surfaces, letting you disable direct light shadows for Mesh emitters. To make this option work, the Direct light calculation must include the emitter (the sampling rate must be greater than 0).
4. Spectron Light
If you want to create procedurally-driven volumetric lighting – like spotlights – with blockers, barn doors, gels, etc, Spectron is a procedural lighting system for you. You can use Spectron for quick volumetric effects and spotlight generation.
Some parameters of Spectron Light
Transform Tab
-
-
-
- Keep Position When Parenting – Keep light source’s translation values when parenting to another object in the scene.
- Translate/Rotate/Scale – Determine the position and orientation of the light source. Scale has no renderable effect on the light source
-
-
Light Tab
-
-
-
- On – Toggle the light source.
- Enabled in Viewports – Determine whether the light source illuminates objects in the viewports.
- Light Types – Determine the shape of the light source.
- Shader Path – The path to the shader used for the Spectron light.
-
-
Spotlight Tab (If Spotlight is selected as the Light Type)
-
-
-
- Throw Distance – Determine the volumetric distance of the light source.
- Cone Width – Set the radius of the volumetric code of illumination.
- Barn Doors – Set the shape of the barn door effect using various parameters here.
-
-
Scattering Tab
-
-
-
- Density – Increase the absorption density.
- Volume Step Length – Adjust this parameter depending to the volume size. The default value is 4. If the volume is smaller than this, you need to decrease this value and it will decrease the render speed. If you want to increase the value, it causes the ray marching algorithm to take longer steps. If the Volume Step Length exceeds the volume’s dimensions, then the ray marching algorithm takes a single step through the whole volume. To get the most accurate results, keep Volume Step Length as small as possible.
- Volume Shadow Ray Step Length – Step length that is used by the shadow ray for marching through volumes.
- Use Volume Step Length for Volume Shadow Ray Step Length – Check box for using the Volume Step Length for the Volume Shadow Ray Step Length as well.
- Absorption – Determine the absorption value of the volume where 0 (black) means that there is no absorption. Values greater than zero determine how quickly the medium absorbs white light.
- Invert Absorption – Inverts the absorption value allowing the specified absorbed color to be the actual color that is visible.
- Scattering – Determine how fast light scatters as it moves through the surface. High values scatter light faster as it enters the surface, and low values pass light deeper into the surface before it scatters. A value of 0 disables scattering. When using a float or grayscale texture, values greater than 0 determine how fast the light scatters.
-
-
Emission Material Tab
-
-
-
- Diffuse, Opacity, Shadow Catcher, and Double Sided parameters do not have any effect on the light source. These parameters are left over from the default Diffuse material.
- Light Color – Determine the color of the light source.
- Surface Brightness – Enable this will affect the brightness of the light.
- Power – The overall brightness of the light source.
- Sampling Rate – Indicate how often the light source should be sampled.
- Light Pass ID – ID of the light pass that captures the emitter’s contribution. It works in conjunction with the Light Pass ID Render Element.
- Visible On Diffuse – Enable light source visibility on diffuse surfaces. Illumination or shadows could be casted on diffuse objects if you use Black Body or Texture emission light sources. Therefore, disabling this option disables emission – it’s invisible in diffuse reflections, but is still visible on specular reflections. It’s also excluded from the Direct light calculation.
- Visible on Specular – Enables the light source’s visibility on specular surfaces, and hides emitters on specular reflections/refractions.
- Cast Shadows – Enables light sources to cast light and shadows on diffuse surfaces, letting you disable direct light shadows for Mesh emitters. To make this option work, the Direct light calculation must include the emitter (the sampling rate must be greater than 0).
- Transparent Emission – Light sources cast illuminations on diffuse objects, even if the light source is on transparent material.
-
-
iRender - Fastest rendering service for Octane
The article sums up the basic knowledge of Octane light for Houdini for you. Hope it helps you in your studying of Octane.
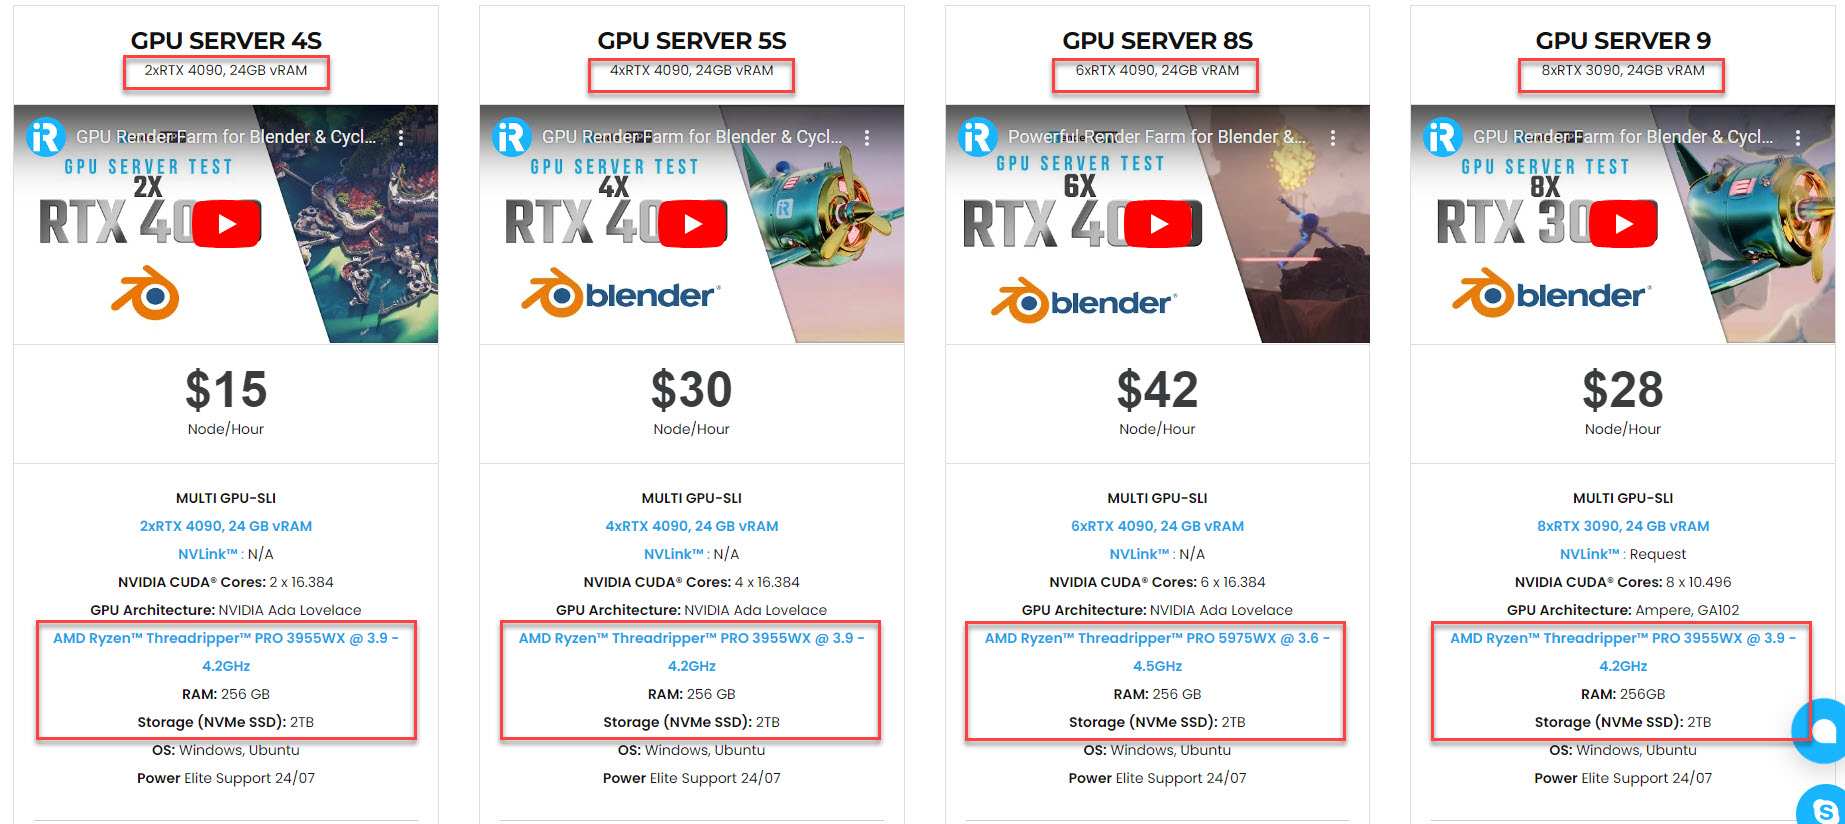
iRender is always up to date with the newest technology. That explains our releasing of new servers with RTX4090s from 2022.
As Octane can scale up linearly when you use a multiple GPUs system, we choose to invest in our multiple RTX 4090s like 2/4/6 x RTX 4090s. These servers can serve your project from simple to complex ones.
We are not only providing you the most powerful graphics card, but also the same level of hardware, such as AMD Ryzen Threadripper processor, 256 GB RAM, 2 TB of storage (NVMe SSD).
A processor is a very important factor because if you are also using Octane with some program like Cinema4D, Houdini, or Maya, Blender – then a CPU with a high clock speed will bring you good performance for modeling or animation. Moreover, high frequency will ensure that the system is very responsive with low loading times, and users will experience snappy viewports. Additionally, our testing has shown that a CPU clock speed can directly affect GPU performance. Therefore, iRender has changed from an old processor to a Threadripper one.
With the most powerful hardware and 24/7 live support, you can experience the newest card and enjoy working smoothly in a customized pipeline like you have always done with your own PC.
Don’t hesitate to register right now to render on our servers RTX4090s. You just need to update the latest NVIDIA studio driver to get the best out of it. Contact us via Whatsapp (+84) 916806116 for more support.
Happy rendering!
Source and images: otoy.com
Related Posts
The latest creative news from Octane Cloud Rendering, Houdini Cloud Rendering


