Understanding Noise in Redshift for Faster Rendering
As we all know, “Biased” renderers allow users to specify the quality (‘num samples’) of effects such as glossy reflections, brute-force GI, AO and so on. This level of control is both a strength and weakness of biased rendering.
It’s a strength because the human eye is much better at determining if a particular object/material/light is more visually important and can afford more computational effort (more samples) to get it to look clean. For this reason, proper adjustment of the various ‘num samples’ parameters can produce cleaner results in less time than on renderers that don’t allow that level of control. However, that level of control is also a weakness because the artist has to spend time tweaking the ‘num samples’ settings. Even worse, sometimes users may increase the ‘num samples’ of the wrong effect which can make rendering longer while not providing any visual benefit.
For this reason, it’s important to understand the different possible types of noise that exist in Redshift and know which settings to tweak to produce clean results. Noted that this document deals with ‘final rendering’ noise. It doesn’t cover noise of point-based techniques such as SSS, caustics, irradiance cache or irradiance point cloud.

The different types of noise
Any computer graphics effect that requires the shooting of multiple rays (‘samples’) is prone to noise.
These effects are the following:
- Area lighting (shadows)
- Ambient occlusion
- Glossy reflection and refraction
- Brute-force GI
To improve noise on individual lights, you need to increase the “num samples” area lighting parameters of the light responsible for the noise. Typically, the larger the area light, the more samples it will need to produce clean shadows. But size is not the only concern: a light might be small but casting long, soft shadows. In this case, it also needs more samples. Generally speaking, lights producing large shadow penumbras might need 128-256 samples or even more.
To improve noise on ambient occlusion, you need to increase the “num samples” of the AO shader node, per-material. The AO feature of the architectural shader also has a “num samples” parameter. The stronger the AO effect is (based on distance, spread, etc.) the more samples it needs. 64-128 samples are often sufficient to get clean results.
To improve noise on glossy reflections/refractions, you’ll need to increase the appropriate ‘num samples’ of the shader node, per-material. Typically, the lower the glossiness (i.e. the softer the reflection/refraction), the more samples you’ll need. Also if the environment contains very bright lights and reflections, you might also need higher ‘num samples’ too. Low-gloss, high-contrast scenes might require large values such as 256 or even 512.
A few examples
The advice of ‘increase num samples when you see noise’ is not very useful if you cannot tell which effect is responsible for that noise. While this typically comes with experience, we’ll attempt to visually demonstrate the different types of noise so you have some idea what to expect.
Given that depth of field and motion blur can also introduce noise, it is recommended that you disable them while adjusting ‘num samples’ for things like glossy, AO, GI, etc.
While adjusting ‘num samples’ of various effects it is recommended that you use low, fixed rate unified sampling. Set unified sampling’s min/max samples to a value like 16. Please read the ‘unified sampling’ documentation for more details.
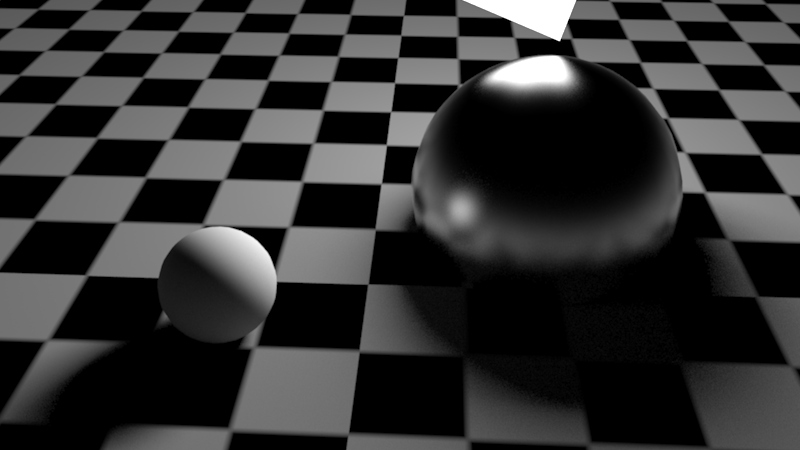
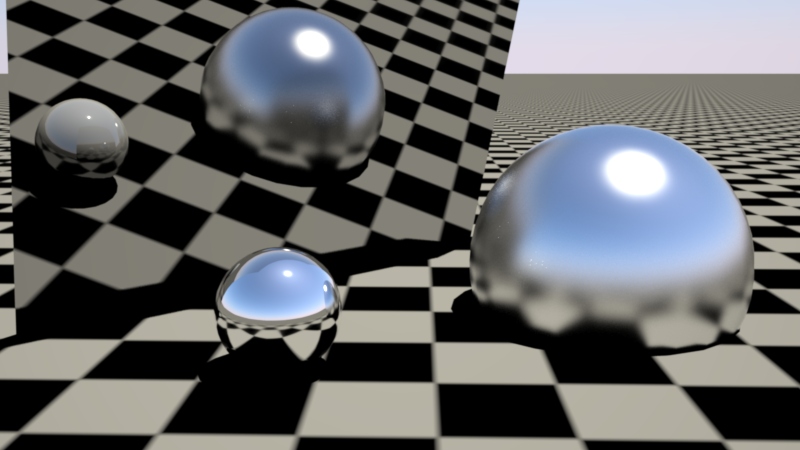
Area lighting and glossy reflections
The scene shown below demonstrates area lighting and glossy reflections. The left sphere is purely diffuse while the right sphere is purely reflective. GI is disabled. The scene is using default settings. The default area light samples are 16 and default glossy reflection samples are 8. As it can be seen, these default settings are not enough to obtain a clean result.

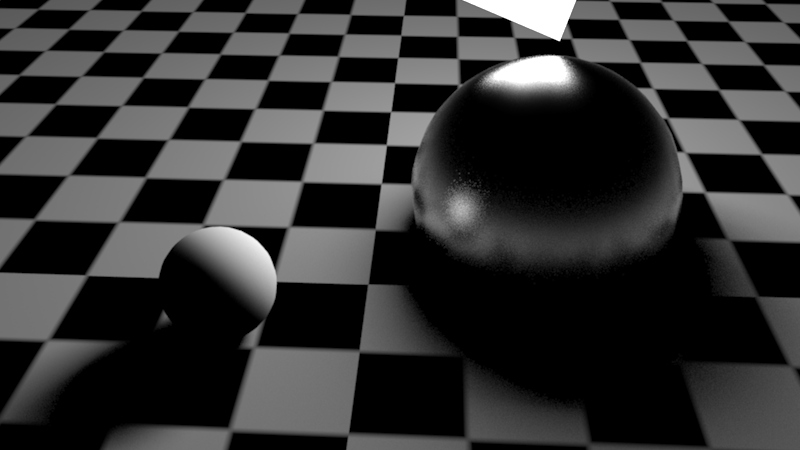

If the reflection of an area light looks noisy on reflective materials, try increasing both the area light samples as well as the material’s reflection samples.
Portal lights also have ‘num samples’. If you are rendering an indoor scene and are using portal lights, the noise you see might be because of the portal lights, not GI! Because portal lights are usually big area lights, they may need a fairly high number of samples.
Brute-Force GI noise
You will typically see brute-force GI noise on the parts of the scene that is not directly ‘seen’ by lights, such as the dark sides of objects.
If brute-force GI is enabled for our test scene, the default setting (16 rays) produces noise underneath the diffuse sphere.

Avoid using brute-force GI for both primary and secondary GI engines. Especially on indoor scenes, using the irradiance point cloud as the secondary GI engine can help produce clean results much faster than using brute-force as the secondary engine.
Fireflies
Fireflies are a type of noise that can occur when a small percentage of rays are unlucky enough to sample extremely hot light sources, when most of the rays do not. They can also occur when a rough surface reflects or refracts an extremely hot source and there are just not enough rays to get a smooth result. Cranking up the number of rays to get a smoother result may help, but for low gloss reflections/refractions the results may actually appear worse, because the probability of the rays hitting the extremely hot source will have increased. You may find you need many thousands of rays to get a smooth result, which can dramatically impact performance.
Thankfully, there are a couple of fairly cheap solutions available to help solve this problem.
Max Secondary Ray Intensity
This technique, while not physically correct, is the most effective at reducing firefly noise and requires no set up time. It works by limiting the brightness of secondary ray samples (reflection/refraction/GI), i.e. the results of lighting and reflections/refractions when seen through secondary rays. By limiting the brightness, fewer rays are needed before they average out to give a smooth result.
The two examples below show the same scene as above, but with a hot sun light and a mirror to demonstrate any changes in reflections.

Lower values for ‘Max Secondary Ray Intensity’ do a better job of mitigating fireflies, but result in more energy loss.
The ‘Max Secondary Ray Intensity’ value works in conjunction with Redshift’s photographic exposure ‘allowed overexposure’ setting. An aggressive ‘allowed overexposure’ value (such as 0.0) means that low values (such as 1.0) should be used for ‘Max Secondary Ray Intensity’, otherwise you will still get fireflies! If you need to preserve high intensities on your highlights, you should avoid very low ‘allowed overexposure’ values (e.g. below 0.2), which in turns allows for higher ‘Max Secondary Ray Intensity’ values such as 2.0, 3.0 or higher to be used.
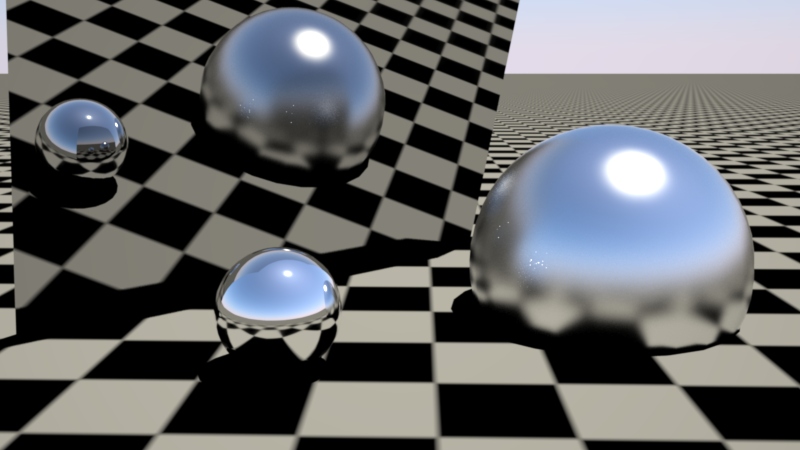
Ray Switch Shader
The ray switch shader can be used to change the appearance of an object through reflections/refractions, by allowing you to define a different material for different ray types. By simply cloning the shader graph for the material and toning down the reflection strength, you can reduce fireflies. While this is a more manual process, it usually results in even greater energy loss compared to using ‘Max Secondary Ray Intensity’ since the overall reflection intensity is being reduced, whereas ‘Max Secondary Ray Intensity’ is simply clamping individual secondary rays which are above a certain intensity.
In the example below, the small sphere which was causing the fireflies in the fuzzy, larger sphere has a ray switch shader applied to it, with the reflection component manually toned down to reduce the brightness of the specular sun reflections. While this has effectively cut the fireflies from the fuzzy sphere, the consequence of the toned down reflection are very visible in the large mirror.
Above are some features, tips, and example to use Noise in Redshift for designers. As we all know, redshift is one of the most powerful rendering engines that can take advantage of multi GPU cards. However, in spite of having in hand this wonderful rendering engine, designers still cannot make full use of this engine because of their slow performance PC, or in case you have a deadline and need much more power to finish your project as soon as possible. Understand these concerns, let’s come to our next part, we will reveal to you what wonderful things you can get once choosing our render farm to render your redshift projects.
Why choose iRender to render your redshift projects?
Free redshift license for Prime customers
Yes, exactly! iRender provides the Redshift license to Prime customers. Users who recharge enough points to become Prime customers will be able to use the Redshift license without usage or maintenance costs. You can fully read the manual and benefits of using the Redshift license provided by iRender here.
Powerful hardware
iRender provides 4 types of multi-GPU-servers (6x GeForce RTX 1080 Ti/ 6x GeForce RTX 2080 Ti / 6x RTX 3080/ 6x RTX 3090) which are the most effective for Redshift rendering in multi GPU cards coming with the following configuration specifications:
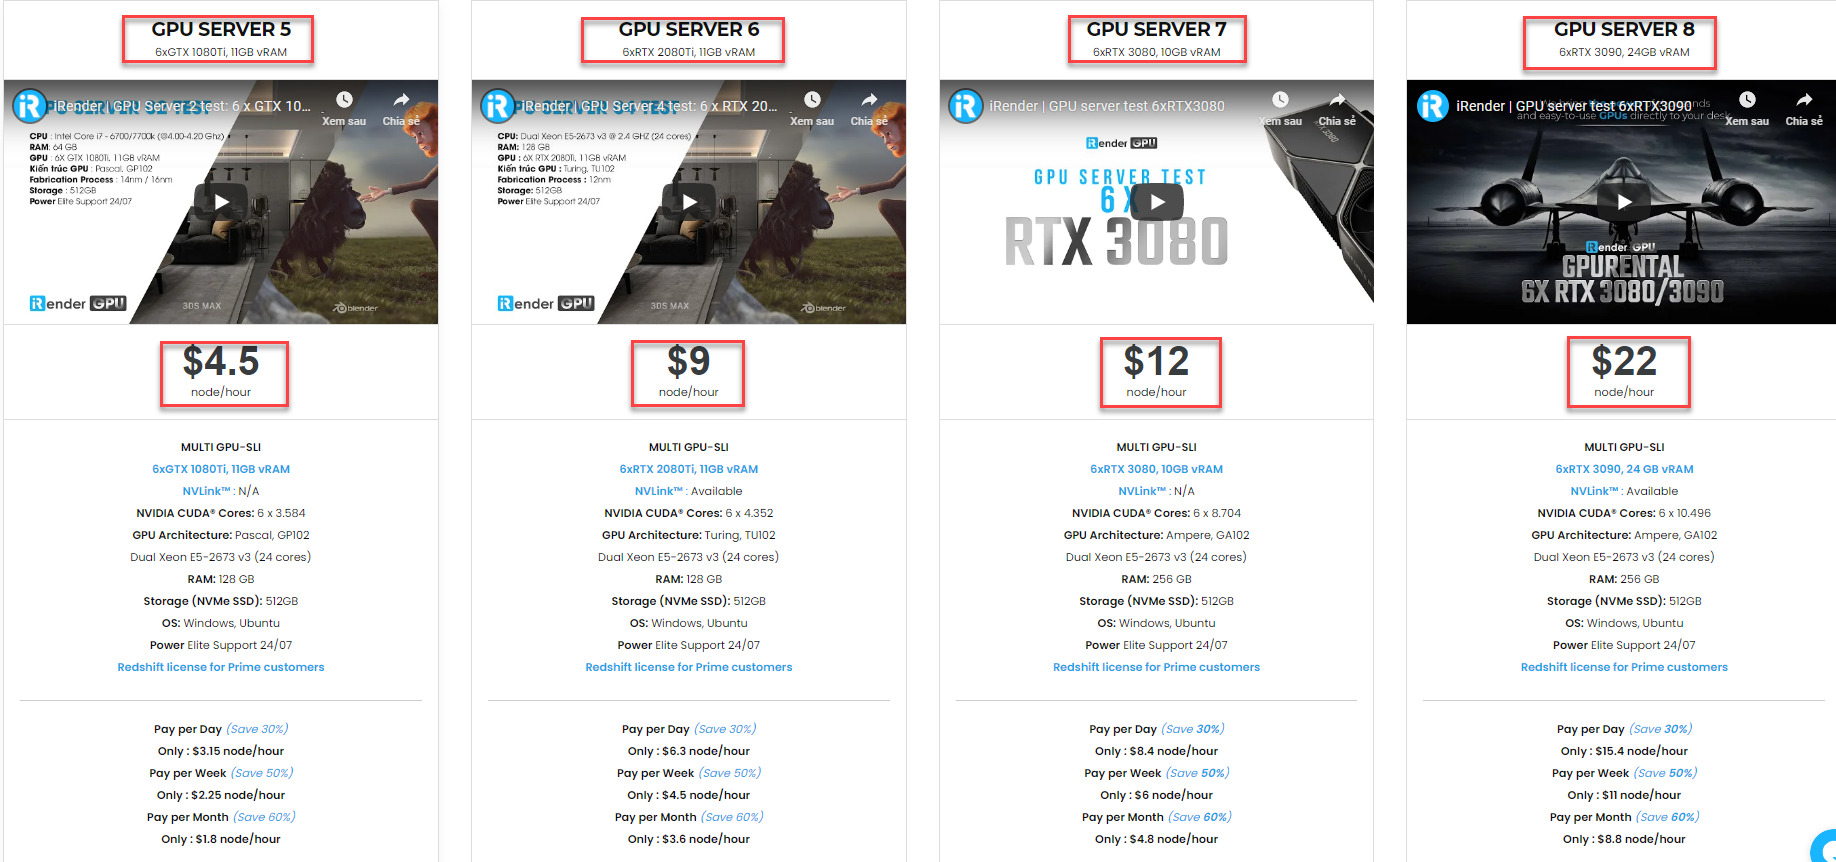

The servers’ configuration of iRender not only surpasses the minimum hardware requirements of Redshift, but it also exceeds the recommended requirements above:
- Redshift supports multi GPUs on one machine, increasing rendering performance multiple times. This is one of the main reasons we recommend these 4 packges for designers to have flexible choice based on their budget and time.
- These package uses Nvidia GPU cards with a VRAM capacity minimum from 11GB up to 24 GB, which completely exceeds the Redshift recommendation of an Nvidia GPU with CUDA compute capabilities 7.0 and 8GB VRAM capacity or higher.
- A RAM capacity of 128GB (server 5, 6) and 256 GB (server 7,8) is many times higher than recommended.
- The Dual Xeon E5-2673 v3processor has also completely met the CPU requirement from Redshift. Although Redshift mainly depends on GPU performance, some processing stages that occur during post-processing also depend on the performance of CPU, disk or network drive. These include extracting mesh data from your 3D application, loading textures from disk, and preparing scene files for GPU. Depending on the complexity of each scene file, these processing stages can take a considerable amount of time, and as a result, lower-end processors can bottleneck overall rendering performance. Thus, CPU is also considered as one of the criteria that cannot be ignored.
- In terms of operating system, iRender currently provides services with two operating systems: 64-bit Windows 10and 64-bit distribution Ubuntu 18.04.5 LTS with glibc 2.27, ensuring the recommended operating system that Redshift offers.
We have tested rendering on all 4 servers to give you a better overview of the power of each server. Please watch through the video below:
Let’s take a look at Redshift benchmark table when rendering in iRender’s 4 cards packages:
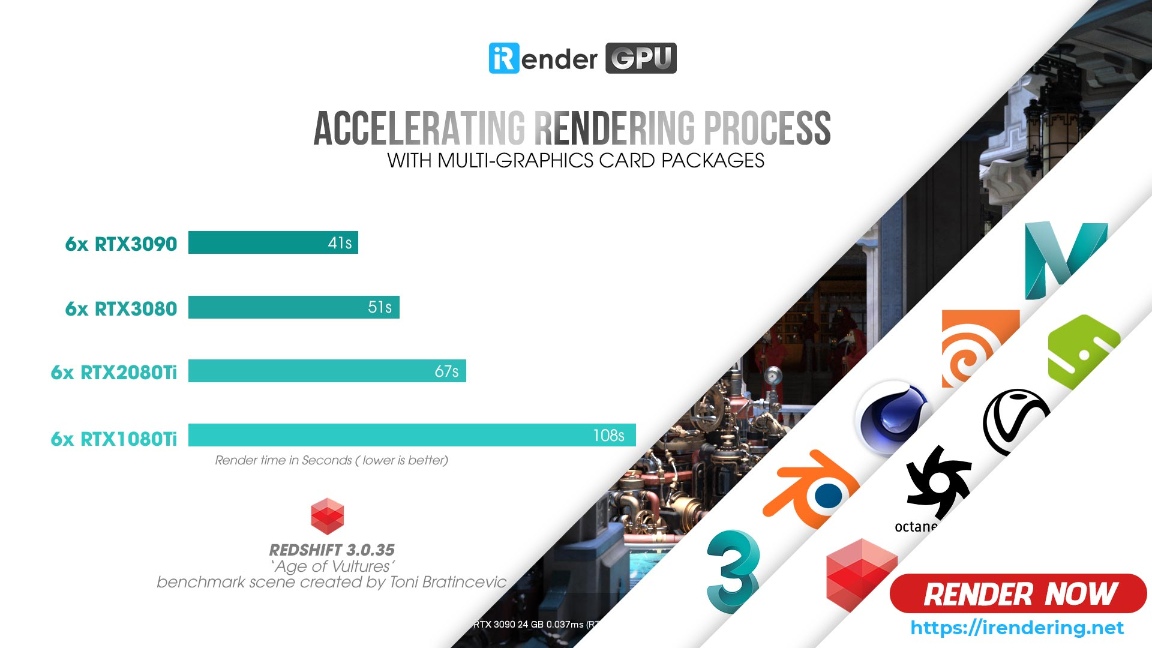
To sum up, using redshift to render your Houdini projects is fast, using iRender’s 6-card GPU servers is definitely a lot faster. These servers are the ultimate online solution for rendering allowing up to multiple, powerful 6x GeForce RTX 1080 Ti/ 6x GeForce RTX 2080 Ti / 6x RTX 3080/ 6x RTX 3090 GPU. These servers are the premier solutions to maximize your advantage when you need it most – to win the project, to meet the impossible deadline, or pivot your visual direction with unparalleled speed. Depending on your budget and your time, let’s pick one server to experience new level of rendering.
Deeper discount with Fixed Rental
You will be charged on a per-minute basis. Depending on the type of server you choose, we will issue you an invoice once you shut down the servers, so that you will control your balance easily.
The hourly rental option is always available for you to choose. However, you can always save from 30% to 60% with our Fixed Rental feature. For those who’re in need of a server more than a day, or have an extremely large project, we advise to choose a daily/ weekly/monthly rental package. The discount is attractive (30% for daily packages, 50% for weekly, and 60% for monthly packages).
We accept payment through PayPal, Stripe, bank transfer, or credit card. And of course, we sometimes provide promotions for customers on special occasions. Staying connected with us to keep updating these programs.
Real human support 24/7
Users can access to our web-based online platform and using multiple nodes to render at the same time. Hence, with us, it does not matter where you are present – as long as you are connected to the internet, you can access and enjoy the 24/7 rendering services that we provide, and if you meet any issue, our real human 24/7 support team is always ready to support you.
Conclusion
iRender hopes you can clearly noise in Redshift for Faster Rendering. Besides that, iRender is on the way to become the best render farm service nowadays. Thanks to our leading technology, we help users create high-quality images and videos in the shortest time ever and minimize the rendering time
With the above advantages and the machine configuration package that iRender are offering, we believe that designers will have the most comfortable, quickest, and most effective rendering time with Redshift.
So, do not hesitate anymore, let’s HERE to get FREE COUPON to test our GPU servers and reach a new level of cloud rendering.
iRender – Happy Rendering!
Source: Redshift documentation
Related Posts
The latest creative news from Redshift Cloud Rendering, Cinema 4D Cloud Rendering , 3D VFX Plugins & Cloud Rendering.