Ways to Speed Up Rendering in Blender with View Regions
If you’re in Blender’s rendered shading mode and have highly complex objects and materials in the 3D viewport, you may notice that your machine’s performance takes a bit of a dive and the visualization process is substantially slower. If you’re only interested in rendering a specific area, how do you go about disabling all other unnecessary calculations, regarding the background or other irrelevant objects, that slow down the viewport and your workflow. This is where Blender’s View Regions tools come into play.
Blender’s View Regions Tools
Blender’s View Regions allows you to set the limit of the 3D view display in the 3D viewport. This is helpful when designing complex models and scenes, because it limits how much of an element is seen or calculated. You can choose to render a selected region within the viewport instead of all of it, which is particularly helpful when you want to quickly render a specific area to preview changes to the model or scene. Blender comes equipped with three separate View Regions tools: Zoom, Clipping, and Render.
Zoom Region
The Zoom Region tool allows you to specify a rectangular region and zoom into it so that only the designated region can be viewed in the 3D viewport. You can achieve this by using the Shift+B shortcut, then clicking the left mouse button and dragging the rectangle to create the zoom region. Alternatively, you can zoom out of the image using the middle mouse button.
Clipping Region
When the Clipping Region tool is applied, only what is inside the region that you have designated will be visible. Other tools such as paint, carving, sorting, and transforming photography will disregard the geometry outside the boundaries of the designated region. The Clipping Region will not simply be a flat rectangular region, it will actually create a volume: Rectangular pyramid volume (infinite length) if the view is in perspective. Right-angle parallelepiped volume (unlimited length) if the view is orthographic. You can activate the tool with Alt+B or by using the View menu and locating Clipping Region in the View Regions submenu. This will produce a crosshair cursor. Using the left mouse button, click and drag to create a rectangle, which will define the region of the space to be clipped within the 3D space. You may notice that the object in your scene is no longer visible or “clipped.” You can still use navigation tools as usual to zoom and change the angle of the scene in the viewport, but you will notice that only the inside of the Clipping Region’s designated volume is visible regarding your object. All editing tools also work as usual within the designated region.
Render Region
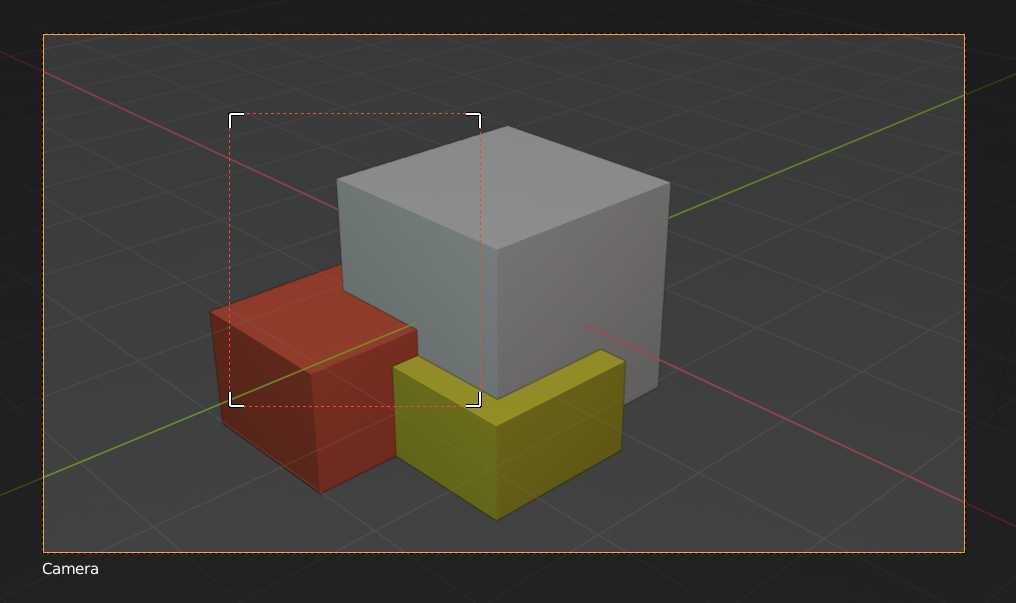
Finally, with the Render Region tool, you can render a specific area of the 3D view, allowing for easier editing of heavy calculations. You can achieve this by using the Ctrl+B shortcut, once again clicking and holding the left mouse button and dragging the rectangle to create the region. When setting the viewport shading mode to Rendered, it will only calculate the information inside the designated render region, which should have the effect of decreasing rendering time. When working on a complicated scene, you can isolate geometry or complex elements and limit the calculations needed to render in the viewport. For designers with slower workstations and extremely large files, this can be very useful. Pressing Ctrl+Alt+B, or selecting Clear Render Region in the View Regions submenu in the View menu will disable the region. This can also apply to renders through the lens of your specified camera. Rendering your final render can also be confined to your designated region as well. In the Dimensions submenu within the Output Properties tab, you will find the Render Region and the Crop to Render Region options. Enabling the Render Region option will render the region and a transparent background. If you don’t want a transparent background, enabling the Crop to Render Region option will render only the dimensions of the region.
Animated Render Border Add-on
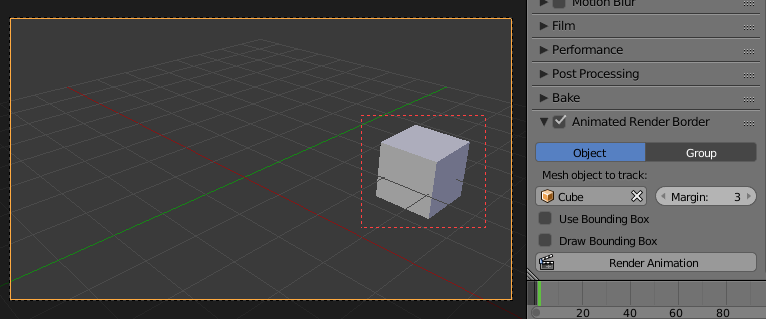
Render Region is a great way to maximize your computing power and focus on a specific element in a scene, and it’s great for workflows when making single still images but not so much if you’re working on an animation where an object of interest is moving around on the screen. Ray Mairlot has created a really useful add-on that’s helpful for rendering animations in designated render borders called Animated Render Border. The add-on claims to make the designated render region adaptive so that it updates its location and size every frame in the scene’s timeline to always track a specified object, collection of objects, or even keyframe positions, focusing your renders on just a specific part of an image in motion.
The Professional Cloud Rendering Service For Blender
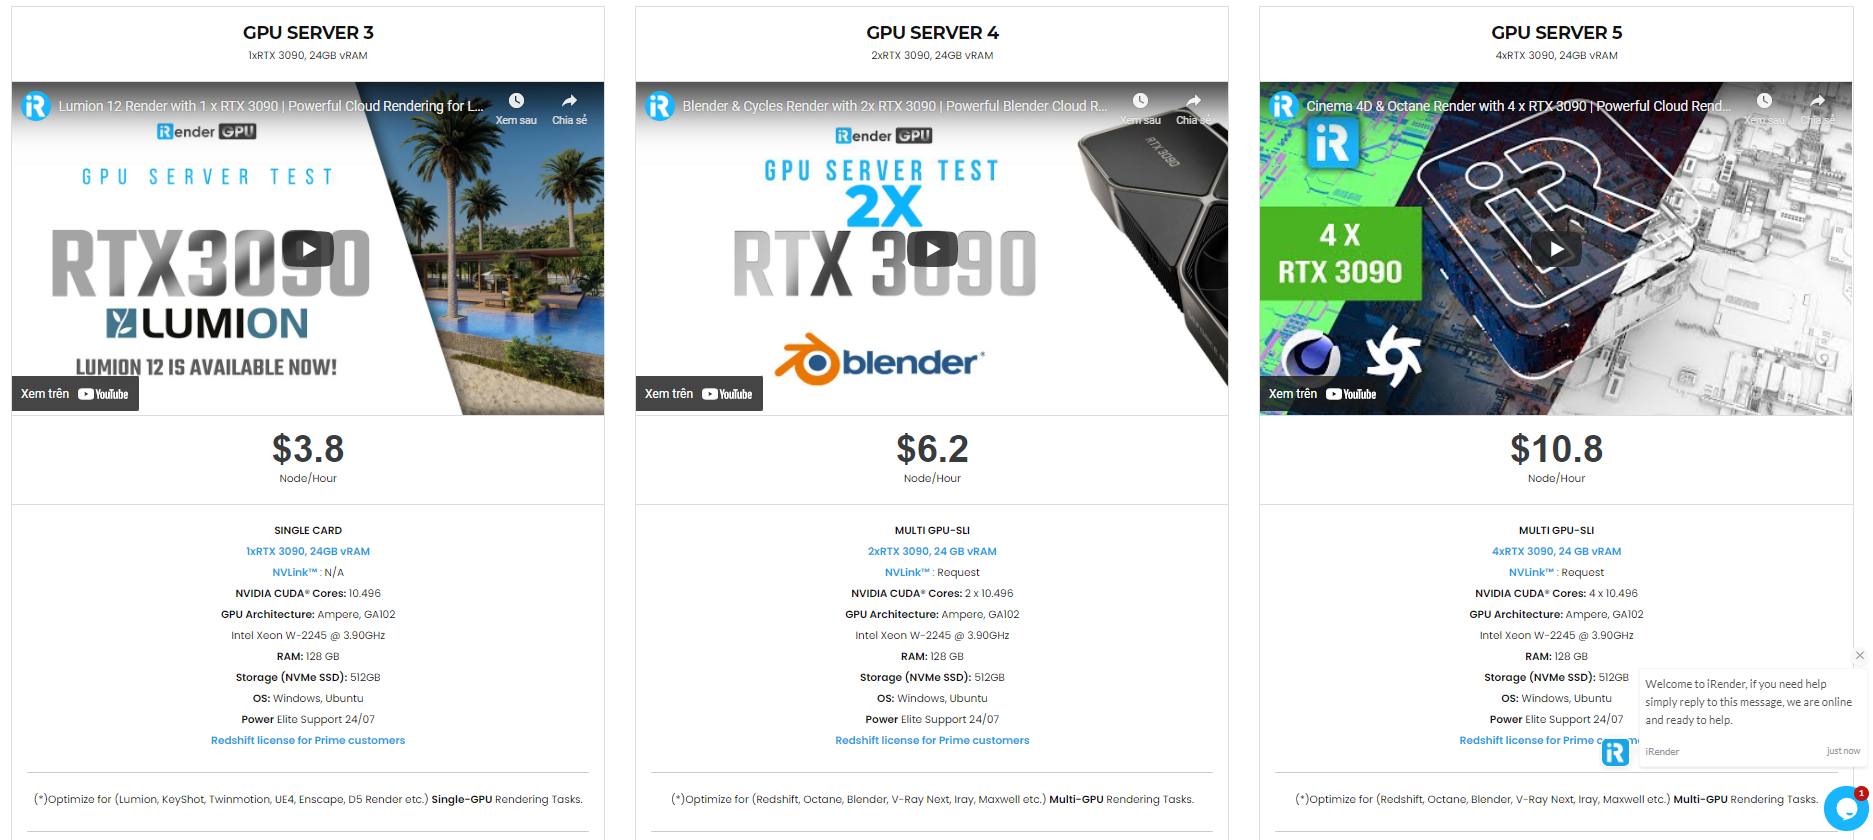
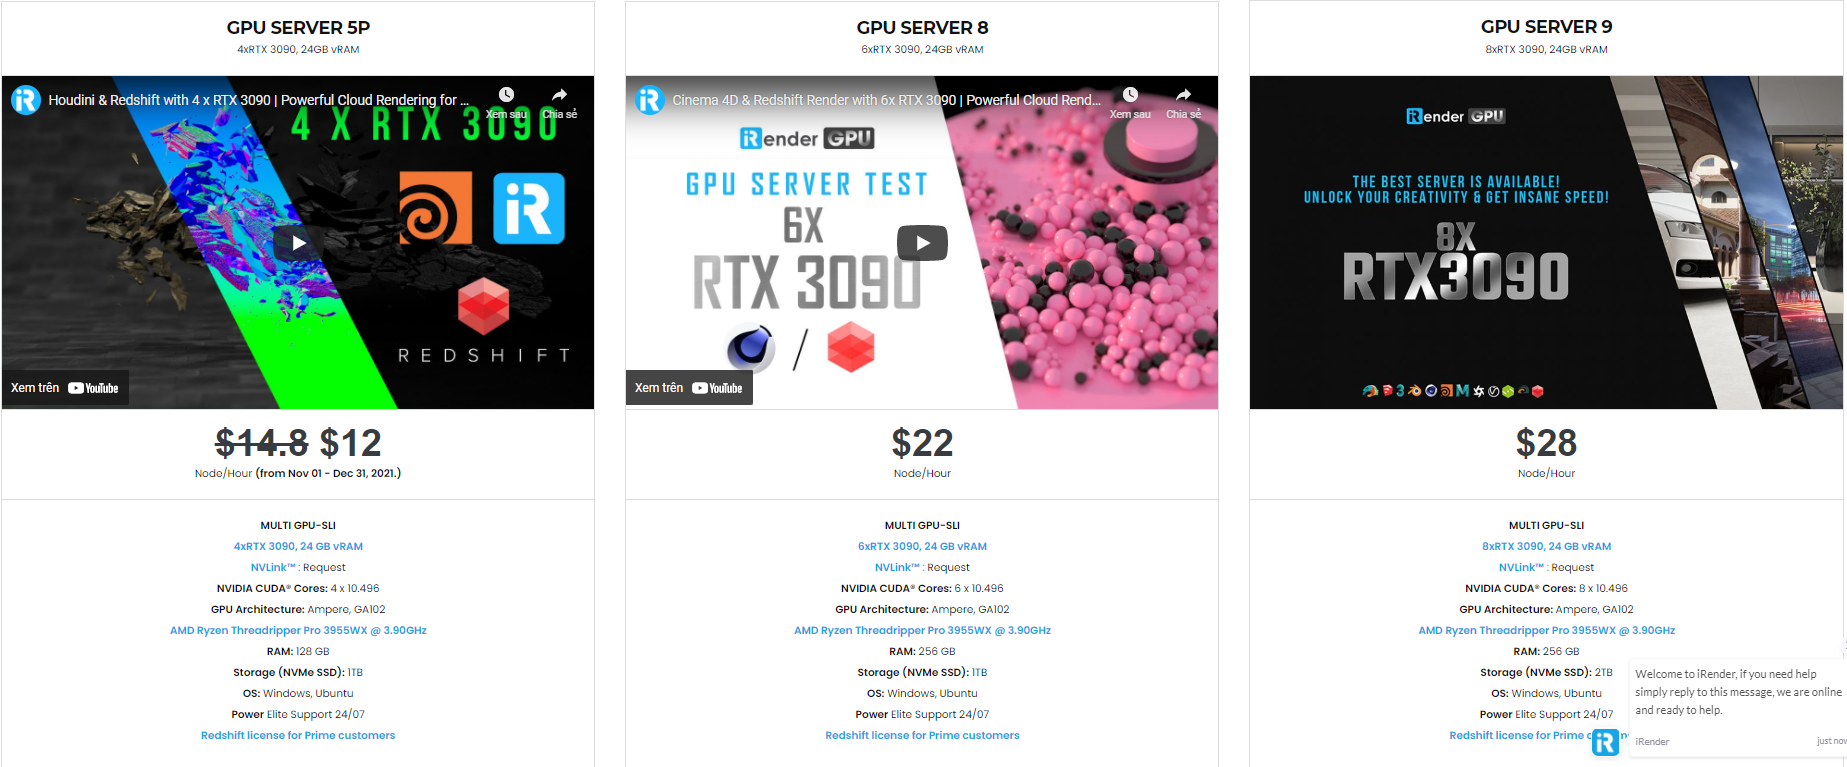
iRender is a Professional GPU-Acceleration Cloud Rendering Service provider in HPC optimization for rendering tasks, CGI, VFX with over 20.000 customers and being appreciated in many global rankings (e.g. CGDirector, Lumion Official, Radarrender, InspirationTuts CAD, All3DP, VFXRendering). We are proud that we are one of the few render farms that support all software and all versions. Users will remotely connect to our server, install their software only one time and easily do any intensive tasks like using their local computers. Blender users can easily choose their machine configuration from recommended system requirements to high-end options, which suit all your project demands and will speed up your rendering process many times.
High-end hardware configuration
- Single and Multi-GPU servers: 1/2/4/6/8x RTX 3090/3080/2080Ti. Especially, NVIDIA RTX 3090 – the most powerful graphic card.
- 10/24 GB vRAM capacity, fitting to the heaviest images and scenes. NVLink/SLI requested for bigger vRAM.
- A RAM capacity of 128/256 GB.
- Storage (NVMe SSD): 512GB/1TB.
- Intel Xeon W-2245 or AMD Ryzen Threadripper Pro 3955WX CPU with a high clock speed of 3.90GHz.
- Additionally, iRender provide NVLink (Request) will help you increase the amount of VRAM to 48GB. This is a technology co-developed by Nvidia and IBM with the aim of expanding the data bandwidth between the GPU and CPU 5 to 12 times faster than the PCI Express interface. These servers are sure to satisfy Blender artists/ studios with very complex and large scenes.
Let’s see rendering tests with Blender on multi-GPU at iRender:


- Reasonable price
iRender provides high-end configuration at a reasonable price. You can see that iRender’s package always costs much cheaper than packages of other render farms (in performance/price ratio). Moreover, iRender’s clients will enjoy many attractive promotions and discounts. For example, this October, we offer a promotion for new users and discounted prices for many servers, users will take advantage of these to level up their renders.
SPECIAL OFFER for this December: Get 20% BONUS for all newly registered users.
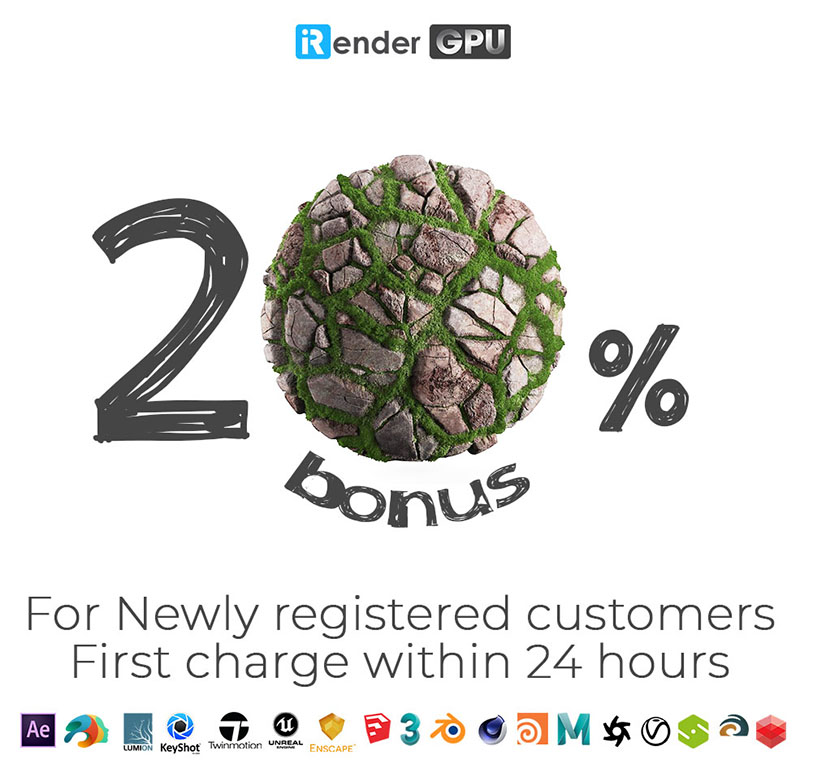
If you have any questions, please do not hesitate to reach us via Whatsapp: +(84) 916017116. Register an ACCOUNT today and get FREE COUPON to experience our service. Or contact us via WhatsApp: +(84) 916017116 for advice and support.
 Thank you & Happy Rendering!
Source: all3dp.com
Related Posts
The latest creative news from Blender Cloud Rendering.