Using the Move Tool in Keyshot with ease
KeyShot is a real-time ray tracing and global illumination application that may be used to generate 3D renderings, animations, and interactive images. You could make photo-realistic real-time rendering on both Mac and PC, including laptops. Because it is CPU-based architecture, which eliminates the need for high-end graphics cards.
How to trigger Move Tool?
There are four ways to trigger the Move Tool in Keyshot:
- Right-click a selected part/model in the Scene Tree and choose Move.
- In the Real-time View, right-click a part and select Move Selection, Move Part, or Move Model. It depends on what you want to move.
- In the Tools section of the Ribbon or the Scene tab of the Project Panel, click the Move button. If no part(s) are chosen, a window will appear, allowing you to pick the part(s) you want to move.
- You press ctrl+d for Windows or press cmd+d for Mac. If no part(s) are chosen, a window will appear, allowing you to pick the part(s) you want to move.
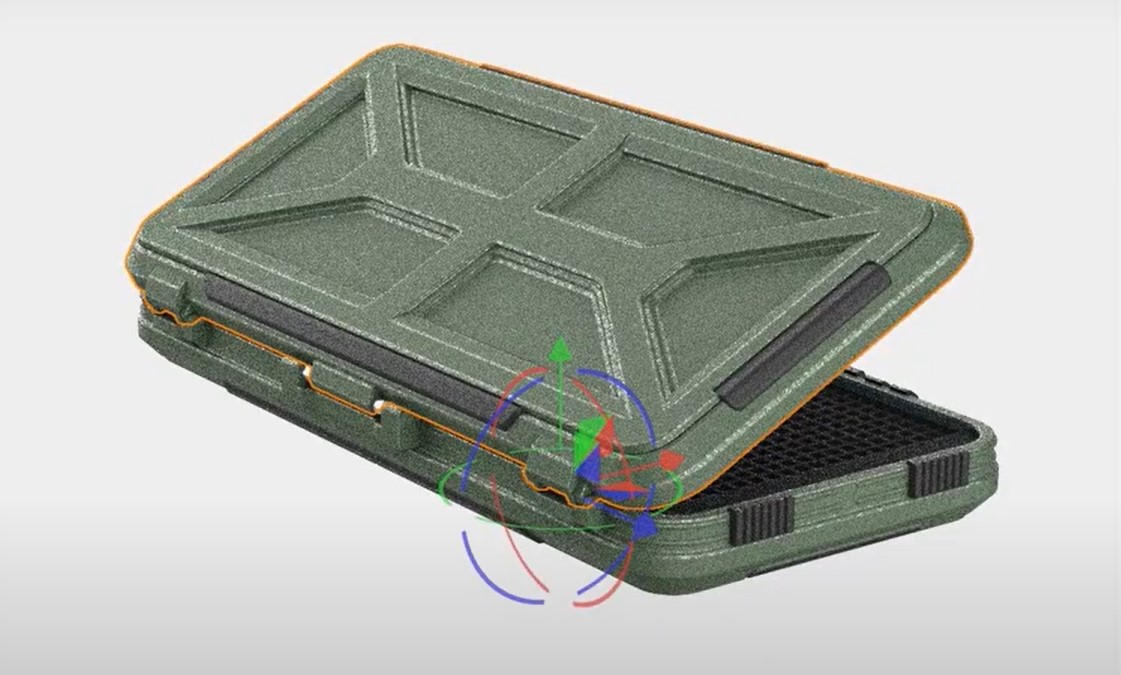
The Move Tool will appear in the Real-Time View once you’ve decided what to alter. Different handles on the Move Tool govern translation, rotation, and scaling in the X, Y, and Z dimensions.
Working with the Move Tool in Keyshot
1. Edit Move
When you’ve finished moving an object, the top of the Move Tool will show you how much you’ve translated, rotated, or scaled it. After that, you may change the value.
2. Mode Selection
Choose which handles to display on the Move Tool in Keyshot. When turning, hold Shift while dragging to snap the rotation in 15° increments.
3. Mode Selection
This section displays the current location of the object you’re moving. The boxes may be adjusted to change the object’s location quickly.
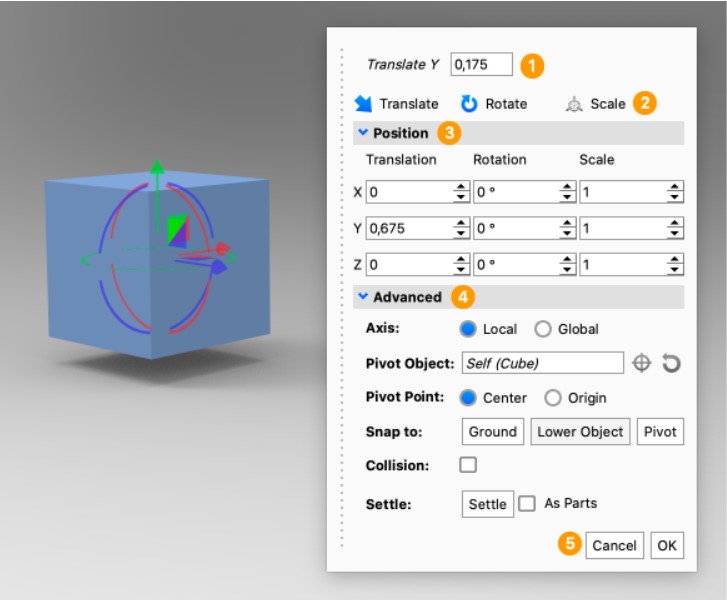
4. Advanced
Axis
- Select an axis to reference your transformations from.
- Local make advantage of the axis that comes with the part or model.
- The XYZ coordinates from the KeyShot scene are used by Global.
Pivot Point
A pivot point that is off-center may have been used to represent an object. You can select which pivot point should be utilized here.
- Center: The pivot point for movement will be the center of the item.
- Origin: The pivot point established in the object’s modeling program will be utilized as the pivot point for movement.
Pivot Object
The Pivot is placed in the center of the current selection by default. Click the pick icon to open the Pivot Selection dialog and choose another pivot point.
- Pick: When the Pivot Selection dialog appears, pick apart or a model/group to use as a Pivot – either directly in the Pivot Selection dialog or by clicking on the part in the Real-Time View – then click OK. This basically makes the selection’s center the pivot. The pivot field’s name is changed to the part/name, group’s, and the Move tool is relocated to the pivot point.
- Reset: The pivot point will be returned to its original location in the middle of the part(s), and the text in the pivot field will read Self once more.
Snap to
You may rapidly move the object into place using the snap to functionality.
- Ground: The Snap to Ground command moves the model in the Y-direction (up-down) to snap the model’s bounding box’s lowest point to the ground plane. When the model has been relocated and is no longer contacting the ground plane, this is handy.
- Lower Object: Using the Snap to Lower Object option, the bottom edge of the object’s bounding box will be automatically moved to the top edge of the bounding box of the portion below.
- Pivot: Using the Snap to Pivot option, the part(s) will be moved to the specified pivot. The option will more precisely match the center of the part(s) with the pivot object’s center.
Collision
Toggle on Collision detection. As a result, while moving items in the scene, collisions between objects will be recognized, making it simpler to avoid crossing objects. While moving the item, hold down ctrl on Windows and cmd on Mac to temporarily stop collision detection.
Settle
The Settle function will use physics to drop the presently chosen item. Toggling this will cause the settle to treat the pieces of the group as independent objects if a Group is chosen.
5. Cancel/OK
Press OK to complete the movement. Press Cancel to cancel the movement you’ve just made.
Using Move Tool with The Professional Cloud Rendering Service iRender
iRender is a GPU-Accelerated Cloud Rendering Service with Powerful Render Nodes: 1/2/4/6/8x RTX 3090. On the basis of the IaaS paradigm, we deliver high computing performance (Infrastructure-as-a-Service). Keyshot Users can easily choose their machines configuration, ranging from recommended system requirements to high-end options, which suit all your project demands and will speed up your rendering process many times.
High-end hardware configuration:
- Single and Multi-GPU servers: 1/2/4/6/8x RTX 3090.
- 24 GB vRAM capacity, fitting to the heaviest images and scenes. NVLink/SLI requested for bigger vRAM.
- A RAM capacity of 128/256 GB.
- Storage (NVMe SSD): 512GB/1TB.
- Intel Xeon W-2245 or AMD Ryzen Threadripper Pro 3955WX CPU with a high clock speed of 3.90GHz.
Incredibly, iRender supports NVLink (Request) which helps you increase the amount of VRAM to 48GB. This is a technology co-developed by Nvidia and IBM with the aim of expanding the data bandwidth between the GPU and CPU 5 to 12 times faster than the PCI Express interface.
Let’s look at some Keyshot rendering tests on single and multi-GPU (NVLink) servers at iRender.


If you have any questions, please do not hesitate to reach us via Whatsapp: +(84) 326243106. Register an ACCOUNT today and get a FREE COUPON to experience our service. And get 20% BONUS for all newly registered users. Let’s CHECK IT OUT
iRender – Happy Rendering!
The Reference: manual.keyshot.com
Related Posts
The latest creative news from KeyShot Cloud Rendering , Cinema 4D Cloud Rendering , 3D VFX Plugins & Cloud Rendering.